How to tighten the CV joint boot clamp? 3 ways
Most often, this type of fastener comes standard at the factory. This is due to reliable fixation and ease of installation. In order for the CV joint clamp to be used for a long time, the following conditions must be met:
- when making the tape, the manufacturer used high-quality steel;
- installation on the boot was carried out using a device for tightening CV joint band clamps;
- To install fasteners, you must have skills in using the tool.
To tighten the CV joint clamps, you can use improvised means, but the quality in this case will depend only on the experience of the craftsman. The only tool you need is pliers. Sequence for tightening the clamp:
- The clamp fits onto the boot;
- The tip is grabbed with pliers;
- Pull with a little force and make sure that the clamp tightens the boot without distortion;
- Create maximum force and bend upward;
- Bend the antennae;
- Fasten the end of the ribbon.
Upon completion of installation on the constant velocity joint, it is necessary to check the uniform fit of the clamp and the absence of distortions.
Alternative options
You can also secure the CV joint boot clamp using a screw clamp. You can use a wrench or a screwdriver to tighten it. It practically does not require any skills to fix it, but it has a number of disadvantages that do not allow it to occupy the niche of clamps for CV joints:
- the grenade is susceptible to parasitic vibrations, which causes the bolt to unwind, especially if the clamp is installed without sufficient tightening;
- the design feature in the form of a protruding lock is capable of clinging during operation;
- frequent cases of loose fixation due to poor quality of clamps.
A temporary alternative placed on the CV joint can be a screw clamp with a key. Its installation can be done on the road to ensure that the lubricant is not contaminated when traveling to a service station.
When choosing between a band clamp and a clamp clamp, you should be guided by your preferences and the manufacturer’s recommendations. They both can last a long time if installed correctly. Care and accuracy when installing any of the fasteners will allow the lubricant to remain clean for a long time.
CV joint boot clamp, pliers, pliers and other devices and tools for installation, crimping and tightening of tape and plastic types
If you have any questions, leave them in the comments below the article. We or our visitors will be happy to answer them
Why attach a clamp to a CV joint?
The CV joint is a reliable mechanism that can travel more than 150,000 km without problems, but over time it becomes unusable. An unpleasant crunch indicates problems with the part. Not only used cars, but also brand new cars can crunch. The ability of a hinge to serve faithfully for a long time depends on 2 conditions:
- complete lubrication;
- protection from negative environmental influences (pollution or water ingress).
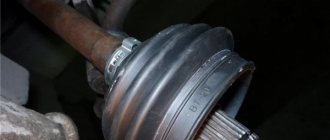
The hinge needs to be lubricated - and the more often the better. And it is protected with the help of a boot, which is put on the shaft and reliably covers the elements of the assembly. The boot is secured with clamps. When they weaken, an unpleasant sound is heard. Therefore, from time to time the driver is faced with such a task as tightening the CV joint boot clamps.
There are several ways to attach a CV joint:
- belt mechanism;
- clamping fastener;
- U-shaped mounting option.
How to remove a grenade on a VAZ 2109 – Blog of a car lover
Hello. This article is devoted to the topic of replacing the outer CV joint (in simple garnet language) of a VAZ 2109, 2114, 2115. At the end of the article there is a detailed video of the replacement. CV joint stands for constant velocity joint. Before changing the external grenade, you need to make sure that this particular part is faulty. How to understand this will be discussed further.
Signs of failure of the outer grenade (CV joint)
- signs that your grenade has already broken
- signs that the grenade will soon come out and break .
How to understand that a grenade will soon break.
Of course, the first sign of a malfunction of the external grenade is a crackling sound . If you hear a crackling noise while driving with the steering wheel turned, it is definitely a CV joint.
The greater the angle of rotation of the wheel and the harder you press on the gas, the louder the clicks. Another sign that does not always appear is vibration on the steering wheel at speeds greater than 80 km/h. The vibration is only slightly similar to the vibration from an unbalanced wheel.
It usually manifests itself as a slight twitching of the steering wheel.
How to understand that the outer CV joint has broken.
If the CV joint breaks, the car will stop moving. In any gear engaged, press the gas, the speed increases, but the car does not move.
How to understand that it is the outer CV joint that has broken, and not the internal one or the clutch in general (the first signs of failure are similar to the signs of a clutch failure)? First of all, start the car and put it in any gear. Next, open the hood and look in turn at each of the shafts going from the box to the wheels (one short, the other long). If any shaft is spinning, it means that the CV joint has broken on this side.
I recommend not just visually looking at the shaft, but touching it with some long, hard object, such as a stick. The main thing is that there is nothing on it that could wrap around the shaft . When you touch the shaft with a stick, if it is spinning, you will feel a slight vibration. This is usually done in the dark, because it is difficult to understand whether a cylindrical object is spinning, especially in the dark.
How to remove a vaz shruz
Having determined that it is the external grenade that is broken, we begin to remove it.
How to unscrew the hub nut on a VAZ?
First of all, unscrew the hub nut. To do this, take a 30mm head and a lever, the larger the better. We put bricks under the wheels to prevent the car from rolling (simply putting it in gear is not an option, the wheel will spin) and begin to unscrew the hub nut.
In this matter, the more you weigh, the better, since I very often lacked my weight and leverage of about one and a half meters. I got out of the situation in the following way: I stood completely on the lever, as close to the edge as possible, thereby giving maximum tension to the nut, and hit the lever with a hammer. Usually this method helped me unscrew even the most soured wheel nuts.
One more nuance: if the outer walls of the head come into contact with the walls of the hub, it is better to lubricate the head with mining or lithol, or, in extreme cases, with silicone grease. Thanks to this trick, the head will not bite in the hub.
How to remove a grenade?
The hub nut is unscrewed, now we remove the wheel, unscrew the two bolts that hold the ball joint, disconnect the suspension arm and the hub, move it to the side of the car while lightly tapping the grenade, remove it from the hub. At this point there are two options:
- The grenade is already broken.
- Replacing the grenade due to its crunching sound.
In the first case, you simply remove the outer part of the CV joint from the shaft, then the retaining ring from the drive shaft and knock off the cage with a hammer.
In the second case, removing the CV joint becomes more difficult. You need to deflect the grenade relative to the shaft at the maximum angle so that the bearing balls and their cage are visible.
Now use a hammer to break the jumpers of the cage between the bearing balls and take out the balls one by one. When you take out the last ball, you can remove the body of the grenade, and then its inner part sitting on the shaft, after first removing the locking ring from the shaft.
Of course, you can simply try to knock the grenade off the shaft, but due to the locking ring this will be problematic.
That's it, the CV joint is completely removed. Now let's start installing the new part.
How to install a new CV joint on a VAZ.
Be sure to follow this sequence for installing new parts:
- Small clamp.
- Grenade boot.
- Large clamp.
- Retaining ring.
- The CV joint itself.
To begin with, we clean the drive shaft from dust, dirt and old grease. Most CV joints come with grease, a boot, two clamps and sometimes a new hub nut. If suddenly there is no lubricant in the kit, it is better to use graphite lubricant, and if it is not available, then a simple lithol. First of all, we put on a small clamp.
Using special devices when installing a band clamp
To simplify tightening the tape and improve the quality of fixation of the boot, a special tightening machine is used. Its design includes:
- pen;
- holder;
- pinwheel.
To use the device, you should follow the plan:
- Place the tape over the boot;
- Insert its end into the cut of the holder;
- Place the holder against the clamp lock;
- Using rotational movements, begin to wind the tape onto the tool;
- With sufficient tension, bend the tape;
- Check the fastened clamp for correct installation.
To ensure high-quality installation, the final force must be correctly determined. The tightening force should not allow the grease to come out, but it should not allow the boot to cut.
Using special devices when installing a band clamp
To simplify tightening the tape and improve the quality of fixation of the boot, a special tightening machine is used. Its design includes:
To use the device, you should follow the plan:
- Place the tape over the boot;
- Insert its end into the cut of the holder;
- Place the holder against the clamp lock;
- Using rotational movements, begin to wind the tape onto the tool;
- With sufficient tension, bend the tape;
- Check the fastened clamp for correct installation.
To ensure high-quality installation, the final force must be correctly determined. The tightening force should not allow the grease to come out, but it should not allow the boot to cut.
CV joint clamp. What is this?
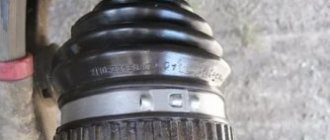
A CV joint boot clamp is a special fixing element , usually made of metal; it is installed on the device to prevent depressurization, which can subsequently lead to leakage of lubricant.
The CV joint clamp solves the problem of sealing the space between the rubber base of the part and the mounting location.
The boot is a rubber part that is attached to the CV joint to protect it from dirt, dust and water. To attach the CV joint boot you will need a special clamp, as well as a fixing device.
A clamp, or hand-held tool for installing clamps, is used when working with vehicle drive elements. Some car enthusiasts prefer to do without this important tool, but its presence contributes to high-quality and reliable fastening.
Signs of boot failure
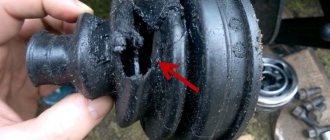
As mentioned in one of the previous sections, the boot has become something of a consumable item for car enthusiasts. If he “walks” for at least a year, this can already be called an excellent result. It is very easy to identify a defect in the boot - just inspect the boot properly. A sign of product failure is:
- Rupture in one or more places;
- The presence of grenade lubricant on the outer surface of the boot;
- The appearance of a large number of small cracks.
Although it is recommended to inspect the boot every 10-15 thousand kilometers (and even more often in the case of a cheap consumable), often the car owner receives a signal about the need to replace it without a visual inspection - when a grinding and crunching sound begins to be heard in the lower part of the car.
What to do if the boot ruptures on the road
It is absolutely unacceptable to move with a torn boot. The hinge will not tolerate even the slightest contamination. Mixed with lubricant, these abrasives will quickly wear out its precision-made and polished grooves and render the CV joint unusable. But it is not always possible or willing to use a tow truck or carry out road repairs.
Temporary protection can be provided in a variety of ways, from wrapping the remaining boot with tape to cold vulcanizing holes and cracks.
Even a simple cloth wrapped and secured around the cover will help filter out dust. The main thing is to do this reliably and control the condition of the patch to the point of repair. And when replacing the cover, be sure to disassemble the hinge, rinse it thoroughly and fill it with new grease as required.
Dust will definitely get there, even if it is not visible. During operation, the temperature of the unit changes; it literally works like a pump for dirty air under the car. It is easy to check the tightness by simply squeezing the case with your hand. You can also check the condition in doubtful cases of the presence of surface cracks, although usually the problem area is immediately noticeable by the grease protruding outward.
Replacing the external grenade
VAZ 2110Replacement of external grenade
Download the sound of an external grenade crunching.
If you experience a noise or knocking noise from the front when turning, as if someone is hitting a disc loudly with a hammer, then you should know that it’s time to replace the CV joint or external grenade, another name. In general, the boot breaks and the dirt mixes with the lubricant and creates an abrasive. Of course, if the boot was discovered, then there is a chance to save everything.
Remove the CV joint, wash it with gasoline, fill it with new grease, and put on a new boot. But most often this is a replacement of the CV joint. How critical is the knocking of the CV joint? The greatest load occurs only during critical turns, so try not to twist the steering wheel to the maximum and accelerate to the maximum speed. They usually say that as long as the crunch does not appear and the car is driving in a straight line, then everything is fine.
But you still need to be careful. I drove with a wild knock for about 1.5 months. Not a very good indicator, of course, but I realized that the thing is quite reliable. There can be two outcomes. Or the wheel will lose control of the drive - the internal clip of the grenade will break. Or the wheel may stall (which usually does not happen).
Therefore, it is necessary to change the CV joint, especially if you are young and like to press the accelerator pedal, especially on roads in Russia. The work is quite dirty.
Ball puller, an excellent thing with the proper quality
Required Parts
- New CV joint, suitable for EJ9 D14 HDK H0-35, can be taken with ABS HO-35A50 no crime
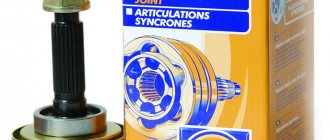
- New boot, for example RBI O17201UZ, it comes with clamps
- Grease filler for CV joint
- Head 32 regular hexagon
- Head 19
- Head 17
- Wrench or torque wrench up to 200nm
- Ball puller
- Universal CV joint puller
- Hammer
- Cotter pin, 2.0X18 to tip
- Cotter pin, 3.0X20 for lower ball
Cotter pin, for locking the slotted nut
Just in case
There are all sorts of cases, but with a half-removed CV joint you won’t get far.
- Thin chisel (1cm)
- Hammer, heavy
- Pliers
- Bulgarian
CV joint puller, a neat and painless method.
How to replace an external CV joint or external grenade
First, you need to loosen the hub nut. It is convenient when you have access to the nut while the wheel is not removed and the car is not yet raised; to do this, knock out the hub plug on the wheel rim. Loosen the hub nut and wheel nuts. While the car is not raised, turn the wheels in the opposite direction for convenience. Left wheel - steering wheel to the left.
Right wheel - steering wheel to the right. I hope there is no need to explain about the safety of the car and the jack. With the wheel hanging, remove the hub nut. Next, move to the tie rod end. The tie rod end nut is secured with a cotter pin. It is usually bent on one side and passes through the nut and the body of the lug "screw". Knock out the cotter pin and use pliers to pull it out.
Using a 17mm socket, remove the nut. Next, use a ball puller, or for example a jack (from below), to pull out the steering rod. Now you can rotate the fist in any direction. Repeat the operation with the lower ball and head at 19. When the ball comes up, pull it towards you so that the CV joint comes out, then move the fist towards the front end and fix it there.
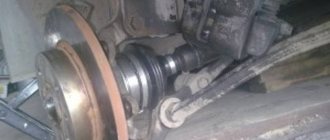
As you can see, you now have full access to the CV joint.
Slotted nut, located on the lower ball and rack tip
Removing a grenade
First you need to remove the rubber boot. Mine was torn and I just turned it inside out. If the clamps allow you to remove them, remove and move the boot towards the box (inside). If this is not possible, then use a chisel to “break through” the clamps. Now the most interesting thing is removing the CV joint itself. The idea is that there are grooves at the end of the drive, thanks to which the inner part of the CV joint rotates, and through the bearing itself.
But, at the end of the drive there is a groove in which there is a retaining ring, and your task is to remove the inner part of the CV joint from the drive through this ring. Most often it is knocked down with a hammer, but I don’t like this method, since there is a chance of damaging the drive itself, and an internal grenade. Of course, I understand that everyone does this, but I use a universal puller that simply pushes out the grenade clip.
It works like this: one part is attached to the drive (clamped), and the other, under the action of two bolts, pushes the inner race. But it happens that the ring is stuck, and the universal puller is dead. In this case, you need to point the grenade as steeply as possible to see the inner clip. Next, use a chisel or hammer to break the inside in a circle.
Having taken out the outer part, when all the balls are in your hands, arm yourself with a grinder, and very carefully saw the clip into 3 parts and knock it down with a hammer.
I rode with such a torn boot for 1.5 months. Both pullers are visible in the photo.
Tool for installing band clamps
To make a tool for clamping CV joint clamps, the author uses a 14x14 mm square profile. The length of the workpiece is 75 mm.
First of all, we cut off the upper part of the aluminum profile so that the result is a U-shaped part. One of the sides of the workpiece will need to be cut at an angle.
In principle, you don’t have to bother so much and buy a ready-made U-shaped profile.
Next, we retreat 25 mm from the back of the U-shaped part and drill a hole with a diameter of 4 mm.
The author makes the next part of the homemade clamp from a cotter pin and a furniture tie for door handles.
We insert the resulting part into the hole in the profile. The homemade clamp for clamps is ready. Now you can try the device in action.
How to tighten a clamp on a CV joint boot
We put the factory band clamp on the boot, making sure that there are no distortions.
We insert the end of the metal tape into the clamp, as shown in the photo below. The master cuts off the excess part using scissors.
After this, turn the knob on the clamp and tighten the tape. When the tape is tightened, we wrap it.
We cut off the excess end of the metal strip with scissors, and bend the remaining “stub” with a finger or a hammer. The installation of the clamp on the CV joint boot has been successfully completed.
Clamp fastener
Some European-made cars have switched to using clamp clamps, as they combine reliability and simplicity. To install them, special pliers for CV joint clamps are used.
Placing the clamp on the CV joint occurs in the following order:
- The required diameter is selected;
- The clamp is located on the boot. It should be installed without distortions;
- To perform crimping, clamp pliers are used. If they are unavailable, you can use pliers of a suitable size;
- Upon completion of work, you should check the reliability of fixation of the clamp.
The main advantage of clamping fasteners is that there is no need to purchase expensive special tools. Carrying out the work with conventional pliers will ensure high reliability and long service life.
Design features of the product
A clamp is a simple and effective device that has a lot of standard variations, but, in essence, they all have similar design characteristics. The difference is presented in the form of shapes and fastening devices. Their use is most common in the field of installation and repair of pipeline systems; this determines another characteristic feature of the design. For better fixation and tightness, the product often has a rubber gasket.
Regarding the practical benefits of the products in question, we can say that without them it is almost impossible to carry out high-quality fixation of the pipeline, both horizontal and vertical.
The line of types of this device begins with the simplest one-sided products, which are a threaded pin. It then continues with variations that differ not only in the greater complexity of the design, but also in size (this should be understood as the maximum diameter of the pipe for which a particular product can be used) and intended purpose.
Clamps
The most common problems that clamps help solve:
- Repairing cracks in pipeline systems. Depending on the type of product, even fairly large damage can be covered.
- Pipe fracture is not a common but serious problem. For the most part, it is encountered by those who professionally install and repair pipelines.
- Also, if it is necessary to eliminate “fistulas” in water pipes, clamps are again widely used. In such a situation, it is necessary to use a soft substrate.
Note! If the pipe being repaired is used to transport corrosive liquids, then it is necessary to use a type of fastener that can withstand these specific operating conditions.
- Specifically for steel pipes, the product can help reduce the risk of leaks caused by corrosion. Situations often arise where it damages the metal so much that a leak can occur at any minute.
The market is saturated with all sorts of configurations of clamps from different manufacturers. Factory production, in addition to professional manufacturing, also provides a guarantee of quality. After all, the products are manufactured in accordance with GOST. Such government quality regulation is associated with the high degree of role of clamps in maintaining the integrity of the structures in which they are used. Based on this, the question arises whether it is worth making a clamp for a steel pipe with your own hands.
Clamp fastener
Some European-made cars have switched to using clamp clamps, as they combine reliability and simplicity. To install them, special pliers for CV joint clamps are used.
Placing the clamp on the CV joint occurs in the following order:
- The required diameter is selected;
- The clamp is located on the boot. It should be installed without distortions;
- To perform crimping, clamp pliers are used. If they are unavailable, you can use pliers of a suitable size;
- Upon completion of work, you should check the reliability of fixation of the clamp.
The main advantage of clamping fasteners is that there is no need to purchase expensive special tools. Carrying out the work with conventional pliers will ensure high reliability and long service life.
Alternatives
There is an opinion among car enthusiasts that standard CV joint clamps are unreliable. We will not find out the reasons for such notoriety; there can be many of them: from violation of production technology and savings on quality raw materials to incorrect installation. Let's consider which alternatives to standard clamps have become the most popular when securing CV joint boots.
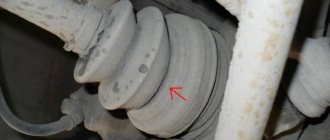
The first and most obvious substitute is a screw clamp. The one that everyone is used to seeing on hoses. This element is tightened by screwing in the bolt. It looks like this:
In principle, this element should provide a sufficiently strong fixation and prevent dust or water from getting into the pad.
The second most popular substitute was plastic clamps (ties). According to reviews from car owners, clamps made of good plastic last a really long time. As for fixation, it is definitely not inferior to standard CV joint clamps. The problem here is to find a good plastic tie.
The CV joint crunched. Do-it-yourself CV joint repair
CV joint (Constant velocity joint, or simply “grenade” in common parlance) is a device that provides torque transmission with a rotation angle of about 70 degrees relative to the axis. CV joints are used in passenger cars, more precisely in drive systems with steered wheels, usually paired with independent suspension, sometimes found on the rear wheels.
What to do if the CV joint crunches, and what does this mean?
As a rule, the CV joint has a fairly large margin of safety, sometimes its life exceeds the life of the vehicle itself. Often, premature failure of this mechanism is associated with rupture of the protective cover, as a result of which dust mixed with sand and moisture gets onto the rotating parts of the hinge. Because of this, increased wear of all parts begins in the CV joint. It also happens that the boot is intact, but the cracking sound is very strong. This may indicate obvious problems that are caused by aging of the lubricant inside the mechanism. Sometimes when buying a foreign car with “decent” mileage (from 250 thousand km), owners interested in selling stuff the CV joints with pieces of rags or paper mixed with lubricant. All this “vinaigrette” will make itself known after 2-3 thousand km. If you ignore the crunching of the CV joint, then over time it will intensify, as a result of which wear will increase and the CV joint will simply need to be replaced with a new one, since parts with a large “wear” cannot be restored.
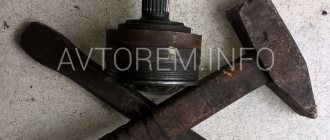
In order, as they say, to get to this ingenious mechanism, you should dismantle the axle shaft, loosen the boot clamps a little, and then pull it towards the axle shaft. In order to remove the CV joint from the axle shaft, you will need a hammer, but without fanaticism, please. And also a drift made of soft material (aluminum, copper, or wood). A CV joint is a rather complex product, despite the fact that it consists of only four elements: a knuckle, balls, a separator and a housing.
Question of material selection
Although experts say that when choosing a boot you should be guided primarily by the manufacturer and price, in reality it is also worth considering the material of the product. For example, the most common rubber boots have many disadvantages that a competent car enthusiast should know about. Further we will talk only about non-original anthers and their most common “diseases”. Here are the main problems with rubber boots:
- Small operational resource. It is 6 months on average and up to 18 months at best;
- Low frost resistance. The anthers quickly “tan” in severe frosts.
Rubber products have an affordable price tag and are easy to change. This is partly why rubber boots are considered one of the automotive consumables along with brake pads, windshield wiper blades and filters. True, it is far from necessary to change the boot, but it is highly advisable - this will prevent the grenade from quickly failing. Regarding the disadvantages of thermoplastic products:
- Geometry problems. This applies to non-original boots - they simply jump out of place or do not fit tightly enough to the hinge, allowing water and dirt to pass through the gap;
- Installation problems. Band clamps do not always hold the boot well enough, and if they are not installed and tightened correctly, they will loosen after just a few months of use.
If the original equipment of the car includes thermoplastic boots, you can be sure that the seal will last a long time - up to 10 years. But its clamps can quickly become loose. In the case of non-original boots, problems with clamps are almost always observed. The manufacturer is trying to solve the problem of gaps between the product and the grenade using special sealants, but special chemical compounds do not last long enough on thermoplastic-metal vapors - the sealant quickly becomes ineffective. Ideally, a thermoplastic product should be blown with a construction hairdryer before installing it on the CV joint. Regarding the disadvantages of silicone anthers:
- Excessive flexibility of the material and low strength when twisted and when hit by small sharp stones when driving on poor roads/off-road;
- High softness, affecting the fit of the boot. Even tightly tightened clamps after a while stop holding the boot and it jumps off, which is why small gaps form between it and the grenade.
When looking for a suitable boot, you can take both original and non-original ones. If you decide to take a non-original, then the choice will be very rich. Exception: new car models for which there is not yet a large range of spare parts from the secondary market. After a while, it will be possible to take a boot for them from a non-standard material, such as polyurethane or silicone. You can search for a spare part by:
- Parameters of your vehicle;
- Boot code;
- Boot parameters.
In the third case, specialized sites simplify the search. But if you are looking for a spare part based on vehicle parameters, then it is best to turn to online catalogs of large marketplaces that have an advanced search system. For example, to, where a full-text search system is also implemented. You should consider the following:
- It's not worth saving. It is better to take not the cheapest rubber or plastic product, but if you use the car exclusively in the city, then a silicone one. You can also experiment with polyurethane anthers, but we do not recommend taking them “in a circle”, i.e. 4 pairs of internal and external anthers at once;
- In theory, a worn hinge can be restored. It needs to be disassembled and cleaned of old grease, paying special attention to the cage and balls. Then the hinge needs to be filled with new lubricant - usually 250-350 milliliters is enough;
- When choosing an inexpensive CV joint, it makes sense to additionally order a good boot. We have already written that cheap hinges are often equipped with low-quality anthers - this problem can be easily solved, albeit for additional money.
Do not forget that when selecting a non-original boot, it is important to pay attention to the manufacturer. The best option would be a manufacturer that is also a supplier to the conveyor belts of large automobile concerns. In the vast majority of cases, it supplies fairly high-quality products to the secondary market. It is worth highlighting the following companies:
- Maruichi (Japan);
- SKF (Sweden);
- GKN, Loebro, Spidan (sub-brands, Germany);
- RBI (Taiwan);
- Jakoparts (Germany).
You should be careful with the latter company - recently the quality of its products has not been stable. If you decide to take a classic rubber boot, we recommend that you carefully examine and touch it. If you bend the edge of the boot, even small cracks should not be visible inside.
What to do if the boot ruptures on the road?
If the boot ruptures on the road, it is necessary to jack up the car body, and then remove the old lubricant through the hole and introduce a portion of fresh substance. The damaged area is covered with a plastic bag or wrapped with insulating tape or stationery tape. Such protection is designed for a range of up to 500 km on dry roads. If driving in wet weather, it is recommended to check the condition of the package every 30-40 km, since dirt getting into the lubricant leads to accelerated wear of the hinge.
vote
Article rating