Gazelle gearbox repair is a complex undertaking that needs to be prepared for in advance. The gearbox operates by transmitting torque to the wheels from the motor shaft. It is worth understanding that the slightest malfunction in the functioning of the transfer case can threaten your safety. If there is no service station nearby, you can repair the fault yourself. If you strictly follow the step-by-step instructions, even a novice motorist can carry out this procedure without any problems.
How to disassemble and reassemble the gearbox of a Gazelle car
We screw the filler and drain plugs into place.
Remove the power unit support.
Remove the reverse light switch.
Remove the speedometer drive.
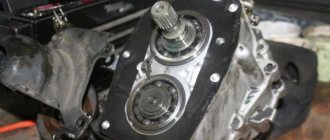
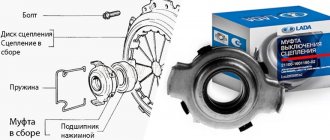
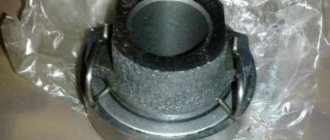
Remove the coupling with the bearing and the foam rings of the front cover.
Using a 12mm wrench, unscrew the three bolts securing the bearing cover (the bolts are installed on the sealant).
Remove the cover with gasket.
When installing it later, pay attention to the coincidence of the oil drainage channel in the cover and the hole in the crankcase.
Using a screwdriver, we remove the cuff of the input shaft from the cover (when disassembling the gearbox, we replace all cuffs regardless of their condition).
Using a mandrel or a head of suitable diameter, we press in a new cuff.
Using a 13mm wrench, unscrew and remove the bolt securing the reverse gear axis bushing to the front crankcase
Using a thin screwdriver, pry up and remove the retaining ring of the input shaft bearing
Using a 12 key, unscrew and remove the breather.
Using a 12mm wrench, unscrew the ten bolts connecting the front and rear crankcases (the two bolts passing through the mounting sleeves are longer than the others).
11. Carefully tapping with a hammer through the brass mandrel, uncouple the front and rear crankcases.
In this case, you must not strike the end of the input shaft, as the synchronizers will be damaged.
We disconnect the gearbox housings
Carefully, trying not to damage, remove the sealing gasket
We remove the adjusting shims from the bore under the intermediate shaft bearing in the front crankcase (they may not be there).
In this case, the axial clearance in the bearings is established only by the inter-crankcase sealing gasket.
By turning the input shaft, we engage reverse gear (we move forward the rod of V gear and reverse gear).
Using a 10mm wrench, unscrew the bolts securing the three gear shift forks.
Using a 12mm wrench, unscrew the four bolts securing the gear shift lever housing.
Remove the lever housing with the gasket.
Using a 12mm wrench, unscrew the bolts securing the rod clamp plate.
Remove the plate with the gasket.
We take out three springs and three gear lock balls (they can be removed with a magnetized screwdriver or by turning the box over).
We take out the rod of 1st–2nd gears (in order not to mix it up during assembly, we immediately put the fork on the rod and fasten it with a bolt).
We take out the rod of the V gear and reverse gear, putting the appropriate fork on it.
We take out the rod of III–IV gears. We remove the locking pin from the rod.
To prevent the blocker plungers from falling out, we insert tubes rolled out of thick paper into the holes of the rods.
Using a 13mm wrench, unscrew the bolt securing the reverse gear axis to the rear crankcase.
Using pliers, we push apart the antennae of the retaining ring of the rear bearing of the secondary shaft and, tapping with a copper hammer on the rear end of the secondary shaft,...
…we take out the set of shafts along with the axle and reverse gear
We separate the primary and secondary shafts.
We remove the 4th gear synchronizer and take out the 14 rollers of the front support of the secondary shaft.
Gears, synchronizers and other parts located on the primary and secondary shafts are similar to each other, so to facilitate subsequent assembly, they should be carefully laid out in the order of removal.
Using two thin screwdrivers or special pliers, we unclench and remove the retaining ring and spring ring from the input shaft.
Use a tool (two mounting blades or a special puller) to press the input shaft bearing
Similarly, remove both intermediate shaft bearings
Having installed the secondary shaft vertically in a vice through soft gaskets, remove the locking and spring rings of the clutch hub for 3rd–4th gears
Remove the clutch assembly with the cotters and synchronizer springs.
It is better not to disassemble this kit, but if such a need arises, mark the relative position of the parts.
The gear clutches are not symmetrical, so they are installed in only one position.
Remove the synchronizer ring and the third gear gear along with the plastic separator and rollers
Use a screwdriver to pry up and remove the retaining ring and two thrust half-rings.
Use a magnetized screwdriver to remove the locking ball of the half rings.
Remove the 2nd gear with bearing.
Remove the 2nd gear synchronizer ring.
Remove the clutch for 1st–2nd gears
...and the 1st gear synchronizer ring
Remove the 1st gear gear with bearing.
We carry out further disassembly of the secondary shaft from the other end.
Using a thin screwdriver, remove the retaining ring and spring ring.
Remove the speedometer drive gear and remove its locking ball.
Using two mounting blades or a special puller, remove the rear bearing of the secondary shaft
We take out the pin with pliers.
Remove the 5th gear with bearing and synchronizer
Remove the spacer ring.
Using special pliers and screwdrivers, remove the spring ring and then the fifth gear and reverse clutch
Remove the synchronizer ring.
Removing the reverse gear with bearing
We remove two cuffs from the rear crankcase extension (information on the first page)
Before assembly, check the condition of the gearbox parts.
Cracks of any shape and length are not allowed on crankcase parts.
The bearing housings, the holes for the shift rods and the steel babbit bushing of the rear housing extension must be smooth, without nicks, signs of scuffing or noticeable wear.
The bearings should fit into the sockets tightly, by hand force or by lightly tapping through the spacer.
The crankcase gaskets must be intact, without ruptures, delaminations or breaks.
We check shafts, axles and rods for cracks, noticeable signs of wear, scuffing and metal envelopment.
This also applies to the splined parts of the shafts; the mating parts should move easily on the shafts, without noticeable play or jamming.
Remove minor traces of scoring, as well as possible corrosion (on the splines), with a velvet file and very fine sandpaper, and polish the shaft journals with thin GOI paste or diamond paste.
On the teeth of gears and synchronizer couplings, chips, traces of jamming and chipping are not allowed; on the cones of synchronizers there should also be no traces of jamming, severe wear and enveloping of bronze on steel.
Ball and roller bearings must be in perfect condition.
Their rotation should be easy, without jamming, clicking, play or vibration.
Fatigue chipping (pitting), noticeable wear and chips are not allowed on raceways, balls and rollers (needles).
Ball bearing cages must not touch the rings or have cracks or breaks.
In general, after a mileage of about 100 thousand km, it is better to replace ball bearings, regardless of their condition.
How to repair a Gazelle gearbox
The comparative cheapness, coupled with the spaciousness of this car, classified as a commercial vehicle, made it a real “workhorse”. It is in demand and is used throughout the CIS. Another sign of a classic work machine is the ease of finding spare parts. When you need to repair a Gazelle gearbox, and the gearbox is the worst of the components of this Russian light-duty car, you can safely go through everything, from bearings to synchronizers. These parts are available for sale at any auto store.
Design and principle of operation
As with any car, the Gazelle’s gearbox performs the most important transmission functions. It converts and transmits torque to the wheels from the engine. Therefore, a lot depends on the quality of operation of this unit. For example, the comfort and safety of people, because any malfunction of the gearbox carries the risk of accidents.
The small Russian car is equipped with a manual 5-speed gearbox. Despite the manufacturer's assurances that it is durable and unpretentious, most owners claim the opposite. The reliability of the unit is poor primarily due to constant excessive loads, since commercial vehicles can be operated for 24 hours straight.
Structurally, the Gazelle gearbox is not complicated: in most parts it is unified with the GAZ-3110 Volga gearbox. All Gazelle modification boxes are identical, except for the Gazelle-Business and Next manual transmissions. A 5-speed three-shaft gearbox is also used here, but it has different gear ratios. Some versions may also have a longer lower end of the lever and a taller lever housing.
The main elements of the checkpoint are:
- double crankcase;
- gears;
- main shafts and intermediate;
- synchronizers, balls, springs;
- gear shift mechanism.
The crankcase is made of aluminum alloy for lightweight purposes. It consists of two parts: front and rear with extension. They are securely connected with 10 bolts through a 0.33 mm paronite gasket. To ensure alignment of the shaft ends and rod holes of the switching mechanisms, they are centered with special bushings pressed into the crankcase.
There are quite a lot of gears in the box. The input shaft has its own gear, and so do the gearbox transmissions, including the rear one. Structurally complex helical sprockets, rotating on needle bearings, are protected by plastic separators. The reverse idler gear rotates on roller bearings.
The shafts are equipped with other unique parts. For example, the secondary shaft is limited from axial movements by retaining rings and special thrust half-rings. A collar is also provided. The input shaft is equipped with a drive gear for the speedometer drive. All shafts, including the intermediate one, have gears, and at the ends there are roller or ball bearings and retaining rings/half rings. A special place is occupied by bushings, fixing pins, spring washers and 0.2 mm shims. The drive and driven shafts are connected at their ends to the engine crankshaft and crankcase. The intermediate shaft is located inside the box body.
Inertial synchronizers are equipped with toothed rims that mesh with gears due to small splines. Since 2003, the 1st and 2nd gear synchronizer has been replaced on Gazelles 3302 and 2705. A double-acting double-cone version is now used. This was done in order to improve the clarity of gear shifting. This synchronizer has increased braking torque.
The gear shift mechanism, in addition to the lever, is equipped with springs, a seat, seals, a thrust cone, and bushings. There are a lot of washers, plugs, and dowel pins. Speeds are switched using forks - there is a separate one for fifth gear and reverse gear. The locking device or fuse consists of two plungers and a locking pin. To prevent accidental engagement of reverse gear, a separate bushing with a spring is provided.
News
After a long illness, on June 19, 2022, master Andrei Vladimirovich died at the age of 59. He was an exemplary family man, a good father and grandfather, a master from God, a real man. We all remember him and mourn him immensely. This site will continue to operate, but it is unlikely to be updated. 04/28/12 New version of our free program for GSK - AVgarage
! 12.11.10 Replacing the rear silent blocks of the lower arm of the front suspension on MMC Lancer IX in pictures. 25.11.09 We kindly ask customers to pick up spare parts forgotten at the service within 2 weeks. 02/12/08 Replacing the camshaft oil seal on the MMC Space Runner (4G93 engine) in 5 minutes. 02/05/08 The master installs a VAZ gearbox on IZH “Oda” cars with a Zhiguli engine. 01/25/08 Repairing a gearbox and replacing a clutch on a Mitsubishi Space Runner in pictures. 01/14/08 From now on the site will live at this address. 01/30/07 Material has been added about the design and installation of the secondary shaft of the gearbox of rear- and all-wheel drive VAZs of the new model. 01/20/07 Work on a new version of the site has been completed. 08/12/05 New pages have appeared - Useful and Cooperation. 06/21/05 The Conference is open on the website. 03/19/05 A section on repairing the transfer case of all-wheel drive VAZs has been added. 03.13.05 Information has appeared about the design and malfunctions of the transmission of all-wheel drive VAZs. 02.12.04 Photos of faulty units and parts of gearboxes with comments from the foreman have appeared. 11/23/04 Photos of faulty components and parts of the gearboxes of rear-wheel drive VAZs with comments from the technician have appeared. 06.21.03 The content of the paragraph devoted to the conversion of the 4-speed VAZ gearbox into a 5-speed one has been changed.
The most common symptoms and troubleshooting methods
Despite the structural simplicity of the unit, repairing a Gazelle gearbox with your own hands involves serious work. Without the proper knowledge and skills, it is better not to touch the unit, so as not to make it worse. To replace damaged parts, the box must be dismantled and disassembled.
There is a noise in the box
Most often, a sign of a mechanical malfunction is a dull hum or crunch, indicating weak fixation or destruction of the bearings. An unpleasant cracking sound is also possible, indicating damage to the synchronizer rings. Often the box howls, and in completely different ways. The strength of the sound and its character depend on the speed of movement, the specific gear, and the duration of driving.
It is noteworthy that the characteristic noise does not always indicate a gearbox malfunction. Especially if the elements of the box have recently been replaced. In this case, the howling will only be a sign that the parts have not yet gotten used to it. Often, the crunching of the gearbox is confused with malfunctions of the clutch or other related units. And any experienced Gazelle driver will confirm that until you disassemble the box, the specific cause of the noise can only be determined with a 50 percent probability. But a competent bulkhead will help you immediately find the problem area. Before this, of course, you need to check the oil level. If it's ok, you need to disassemble the gearbox. Anything can turn up during the troubleshooting process. For example, there may be a mismatch in bearing markings, missing washers, or incorrect sizes.
Thus, noise in the Gazelle gearbox is caused by wear of bearings, gears, synchronizers or their destruction, breakdown, as well as a low level of MTF or its poor quality. The alignment of the crankshaft and crankcase is rarely disturbed, but it doesn’t hurt to check the runout of the mounting hole for the box.
Difficulty shifting gears
If it becomes difficult to change gears, this indicates one of the problems:
- synchronizers or gears of a certain gear are worn out;
- the lever or other switching mechanisms are damaged - most often the fork;
- problem with the clutch - it does not engage completely, the pedal drive cable is loose, the driven disc is damaged.
Often, poor gear engagement is due to design flaws in synchronizers. When the clutch plate is pressed against the flywheel or pressure plate, the bearing in the crankshaft creates resistance. This is enough to block the inclusion of speeds.
It also happens that it is difficult to change gears on a warm engine, but when it is cold everything goes like clockwork. The point here is that initially there is a thick layer of lubricant between the synchronizer thrust ring and the gear. After the temperature rises, the oil liquefies, the ring and gear are rubbed almost dry, and the coupling rests against the teeth of the ring. Either a high-quality grip, such as HOLA, or another MTF compound will help.
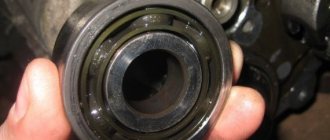
Signs of a broken input shaft bearing
The safety of movement depends on the proper operation of the components of the gearbox, in particular bearings. As a rule, when it wears out, there is a possibility of jamming and gear breakage. In this case, installation of a new spare part is required. Among the signs indicating the presence of bearing failure are:
- howling sound in neutral;
- knocking sound when activating any speed mode;
- the transmission switches itself off.
Also, replacing bearings is important if the clutch has failed. This may lead to an emergency on the road.
As a rule, the howling sound occurs when moving. If there is a knocking noise, the bearing is deformed. It should be noted that the whistle may be due to the fact that this spare part has insufficient lubrication.
What factors affect the service life of a bearing? Firstly, this is the quality of execution of this spare part, secondly, these are the operating conditions of the car, thirdly, this is the timeliness of maintenance, where the degree of wear can be determined.
Thus, noise from the gearbox is associated with bearing failure. Replacing them requires disassembling the gearbox. Wear of the bearing of the input shaft of the Gazelle gearbox entails failure of the gearbox. That is why the car should be diagnosed in a timely manner.
The box turns off (the gear goes out)
If the speeds are off, the culprit may be the fork, clutch, or worn transmission gears. It happens that the spring that presses the fixation ball bursts. It is also possible that the input shaft splines may dry out. The reason may be the bronze crackers on the third and fourth gear forks - they break in half. It is also possible that burrs may form on the locking device.
Many defective parts are installed on the Gazelle gearbox right from the factory. For example, blocking rings, which must have a gap of at least 0.3 mm. In fact, there are many such elements with a gap of 0.1-2.5 mm.
It happens even worse when incorrect assembly is performed after repair. The unfortunate masters are capable of sorting out the crackers and springs so unsuccessfully that after a while certain gears will not turn on at all.
Active Antenna Feature
An active antenna receives a radio signal and, using a special amplifier, increases its power. The amplifier can be assembled based on semiconductor transistors or more complex microcircuits. The signal applied to the input increases its power due to the DC current applied to it through the amplifier components.
Each active antenna requires additional power supply from a battery. For this purpose, modern car radios have a special positive contact that supplies voltage to the active antenna only when the device is turned on. Despite the fact that the current consumption of the antenna is very small, it must be connected in such a way that it does not work in vain.
Do-it-yourself overhaul of the Gazelle gearbox
Any difficulties with shifting gears, noise, or spontaneous activation of speed require urgent repair of the gearbox. Long-term operation of the Gazelle sooner or later leads to one or more characteristic malfunctions:
- destruction of bearings;
- loosening the fixing bolts;
- wear of synchronizer rings;
- gear damage;
- formation of burrs and other malfunctions.
Repairing the Gazelle gearbox involves dismantling and disassembling. First you need to prepare a number of necessary tools. In addition to standard tools, you need a beard, pullers, a needle file, and fine-grained sandpaper. After the car is driven onto the overpass, the crankcase is freed of oil. Then the cardan is removed and the lever with the cap is taken out. The wiring for the reverse light and the speedometer cable are disconnected from the box. The gearbox is dismantled by unscrewing the exhaust pipes and bracket. The box is also fixed with the clutch housing - there are 4 nuts. When removing it, you need to be very careful not to damage the cylinder head - the Gazelle gearbox weighs 32 kg. For this reason, the cylinder head should be covered with a wooden block in advance.
Disassembling the gearbox
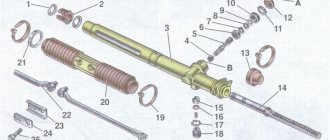
Step-by-step disassembly of the unit will prevent you from making mistakes, and the procedure will be much simpler. It is better to place the removed box on a flat table in the garage to make it more convenient to work. Further reassembly steps are given with simultaneous troubleshooting. Before this, it is advisable to study the Gazelle checkpoint diagram .
- Pull out the lever with the bracket, if it was not removed at the dismantling stage. Check the spring-loaded cups that are responsible for stabilizing the switch. There should be no significant play in the lower part of the rod, both springs should be in place and in good condition. Check that both fixing pins are firmly seated on the sides of the upper part of the housing, where the speed selector directly fits. Test the lower part of the handle and its seat in the gearbox for wear - the metal should not be severely corroded.
- Check the condition of the end of the input shaft onto which the flywheel support bearing fits. Grooves, steps, and other signs of wear on the metal surface will indicate a specific problem. This will be the cause of strong play, causing tremors, noise and other problems of the box. Remove the flange covering the inside of the box on the input shaft side. Pull out both retaining rings - a bit, a flathead screwdriver and a hammer to help. Check the drive shaft bearing for play. During assembly, replace the worn-out part with a new one.
- Halve the box. The Gazelle-Business model has an additional locking bracket, which also needs to be unscrewed. Both parts of the old-style gearbox are simply bolted together. Unscrew the speedometer drive gear and the reverse drive gear of the intermediate shaft.
- Remove the front housing cover and pay attention to the condition of the drain plug with the magnet. As a rule, a lot of dust, shavings and other wear elements collect in this place. Test the outer race of the roller bearing - it should fit tightly, not play, and also the track - ideal without cavities or bulges. Clean and sand all uneven surfaces with fine sandpaper.
- Check the condition of the input shaft bearing - note that there is not only axial, but also radial displacement. Replace if during operation it moves to the 4th gear gear - this is easily determined by the damaged parts of the gear.
- Check synchronizers of all gears. There should be no close contact with the gear rings, no gap, in other words, there should not be much thinning. Otherwise, the problematic synchronizer must be replaced. Experts also recommend replacing elements whose teeth have ground cones. The synchronizers have a special boss that serves as a limiter. If it is also worn out (the factory thickness of the ebb is at least 6 mm), the speed on the box may turn on spontaneously or difficulties with turning on will be observed.
- Check the gears for shells and signs of wear.
- Check the condition of the forks and synchronizer clutch rings. The thickness of the seat for the fork with replaceable crackers in normal condition should be about 9 mm. If it is more, then this already indicates wear and play. The problem is solved by replacing elements - crackers, rings.
- Check the condition of the vent. It should not cling to the main gear synchronizer rings, otherwise this will indicate its displacement. Traces of contact are clearly visible on the surfaces of the teeth. The problem can be solved by proper shaft adjustment.
- Remove the input shaft. Measure the diameters of the end of the secondary shaft and the hole of the main shaft. Subtract the smaller number from the larger number and divide the resulting amount by two. Measure the circumference of one of the rollers located at the junction of the shafts. Compare the indicators - if they are very different, you can judge there is a large backlash.
- Loosen and pull out the rear part of the box housing - the secondary shaft is located in it. Do it carefully, remove the rods carefully!
- Carefully inspect the inside of the rear housing. Clean off dirt, check the bearing seats and bearings. In the extended area of the casing or shank, it is recommended to check the bushing - it must be installed normally, do not cover the drain hole, otherwise the box parts will not be well lubricated.
- Check the secondary shaft parts. Replace those that have strong production. The 5th gear gear especially suffers. This happens to drivers who constantly overload their Gazelle.
Attention! If the secondary shaft bearing is destroyed, this is always fraught with serious consequences. The back of the box may fail completely. In case of damage to the input shaft bearing, the situation is not so critical.
It remains to check the condition of the vent. There is nothing complicated here - visually inspect the helical gears in the light. There should be no traces of wear on them. To remove the bearings from this shaft, you need to arm yourself with two large screwdrivers or short pry bars. The tools are placed on both sides of the bearing, the shaft is placed vertically. Then gently press on both screwdrivers. The clip will easily pop up with effort.
Recommendations for extending the service life of the unit
Without proper care, the Gazelle gearbox quickly breaks down. Some explain this by the mismatch of the unit for a truck. As you know, the box used here, albeit modified, is from a passenger car. Therefore, the slightest overload or prolonged operation has an extremely negative effect on the resource. Already by the 80,000th mileage, gears begin to fly out, crackling and noise appear.
First of all, you need to change the oil correctly and promptly. The replacement interval is determined by the manufacturer at 50,000 mileage, but it is better to do this twice as often. You need to fill in not the lubricant that comes from the factory (cheap TAD 17), but higher quality analogues. For example, GL-4 or 5 with a viscosity of 75W-90.
- do not load the car above the norm of 1.5 tons;
- drive on good roads, avoiding gravel and complete off-road conditions;
- monitor the clutch, refill technical fluids on time.
Repairing and disassembling the Gazelle gearbox is not an easy task, but following the instructions, you can handle the operation yourself. If something doesn’t work out, you can always take the box to a service center or call a specialist to your home.
Selecting transmission oil for manual transmission
SAE 75W-90
Regular transmission inspections ensure safe and comfortable driving. The main factor in maintaining the transmission system in good condition is the use of high-quality oil.
For GAZelle, it is recommended to use gear oil with a viscosity of SAE 75W-90. It provides reliable protection against gearbox wear and corrosion and has good fluidity at low temperatures.
Changing the transmission oil can be done by yourself; it is prescribed at 60,000 km. However, it is possible to carry out this procedure earlier, for example, if you often travel cross-country.
Thus, the GAZelle model 3302 should not be overloaded. A properly functioning gearbox will ensure the normal operation of other vehicle systems. The main reason for expensive mechanical repairs is the driver’s neglect of regular maintenance. Malfunctions with the gearbox also occur due to the fact that low-quality fuel was used. The entire transmission system suffers from this. The problem can be avoided if you constantly monitor the fluid level in the GAZelle 3302 gearbox.
Table: malfunctions of the Gazelle box according to the nature of the noise
| Position | Character of noise | Malfunction |
| Neutral speed, clutch depressed or when the clutch is released after changing any gear other than reverse or fifth | Howl | The cause of this in most cases is a worn input shaft bearing or drive gear bearing. |
| On the move when changing gears | Crunch | Most likely, wear of the clutch release bearing, but the reason may be hidden in the synchronizers - wear or destruction of the blocking rings on the shaft |
| When moving, the gear is knocked out | Knock, push | Problems with the gearbox fork |
| Cold engine, difficult to engage fifth gear | A hum that goes away after warming up | Too thick oil or poor quality lubricant |
| Speeds change while driving | Knocks | Oil starvation, insufficient MTF levels |
| Only when different gears are engaged | Howl | Problems with individual gears |
| In fourth or fifth gear | Crackling | The sump is shaking, needs adjustment |
| During acceleration and deceleration | Rattling | The synchronizer ring is displaced relative to the intermediate shaft |
Now you know how to remove and rebuild the Gazelle gearbox yourself.
Source