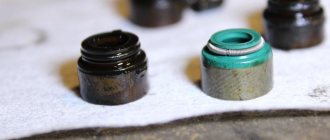
Valve seals (VSE) isolate the internal combustion engine from excess lubricant. They are made from a special type of rubber that can withstand loads. However, over time they still wear out, so excess oil gets inside the power plant. This leads to increased vehicle consumption and other problems. Find out how to replace valve stem seals yourself.
Valve seal arrangement
The design of valve stem seals has only two options. The first type of seal is a lip valve. The name speaks for itself. The device is put on a section of the valve guide. This is the most common type of cap due to its simple design and fairly low cost. There are also disadvantages to this cap device. Without special skills and tools, replacing them yourself will be problematic. You will need professional help.
Another type of cap is installed under the valve spring. The spring stabilizes the seal on the head, thereby sealing the joint. This option of oil seals is good because there is no contact with the guide sleeve, there is no heating, which in turn provides longer wear resistance. Also, the advantages of the second type of valve stem seals include the ease of installation. This does not require any additional tools; it is quite possible to replace them yourself. The only downside, perhaps, is the cost of this type of seal. It sometimes exceeds the cost of the first type several times.
It is also worth paying attention to the material from which the seals are made. The best solution would be valve stem seals made of fluorine rubber or acrylate rubber.
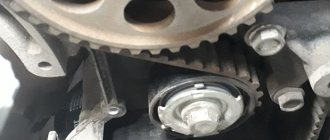
Removing the timing belt
The final step is to remove the cover from the timing belt. To do this, remove the coolant reservoir from its place, disconnect the level sensor from it, and place it on the engine itself. We have access to the lid from the side. Unscrew one bolt there and remove the side cover. We do not remove the top cover from the block yet (we will first align the timing belt to the marks before removing it).
Next, we jack up the car and put it on a stand, hanging the front right wheel. We remove the wheel, unscrew the nut holding the fender liner and bend it, thereby opening access to the crankshaft and timing tensioner (to the left of the crankshaft).
Important information: there is no need to touch or remove the drive belt! He won't bother us.
To rotate the crankshaft, we need a 30mm head and a long shaft so that we can turn it comfortably and not constantly struggle, because we will have to turn it a lot, a lot). I actually assembled such a structure and it hung on me from the beginning to the end of the repair.
Before you continue removing the belt, you need to align the timing mechanism to the marks. On camshafts, marks on the gears indicate the corners of the cutouts in the cover. There are marks on the crankshaft and its 2 sprockets, and there is a protrusion on the engine block. This ledge should be just between these two marked stars.
When should caps be changed?
On average, oil seals need to be replaced every 100,000 km. The indicator is average, you should not adhere to these figures. What are the signs that the seals need to be replaced?
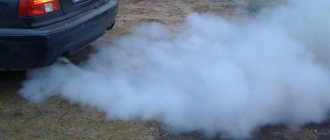
- increased engine oil consumption. If you notice that the car “eats” oil and needs topping up every 1000 km, this is the first sign that the sealing is broken and the oil is simply running away;
- blue, gray smoke from the exhaust pipe. It may only occur when starting up, or during braking, but it’s worth paying attention to;
- unnatural coating on candles.
Important! If you notice at least one of the above signs in the operation of your car, you should at least check the condition of the valve stem seals, and possibly replace them.
Location of valve stem seals in the engine
To find the caps, you need to open the hood of the car and look at the engine. The caps are located directly on the engine valves. Accordingly, as many valves as there are in a car, there are as many caps.
The replacement method and the arsenal of tools required depend on the make of the car and the design of its engine.
Tools for replacing oil seals
To replace the seals you may need the following tools:
- tool for removing (de-sharpening) valves. Available in any auto store, cost from 150 rubles;
- tweezers. You can buy it in any store, cost from 50 rubles;
- mandrel for pressing valve stem seals, price from 100 rubles;
- a set of keys. Socket wrenches, open-end wrenches, and a spark plug wrench must be present;
- collet clamp (cap puller). Its cost is not so low; if you search, you can purchase it for less than 1000 rubles;
- new timing cover gasket;
- hammer.
How to replace the caps without removing the cylinder head?
- When working to replace oil seals, the car engine must be cold.
- Remove the timing cover (gas distribution mechanism).
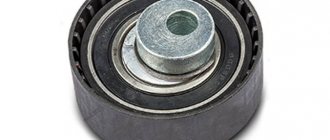
- The camshaft drive tensioner should be loosened when dismantling it.
- For a chain drive, unscrew the drive gear and remove it from the camshaft. With a belt drive, it will be easier to remove the belt from the gear.
- Unscrew the bed fastening from the camshaft, here you will need keys.
- Remove the valve tappets. The dismantling option depends on the individual design of the car.
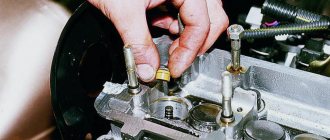
- Secure the desiccant bracket as close as possible to the edge of the lever, install it on the camshaft bed mounting stud. And fix the one closer to the middle with a ring on the plate that covers the valve springs. Press the desiccant lever so that the springs are compressed as much as possible and the plate goes down. With your other hand, use tweezers to remove the crackers from the plate.
- Remove the spring and plate from the rod.
- Attach the collet clamp to the cap. While moving the weight up, press or hit the top stop, this will remove the cap.
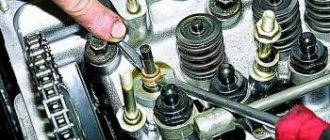
- Remove the spring from the caps, insert the cap into the mandrel.
- Together with the mandrel, begin to put the cap on the valve stem. Here you will need a hammer; with gentle blows on the mandrel, “plant” the oil seal in its place.
- Do not forget to mount the removed springs on the caps.
- After installing the seals, install all the components in their places in the order in which they were removed and dry them.
Important! The number of valve stem seals on your car determines how many times this procedure will have to be performed.
We remove the excess.
The first step is to remove the throttle cover and spark plug cap. After this, you need to disconnect the high-voltage wires from the spark plugs and take them to the side. You also need to disconnect the throttle cable going to the gas pedal. After this, you need to disconnect the plug from the mass air flow sensor, remove the trunk clamp between the throttle and the air filter and pull out the entire air filter box from under the hood. This way we will free up a decent amount of space under the hood.
After the air filter box is removed and we have enough free space, we remove the distributor cover (!! without disconnecting the wires so as not to mix it up later!!) from the intake camshaft and the sensor from the exhaust camshaft.
Next, for ease of work, remove the fuel rail with injectors: unscrew the two bolts on the intake manifold. Turn off the power to the injectors. Before disconnecting the ramp from the fuel line (it is simply pulled out of it when the ramp is turned with the nozzles up), we place the container under the gasoline - probably 200 grams will flow out. And after that, be sure to plug the holes in the manifold under the injectors with rags - so that nothing accidentally gets there (a flyaway cracker, for example). It is best to screw the two bolts that held the ramp back into the manifold so as not to lose them. You can’t just buy bolts with M7 threads - it’s a scientific fact.
Helpful Tips:
- For the long-term life of valve stem seals, it is important to use high-quality motor oil that meets the characteristics stated in the vehicle’s technical data sheet. You should not use synthetic oils where the automaker recommends semi-synthetic ones, and vice versa;
- The service life of valve seals does not depend on the technical parameters of the vehicle. No matter how modern a car is, this does not mean that the service life of its consumable components is many times higher than that of a car with lower technical indicators;
- You can avoid troubles when replacing valve stem seals by following one simple rule: buy original valve stem seals recommended by the car manufacturer;
- The average service life of oil seals is 100,000 km. If during this run you do not notice any signs that the caps may have become unusable, replacement is necessary in any case;
- the use of specialized additives to restore the performance of oil seals does not provide any guarantee that their original properties will actually be restored;
- In the absence of a tool such as a collet clamp, it is not recommended to use pliers. Despite the fact that the operating principle of these tools is similar, the work with pliers is rougher. Very often, after such repair work, it is necessary to restore the operation of other parts;
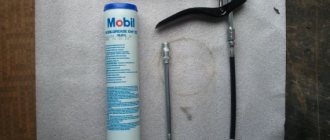
- When replacing oil seals yourself, have sealant on hand. When installing it with a steel surface, you may have to apply sealant in advance;
- if you decide to replace the oil seals yourself, be sure to read the technical instructions for your car;
- If you do not have sufficient skills and knowledge in the field of car repair, it is still recommended to entrust this work to professionals. In car services, the procedure for replacing oil seals does not take much time.
Recommendations
Now there are many wonderful new products. For example, there are special additives that can restore oil seals. It would seem that everything was filled in, all the worn rubber bands were restored. But in practice this is impossible. According to reviews, additives, on the contrary, increase oil penetration into the cylinders.
What to do if the valve falls into the cylinder?
As I wrote above, in the case of holding the valve with a screwdriver, it is better to bring the piston to top dead center. If the valve tries to fall into the cylinder, it will rest against the piston with its plate and will not fall completely.
In this case, you can get it out with pliers, and if it has sunk deep, a telescopic magnet will help you. It looks like this:
This device is useful in any car and at home. It is often found in hardware stores, but you can also buy it from the Chinese for ridiculous money.
After you lift the valve to its original position, press the screwdriver or rod into it again.
How to replace valve stem seals (oil deflectors) on lower valve engines?
Until 1992, engines with bottom valves were produced in Russia - gas 51 and its stationary and marine modifications. In this engine, the valves are located at the bottom. Most of these engines do not have any oil deflectors; gas 51 certainly does not have them! They are not needed there, but some engines had them, but only on the intake valves.
On these engines it is impossible to change the oil baffles without removing the cylinder head. But these engines are a throwback and the likelihood that you will have to repair them is negligible.