Replacing the front crankshaft oil seal of a VAZ 2108
The VAZ 2108 crankshaft oil seal is replaced when oil leaks are detected in places such as the oil pan, as well as in the front or rear part of the engine, where the oil seals are actually located. Our instructions will help you identify the causes and fix the malfunctions yourself, without resorting to the services of a service station, and will help you save your money.
Replacing the front crankshaft oil seal of a VAZ 2108 on your own
Any replacement of the oil seal is carried out after it ceases to fulfill the task assigned to it, that is, it begins to leak or “take oil”. It is sometimes quite difficult to notice leaks of oil or any other liquid; it is even more difficult to do this if the engine is in terrible condition.
The front crankshaft oil seal of the VAZ 2108 (09, 099.) is also replaced if leaks are detected. For example, if you see oil stains on the front of the engine crankcase or there are other greasy marks in this area, you need to make sure that the crankcase ventilation system is working properly. If it is clogged or there are problems with the hoses, immediate corrective action must be taken. If they are not the cause, then most likely the problem will be in the crankshaft oil seal.
In this article we will talk about how to replace the VAZ 2108 crankshaft oil seal with your own hands if such a need arises.
As always, the first thing about the tools you will need:
- Keys for: “10” - (3 open-end, socket and ring with ratchet), “17”, “27”, key for adjusting the timing belt tension roller;
- Screwdrivers;
- Graphite lubricant;
- Empty container for draining oil;
- Oil;
- Sealant.
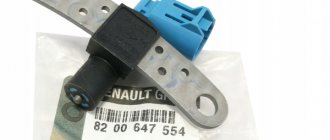
Spare parts:
The work is carried out in an inspection pit.
Causes
First, it’s worth understanding the most basic causes of this problem. This will avoid complications in the future.
Most often, natural wear and tear
. The fact is that when the engine is running, vibrations constantly occur, which lead to gradual wear of the oil seal. It is worth noting here that this reason has a stronger effect on the front oil seal; more vibration load is transferred to it. The rear one is relatively protected from this by the flywheel and gearbox.
, which also occurs quite often - low quality parts. Nowadays, even in a large store you can buy counterfeit spare parts. In the case of oil seals, low quality rubber is used. It wears out quickly enough, which leads to leakage.
Also, in some cases, the problem appears due to unqualified installation. Despite the certain ease of installation, you can make several gross mistakes that will lead to lubricant leakage. Therefore, installation should be carried out extremely carefully and carefully.
Replacing the front crankshaft oil seal on a VAZ 2108 - detailed instructions
1. Remove the engine protection, if equipped.
2. Then - the timing belt cover.
3. Now you need to align the camshaft and crankshaft to the marks.
4. To remove the timing belt, you need to loosen it a little.
5. Install the jack and hang it up, remove the front right wheel.
7. Using screwdrivers, remove the crankshaft pulley.
8. Install the container and drain the oil from the pan.
9. Dismantle the pallet itself; to do this you will have to unscrew as many as 16 bolts.
10. Remove the oil receiver and perform a visual inspection to make sure it is not clogged anywhere. If necessary, blow out using compressed air.
11. Unscrew the 6 bolts securing the oil pump to the block, arrange them in the order of unscrewing, so as not to confuse which one was tightened where.
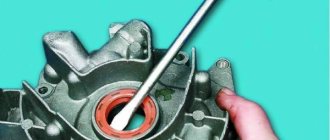
12. If there are “rags” left on the block from the old gasket, remove them.
13. Remove the old oil seal; finger pressure is usually sufficient.
14. Install a new oil seal; for this you can use a mandrel in the form of a head at “27”.
15. Before installing the oil pump, it is necessary to lubricate the edge of the oil seal with oil, and also lubricate the oil pump gasket with graphite grease.
16. Now install the oil pump on the crankshaft; it fits in only one position - along special guides.
17. Upon completion of installation, you must reassemble everything in the reverse order.
It is also better to lubricate the pan gasket, but not with oil, but with sealant. Then install the pan and fill in the oil, check its condition, it may need to be replaced. How to tension the timing belt is written here.
Be sure to watch the video on how to replace the front crankshaft oil seal on a VAZ 2108.
Thank you for visiting vaz-remont.ru
Consequences
Despite the seeming trifle, this malfunction can lead to a number of very unpleasant consequences. They can result in expensive repairs to your car's engine. That is why it is necessary to quickly respond to such a leak.
It is also worth understanding that in some cases it may be difficult to diagnose. Some car models have an oil pump located next to the front oil seal; its gasket is also prone to leaks. Therefore, always carefully inspect the car before you begin troubleshooting. This way you will be able to avoid additional complications with a high degree of guarantee.
Where is the front crankshaft oil seal located?
- It is located in the oil pump cover itself, or to be more precise, it is located on the toe of the crankshaft. In order to see it you will have to remove the timing belt cover. (You will learn how to remove the timing belt cover in this article as we proceed)
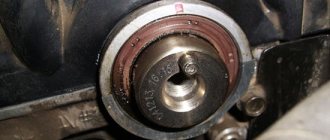
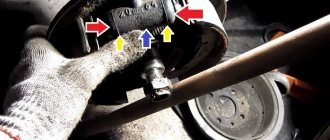
- When the cover is removed, turn your attention to the lowest crankshaft pulley, which is indicated by a red arrow in the photo. It is under this pulley that the front oil seal is located.
When should you replace the front crankshaft oil seal?
- The appearance of various kinds of cracks, ruptures and defects on it.
- The oil seal must also be replaced when it becomes oily, that is, when oil leaks are detected on the oil seal.
It is not always necessary to immediately change the oil seal when oil leaks are detected, because oil can also ooze through the oil seal for the following reasons:
When the crankcase ventilation system is dirty. (You can learn how to clean the ventilation system from the article specifically dedicated to: “Cleaning the system”)
And also when the hoses of the crankcase ventilation system are strongly pinched. In this case, inspect all system hoses for kinks and correct the problem if possible.
Replacing the crankshaft oil seal Kalina 8 valves
Inexperienced drivers are often interested in what to do if the crankshaft oil seal leaks. In fact, there may be several reasons for this, but in any case, you need to replace this part, because there are no other ways to fix the leak. It is worth understanding that the leak should be eliminated as soon as possible, otherwise a number of problems and difficulties will arise. Therefore, do not delay solving the problem. The front oil seal can be changed without any problems at all; the rear oil seal will have to be tinkered with. But, in general, this work is simple and does not require great qualifications. Typically, services entrust this work to young specialists.
What to do if the crankshaft oil seal is leaking? The answer here is clear - change
. This is the only way you can eliminate a dangerous leak. If you do not replace it, you will most likely get a number of other malfunctions of the power unit. Also, do not forget about the need to constantly add oil to the engine, and lubricant is not so cheap now.
How to replace the front crankshaft oil seal on a VAZ 2108-VAZ 21099?
- At the very beginning of the operation, remove the “Gas Distribution Mechanism” belt from all pulleys. (For information on how to remove the belt, see the article: “Replacing the timing belt”)
- Next, using two flathead screwdrivers, pry out the gear-type crankshaft pulley.
- Then remove the toothed pulley from the crankshaft nose.
- Now, using a screwdriver, pry and remove the crankshaft key so that it does not get lost when removing the oil seal.
- Next, without removing the screwdriver, use it to pry the crankshaft oil seal and then remove the oil seal from the cover.
- Before installing a new oil seal, lubricate its working edge with engine oil.
- Then press the oil seal into place using a socket, or using a piece of pipe of a suitable size, or using a mandrel.
- After pressing, install the new oil seal in the reverse order of removal, installing a key in the groove of the crankshaft, and the crankshaft toothed pulley on the toe.
When all the parts are installed, install the “Gas Distribution Mechanism” belt in its place!
If you find an error, please select a piece of text and press Ctrl+Enter.
Source
Purpose of oil seals
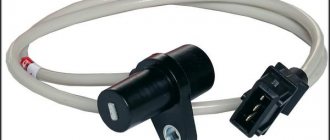
An oil seal (also known as a radial shaft seal) is a special device that is designed to seal rotating joints of car parts. Oil seals have been used in the automotive industry for a very long time; their design and purpose are very complex. The cuff does not touch the shaft surface during operation; the parts are sealed due to the vacuum it creates in the area of shaft rotation using special notches.
Tip: When holding the new oil seal in your hands, slightly bend its working edge: it should be elastic, even and sharp. The duration of operation of the new omental cuff depends on its sharpness
How to replace the front crankshaft oil seal of a VAZ 2108 with your own hands
- Align the camshaft and crankshaft to the marks.
- To remove the gas distribution mechanism itself, you need to lower it.
- Install the jack and hang the right wheel.
- Remove the generator pulley and belt.
- Use screwdrivers to remove the crankshaft pulley.
- Drain the oil from the pan into a container prepared in advance.
- Unscrew 16 bolts and remove the pan.
Rear oil seal
As already mentioned, leakage is a rather complex and dangerous problem. At a minimum, your car will lose lubricant, which is not cheap these days. But, besides this, there are other nuances and features that simply need to be taken into account. The consequences may be as follows:
- Fuel consumption increases;
- Oil may get on the clutch disc, making it impossible to use further;
- In some cases, there is a loss of power.
Therefore, as soon as you suspect a lubricant leak through the rear oil seal, you should fix this problem as soon as possible. In this case, you can avoid trouble.
Also check out
- Remove the oil receiver and inspect it (it should not be clogged). If necessary, you can blow it out with compressed air.
- We unscrew the 6 bolts that secure the oil pump to the block, then you need to put them aside in the order in which they were tightened.
- Remove what is left of the old gasket from the block.
- Remove the old oil seal.
- Using a socket on “27”, install a new oil seal.
- Before installing the oil pump, it is necessary to treat the edge of the oil seal with oil and apply graphite lubricant to the oil pump gasket.
- Install the oil pump onto the crankshaft using special guides.
Reassemble in reverse order.
Recommendations:
- It is better for the pan gasket to be lubricated with sealant rather than oil.
- When installing the pan, add oil (it may need to be replaced).
- You can read about timing belt tension in this article.
Replacing the front crankshaft oil seal of a VAZ 2108 on video:
Oil seals
What is an oil seal?
This page showed oil seals by size for VAZ cars and catalog numbers, role and purpose... I welcome all readers to the RtiIvaz.ru blog. The page shows photographs of crankshaft oil seals as a set for the gearbox of a family of classic rear-wheel drive cars, as well as gearboxes of front-wheel drive eights and a dozen VAZs. The cuff of the rear gearbox, also called the rear axle, is installed in rear-wheel drive “Classic” cars.
In fact, there are many of them different in shape, size, and purpose. Some hold oil, antifreeze or antifreeze, others hold air, water pressure, all are designed to protect car parts from dirt, dust and other factors.
For example, the crankshaft seal and the camshaft keep oil from flowing between the joints of the camshaft journal and the seat of the engine block. The same role is played by the cuffs of the gearbox, gearbox, and axle shaft. The hub is protected from dirty water and dust from leaking antifreeze or antifreeze into the pump.
You can list the role of the purpose of car oil seals, I will only say one thing without them in our age of mechanical engineering. Someday they may disappear in a car, but this is already on the verge of fantasy when the car becomes something like a flying saucer “UFO”. In the meantime, we will think about these photo seals and where to use them.
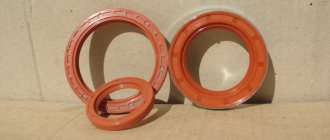
Let's look at a photo of crankshaft cuffs for VAZ 2108 car engines; 2109; 2113; 2114; 2115; 2110; 2111; 2112; 2170; 1118 and 1111 "Oka".
The set includes three seals, two small and one large. Of the small ones, one goes to the front camshaft cover, the other small one goes to the front crankshaft of VAZ 2108 cars; 2109; 2113; 2114; 2115; 2112; 2115; 2170; 1118 and 1111 "Oka". The large rear one is located in the engine crankshaft on the clutch side.
- 2108-1005034 size: 28x42x7 2 pieces (front small ones numbered 2 and 3).
- 2108-1005160 size: 80x100x10 1 piece (large rear one under number 1).
That's all about the rubber cuffs (RTI) of the VAZ 2108 car engine.
Next photo is the crankshaft oil seals for Lada 2101-2107:
Let's look at a photo of crankshaft cuffs for VAZ 2101-2107 car engines.
The set includes two seals, one small and one large. The small one from the front engine cover is large from the rear one.
- 2101-1005034-02 size 40x56x7.5 1 piece (front small number 2).
- 2101-1005160-02 size: 70x90x10 1 piece (rear large number 3).
That's all about the VAZ-2101-2107 engine oil seals.
Next is a photo of the gearbox cuff for Lada 2101-2107:
For VAZ 2101-2107 gearbox VAZ 2101-2107
Photo of a repair kit for the Auto Lada gearbox - 115 rubles for passenger cars Lada 2101-2107 rear wheel drive.
- 2101-1701043K size: 47x28x8 1 piece (small number-2).
- 2101-1701210K size: 32x56x10 1 piece (large number 1).
Next is a photo of the rear axle gearbox oil seal for cars 2101-2107:
For VAZ 2101-2107 For VAZ 2101-2107
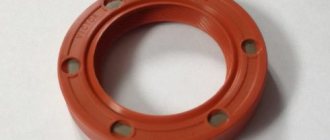
Photo of the rear axle gearbox oil seal (red).
- 2101-2402052-01r size: 35.8x68x12 (Lada 2101-2107 rear axle).
- 2121-2302052r size: 35.8x68x12 (Niva 2121 front axle).
Installed on the rear axle gearbox of rear-wheel drive Lada 2101-2107 passenger cars. The same size goes to the 2121 Niva front axle gearbox, only the design number is different and the direction of the rotation arrow is in the opposite direction in relation to the gear cuff of the Lada 2101-2107.
Next, consider a photo of the gearbox seals 92r Auto 2110.
Photo of the 92r gearbox repair kit Auto 2110 consists of four oil seals.
- 2108-1703042-01 1 piece size: 16x30x7 (old sample rod number 3).
- 2110-1701043RT 1 piece size: 25x45x9 (input shaft number -4).
- 2110-2301034RT size: 35x57x9 (right) 1 piece (black drive number 2).
- 2110-2301035RT size: 35x57x9 (left) 1 piece (red drive number 1).
Repair kits for the Auto 2110 gearbox are completely rubberized, unlike the metal seals for the 2108 gearbox, they do not differ in size and therefore they are also placed on the Auto VAZ-2108 gearbox. Selector rod seal 2108-1703042 I recommend installing two pieces to enhance sealing or a wide reinforced one. They also come in reinforced wide ones. Don't forget to top up and change the oil in your car's gearbox.
Gear selector rod seals
In the photo YOU see two cuffs, gearbox selection rods 2108-2110, one of which is a new type, wide (reinforced), the other is an old type, narrow.
- 2108-1703042-01 size: 16x30x7 1 piece (the old-style narrow selection rod is numbered 2).
- 2108-1703042-12 size: 16x30.5x12 1 piece (new sample selection rod, wide number - 1, see photo).
Front hub oil seal 2101-2107
Photo of the front wheel oil seal with spring assembly (red) hub of cars 2101-2107 “Classic”
- 2101-3103038RT size: 40x57.15x10 1 piece.
On the axle shaft 2101-2107
Photo of the axle shaft seal of the rear axle of classic cars: 2101-2107 and 2121 Niva.
- 2101-2401034R size: 30x45x8 1 piece.
Niva hub oil seal
In the final part, let's look at a photo of the front wheel hub oil seal with a spring assembly of the VAZ 2121 Niva car and here we will finish studying the material that interests YOU.
- 2121-3103038Р size: 56x73.15x10 quantity 1 piece.
Goodbye on the pages of the blog RtiIvaz.ru!
You may also be interested to know:
By sending a message or subscribing to comments, you confirm your consent to the collection and processing of your personal data. Privacy Policy
Source
What to do?
Having dealt with the causes and consequences of such a malfunction, you should ask yourself what to do about it. Everything is simple here, you will need to fix this problem. This can be done in one way - by replacing the part.
When purchasing, pay attention to the quality of the oil seal. It is better to purchase parts made by well-known brands. It would also be optimal to buy components at large auto stores. In this case, there will be significantly less risk of buying counterfeit goods. Also look at the quality of the part, it should not be damaged. Their presence indicates a defect; it is better not to install such a spare part on a car.
STAGE 1
We drive the car into the inspection hole and lift the front right wheel with a jack. We remove the wheel and, opening the hood, let the engine cool. It is desirable that the engine temperature is approximately 60 degrees Celsius. Before getting to the Kalina timing belt, you need to remove the generator belt and its drive pulley on the crankshaft.
The generator drive device is shown in the photo below:
FIGURE 4 Installing the generator belt for 8 valve Kalina
As can be seen from the photo, the generator belt is tensioned using a roller. To remove the poly V-belt, you need to loosen the tension on this roller. To do this, you first need to loosen the rod locknut with a wrench (19). Loosen the locknut and use a wrench (on
we tighten the rod itself until the belt loosens and it becomes possible to remove it. The turn came to the generator drive pulley on the crankshaft. To do this, you need to go down into the pit and remove the engine boot protection on the right side. You also need to remove the flywheel protection, which is secured with three bolts (10) from the bottom of the engine, to the gearbox housing. We remove the protection and, by inserting a flat-head screwdriver between the teeth of the ring gear and the gearbox housing, lock the flywheel. This is necessary so that when unscrewing the bolt the crankshaft does not turn. The bolt (17 key) is tightened very tightly, so to unscrew it you will need to apply some force. To do this, it is better to use a socket with the same size and a pipe as a lever. Having torn off the bolt, unscrew and remove the generator drive pulley.
STAGE 2
At the second stage, we begin to directly remove the timing belt of the Lada Kalina 8 valves...
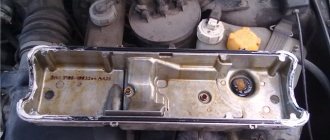
We leave the pit and remove the upper plastic engine protection. It is attached to the engine with four clips; you just need to carefully pull it off from each clip in turn. Next, remove the timing belt protective cover of the Lada Kalina. To do this, you need to unscrew the three mounting bolts with a wrench (10). One of them is located in front of the casing, and the other two are on the side. Having unscrewed the bolts, we removed the casing, and the entire gas distribution mechanism drive opened in front of us (see photo).
FIG.5 Timing drive Kalina 8 Cl
Now the crucial moment has come! It is necessary to install the entire Kalina timing belt drive strictly according to the marks. To do this, you need to take a socket head (19), preferably with an extension, and screw back the bolt that we unscrewed when removing the generator drive pulley.
Using this bolt, turn the crankshaft clockwise until the marks on the crankshaft and camshaft gears match. The locations of these marks are indicated in the illustrations above.
It is better to turn it by the crankshaft, but it is not advisable to do this with the camshaft. This must be done because the Kalina timing mechanism is driven precisely by the crankshaft, and not by the camshaft.
Next, you need to use a wrench (17) to loosen the bolt securing the tension roller and loosen the tension of the timing belt. Remove the belt and tension roller to check the condition. Usually, when replacing the Kalina timing belt, the roller is also changed, since most often the bearing on it has, albeit a small, play. And this is unacceptable. Checking the condition of the pump. You need to tug on the pulley without removing it, and if there is play, it is better to replace it immediately.
Changing the rear oil seal
First, we'll tell you how to change the rear oil seal. As a rule, this is where the most difficulties arise:
- We dismantle the box and clutch basket. More details about this work should be found in the repair instructions for your car;
- Remove the flywheel. Usually it is attached to 8-10 studs. To tear them out of place, you need to jam the crankshaft; it is most convenient to do this with a pry bar;
- Using a screwdriver, remove the old oil seal from its seat;
- Clean the crankshaft journal with a soft cloth. Do not use sandpaper for cleaning;
- The new one is lubricated with oil and installed in place. It is better to use a special mandrel for pressing, but if you don’t have one, you can use a piece of pipe of a suitable diameter.
Replacing a pump on an 8-valve Kalina
On a Kalina with an 8-valve engine, replacing the pump is not so difficult. But if a novice car enthusiast needs to do the work, he often has various questions. For example, what part to choose, what tool will be needed during work, what to do and in what order.
Which pump to choose for Kalina
When the time to replace the pump approaches or the part fails, many Kalina car owners are faced with the problem of choosing a pump. It’s clear that car owners want it to work for as long as possible. In order not to make a mistake, you need to consult with experts and read the reviews of other drivers. However, preference should be given to factory-made products.
When purchasing, pay special attention to the packaging: it must be of high quality, uncreased, with a gasket inserted inside, a warranty card, and a specified service life of the part. A high-quality product is packaged in a box with a holographic sticker. A TZA pump is installed, which has a fairly long service life.
You need to approach the choice of pump with all responsibility and not purchase a part from an unknown manufacturer.
The most preferred manufacturers of water pumps include:
It is quite difficult to answer unequivocally which manufacturer’s pump is better. Each detail has its own pros and cons. Which option to choose depends only on the owner. Pumps from VAZ-2108–09 and 21114 are also suitable for the 8-valve Kalina.
Video: review of water pumps for VAZ
Where is the pump located on Kalina?
On the Lada-Kalina car, the pump is driven by the timing belt and is part of the gas distribution mechanism. To carry out repair work, you need to look for the pump on the right side of the power unit. Without removing the timing belt, only the device pulley can be seen.
The water pump on the Lada Kalina is located on the right side of the engine
What tools will you need?
To replace the pump, you need a standard set of tools (wrenches, sockets), as well as a 6-point hexagon. It is necessary to select a suitable container and rags for draining the antifreeze in order to minimize engine contamination. Even though a new gasket is used when installing the part, for reliability it is recommended to use a sealant with high thermal conductivity.
To replace the pump you will need a standard set of tools that every car owner should have at their disposal: keys, sockets, screwdrivers
Preparatory activities
Preparing to remove the pump comes down to the following steps:
- It is necessary to remove the engine protective splash guard. It is secured with 10mm turnkey bolts.
- Remove the positive terminal from the battery, as well as the high-voltage wires from the ignition coil. The coil, so as not to interfere with free access to the antifreeze drain, is removed and put aside. To do this, use a 5 mm hex key to unscrew the coil bracket fasteners.
- Drain the coolant from the cylinder block into a prepared container by unscrewing the drain plug with a key to “13”, and also unscrew the expansion tank cap.
- If the antifreeze needs to be drained from the radiator, then move the container under the drain hole and unscrew the plug.
How much coolant to drain and add when replacing the pump
Before replacing the pump, you will need to drain some coolant. As a rule, only part of the antifreeze is drained from the cylinder block; there is no need to touch the radiator. If there is leakage from the pipes, replace them too. In cases where the antifreeze and water pump were replaced a long time ago, it is recommended to completely drain all the antifreeze from the system to replace it with a new fluid.
If the coolant has been changed recently, it is enough to remove the hoses from the expansion tank and wait until the liquid drains. After repair work, coolant is filled to the required level. It is recommended to replace the coolant every 60 thousand kilometers. The total volume of antifreeze in the Lada-Kalina cooling system is 7.84 liters.
To drain antifreeze from the cylinder block, unscrew the plug with a 13 key, placing a suitable container under the engine
Pump replacement procedure
After the plastic engine protection is removed, you need to align the marks on the camshaft gear and the crankshaft flywheel. Otherwise, during the repair process, the valve timing may be disrupted, which will lead to additional problems. To align the marks, lift the front wheel with a jack and turn on fourth speed. By rotating the wheel, the crankshaft of the engine is turned. Before this procedure, you must remember to remove the plug that covers the marks on the flywheel. It is located on the side of the checkpoint. The mark on the flywheel must be aligned with the groove on the housing, and the camshaft mark must be positioned opposite the slot at the top.