Front SC
We recommend starting with the front one, since this oil seal is the easiest to replace. Even a car owner without much experience can handle it. Once you learn how to change it, you will most likely be able to replace the rear crankshaft oil seal yourself. But it is better to act according to the circumstances.
Retrieving an element
The steps for replacing the front oil seal are as follows:
- Remove the protective cover located on the timing belt;
- Remove your engine protection. You will have to get under the bottom and unscrew the corresponding fasteners;
- Set the piston of the first cylinder to top dead center on the compression stroke;
- Slightly loosen the timing belt tension, after which it can be easily removed;
- Remove the front right wheel;
- Remove the generator drive belt, and also do not forget to remove the pulley;
- Now we dismantle the fasteners of the crankshaft pulley and take it out. Here you will need to first remove the key;
Front SC
- Be sure to drain the engine oil from the system. To do this, prepare an appropriate container in advance. If you plan to refill the oil, be sure to keep the container clean and dry;
- Remove the oil pump. It is on this that the desired crankshaft oil seal is located;
- To remove the SC, you will need a flathead screwdriver;
- At the same time, check the condition of the oil filter. Replace it if necessary;
- Having dismantled the old front crankshaft oil seal, you can now install a new one in its place;
- Installation of the SC is carried out with a 27 mm nozzle or head;
- Assembly of the unit is carried out exactly in the reverse order.
Since replacing the AC requires serious dismantling work, it is not superfluous to simultaneously check the condition of other units, replace the oil, filter or other parts.
Replacement procedure
Replacing the camshaft oil seal on a VAZ-2114 8-valve car and other vehicles equipped with a similar engine is practically no different from that on the 16-valve power units of the 2112 model. However, there are still some differences.
Performing manipulations on 8-valve engines
The replacement procedure begins with fixing the car in a stationary state using the parking brake and “heels” under the wheels. The gear lever must be in neutral. After this, using a 10mm wrench, the timing cover is removed.
The camshaft and crankshaft pulleys should be installed in the TDC position. To do this, the mark on the camshaft sprocket is aligned with the installation lug located on the rear cover of the timing drive. After the gas distribution mechanism has been brought to the required position, it is fixed using a screwdriver inserted into the teeth of the flywheel.
Using a 17 key, loosen the tension roller bolt and remove the belt from the upper sprocket. After this, the camshaft pulley is secured from turning and the bolt securing it to the end of the shaft is removed. The star itself is removed
When dismantling the sprocket, care should be taken, since under it there is a small semicircular key, which is very often lost during the disassembly of the timing drive.
After the above-described manipulations, the camshaft oil seal is removed using a screwdriver. The new part is lubricated with engine oil and pressed into place using a special mandrel. If you don't have one, you can use a socket head of a suitable size. Assembly of the mechanism is carried out in reverse order.
Performing manipulations on 16-valve engines
Replacement of VAZ-2112 camshaft oil seals is carried out in a manner similar to that described above. In this case, the exhaust camshaft sprocket is first dismantled, then the intake camshaft. The amount of work increases slightly due to the greater number of mounting points for the timing cover.
In addition, special care should be taken when reassembling the mechanism and setting marks. On 1.5 liter 2112 engines, incorrect installation of timing marks often leads to damage to the valve mechanism and CPG
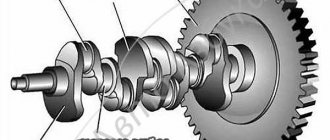
What is the crankshaft oil seal for and where is it located?
The main purpose of the oil seal is to prevent engine oil from leaking from the engine. Reliable sealing of the holes is possible due to the pressure inside the crankcase, which ensures the tightest possible pressure of the oil seal to the part. Thanks to this principle of operation, the liquid in the internal combustion engine system does not leak and does not subject the engine components and assemblies to excessive frictional loads.
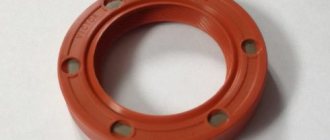
The oil seal is made of heat-resistant material: fluorine rubber, silicone. Also on the outside of the seal you can see some notes; most often, they tell the driver in which direction the crankshaft is rotating. Information is necessary in order to correctly install new sealing elements
The design of the power plant determines the presence of two oil seals - front and rear. The rear rubber product is designed for installation on the part of the crankshaft that connects to the flywheel. The crankshaft end is a flange, so the rear seal has impressive dimensions and a fairly large amount of material, which ensures its long service life.
The front rubber element is mounted on the limit switch, which is the drive for the engine mechanisms. Its dimensions are smaller than the similar part at the other end, therefore the front oil seal is significantly inferior in terms of service life.
Causes of failure
The most obvious factor indicating problems with the crankshaft oil seal is numerous traces of oil on and near the engine. There may be several reasons for the loss of strength of the crankshaft oil seal (CS). Here are the main ones:
- Natural physical wear of the part associated with a long service life, which has already approached 3 years or even exceeded it;
- Problems that arose during the last installation of a new SC;
- Incorrect assembly of the unit, which resulted in a violation of the tightness and integrity of the cuff;
- Presence of mechanical damage on the element;
- The use of rubber of dubious quality, which even theoretically could not last long.
The design of the “ten” provides for the presence of two crankshaft oil seals - front and rear. Their replacement is somewhat different. Therefore, they should be considered separately.
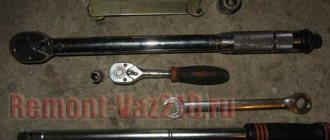
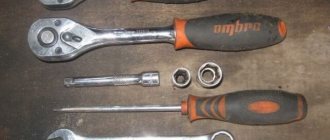
Tools and materials
What's a repair without tools?! You will need a certain set of everything you need. This set includes:
- Car keys;
- Timing belt tensioner;
- Set of screwdrivers with bits;
- Waste collection container;
- Antifreeze or high-quality graphite lubricant;
- Container with motor oil;
- Heat-resistant sealant;
- New crankshaft seals.
Replacing the crankshaft oil seal on a VAZ 2110 8 valves
In this section we will talk about dismantling the front crankshaft cuff. To carry out this work, you will need a standard set of keys, screwdrivers and, of course, new cuffs. Drive the car onto a lift, pit or overpass, and then start working according to the algorithm:
- Disconnect the negative terminal from the battery. Remove the toothed belt guard.
- Remove the timing belt. If oil is found on it, it also needs to be replaced.
- Remove the right wheel of the car, then remove the alternator belt.
- Unscrew the crankshaft pulley mounting bolt and remove it.
- Drain the oil and replace it.
- Reassemble in reverse order.
Remember that you should not save on these parts - their cost is not high, but replacement work is quite a lot. Plus, a poor quality product can end up causing serious engine damage, which will drain your wallet and waste a lot of your time.
Stories from our readers
“Fucking basin. "
Hi all! My name is Mikhail, now I’ll tell you a story about how I managed to exchange my two-wheeler for a 2010 Camry. It all started with the fact that I began to be wildly irritated by the breakdowns of the two-wheeler, it seemed like nothing serious was broken, but damn it, there were so many little things that really started to irritate me. This is where the idea arose that it was time to change the car to a foreign car. The choice fell on the melting Camry of the tenth years.
Yes, I had matured morally, but financially I just couldn’t handle it. I’ll say right away that I am against loans and taking a car, especially not a new one, on credit is unreasonable. My salary is 24k a month, so collecting 600-700 thousand is almost impossible for me. I started looking for different ways to make money on the Internet. You can’t imagine how many scams there are, what I haven’t tried: sports betting, network marketing, and even the volcano casino, where I successfully lost about 10 thousand ((The only direction in which it seemed to me that I could make money was currency trading on the stock exchange, they call it Forex. But when I started delving into it, I realized that it was very difficult for me. I continued to dig further and came across binary options. The essence is the same as in Forex, but it’s much easier to understand. I started reading forums, studying trading strategies. I tried it on a demo account, then opened a real account. To be honest, I didn’t manage to start earning money right away, until I understood all the mechanics of options, I lost about 3,000 rubles, but as it turned out, it was a precious experience. Now I earn 5-7 thousand rubles a day. I managed to get the car buy after half a year, but in my opinion this is a good result, and it’s not about the car, my life has changed, I naturally quit my job, I have more free time for myself and my family. You’ll laugh, but I work directly on the phone)) If If you want to change your life like me, then here’s what I advise you to do right now: 1. Register on the site 2. Practice on a Demo account (it’s free). 3. As soon as you get something on the Demo account, top up your REAL ACCOUNT and go to REAL MONEY! I also advise you to download the application to your phone, it’s much more convenient to work from your phone. Download here.
Why is it necessary to change on time?
Naturally, timely repair of parts that have become unusable will extend the life of both the engine and the VAZ-2110 vehicle itself. The time after which it is necessary to change the oil seal directly depends on how old or new the car is, on the driving style of the car owner and operating conditions.
If you change them in a timely manner, this will help reduce the cost of car repairs, because such measures eliminate engine oil leaks, which negatively affect the operation of the engine.
If you do not change it in time, the VAZ-2110 car will “eat” more motor oil, and the engine itself will begin to collect dirt and dust, which cannot but affect the stability of its operation. Engine oil leaks negatively affect car parts that are not made of metal, and the contact in the terminals will become much worse, which, in turn, will affect how the car starts.
Any car has parts, for example, crankshaft cuffs, that need to be changed according to the manual or as they wear out. Replacing the VAZ 2110 crankshaft oil seal, as well as valves, can be done at a service station or with your own hands.
When is it time to change?
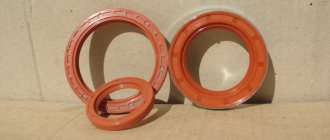
The car crankshaft has two oil seals: front and rear. They are dense elastic rings in a hard cage.
Their purpose is to prevent dust and dirt from entering the crankcase and to prevent oil leakage. The service life of the sealing rings is 150 thousand kilometers. But consumables may wear out sooner. The reason for this may be:
- poor quality product;
- work under increased loads;
- overheat;
- untimely replacement of oil and filter;
- use of oils that do not meet the recommended ones.
You can diagnose the replacement of oil seals by the oil stains that appear on the engine and gearbox. An oil leak can cause the timing belt to break, causing damage to the valves. In this case, it may be necessary not only to replace the valves, but also to overhaul the engine.
Rear SC
The procedure for replacing the rear motor assembly is noticeably more complicated than the front one, so not everyone will decide to carry out such work on their own. We recommend that you consult first and watch training videos.
To replace the rear AC, you will have to spend a little more time and effort. The work is not easy, but with the right approach, a positive result can still be achieved.
Rear SC
- Disconnect the negative terminal from the battery. This will completely de-energize the car and avoid unpleasant situations.
- Remove the flywheel.
- Remove the rear protective cover from the engine crankcase.
- Next, we disconnect the fastening bolts from the oil seal retainer, after which it can be removed together with the seal outward.
- Be sure to arm yourself with a core or mandrel. Using these tools, you can press the crankshaft rear oil seal out of its seat - the race. The element itself is clamped in a vice, after which the problematic component is exposed to the tool.
- The holder is probably covered with dust and dirt. Be sure to delete it.
- Now carefully examine the condition of the surface. Even if there is even minor damage to the retainer, it will have to be replaced along with the oil seal itself.
- Now select a suitable mandrel so that its size matches the parameters of the new oil seal. Insert the spare part into its place. In this case, it is important that the working edge of the new oil seal is directed with the working edge inside the retainer, that is, the holder.
- Be sure to change the seal on the retainer. This is done regardless of the condition of the seal on the old crankshaft oil seal.
- Lubricate the crankshaft lips and flange with regular engine oil. This will make it easier to return the holder to its seat.
- To make it more comfortable for you, use a wooden stick to support the lip on the oil seal.
- Now all that remains is to perform the reassembly procedure, following the specified sequence of dismantling work.
The basis for successful replacement of front and rear joints is patience, attentiveness and perseverance. If you rush, rush, nothing good will come of it, and you will have to go to a service station and pay a lot of money.
Tools and materials needed to replace valve stem seals
This job requires a separate set of tools. Naturally, a regular service station has them in its “arsenal” at the beginning. But the owner of a Priora who decides to change the valve stem seals on his own will have to get them or rent them:
- A set of spanners (spanners).
- Set of sockets with a knob.
- Valve spring compressor.
- Set of hexagons.
- Screwdrivers.
- Mandrel.
- A device for removing and replacing valve stem seals and crackers.
- Magnet.
- Marker.
- Sealant for gaskets during replacement.
- A set of head gaskets to replace the old ones.
How to determine the wear of oil seals on a VAZ-2110
An oil leak from under the clutch housing cover can be seen if you drive the car into an inspection hole.
If oil leaks are found on the car engine housing, you should not immediately buy new oil seals and change them.
The oil seal itself is a product made of a combined material. In this case, it is rubber and metal. The purpose of the oil seal is to provide a tight seal between the rotating parts of the car. In another way, the oil seal is called the shaft cuff.
Before changing oil seals, you need to check the following engine parts and systems:
- Check the oil supply system for blockages.
- Oil filter.
- Hoses for their integrity.
- Crankcase ventilation system.
Cuff edges
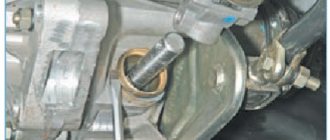
When you see these drips, suspicion falls on the front crankshaft oil seal.
You can verify this by removing the timing cover.
If all these systems are in working order, and oil leaks on the engine do not disappear, it means that the seals have most likely become unusable. The most characteristic sign that indicates the deterioration of the seals is traces of oil smudges on the edges of the cuff.
Since the crankshaft pulley rotates at high speed, oil gets onto the entire front part of the engine, and the accessory belt also becomes oily. Such a belt will have to be changed, since its contact with oil is unacceptable. In addition, there is another sign indicating wear of the rear oil seal. These are traces of oil on the joints of the clutch housing and cylinder block.
How is the crankshaft oil seal replaced?
To successfully complete the task, you first need to arm yourself with all the necessary tools and prepare an inspection hole in the garage to perform a whole range of work.
Developments from the following manufacturers are recommended for purchase:
| Name | Manufacturer | Price |
| Victor Reinz | Germany | 350 rubles |
| Elring | Germany | 300 rubles |
| Ajusa | Spain | 650 rubles |
| Espra | Spain | 250 rubles |
| Goetze | Germany | 600 rubles |
Screwdrivers, wrenches, sockets, and new seals should be on hand. All work comes down to separate replacement of the front and rear crankshaft oil seals.
Changing the front oil seal
Access to the front crankshaft oil seal largely depends on the specific make of the car, so before carrying out all the work, it is advisable to read the operating instructions with all the necessary information. For owners of domestic cars, in particular the VAZ brand, all work comes down to the following steps:
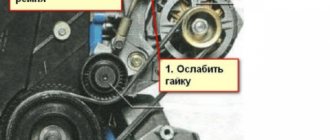
- At the first stage, the tension of the generator belt is weakened
- The belt is completely removed from the pulley
- The nut that serves to clamp the pulley is unscrewed
- Remove the pulley from the shaft
- In car modifications with a transverse engine, the oil pump housing is removed
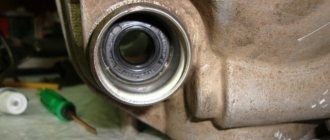
- Pry a screwdriver under the oil seal and remove it from its seat
- Installing a new seal
- We assemble the parts in reverse order
It is advisable to treat the junction of the oil seal with the crankshaft with machine oil and apply the substance to the outer surface of the seal and the output end of the shaft.
Changing the rear oil seal
This type of work requires a lot of time and effort from the car owner. To get to the rear oil seal, you need to disassemble the cardan and disconnect the box and clutch housing. The next steps are as follows:
- We dismantle the gearbox along with the clutch basket, do not touch the flywheel
- Loosen the bolts securing the flywheel to the engine
- To set the flywheel to a static position, fasten one gearbox mounting bolt and insert a screwdriver, resting the teeth against the mechanism
- We remove the retaining plastic, and only after that the flywheel itself
- Unscrew the rear clutch shield and release the fasteners connecting the rear engine cover
- Find the rear oil seal and remove it with a screwdriver
- Lubricate the seat
- Press in a new copy with a screwdriver
It would not be superfluous to replace the rear cover gasket; it is also advisable to lubricate all contacting parts with machine oil during work. Then we assemble the entire assembly in reverse order.
Replacing the clutch and rear crankshaft oil seal
In order to replace the clutch disc, clutch basket, release bearing or rear crankshaft oil seal , we drive the car into a pit, jacking it up on both sides, or lift it on a lift. If it is necessary to replace one of the listed parts, it is advisable to replace all the others. Remove the front wheels. Open the hood. Remove the terminals from the battery. And take out the battery itself. Remove the engine protection.
Now you need to drain the oil from the gearbox. To do this, use wrench No. 17 to unscrew the oil drain plug from the gearbox. It is located at the bottom of the gearbox, on the side of the left axle shaft.
Prepare a container for drained oil in advance. We make the last turns of the cork manually, holding the prepared container in the other hand. You can learn more about this procedure in the article “Changing gearbox oil.” Screw the drain plug back in and clamp it. Remove the electrical connectors from the reverse gear solenoid. And from the speed sensor.
Remove the flywheel protection from the gearbox housing by unscrewing the three fastening nuts.
Having locked the brake disc, unscrew the central nut of the left axle shaft with head No. 30. Then the right axle nut.
In the same way - on both sides - we unscrew the bolts securing the ball joints to the steering knuckle using wrench No. 17.
We remove the outer CV joint from the hub. We remove the left axle shaft from the gearbox housing. You can learn more about this procedure in the article “Replacing the outer CV joint and CV boot.”
We remove the outer CV joint of the right axle shaft from the hub.
To make it easier to remove the right axle shaft, remove the engine mount. Unscrew the three bolts securing the pillow. One of them is with head No. 17. The remaining two are with head No. 19.
We loosen the fastening of the gear shift rod against longitudinal movement.
We knock it out with a hammer. Let's take it off.
Unscrew the two nuts securing the engine mount to the car frame.
And finally we remove it. Using key No. 13, unscrew the gear shift rod from the gearbox.
We knock it out with a hammer and remove it.
In order not to lose the removed nut and gaskets, you can screw them back. We remove the right axle shaft from the gearbox housing.
Then press out the rear mount of the left trailing arm.
And unscrew the front mount from the body. This is necessary so that later it does not interfere with the removal of the gearbox housing.
Then we move under the hood. The air filter housing must be removed. To do this, remove the connector from the air flow sensor.
Remove the corrugation from the air filter housing.
Unscrew the two bolts securing it to the car frame. Remove the antifreeze return hose fastener.
Remove the air filter housing. Remove the positive wire from the starter. And an electrical connector.
To avoid accidentally damaging the starter when removing the gearbox, it can also be removed. To do this, unscrew one fastening nut from the top. And two - below. We remove the starter.
Now we unscrew the two bolts securing the clutch cable housing using wrench No. 17.
We remove the cable from the clutch fork lever and move it to the side so that it does not interfere.
Let's go back under the hood. Using socket No. 19, unscrew the two upper bolts securing the gearbox to the engine block. And the ignition coil mounting bolt.
Then we move under the car. Now it is necessary to place a hydraulic strut with a rubber cushion under the engine sump so as not to damage the sump. This is necessary so that the engine does not fall when we unscrew the remaining mounting bolts.
Unscrew the two lower bolts securing the gearbox to the engine block.
We do not remove the last bolt; we will do this later, just before removing the gearbox. Now we remove the rear gearbox mount. To do this, use head No. 17 to unscrew the three nuts that secure the cushion to the gearbox housing. And two bolts fastening to the spar with an E14 star head.
Now that all the fasteners are freed, we can remove the gearbox. We finally unscrew the bolt securing the gearbox to the engine block, the one that we unscrewed last and did not remove. Be careful - the gearbox is quite heavy, so it is better to do this with two people.
Now you need to remove the basket and clutch disc. To do this, insert a bolt. And, resting on it, we fix the flywheel with a screwdriver.
Using head No. 8, unscrew the six bolts securing the clutch basket. Remove the clutch disc and basket.
Thanks for subscribing!
Let's inspect the flywheel. If on it, on the contact plane of the clutch disc, there are cracks, multi-colored spots of overheating, wear - an uneven plane, wear - then the flywheel should be replaced.
Along with replacing the clutch, we recommend replacing the rear crankshaft oil seal. Since the oil seal is located in a very hard-to-reach place, behind the flywheel, this will save us from the need in the future to remove the gearbox just to replace it, and due to wear, sooner or later it will begin to leak oil. Using wrench No. 17, press out the six flywheel mounting bolts. We unscrew them by hand.
And remove the flywheel. Now we can see the crankshaft rear oil seal. In order to remove the oil seal, we pick it up and take it out.
Let's clean the oil seal contact plane. Then we take a new oil seal. Let's coat the contact plane with a thin layer of silicone sealant. Let's put it in. And carefully press it in.
Reinstall the flywheel. The flywheel mounting bolts are installed with thread sealant. But first, let's clean the bolts from the old sealant with a brush with metal bristles. Apply thread sealant to the threads. And screw it into place. We screw in the first two bolts crosswise so that the flywheel is guaranteed to be installed evenly. Having locked the flywheel, we clamp it with key No. 17.
Install the new clutch disc into the basket with the convex part facing outwards.
Then we install the basket with the disk on the flywheel. And we tighten the bolts.
But we don’t tighten it all the way so that the clutch disc can be centered. Now let's align the clutch disc strictly in the center, using a special guide for this. The clutch disc should be positioned exactly in the center of the flywheel. You can do this by eye, but in this case the accuracy of the alignment is difficult to guarantee, as a result of which the gearbox simply cannot be installed.
Finally tighten the basket mounting bolts. We do this carefully, as they can be easily torn off. Now let's turn our attention to the clutch basket petals. The grooves on them indicate that the release bearing is faulty.
The release bearing is located inside the gearbox bell, on the clutch fork. To remove it, remove the wire bracket.
Having removed the bearing, we wipe the seat. Coat the input shaft with grease.
And install a new release bearing. We fix it with a wire clamp.
Now that all the faulty clutch parts have been replaced, let's put everything back together. We throw in the gearbox. Be careful to ensure that the input shaft fits into the hole in the clutch disc. This is why we previously centered the disk. Then we insert and screw in one of the lower bolts securing the gearbox to the engine block. In this case, an assistant must hold the gearbox. When the first bolt is screwed in, you no longer need to hold the gearbox. Screw in the second bolt. And we clamp it. Reinstall the gearbox cushion. We screw it to the gearbox. We tighten the nuts. Then, lifting the gearbox, we align the holes in the cushion with the holes in the spar. Insert the bolts. And we squeeze them. After this, you can remove the support from under the engine. Install the engine mount. We screw it to the car frame. And then to the gearbox. And tighten the bolts. We put the gear shift rod in place. And we screw it on. Install the starter. We tighten the lower nuts. We insert the left axle shaft into the gearbox. Then - the outer CV joint into the hub. We push the inner CV joint into place. We screw the ball joint to the steering knuckle. Then we insert the right axle shaft into the gearbox. We insert the outer CV joint into the hub. We screw the ball joint to the steering knuckle. We move under the hood and screw in the upper bolts securing the gearbox to the engine housing. We tighten the upper starter mounting nut. We fasten the positive wire to the starter. And put on the electrical connector. We fasten the clutch cable housing. And put the cable end on the clutch fork. We put the electrical connectors on the reverse gear solenoid and the speed sensor. We screw the front suspension trailing arm mount to the frame. We clamp the rear trailing arm mount. Then you need to pour oil into the gearbox. You can learn more about how to do this in the article “Changing gearbox oil.” Install the battery. Replace the air filter housing. And we screw it on. We install the corrugation. We clamp the clamp on it. We put the connector on the air flow sensor. We fix the antifreeze return hose. We tighten the central nuts of the axle shafts. Screw on the flywheel protection. We install the wheels. Then we'll check how the clutch and gearbox work.
Replacing the crankshaft oil seal on a VAZ 2110 16 valves
In order to remove and replace the front crankshaft oil seal of a VAZ 2110 (16 cl), you will need the same standard set of tools. All actions are also similar to the procedure for replacing the cuff on an 8-valve engine. So, the algorithm for removing the front cuff from the crankshaft is as follows:
- Remove the timing belt.
- Remove the generator belt.
- Remove the front right wheel and, if necessary, the fender liner.
- We unscrew the bolt securing the crankshaft pulleys and dismantle them.
- We replace the cuff and put everything back together in reverse order.
If you are replacing the front cuff, it makes sense to replace the back one as well. And if you do this at the same time, you will save time, since the components are replaced from one place with the removal of the wheel and, possibly, the fender liner.
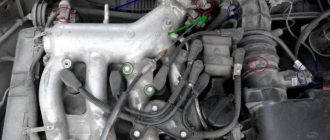
Replacement of camshaft seals VAZ 21124, replacement of timing belt
The first time I installed the caps and dried the valves
The Lada
Priora
a VAZ 21126
16
valve engine. Were.
- Injectors.
- Ignition coils.
- Camshaft sensor.
- Oil pressure sensor.
Drain the coolant into a container. Disconnect and move to the side the throttle (gas) cable. Search results for Lada Largus rear replacement. Brake discs. Does the Vesta fret have 8 and 16 valves? And proceed to the next stage.