01/26/2022 10 204 VAZ 2107
Author: Ivan Baranov
The functioning of the clutch system determines the performance of the vehicle. This means that attention should be paid to the performance of this device, especially if you notice something wrong while driving. Today you will learn how to change the clutch release bearing of a VAZ 2107, what to prepare for replacement and how to do it correctly.
Car VAZ 2107 [Hide]
Clutch device for VAZ 2101, 2103-2107 cars
Structurally, the clutch of VAZ rear-wheel drive cars does not differ from each other, with the exception of the use of slightly different sizes and additional elements in cars with more powerful engines (2106-2103 and 2121). The clutch is a mechanism that controls the transmission of torque from the engine crankshaft to the transmission input shaft.
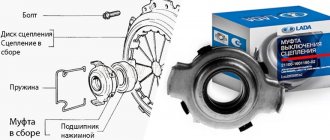
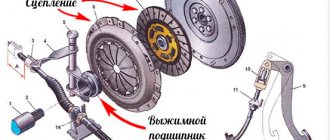
VAZ 2101 clutch design and drive diagram: 1 - flywheel; 2 — clutch driven disc; 3 - basket; 4 — release bearing with clutch; 5 — hydraulic drive reservoir; 6 - hose; 7 — master cylinder of the hydraulic clutch release; 8 — servo spring of the clutch pedal; 9 — clutch pedal return spring; 10 — clutch pedal travel limit screw; 11 — clutch pedal; 12 — hydraulic clutch release pipeline; 13 — ball joint fork; 14 — clutch release fork; 15 — release spring for clutch release fork; 16 - hose; 17 — working cylinder of the hydraulic clutch release; 18 - bleeder fitting
The flywheel, also known as drive disk 1, is rigidly attached to the crankshaft. Clutch basket 3 is fixed to the flywheel with six bolts, and between them, on the splines of the gearbox input shaft, there is clutch driven disc 2 with friction linings. If it is necessary to disengage the clutch by pressing pedal 11, the clutch release fork 14 presses on the release bearing 4 and disconnects the drive disk from the basket by moving the driven disk 2. The clutch release fork is driven by the hydraulic system.
Bleeding the system
Draining fluid from the clutch drive system is very simple:
- Using a blower, pump out the liquid from the expansion tank.
- Unscrew the fitting on the working cylinder and wait until all the fluid is gone.
- Press the clutch pedal several times to remove any remaining brake fluid.
- Change tubes if necessary.
- Tighten the fitting.
- Fill the reservoir with fresh brake fluid.
- Place a transparent tube onto the fitting.
- Have an assistant press the clutch pedal several times. With the last press, you need to hold it in the extreme position.
- Unscrew the fitting half a turn, allowing fluid and air to escape.
- Repeat the procedure until liquid begins to flow without air bubbles. Don't forget to monitor the level in the expansion tank.
In fact, two or three passes are enough to get rid of air in the system. As you understand, pumping the clutch on a VAZ 2106 is not difficult. The procedure is very similar to bleeding the brakes, only it is much faster - the line is very short.
After replacing the clutch, it will need to be adjusted. Pay attention to the working cylinder rod - it has a thread along which you can move the nut. It is by moving it that the clutch is adjusted on VAZ 2106 cars and the rest of the classic series. It is also possible to adjust the free play of the clutch pedal; for this purpose, a special bolt is provided directly above it.
Replacing the release bearing on a VAZ 2101-VAZ 2107
Removal: 1) At the very beginning of the operation, you will have to remove the box from the car. (see details in the instructions: “Replacing the box on a VAZ”)
2) Now take a screwdriver in your hands and remove the springs securing the bearing to the fork.
3) Gradually pull along the shaft, in other words, pull the release lever towards you - it is removed from the shaft.
4) After removing the bearing, unclench the ends of the spring attached to the gear shift fork. After decompressing, simply remove this spring. If you find the bearing is in good condition, but the spring is not, replace the spring with a new one and continue to use your bearing. The spring is fine, but the bearing is not - take the spring and insert it into the new part.
Note! Please note that sometimes the bearing is still intact, but has already traveled quite a few kilometers, so you should not exclude the possibility of failure in the near future.
Installation
The new spare part is installed on the vehicle in the reverse order of removal.
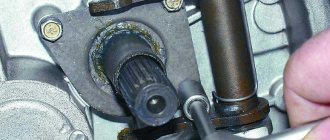
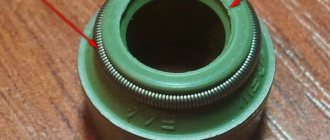
Note! Before installation, it is necessary to lubricate the splined part of the input shaft, indicated by the arrow, with the lubricant described in the set of necessary tools, because over time the lubrication of the shaft disappears, and malfunctions with the splined part may occur due to friction between non-lubricated parts.
Below is a link to a video with a visual demonstration of the replacement process:
How to replace?
If you have no idea what a VPS is or what a clutch disc looks like, then entrust bearing repair work to professionals. If you think that you can cope with this, then we suggest that you familiarize yourself with our car repair manual.
Which to choose?
Selecting an IPS is the first point that must be completed if you decide to replace an element.
There is nothing difficult in choosing an element. Classic VAZ models (2010 - 2107) are equipped with a release bearing of the same type. Just buy the appropriate part at a car store or market, indicating the model of your vehicle. To make it more clear to you what the UPS looks like, you can look at it in the photo below.
Loading …
What will you need?
What you will need to replace the UPS:
- the new UPS itself;
- flat head screwdriver;
- set of wrenches;
- lubricant "Litol-24";
- jack as support.
New release bearing for VAZ 2107
Flat-tip screwdriver: needed to press out the springs holding the IPU to the clutch fork
A set of wrenches - needed to unscrew the various bolts that secure the gearbox to the car body
Litol-24 - will be needed to lubricate the splined part of the input shaft
Jack - necessary as a support for the gearbox
Ordinary bricks can also be used as support.
Step-by-step instruction
The VPS is located in the gearbox, in particular where the unit connects to the clutch mechanism.
- Therefore, first you need to dismantle the gearbox. Note that it is not necessary to completely dismantle it; it will be enough to move it away from the clutch. From the gearbox you need to disconnect the driveshaft, which is secured with three bolts.
- When the bolts are unscrewed, the gearbox can be disconnected from the cylinder block along with the clutch housing. Next, you need to unscrew the transverse part of the engine support from the housing 2107. After unscrewing the nuts, you can remove the unit. Thus, on one side your unit will hang on the muffler pipe, and on the opposite side, place the gearbox on supports. You can use a jack for this.
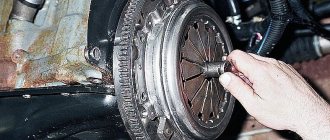
- When the gearbox assembly is dismantled, you gain access to the mechanism basket. You need to remove the six bolts that secure the basket to the flywheel. You can use a screwdriver to move the basket, but be sure to keep the flywheel in one position.
- Having done this, you will see a bearing that is attached to the fork of the mechanism using springs. Take the prepared screwdriver and move the springs to the sides.
- When the springs are separated, the VPS needs to be pulled along the driven shaft of the mechanism towards itself. This is done in order to remove the element.
- After this, when the VPS is dismantled, the ends of the spring that secured it to the gearbox fork can be unclenched. If you notice that not only the release bearing has worn out, but also the spring, then it is also better to replace it.
- The element is installed in the reverse order of removal. Please note that immediately before installing the VPS, the splined part of the input shaft should be lubricated with lubricant, for example “Litol-24”. This is done in order to avoid future malfunctions directly with the spline part. Please note that it is not lubricated enough, as a result of which the friction between the elements increases, causing the parts to fail earlier.
The red arrow in the photo marks the location of the VPS: behind the protection there is a fork that holds the bearing
The red arrow indicates the working cylinder rod, and the blue arrow indicates the clutch fork itself, which holds the bearing.
Take a slotted screwdriver and pry the fork springs away from the VPS.
When everything is done, the IPS can be dismantled from the installation site.
When the VPS is dismantled, release the fixation springs and install them on the new element. Please note: if the springs on your bearing have already exhausted their service life, it is advisable to replace them together with the VPS.
At the end of the work, before directly installing the new element in place of the old one, the splined part of the input shaft must be lubricated.
To do this, you can use the universal lubricant “Litol-24”. At this point, the technical work to replace the element is completed. If you are not sure that you can cope with this type of repair work, then it is better to entrust this matter to specialists: you will have to pay a little money, but you will be sure of the quality.
Clutch selection
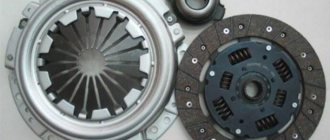
When purchasing a new clutch kit for the VAZ 2107, experts recommend being guided by the following criteria. When assessing the driven disk:
- the surface of the linings must be smooth and uniform, without scoring, cracks or chips;
- all rivets on the disk must be the same size and located at an equal distance from each other;
- there should be no oil stains on the disc;
- there should be no play in the places where the linings and springs are attached;
- The manufacturer's logo must be applied to the product in one way or another.
When choosing a basket, you should pay attention to the following points:
- the casing must be stamped, without cuts or scratches;
- the surface of the disk must be smooth and uniform, without cracks or chips;
- the rivets must be identical and strong.
The most popular brands are the following.
- Valeo (France), specializing in the production of excellent quality brake system elements. The characteristic features of the Valeo clutch are soft operation with a clear engagement moment, reliability, and long service life (more than 150 thousand kilometers). However, such a clutch is not cheap.
The choice of clutch should be approached comprehensively and the choice should be made after examining the product and receiving expert advice.
Clutch parts - removal and installation
To work, you will need a centering mandrel.
1. Place the car on an inspection hole or overpass (see “Preparing the car for maintenance and repair”).
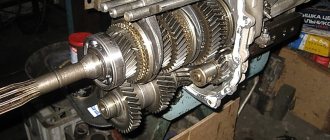
2. Remove the gearbox (see “Gearbox - removal and installation”).
3. Screw one of the clutch housing mounting bolts into the hole in the cylinder block.
If replacing the basket is not planned, then use a center punch to mark its position on the flywheel.
When performing the following operation, to avoid deformation of the clutch casing, unscrew the bolts sequentially, no more than one turn per pass.
4. While holding the flywheel from turning with a mounting blade inserted between the teeth of the flywheel ring, use a 13 mm
unscrew the six bolts securing the basket to the flywheel.
5. Remove the clutch basket and driven disc.
Fault diagnosis
How do you understand that the clutch release bearing (hereinafter referred to as the clutch release bearing) has already reached the end of its service life and is time to change it? This question interests many VAZ 2107 car owners. And for good reason, because although this element can be called insignificant, a lot depends on it.
The service life of the clutch device on domestic cars depends not so much on the conditions of use of the car, but on its mileage. A car owner who likes to squeeze the gas all the way down and drive on the roads will need to change clutch elements more often than a driver who prefers a measured way of driving.
When the wear of the clutch elements reaches the point of no return, the device begins to slip if the engine picks up speed. If you regularly drive with such a clutch, then in the future, and maybe even on the next trip, the driven disk of the mechanism will overheat, which will not allow the driver to continue driving. And even get moving.
A failed UPS that has exhausted its service life
Help, I have a problem! About two weeks ago, the clutch pedal in my car (VAZ 2107) failed! At first I thought that the cable was “covered”. I thought about changing it, but then I saw that the cable was intact. I’ll even say more - the cable is in excellent condition. Then I decided to adjust the rod. Having done this, I was able to travel for about five more days. The pedal has failed again, can you tell me what to do?
And there are hundreds of such questions on the Internet. As you understand, we are gradually bringing the topic to signs of a faulty clutch system. What are the signs that it is time to replace the release bearing of the mechanism? There may be several of them:
- the clutch pedal falls to the floor, although the cable is fine;
- while driving, when pressing the clutch pedal, a slight grinding noise is heard;
- first gear does not engage, therefore, movement can only be started from second speed;
- While driving, some noise appeared, which disappeared when the clutch pedal was depressed.
VPS at the installation site
If at least one sign of a malfunction appears in your car, then it’s time to change the VPS.
What you need to know
The release bearing is not the weakest link in the clutch system, but for some reason it is the one that causes problems and troubles.
Some car owners have gotten used to the whistle and simply ignore it. But this cannot continue for long, since untimely solution to the problem can lead to even more complex and expensive repairs. If the situation gets worse, then a simple replacement will not be enough for you.
The clutch serves to act on the leaf spring of the clutch basket. It is also called diaphragm, so don't be confused if you hear this designation. Due to this impact, the driven disk is disconnected from the flywheel and the pressure plate of the basket. This disengages the clutch.
If the squeezer is faulty, this can lead to various consequences:
- The clutch fork will be damaged;
- The integrity of the clutch spring petals will be compromised;
- The guide bushings are deformed.
In order not to pay twice, or even three times, promptly react to the appearance of a whistle in the clutch and try to quickly take action.
Malfunctions
As a result of vehicle operation, the clutch disc, like any consumable material, can become unusable - the springs weaken, the friction linings wear out and become thinner. Manufacturers do not indicate a specific service life of the disk, because it depends only on the driver: one “clutch” can last only 5,000 km, while another can last 100,000. Increased clutch wear can result from:
- sudden starting at high speeds;
- slip;
- incorrect adjustment;
- participation in racing events;
- leakage of foreign liquids.
Usually there are two faults for which it is worth considering repairs:
- the clutch “slips”;
- the clutch “drives”.
When slipping, the driven disk is not pressed completely against the flywheel. What does this mean? If you sharply press the gas pedal while the car is moving, you may notice an increase in engine speed, but there will be no increase in speed. In the end, the car will someday just stand up and only towing or muscle power can set it in motion. Therefore, the issue of replacing the driven disk should not be shelved.
When the clutch “drives”, uncharacteristic sounds and noises are observed when changing gears, gears are difficult to engage. In this case, the driven disk, on the contrary, does not completely “separate” from the flywheel. In this case, pumping the hydraulics and adjusting the free play of the clutch helps, which can be easily done by anyone in a garage. If you ignore this malfunction, you can run into expensive gearbox repairs.
What you need to prepare in order to repair the clutch yourself:
- A set of keys
- Screwdriver (preferably thin)
- Special pliers-pullers
- WD-40 or similar rust remover
- Knife
- Brake fluid
- Bleeding hose
- Bleeding container
- Syringe
That's probably all that is needed.
Expanding pliers (circlip pliers)
Why it stalls - reasons and their elimination
The clutch usually slips due to the following:
- There is no gap between the pressure bearing and the fifth basket;
- the clutch drive is not adjusted;
- oil gets on the discs;
Depending on the cause of this problem, the repair progress is determined. If the problem is with the diaphragm spring, it will have to be replaced with another one. When the friction linings wear out, the driven disk is replaced. When repairing/removing linings, the gaskets are checked. If they are in poor condition, they are also replaced with new ones. If oil gets on the driven disc, you will need to treat it with kerosene and clean it with fine sandpaper.
Grease may get on any side of the flywheel and pressure plate due to an increased oil level in the gearbox housing or a leak in the rear crankshaft bearing. To solve the problem, diagnostics are performed and the cause of the leak is eliminated - the seals are replaced, then the spare parts are cleaned.
The free stroke according to technical conditions is 30-35 mm, the full stroke is 140 mm. Any deviation from the norm is associated with a malfunction of the transmission and requires adjustment work. The parameter is checked using a ruler. To do this, determine the distance from the pedal to the center of the platform. The adjustment is made on a pit or lift using open-end wrenches 13 by 17 mm and 17 by 19 mm. We clean the adjusting rod and nuts with a brush and treat them with WD-40. Next, the lock nut is loosened, and by rotating the adjusting nut we change the gap. If the free play needs to be reduced, we lengthen the thrust; if it is increased, we shorten it. After completing the work, tighten the locknut.
Damaged release clutch
Checking and replacing the hose on the clutch cylinder
The hose on the clutch slave cylinder is an extremely critical part that is exposed to high brake fluid pressure. Therefore, the car owner must monitor its condition especially carefully.
The clutch cylinder hose is a very important part, the condition of which must be carefully monitored
Here are signs that indicate that the hose should be changed urgently:
- cracks and other mechanical damage visible to the naked eye have appeared on the hose;
- the hose looks intact, but there are visible leaks of brake fluid on it (this means that it is still damaged and microcracks have appeared on it, which the driver simply cannot see);
- The threads on the hose ends are partially or completely stripped.
If you notice any of the above, the hose should be replaced immediately. It is better to install standard VAZ clutch hoses, their catalog number is 2101–16–025–90, and the cost is about 80 rubles.
Hose replacement sequence
Before starting work, you should stock up on an empty plastic bottle and two open-end wrenches: 17 and 14 mm.
- The car is driven into the pit and secured with wheel chocks. Open the hood and find the place where the slave cylinder hose is screwed to the clutch hydraulic tube.
- The main hose nut is held firmly with a 17 mm wrench, and the fitting on the hydraulic tube is unscrewed with a second wrench - 14 mm. After unscrewing the fitting, brake fluid will flow out of it. Therefore, there should be a container in the inspection hole to collect it (a small basin would be the best option).
- The second end of the hose is unscrewed from the working cylinder body using the same 17 mm wrench. There is a thin O-ring in the cylinder under the hose nut, which is often lost when removing the hose. This ring should also be changed (as a rule, new seals come with new clutch hoses).
- A new hose is installed in place of the old one, after which a new portion of brake fluid is added to the hydraulic system.
So, even a novice driver can change the working cylinder on a six. All you need to do for this is to carefully prepare the necessary tools and strictly follow the above recommendations.
Replacing the clutch release bearing VAZ 2107
Clutch adjustment is usually carried out after installation work to replace the clutch mechanism. Correct adjustments will make it possible to continue operating the unit components without failure. Before starting these technological operations, it is necessary to test the hydraulic drive system of the unit for the presence of air in it. If there is an “air lock” in the system, it must be removed. In this case, it is better to replace the vehicle's hydraulic fluid.
The principle of carrying out such adjustment measures is to create the required dimensions between the rod and the piston of the mechanism cylinders, as well as the required dimensions between the release bearing and the friction ring on the drive disk of the unit.
Replacement
So, a description of the sequence of actions when replacing the clutch.
— First, disconnect the terminals from the battery. This will help you avoid short circuit when working.
Let's summarize
Practice shows that to replace the VAZ 2107 clutch cylinder, you can successfully use not only the original, but also its analogues (article 2101-1602615-17, MB01-1602610, A11.1602610, S1939 S3.1). The work often uses French spare parts from the Valeo brand, and German brands Luk, Kraft and Sachs. It is important that your efforts will be justified in any case, since you should not hit the road with a faulty car, and the price of urgently replacing a VAZ 2107 clutch at a car service reaches 5 thousand rubles.
Source
Choose the best
The last point in the question of which clutch is best to install on a VAZ 2107 car will be a short review of the most famous clutch kits for classic cars. Differences in brand products lie in reliability and behavior during operation.
Valeo
The well-known company from France is also known for its high-quality brake pads. Judging by the reviews of car owners, the clutch is characterized by soft operation with a clear engagement moment.
Many note the reliability of the new Valeo kits, which often operate without breakdowns for more than 150,000 km. The disadvantage is the high cost.
World famous German manufacturer of friction clutches. The products have always been distinguished by advanced design solutions. For example, the use of a torsional vibration damper on the pressure and driven discs significantly dampens vibrations, which contributes to comfort. LuK couplings are the best choice in terms of price-quality ratio, however, there are many fakes on sale, so you need to be careful when purchasing.
Kraft
The German brand has been known for 20 years, but recently products under this brand are increasingly being produced in Turkey, which, naturally, makes them cheaper. However, clutches have a lot of positive reviews, including:
- soft squeeze;
- no overheating during heavy duty operation;
- The flywheel has virtually no wear.
Sachs
The German manufacturer has extensive experience in the production of transmission parts. All coupling models are equipped with asbestos-free linings, and they provide:
- Optimal torque transmission.
- Resistant to increased loads.
- No maintenance required.
A domestic enterprise that supplies original products for Lada cars. The design of the coupling was developed by engineers from Tolyatti, but the components used in production are mainly imported. Most car owners, when deciding which clutch is best to install on the classic VAZ 2107, choose this manufacturer. The reason for this choice is the low price and acceptable quality.
Kraft tech
Turkish products licensed from the German company Kraft. The set is characterized by soft operation and is adapted to Russian working conditions. Some of the negative reviews relate to the fragility of the release bearing.
Work on top of the car
So, a start has been made, the goal is to remove the gearbox to replace the clutch. On VAZ 2106 and similar cars this is done quite quickly, it is only important to follow a certain sequence:
- Inside the car, remove the gear shift knob. It is attached using plastic latches. Sometimes difficulties arise with dismantling, and it gets to the point where the latches break off. The price of a new set of fastenings is no more than one hundred rubles, and you can purchase it even after repairs have been carried out. Therefore, do not be afraid if you suddenly break the plastic antennae.
- Go to the engine compartment, unscrew the four nuts that secure the exhaust pipe to the manifold. The fact is that the exhaust pipe will interfere with the removal of the box, but it is enough to move it a little to the side.
- Disconnect the battery and remove it from the car.
- Unscrew the two top bolts of the starter, disconnect the power wires for the windings and the solenoid relay from it.
- Disconnect the ground wire that goes to the gearbox.
Carefully inspect whether there are any “upgrades” on your vehicle specifically that will interfere with the removal of the transmission. If there are any, then make sure that they do not complicate further repairs.