Welcome! It's time to get into the clutch. Grant norm, engine 186, gearbox 2181, mileage 31t. with kopecks, 3 years like from the assembly line. Having read a lot on the Internet + rattling of the release lever (as I thought) + since the spring it began to twitch when starting off. Gradually, over the past five months, the jerking when starting off has increased. It was not comfortable to touch. I had to step on the gas. I waited until vacation to slowly start replacing the clutch. The plans were to change the basket (most likely) and the release lever. But first you need to take it apart, so to speak, perform an autopsy, and then make a diagnosis. This means that to replace the clutch we need a garage with a pit, a car with a manual transmission, two hands, a little gray matter in the head and the actual tool. Since the repair will take place in privacy, first (the day before) you need to purchase 3 bolts 150 mm long (quite enough), I estimated the diameter and thread by unscrewing one of the top bolts and... two hub nuts (in old ones, the thread will pull when unscrewing). 1 first of all, the very first thing is to pull off the hub nuts and unscrew them (I took a cut-off union nut, like a “30” one (it was rusty) and a 40cm pipe), pull off the wheel bolts, DO NOT UNLOCK IT! 2 You can start either from the top or from the bottom, but it is advisable to start from the top while your hands and gloves are clean. 3, remove the air intake and throttle pipe, take other wires and tubes to the side and tie them up so that they do not interfere with us. 4 unscrew the platform, pull off the power fuse block from it and two tubes (fuel and canister valve) are attached to it at the bottom. 5, unscrew the spark plugs to make it easier to turn the crankshaft by the flywheel in the future. 6 remove the starter (three bolts) + disconnect the harness block and the power wire “+” (but it’s more convenient to remove from below, unscrew one bolt at the top and two at the bottom). Under (behind) the starter there is a key bolt at “13” that secures the ignition coil (don’t forget about it).
6(a) we remove the gearshift cable, the principle of the hinge (the horizontal one was pulled off, on the third attempt after a couple of hours, the vertical one still couldn’t. I removed it together with the axle (having previously unpinned it) from (from) the gearshift mechanism. (There’s a little photo below). The nuance is that the fixation mechanism is located on the cable, behind the bracket (in the photo in the same color, gray L = 4-5 cm), it moves back accordingly, if it doesn’t work by hand, pry it with a screwdriver, otherwise you won’t have any luck. bracket (two bolts). Throw the cables over the steering rack rod, tie it a little. 7 fix the bar with the wires to the thermostat, otherwise it will interfere
8 unscrew the two upper bolts and one in front near the starter and tighten our long ones (bought bolts), one by one, not all at once. As they say, with feeling, with sense, with arrangement.
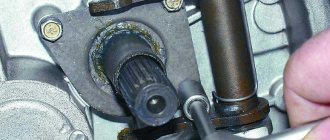
9 this nut is better (it’s more convenient to unscrew when the right drive is removed), but it’s possible without removing it, a knob + a long insert.
10 We unscrew the lower flywheel screen (three bolts with a key *10*) last, before removing the box, since this bolt (see below in the photo) is not convenient to unscrew and remove and install the screen itself. Accordingly, when assembling, we put it first and screw it on!
11 remove the wheels (both), put the car on supports. 12 we climb “into the grave” (under the car in a hole), remove the protection. We drain the oil from the box (a five-minute task). It is advisable to first remove the filler and drain plugs so that they “go by hand”. Then, substituting a clean canister (to use the oil in the future), unscrew the drain plug. If you unscrew the filler plug first, the pressure will be higher, we will cheat a little. 13, remove the screen of the right drive (at the CV joint, grenade, whatever). The right one is in the direction of travel, of course. We unscrew the ball (E12 sprocket head (who hasn’t changed it)). We move the rack to the side, pull out the CV joint (outer) from the hub. Most likely you will have to knock it (it sits on the splines) out of the hub a little. When dismantling the right-hand drive, it is advisable to turn the wheels to the right (the hub will interfere less). 14 on the left side you need to remove the lower lever along with the saber (stretch). Personally, it bothers me when you work alone. We remove the left drive in the same way. 15 place a jack (preferably a diamond jack, it is possible to lower the engine lower) under the engine sump). It is advisable to lift it later by moving the jack under the box. 16 unscrew the clutch cable bracket on the left support of the box, then you will have access to the support nuts and two pillow bolts (head on *15* both here and there) fa.d-cd.net/cc36678s-960.jpg (—//— ). 17 remove the rear support (three bolts on the box, two nuts on the body) 18 lower the box so that it goes under the wing. — after lowering, we remove the gear shift mechanism itself (three bolts), prying it a little (it sits on the sealant) and plug the resulting “hole” (no matter how rude it sounds) with a clean rag (rag) to prevent dirt from getting in during the work.
19 After everything that gets in the way has been removed, we extend the box to the full length of the bolts, adjusting with a jack.
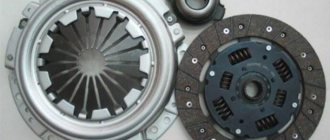
I took it off and shortened the basket and disk, everything is fine there. The disk and basket are “Valeo” from the factory. On the basket, a couple of petals were almost out of plane (one of the reasons for the twitching). The disk was alive, the springs did not dangle (did not rattle), by the way, weak springs are the second reason for jerking and they are trying to replace such a disk.
Why did it happen so?
Perhaps the automatic requests do not belong to you, but to another user accessing the network from the same IP address as you. You need to enter the characters into the form once, after which we will remember you and be able to distinguish you from other users exiting from this IP. In this case, the page with the captcha will not bother you for quite a long time.
You may have add-ons installed in your browser that can make automatic search requests. In this case, we recommend that you disable them.
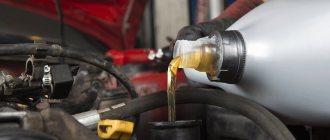
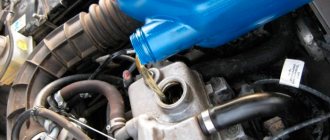
It is also possible that your computer is infected with a virus program that is using it to collect information. Maybe you should check your system for viruses.
If you have any problems or would like our support team, please use the feedback form.
Replacing the clutch on a Lada Granta takes from 3 to 8 hours. Replacing the Lada Granta clutch is done only with the removal/installation of the gearbox. On some models, to remove the box you need to remove the subframe. It is best to determine what exactly to change: the disk, basket or release bearing after the box is removed.
The decision to replace the clutch on a Lada Granta must be made after diagnostics at a car service center. Some symptoms may be similar to a faulty transmission or gearshift mechanism. On robotic gearboxes (robot, isitronic, etc.), after replacing the clutch, you will need to adapt the grip point. This can be done at our stations.
Cost of replacing a clutch on a Lada Granta:
| Replacement options | Price |
| Replacement of clutch Lada Granta, manual transmission, gasoline | from 4500 rub. |
| Replacement of clutch Lada Granta, manual transmission, diesel | from 5000 rub. |
| Lada Granta clutch replacement, DSG, robot | from 8000 rub. |
| Clutch adaptation of Lada Granta | from 2500 rub. |
| Removal/installation of Lada Granta subframe | from 3000 rub. |
If you notice that the clutch begins to behave differently than before, we recommend that you immediately contact a car service for diagnostics. If you start this moment, then subsequently, in addition to replacing the clutch on the Lada Granta, you will also have to replace the flywheel. And the cost of a flywheel is several times higher than the cost of a clutch kit.
When replacing the clutch, we also recommend replacing the crankshaft rear oil seal and replacing the axle shaft seals. When replacing a clutch, a good mechanic will always pay attention to the condition of the gear selector rod seal. The cost of seals is minimal and it is better to do everything at once without overpaying for the same work in the future.
Finding the reason
One of the owners of a Lada Kalina (VAZ 11194) decided to check where there was such noise from the transmission in the cabin. With the help of spot wiretapping, he was able to find out that some of the vibrations from the gearbox are transmitted to the cabin through the clutch cable. This was confirmed by a simple experiment:
- raised the front wheels
- turned on first speed
- raised the speed to 4500-5000 rpm
- Reduced the speed to 1500 rpm using the brake pedal without releasing the gas pedal
Then, the same thing was done with the clutch cable disconnected from the gearbox fork. The familiar sound of “hrrrrr.” "disappeared. The sounds were recorded in an mp3 file (before the pause - with a cable, after - without it). Site users can download the file:
To download files you need to log in to the site.
Conclusion : the clutch cable is a transmitter of vibrations from the gearbox fork.
A similar situation may occur on Lada Grant and Priora cars.
Preparatory stage before replacing the clutch on the Lada Grant
Necessary tools, materials:
- set of car keys, sockets, ratchet;
- extension;
- calipers;
- additional lighting;
- screwdrivers with a set of bits;
- mounting blade;
- pliers;
- hammer;
- metal brush;
- hydraulic (mechanical) jack;
- cylinder and torque wrench;
- graphite-based lubricant “CV joint-4”;
- container for draining waste;
- 6 liters of gear oil;
- clutch assembly;
- wooden spacers;
- rags.
Types and design features
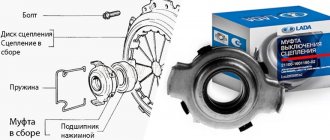
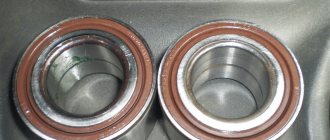
In the design of a car clutch, two types of release bearings are used:
The main elements of release bearings are closed ball or roller bearings. They are used on both mechanical and hydraulic types of products. Their design also includes a housing.
In mechanical elements, this housing is designed to interact with the clutch drive fork. Such units can have a very different design (the housing is presented in the form of a bushing inserted into the inner race, or it is installed on the outer ring), but all housings have special protrusions on which the fork acts. In general, in mechanical bearings, housings are designed for just this.
Clutch diagram of a VAZ car - 2107 1 - flywheel; 2 — clutch driven disc; 3 — clutch basket; 4 — release bearing with clutch; 5 — hydraulic clutch reservoir; 6 - hose; 7 — master cylinder of the hydraulic clutch release; 8 — servo spring of the clutch pedal; 9 — clutch pedal return spring; 10 — clutch pedal travel limit screw; 11 — clutch pedal; 12 — hydraulic clutch release pipeline; 13 — ball joint fork; 14 — clutch release fork; 15 — release spring for clutch release fork; 16 - hose; 17 — working cylinder of the hydraulic clutch release; 18 — clutch bleeder fitting
Signs of clutch wear
| Sign | Cause and remedy |
| Incomplete engagement of the clutch (slips) | Replacing discs, cleaning clutches |
| Incomplete shutdown (leading) | Prevention of the clutch mechanism |
| Periodic jerks | Clutch cable wear, clutch replacement |
| Vibration, beating when shifting to higher gears | The flywheel is bent, the gripper teeth are worn out. Replacing the flywheel and related consumables |
| Noise, creaking, grinding noise when activated | Damper spring wear, replacement with a new one, drive lubrication |
| Pedal free play is increased, exceeding 2 -3 mm | Tensioning the cable, replacing with a new one |
| You can hear the smell of burnt friction linings | Dismantling the clutch block, replacing worn elements |
| Increased fuel consumption | Flywheel worn, teeth damaged |
| Reduced acceleration dynamics | Replacing clutches |
Operating principle
The classic dry clutch design used on passenger cars is permanently closed. The design of such a unit includes a basket with a drive disk, which is bolted to the flywheel. Between them there is a driven disk mounted on the splines of the gearbox input shaft. Due to a powerful diaphragm spring, the driven disk constantly presses the drive disk against the flywheel, which is why this circuit is called closed.
The task of the release bearing is to open the flow. The driver, pressing the clutch pedal, uses a drive to move the bearing along a guide sleeve mounted on the input shaft towards the basket. Due to the force of the driver's foot, this bearing presses on the diaphragm, resulting in the movement of the drive disk along the guides inside the basket. It moves away and releases the driven disk - the transmission of rotation is interrupted. After releasing the pedal, the bearing moves towards the gearbox, and the spring returns the drive disk to its place - the flow resumes.
Review of Manufacturer Prices
| Manufacturer article number | Price, rub.) | Resource (Thousand km) |
| Set of wheels LADA 2190-316010001 | From 3100 | 85 — 105 |
| —/— 2190-31601000 | —/— | —/— |
| —/— 302050901 | —/— | —/— |
| —/— 302052223 | —/— | —/— |
| —/— 302052307 | —/— | —/— |
| LADA 21810160118001 clutch | From 650 | 80 |
| LADA 21090160119000 input shaft guide | From 750 | 75 — 80 |
| LADA 21010160121500 fork support | From 150 | 75 – 95 |
| LADA 21810160120001 plug | From 800 | 85 – 95 |
| Connecting spring fork and clutch 21010160118800 | From 350 | 85 — 95 |
*prices are current as of October 30, 2018.
Recommendations for the selection of parts and components
The vast majority of spare parts are provided by domestic manufacturers. Foreign analogues are 10-17% more expensive. The manufacturing quality of the parts is approximately at the same level.
In order to prevent the purchase of counterfeits, use the services of official representative offices, dealer centers, and authorized service stations.
Lately, ordering parts with their subsequent installation directly in workshops has become popular. The advantages of this choice are professional installation, prompt delivery, and a guarantee.
Lada Granta clutch diagram
List of online stores selling parts (Moscow, St. Petersburg, Kyiv regions)
| № | Name | Address |
| 1. | "VIN code" | VIN-code.rf/ |
| 2. | "Avtopiter" | https://www.autopiter.ru/ |
| 3. | "DvizhCom" | https://dvizhcom.ru/ |
| 4. | "BaltKam" | https://www.baltkam.ru/ |
| 5. | "Elite" | https://eshop.elit.ua/ |
| 6. | "Clan" | https://klan.com.ua/ |
Car radio
Step-by-step instructions for installing a radio in a Lada Granta of the “standard” or “norm” modifications:
- Hook the central pocket-plug by the edges to remove the latches from engagement with the front frame.
- After removing the element from the socket, it is necessary to disconnect the plugs of the factory wiring harness, located in special sockets on the rear part. The car has 2 8-pin connectors for connecting power and speakers.
- Fold the glove box housing down; there are travel stops on the upper part of the rear wall that need to be disengaged from the dashboard frame.
- To expand the working area, it is recommended to remove the cover by pulling it towards you.
- Raise the decorative floor covering of the car along with the soundproofing mat near the passenger seat. Pull out the factory antenna cable equipped with a plug that needs to be extended to the installation location of the player.
- Place standard slides for attaching the radio using special bendable elements.
- Further installation of the radio in Grantu is carried out after switching the loudspeakers.
Installing the stock radio is slightly different from the procedure described above:
- Since the standard frame is designed for 1DIN size equipment, a replacement unit is required. To do this, you will need to carefully pry and remove the plastic climate control controls. The frame itself is fixed with latches, which are removed one by one from the mounting sockets using a plastic spatula.
- For final dismantling, it is necessary to disconnect the connectors connected to the control buttons for the air conditioning, hazard warning lights and heated rear window. It is necessary to make notes that will allow you to correctly connect the plugs on the new panel.
- Remove the keys, climate control parts and ventilation deflectors from the center console, which are transferred to the new unit.
- The “luxury” version of the cladding, designed for mounting a 2DIN radio, consists of 2 sections. The lower part is equipped with additional fastenings with screws, under which it is necessary to install counter elements. The parts are placed in standard places around the perimeter of the instrument panel in the upper and lower parts of the landing window.
- Place a separate adapter frame, which is supplied with the head unit, in the mounting socket of the radio.
- Place the cladding in place, securing the part with latches and screws. The switching cables for acoustic equipment and control buttons are routed through the corresponding holes into the car interior.
- Install a standard player into the guide slides, having previously connected it to the on-board network and antenna. The assembly is secured with side latches; if dismantling is required, the clamps are bent with a screwdriver.
- Install a horseshoe-shaped decorative cladding located around the perimeter of the central part of the decorative panel. Reinstall the plugs for the hazard warning, air conditioning and heated glass buttons, and then place the keys in the standard sockets.
When installing non-original equipment of 2DIN size, the owner is faced with the impossibility of placing the radio in depth. To ensure the fit, trimming of the plastic elements located in the instrument panel is required. The player is fixed in the mounting shaft located in the window of the central cladding; the display is framed from the outside by a transition frame.
Reviews
| № | Positive |
| 1. | Vladimir: I have been successfully using the machine for two years now, there are no comments on the work. Investments are minimal, consumables, filters, oils. |
| 2. | Gennady: I attend every scheduled maintenance according to the schedule. The car is in good condition, the technician is carrying out computer diagnostics. Soon the mileage will be 90,000 km, I hope that repairs will occur after 105,000 km. |
| 3. | Vasily: at 60,000 km I replaced the cable, it started to creak, I didn’t lubricate it, I bought a new one. There are no more comments, everything works properly. |
| 4. | Ignat: I have no special complaints about the car. Of course, Lada is not ideal, but for the budget segment it is the best solution. |
| 5. | Dmitry: at 80,000 km I replaced the repair kit for the bushings on the clutch pedal, it started to creak. Additionally, I lubricated the cable. My recommendations to motorists. All work was carried out independently, without the help of service station workers. |
| 6. | Kirill: I replaced the clutch at 95,000 km, I think that this is a very good mileage for a domestic car. The installation process is not complicated, I did the work myself. Special thanks to the store manager for recommending quality spare parts. |
| 7. | Georgy: replaced the release bearing at 105,000 km, mileage as in the instructions. There are no problems with the engine, the car runs like a watch. |
| Negative | |
| 1. | Victor: my bearing fell apart at 50,000 km, it was replaced at a service station. After 10,000 km the cable creaked and was also replaced with a new one. The Granta model is crude, has many flaws, I do not recommend purchasing it. |
| 2. | Vyacheslav: over the past six months it has undergone unscheduled repairs twice. Initially, the basket flew off after a problem with the starter. |
| 3. | Kirill: despite the manufacturer’s warranty, the clutch basket has already flown for 60,000 km. Contacted the service for diagnostics and repairs. The manufacturing quality is low, the actual service life of the parts is lower than stated. |
Conclusion
The clutch installed on the Lada Grant is copied from the Lada Kalina. The mechanism has proven itself well, the warranty period is “nursing” (100,000 km).
A number of negative reviews about the Lada Granta are unfounded. Many unit failures are associated with violation of operating conditions, aggressive driving style, and failure to comply with technical inspection deadlines.
Often the reason for premature clutch wear is that drivers save money on monthly maintenance and purchase cheap spare parts. After all, a low-quality part cannot work for a long time without breaking.
How to check the release bearing on Kalina and how malfunctions manifest themselves (noisy or buzzing)
To understand whether your Kalina needs to replace the clutch, you must first react in time to signs of failure and diagnose the unit. Signs of a faulty Kalina release bearing:
- Noise or hum when pressing the pedal (damaged, insufficient lubrication or jammed);
- Difficulty pressing the pedal occurs when the coupling ear is broken, as well as the spring is deformed;
- These videos clearly show when the Kalina release bearing is faulty (noise, buzzing, knocking, creaking), as well as how to check the release bearing.
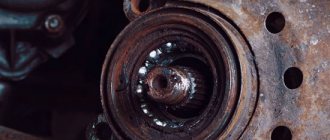
How to remove the release bearing from a Lada Kalina - location of the part and gearbox mounting diagram
As mentioned at the beginning of the article, to correctly replace the VP and dismantle it, you will need to remove the gearbox. Below is a photo of the transmission from below. To dismantle the manual transmission, you will need to disconnect all the components under the hood that are attached to it. Next, the wheel drives and front suspension elements are removed. Then the manual transmission is unscrewed from the “engine” and removed. Inside the “head” of the clutch housing is the release bearing itself.