Hello, dear friends! I think many people are interested in an effective connection diagram for DRLs, that is, daytime running lights.
For several years now, there have been rules in the country according to which, when driving a car during the day, you should indicate your presence with the help of appropriate headlights. Fog lights, low beam headlights and the DRLs themselves are used as such lamps.
The use of fog lights and headlights has objective disadvantages. Therefore, it is best to connect the DRLs from the generator or battery yourself.
There are various ways and schemes for implementing the idea. Some do this without a relay, others combine DRLs with turn signals, others even control the daytime lights with a separate button, etc. To do everything right, you need to know some important points. And then automatic activation will be carried out without violating traffic rules.
Wheels on cars: what they are and how to choose them
The regulations state that the circuit should be used in such a way that the drive wheels turn on automatically when the key is turned in the ignition switch. That is, when starting the power plant. But DRLs are also required to turn off automatically as soon as the main beam headlights come on. Here, as you understand, we are talking about the headlight unit (low or high beam). There is also a rule indicating that the head light should turn on only when the headlights turn on. The exception is short-term signals to warn other drivers.
Based on the above, we can safely say that you should not output the DRL through the button. The same as through the handbrake. But you can install it in turn signals, but you will need to connect 2 additional wires from each turn signal.
All this is extremely important to take into account when connecting the movers. After all, you should be concerned not only with the fact that the light bulbs do not burn out. Although this is an extremely significant point.
Without a well-thought-out and competent scheme, you will definitely not be able to install DRLs yourself. After all, everything should work with a shutdown when the high or low beam is turned on.
There are a number of schemes according to which, in theory, you can install DRLs on your car if they are not included in the standard configuration of your vehicle. The only question is which scheme is better to use.
An important role is played by the voltage stabilizer, which is a subject of much debate when using diode running lights. The DRLs themselves are equipped with resistors that act as a current limiter. But during voltage surges, they are not able to maintain the voltage at a single level. Therefore, it is correct to assume that the use of a stabilizer in such a scheme will be mandatory and necessary. Otherwise, the service life of the DRL will be significantly reduced due to regular voltage drops. Although some still believe that the connection can be made without a stabilizer.
It is worth considering several schemes separately, drawing appropriate conclusions from them and making a final decision for yourself.
How to choose DRL?
The requirements that must be taken into account when installing DRLs have already been described above.
If you want your running lights to comply with traffic rules and GOST, you should pay special attention to their selection. After all, a lot will depend on what kind of road running light you decide to install on your car.
The highest quality products are produced by companies such as Hella and Philips Osram. It is worth choosing them not only because they meet all the standards, but also because they can make your journey on the roads as safe as possible. There are usually no problems with the products of the brands presented above when the car is diagnosed at a service station. Homemade devices cannot meet all requirements.
Usually there are no difficulties with installing DRLs. The only thing that can cause you inconvenience is a violation of the integrity of the car’s structure. This problem is most common among drivers who bought their car before the law on the mandatory use of DRLs came into force.
If you have an old car that does not have DRLs, then you will have to collect a lot of paperwork to obtain permission to make changes to the vehicle. In addition, you will also have to put in a lot of effort to install running lights. After all, to do this you will have to create holes in the bumper and deal with the electronics.
Hotlines:
Moscow:
+7, ext. 206 St. Petersburg: +7, ext. 997 Regions of the Russian Federation: +7, ext.
669 .
Applications are accepted around the clock, every day. Or use the online form.
It couldn't be simpler
This is the simplest scheme, which involves connecting to a battery or generator as a power source.
The scheme provides that the DRLs will be activated simultaneously with the engine starting. The point is to connect the plus to the positive terminal from the ignition switch of your Renault Logan or the same Lada Largus, and fix the minus on the car body in any convenient place. Everything looks simple and extremely logical. But you should not rush to conclusions, nor should you make such a connection. After all, it has an obvious drawback.
If the system is assembled according to this scheme, the diodes from the DRLs will start working constantly while the key is in the ignition switch. There is no question of any coordination with other headlights here. Therefore, such a connection contradicts GOST and traffic regulations.
Connection via 5-pin relay
Now it's time to learn how to connect running lights via a five-pin relay. The scheme is the most universal, and was assembled to eliminate the disadvantages of previous options.
First, about connecting the relay for DRLs:
- 30 – to the positive terminals of LED modules;
- 85 – to the positive wire of the side lamp;
- 86 – on the car body;
- 87a – to “+” from the ignition switch;
- 87 – do not connect (isolate).
The circuit with a five-contact relay works as follows. When you turn the key, +12 V is supplied to the DRLs, thereby turning them on. If you turn on the side lights or headlights, the relay will open contact 87a and close inactive contact 87. As a result, the DRLs will go out and the side lights will turn on. The circuit fully complies with the requirements of GOST and traffic regulations and can work with side lights even based on LEDs.
However, the circuit still has one negative point - the DRLs will turn on immediately after turning the ignition switch. That is, if you turn the key in the ignition but do not start the car, the DRLs will light up.
Despite the existing drawback, the circuit is quite successful, but in order to correctly connect the DRL via a five-pin relay, you will need to supplement the circuit with a voltage stabilizer.
This switching option is interesting because the path of current flow through the running lights is independent. This allows you to install light sources of any type and power in headlights and DRLs.
Low beam or dimensions
You can also connect to the side lights or low beam headlights. In theory, everything here also looks quite simple, interesting and promising. The first of the schemes under consideration provides that you will use an electrical circuit that powers the size lamps. Here the plus from the DRL is connected directly to the battery as a power source. But the minus goes to the plus of the dimensions. At such a moment the latter will be electrically neutral. Thus, the current flows from the plus of the battery through the diodes to the dimensions, and then through the lamp to the housing, where the latter acts as a minus of the created electrical circuit.
Since the level of current consumption will be small, the diodes will start to work, but the size lamp will not turn on.
As soon as the driver switches to the dimensions, a voltage of 12V will appear on its positive side, the potentials will be equalized on the DRL wiring and the diodes will go out. The circuit will begin to operate in normal mode, supplying current to the dimensions.
Everything seems to be fine. But again, conclusions were drawn hastily.
The scheme is simple and working. It just has a few drawbacks:
- The drive trains will remain active when the engine is switched off. This directly contradicts current laws;
- If the dimensions are equipped with LED lamps, such a circuit will immediately become inoperative;
- Operation will not be correct when using powerful SMD diodes as part of DRLs;
- To provide additional safety, you will have to add a fuse to the circuit.
To avoid the first drawback, the circuit is slightly altered. The positive from the LED module is taken not from the positive of the battery, but through the positive of the ignition switch.
The second scheme involves activating the DRL using a low beam lamp. The point is that when the low beam is turned on, the walkers are turned off, and the rest of the time they work.
There are the same disadvantages here as for the previous scheme. That is, it contradicts GOST and traffic rules.
see also
Comments 17
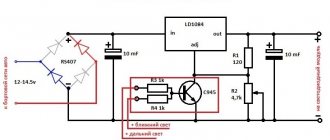
Does your charge light come on when connected to the relay?
Connected according to the diagram. The charging lamp is on. The diode is installed. The lamp is still on. Maybe you need to add resistance? Or are there other options?
check the diode, it may be broken
Connected according to the diagram. The charging lamp is on. The diode is installed. The lamp is still on. Maybe you need to add resistance? Or are there other options?
and correct connection to the relay
The diode is intact. The relay is connected correctly. Can a transistor be connected in front of the diode?
The diagram is correct if you connect the DRL instead of the low beam
a diode is needed so that when the DRL is turned on, the charging lamp does not light up
Your circuit is a little wrong... Look at ledjournal.info/shemy/pod...nykh-khodovykh-ogney.html there is a correct and 100% working circuit, tested personally. Although it is still better to connect the DRLs via a 5-pin relay.
not correct - because at night the DRLs should be turned off, but yours are always on and off when turned on, the BS are constantly on again
Just now I came up with an option (you just need to try it out) Take your circuit or the switching circuit from the fuel pump, but only connect the negative wire of the DRL lamps (better than LED ones) not to ground, but to the plus of the low-beam headlight lamps. We get the effect - when you turn on the low beam, the DRLs turn off automatically (since there is a plus on the wires instead of the required minus), and when you turn off the low beam, the DRLs light up according to your circuit (only the minus goes through the minimum resistance of the filament of the halogen low beam lamp, which is always connected to minus). And when you turn on the high beams, the DRLs will of course light up (well, to hell with them, the high beams are blinding anyway). In short, like at home, maybe someone remembers such switches with LED or neon lighting. So the principle is the same :-)))
The cheapest foreign cars to maintain: reliable and inexpensive
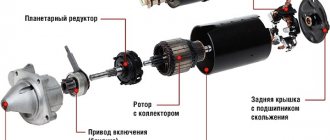
These are two more methods worth considering. A 4-pin relay, a generator and an oil pressure sensor will be used here. But not in a single chain.
Both schemes assume that the DRLs will turn on only when the engine starts. The system is powered by a generator and is based on switching a 4-pin switch and a reed switch.
The connection of the relay contacts looks like this:
- Pin 30 goes to the plus of the LED module;
- Contact 85 goes to the plus of the wire to the dimensions;
- Contact 86 is required for any output from the reed switch;
- 87 contact to the positive terminal from the battery;
- Also, the second terminal from the reed switch goes to the battery plus.
After connection, configuration must be carried out. Here you need to start the engine and start moving the reed switch near the generator in order to get the movement and stable operation of the movers. Then the reed switch should be removed into a special thermal tube and fixed.
If there is no reed switch, then power for the DRL can be supplied through the oil pressure sensor. Then contact 86 goes to the pressure lamp, but otherwise the circuit remains in its original form.
The schemes are excellent in many ways. But they cannot be used in situations where the dimensions are based on LEDs. This is the only significant drawback.
Connection via a 4-pin relay from a generator or oil sensor
The following two methods have a common basis and imply the operation of daytime running lights only after the engine is started. The circuit for switching on DRL from the generator is based on switching a four-contact relay and a reed switch.
The DRL relay contacts are connected as follows:
- 30 – to the positive terminals of LED modules;
- 85 – to the positive wire to the dimensions;
- 86 – to any reed switch output;
- 87 and the second terminal of the reed switch - to the “+” of the battery.
After checking the reliability of all contacts, proceed to setup. To do this, start the engine and, by moving the reed switch near the generator, achieve its activation and a stable glow of the DRL. Then the reed switch is hidden in a thermal tube and fixed in the found place using nylon ties.
At the moment of starting the engine, and then the generator, the contacts of the reed switch and relay close, supplying power to the LED running lights. In this case, the side lamps remain turned off, since the current through the relay coil is small to light them.
In the absence of a reed switch, you can power the DRL from the oil pressure sensor. In this case, pin 86 is connected to the oil pressure lamp. The rest of the circuitry is duplicated.
Both schemes have a common drawback. They cannot be used if LEDs are installed in the dimensions.
How to clear customs of a car and trailer: rules and procedures in 2019
To get rid of the disadvantages of previous schemes, a connection option via a 5-pin relay is used.
The relay is connected as follows:
- Contact 87 is not connected and is simply isolated;
- 87a goes to plus to the ignition switch;
- Pin 86 is needed to connect to the housing;
- 85 goes to the positive wire from the side lights;
- Pin 30 is output to the plus of the DRL LED module.
By turning the key in the lock, 12V begins to flow to the DRL, which allows the running lamps to light. When turning on the headlights or headlights, the relay opens contact 87a and closes contact 87. Thus, the running gears turn off and the other lights turn on. This scheme is good because it complies with GOST and traffic regulations. Plus you can use diode dimensions.
Here it is recommended to use a voltage stabilizer. The only drawback of the scheme is that when you turn the key without starting the engine, the DRLs will light up.
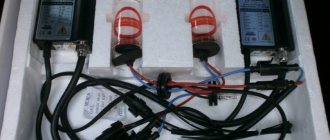
DRL control unit
The most reliable and simplest option is to connect DRLs without a relay, but using a special running lights control unit. It ensures that the DRL turns on after starting the engine, guarantees safe operation, protects against overloads and can be installed on cars with any type of lamps, including LEDs.
Unfortunately, among the variety of industrially manufactured DRL units, the vast majority do not comply with GOST and have mediocre build quality.
Among all the diversity, only 2 options can be noted: the Russian DayLight+ DRL control unit and German products from Philips and Osram. The DayLight+ control unit was developed by Russian radio engineer Fedor Isachenkov, taking into account all the features of the vehicle’s on-board network and has a number of positive aspects:
- there is built-in voltage stabilization;
- full compliance with GOST;
- the maximum long-term load power is 36 Watts (significantly less is required for DRLs);
- simplest connection diagram.
In addition to the points described above, the DayLight+ unit is universal and is suitable for all cars with an on-board 12-volt network, and also has good build quality and a high degree of protection from moisture and dust. German products from Philips and Osram also have all the above-described advantages of the DayLight+ unit, however, German control units are supplied only together with daytime running lights and are more expensive.
Today, daytime running lights (DRLs) are an integral part of automotive lighting technology. In our country, starting in 2010, amendments to the traffic rules came into force, requiring (according to clause 19.5) that during daylight hours on all moving vehicles, for the purpose of identifying them, either low-beam headlights, or running lights, or (according to clause 19.4) fog lights. The number of old cars without standard DRLs on our roads is still high.
Most of the drivers of such cars, in the old fashioned way, as prescribed by traffic regulations, drive with low beams during the day. This leads to increased fuel consumption, as well as frequent burnout of the headlights, instrument panel and taillights involved. But many may not be aware of the most unpleasant consequence of such use of low beam, and this is nothing more than accelerated burnout or darkening of headlight reflectors with subsequent deterioration in the characteristics of low and high beam. That is, the headlight simply stops illuminating the road at night and in this case must be completely replaced.
Another part of drivers mistakenly believes that side lights can be used as DRLs, thereby risking a fine for driving without the appropriate light.
The rest of the drivers, the most advanced and progressive, of which I include myself, are those who install additional LED lights. But even here it is not without certain problems, errors and subtleties, which I will now try to talk about using the example of three implemented LED DRL options (English: DAYTIME RUNNING LIGHTS). Namely:
Recommendations from auto experts
What advice from experts should be taken into account when installing optics:
- All wiring must be carefully insulated; to ensure greater reliability, several layers of electrical tape can be used. Please note that there are high temperatures in the engine compartment, and this can lead to melting of the existing insulation. Moreover, an additional layer of insulation will prevent the negative impact of water on the system.
- It is advisable to secure all wires with zip ties where possible. This approach will ensure better wiring reliability.
- Use DRLs only from well-known manufacturers, so as not to subsequently encounter the problem of premature failure of the optics.
- When installing optics, be sure to follow the installation requirements. If the installation is carried out incorrectly, this may raise unnecessary questions from the police. We have already written in more detail about the requirements here.
- When buying lamps, pay attention to their housing. The entire structure must be made in the most reliable manner; any damage or cracks are not allowed. The glass of the lanterns should also be as strong as possible so that it does not crack at the first damage.
- The best option for installing daytime running lights is in the recesses on the front bumper, next to the fog lights, if any. Alternatively, you can choose a mounting location under the top of the engine radiator cross member. In any case, the main thing is that the installation location of the optics meets the requirements.
- If you bought DRLs of average cost, then check their housing for leaks. As a rule, in inexpensive options, the tightness leaves much to be desired, and this can lead to the bulbs burning out as a result of water getting inside the headlamp.