Hi all! Oddly enough, even modern cars purchased at a dealership are not always standardly equipped with such a simple element as an armrest. This forces many motorists to make an armrest with their own hands and install it in the car.
Today we’ll talk about how you can assemble a similar design for cars. A number of car enthusiasts are naturally interested in how to make a hand support, what scheme can be used, and whether it is easier to buy a ready-made version.
These are the questions we will discuss with you today.
Why is this necessary?
By the way, we have already talked about how to choose an armrest. Therefore, I advise you to follow the link and re-read this material. An option for those who do not want to pick up drawings, draw diagrams, saw or cut something out.
The main thing here is to choose the right model, based on the key characteristics and your own requirements.
Oddly enough, not all drivers understand why an armrest is needed. A regular one, or a folding one, inside of which you can put various small things, the same car fragrance, money, a flashlight, etc.
They have several functions:
- This is a support for the hand, allowing you to rest during the trip;
- if there is a built-in drawer, the armrest becomes additional storage;
- the design may have a stand for water and coffee;
- This is a platform for additional buttons.
The functionality is really extensive. But still, the main task is to ensure comfort and relaxation.
Master Class
Do-it-yourself camouflage on a car
If the layout has been fully approved by you, it can be used as a pattern.
- The contours of all parts are transferred to the lumber;
- The components are cut out with a jigsaw;
- The body is assembled according to the drawing. Just in case, you can first attach it, try it on the car, and if it doesn’t fit, correct it;
- If your handbrake is located in a slot in the armrest, keep in mind that the tree will be visible through it. Therefore, the insides of the box need to be painted or covered with material;
- Foam rubber is glued to the outside of the lid. By the way, it can be replaced with ordinary kitchen sponges. It is better to lay felt on top of the softener: it will prevent the foam from quickly denting. Or lay the last one in 2-3 layers;
- The lid is covered with the selected material;
- A loop is placed connecting the lid and the box itself;
- The armrest body is covered with leatherette. Sometimes they simply cover the walls with it, but this is not the best idea: an accidental cut and you will have to tear off the covering with your teeth. It is better to use wallpaper nails or a furniture stapler for these purposes.
using LED strip
Do it yourself
Interestingly, an armrest can also be made for the back seat, although it is less useful than in the front. This is true, for your information.
The work begins with preparatory activities. First, I advise you to re-read the materials about armrests for Renault Logan. We also discussed the issue of choosing and assembling armrests for the Lada Largus.
Based on these examples, we can conclude that the first step is to take measurements for the future design. Everything here is individual, depending on whether the armrest fits a Grant, Renault Sandero, Hyundai Solaris or any other car. The sizes and distances are different everywhere.
You need to know the following:
- distance from driver to passenger seat;
- driver's elbow height;
- distance from the raised handbrake to the back of the chair;
- maximum height of raised handbrake;
- distance between belt buckles.
This will allow the structure to be made at the optimal height, but so that the armrest does not interfere with the rear passengers, does not interfere with the latching of the seat belts, and allows the handbrake to be pulled out normally.
Types of car armrests
There are different types of car armrests. They come with or without an internal compartment (bar) for storing various small items, and even with backlighting inside. There are three main types of such homemade products.
A simple armrest without a folding cover. It does not allow you to store small items inside. The accessory takes up little space, does not interfere with driving at all, and looks elegant and compact.
For those who need to store glasses, cloths for wiping the interior and exterior, and other small items, you can make a product with an opening top. There is space inside to store various items. This armrest will be a little larger and more voluminous.
There is also a third type of armrests. In them, the interior space is illuminated with a specially installed light bulb. It lights up when the storage compartment is opened. This is very convenient in the dark. The backlight makes it easy to find the desired item in the dark.
There are other types of armrests. For example, you can make a product that has several compartments for storing different items. Or you can come up with a completely original and unusual detail that will fit well into the interior of the car and will perfectly perform its function.
Selection of material
When planning to make an armrest with your own hands, installing it in the seat, you should select the material. Such structures are rarely made from wood.
Homemade supports are mainly made of chipboard or plywood. Although a solid board may be suitable, but not more than 7-9 mm thick.
If you plan to make a complex structure with curves, only plywood will do.
Since the structure will need to be covered, here in addition prepare something from the following list:
- foam;
- polyurethane foam;
- eco leather;
- skin;
- textile;
- dermantin, etc.
Here you will decide the external aspects yourself.
Upholstery with leatherette
For a novice car enthusiast, the process of reupholstering a finished armrest can cause difficulties, so let's talk about it separately. But first, let's define the tools.
Consumables and tools
To make an armrest with your own hands you will need the following materials and tools:
- material for upholstery (previously selected leather or leatherette, the color of which matches the color of the interior trim);
- scissors;
- masking tape;
- black marker;
- silk threads;
- sewing machine.
Sequence of operations
- The finished product is carefully covered with masking tape. Then the places where the seams will go are marked with black lines.
First, the armrest to be pulled is covered with masking tape. - After this, the tape is carefully cut along the lines.
Masking tape is cut along the lines and removed from the armrest - The resulting pattern is applied to the material for the constriction and outlined. Next to the outline you should leave a margin for hemming seams approximately 2 cm wide, as shown in the photo.
The pattern pieces are placed on leatherette and outlined - All the necessary fragments are cut out of leatherette and stitched together on a machine. The resulting cover is placed on the armrest.
Armrest covered with leatherette
So, making an armrest for a car is not as difficult as it might seem at first glance. Only working with a sewing machine while reupholstering can cause certain difficulties, especially if the car owner is a man who has a vague idea of what cutting and sewing is. But with due patience, you can deal with this problem.
Copywriter with five years of experience. (2 votes, average: 5 out of 5)
Force tool set: review, reviews, which one to buy
You can see ideas in photos and videos, or take a completely finished design with all dimensions as a basis.
To begin with, a simple sketch drawn by hand on a sheet of paper will do. But the future project should include the following elements:
- all sizes up to millimeter;
- radius of bends, if any;
- mounting holes and their diameter;
- types of fastening elements;
- penetration depth of fasteners;
- location of hinges for the hinged lid;
- type of loop, its dimensions;
- fixation method, etc.
That is, every detail is important.
There are no trifles here and cannot be. Any mistake can lead to very unpleasant consequences.
Tuning the Gazelle's interior
The three of us in the cabin of the on-board Gazelle are frankly a bit cramped. But if you convert the right sofa into a single chair and forget about the second passenger, it will turn out luxurious. The Gazelle's interior is covered in white leather to enhance the feeling of luxury.
The “gentleman’s kit” for tuning the Gazelle’s interior usually includes:
– equipping doors with electric window lifts;
– replacing the standard heater with a more efficient one;
– installation of ergonomic seats;
– installation of audiovisual equipment;
– production of a ceiling console (or shelf);
– alteration of the dashboard with installation of an on-board computer.
Reconstructing the drive of the sliding windows is simple and does not cause difficulties even for a novice gazelle driver. Heating is being improved in two ways. The first way is to replace the fan and radiator with more efficient devices; the second way is to install (usually under the passenger seat) an additional stove, preferably an autonomous one.
The ceiling console is used to accommodate non-standard electronics, speakers, and lighting fixtures. It has been found out experimentally: using a homemade ceiling shelf for transporting all sorts of small items sooner or later turns into a useful addition to the bomb bay. Don't go wrong with your choice!
Axle for a passenger trailer: types, how to make it yourself
If the sketch is prepared, the drawings are made in accordance with the requirements, you can move on.
Here you will have the following steps:
- Marking the material according to the drawing and cutting out the necessary elements;
- If you need to make a bend, the plywood is treated with steam, bent, fixed, and then left to dry;
- Next, the assembly of the case begins;
- You can connect the elements with self-tapping screws, corners, and wood glue;
- Upon completion of the assembly, the structure is covered.
We have a separate material about interior reupholstery, from which you can highlight a lot of useful and interesting things for yourself.
Step-by-step instruction:
Step 1: Connecting parts a + b
Using wood glue, we connect parts a and b together, following the diagram below. After the glue has dried, additionally secure the boards together with screws for a more durable fastening.
Note: Alternatively, if you want to leave the outside of the stand intact, secure the boards together from the inside with corner brackets and screws.
Step 2: Connecting parts c + d + e
Similar to the previous step, we connect parts c, d and e with glue, and then with screws, following the diagram given.
Step 3: Connecting all the parts together
Now you need to connect the parts assembled in the previous two steps. For this we also use glue and screws from the outside or corner brackets from the inside.
Note: You can also optionally add a board to cover the compartment at the front, that is, attach it to boards c, d and e.
Step 4: Apply putty
This step is necessary if you connected the parts together with screws from the outside and want to hide them. If you used corner brackets from the inside, then the outer surface is already smooth and does not require putty.
Here the screws were screwed in from the outside and the heads went slightly into the wood, forming small recesses. So we remove them using wood putty. After this, we smooth the surface with sandpaper so that the putty is level with the wood.
Step 5: Paint the stand
The color of the paint depends on your personal preferences; you can even varnish the wood, leaving its natural color and structure visible.
You can paint the entire stand, or just the outside, leaving the inside natural.
If you decide to paint the whole thing, apply the paint in several stages so that there is a side on which you can place a stand while the paint dries.
If you paint only the outside, then apply masking tape from the inside along the edges of the boards so that the paint does not get there and the inside looks neat. Here they just painted only the outer part.
TIP: In any case, when painting, you need to apply at least two coats of paint to ensure good coverage of the surface.
White paint, which is scratch-resistant, was used here.
Step 6: Attach the cork sheathing
Now all that remains is to attach the cork covering to the top of the stand. To do this, cut the cork fabric the width of the board located on top (board a), and the length a little more behind it so that you can wrap it under the board and attach it.
After this, apply spray adhesive to the surface of the top board and glue the cork fabric to it. Fold the edges inward and glue them; for reliability, you can secure them with decorative nails for furniture.
Now everything is ready!
- It took 3.5 hours to make the sofa stand, and if you leave the natural color and do not apply paint, the whole process takes about 1.5 hours.
- The result shows that the time was not wasted, because we get a beautiful and comfortable stand that increases home comfort!
We hope you enjoyed the master class, and soon you will be sitting relaxed on the sofa, drinking tea or coffee, and placing a cup on such a wonderful stand!
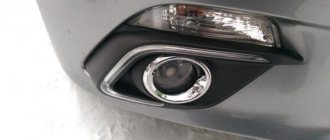
Additional accessories
Decorative and protective door sill covers made of stainless steel are also available for your car. Cost - from 880 rubles per set (4 pcs.). Go to the overlays page
The armrest between the front seats is one of the most common elements of interior tuning of a modern car, the main purpose of which is to create additional comfort for the driver while driving. This is achieved by removing the static load from the elbow joint of the right hand, which is often under tension when periodically changing gears.
Painting, ceiling covering
Over time, the ceiling in the VAZ 2110, and frankly speaking, in any other car, gets dirty, damaged, and generally becomes unsightly and spoils the appearance of the interior. Reupholstery or restoration costs a lot of money, and it must be admitted that it is quite labor-intensive.
Therefore, now many drivers decide on such tuning as painting the ceiling, especially since you can choose a color and tone to suit every taste. What are the options for ceiling paints?
- Universal paint in aerosol cans (you will need about five pieces). You can choose matte paint or shimmer. The only thing you need to remember is that the top may “crumble” a little, plus the interior must be ventilated for several days.
- Universal and water-based paint. They are mixed to soften and better adhere the paint to the soft ceiling material.
- Paints for velor, suede, textiles in the form of aerosols. These types are best used for the ceiling, since painting with them will not make it hard, and the paint will apply more evenly and without stains.
Deciding on the mounting method
Think about the mounting method. Car armrests can be placed tightly between the seats or fixed using special fasteners.
If you decide to stick with tight fixation, you will need to prepare grooves in the lower part of the structure that correspond to the parts in the area of the intended installation location. You immediately need to decide and take into account its thickness when marking the project.
Making your own fasteners is not an easy task, but the result is worth your effort and time spent on this process. The elements of the armrest in its lower part must be tied to the structural elements of the interior of the car or to pre-created fasteners.
Each of your decisions must first be transferred to a drawing, and only then brought to life. This way you can avoid errors and inaccuracies.
The best armrests for VAZ 2110, 2111: comparison of prices and characteristics
An armrest is a special part of a car on which you can rest your arm while driving. It helps to avoid early fatigue on the road, as it relieves stress from the arm muscles.
Armrests for the VAZ-2110 are manufactured by Alamar and Varta. Also for this car model you can choose Chinese-made armrests or universal armrests.
Armrests Alamar
The Alamar company produces quite a lot of models of armrests for the VAZ -2110, made in black and gray colors of various shades: light gray, graphite, black, black metallic, etc. These armrests have two modes of operation - hidden and working, and are also equipped with removable covers with zippers. Alamar armrests fit perfectly under the required console and at the same time have a fairly affordable price!
Price from 460 rubles - out of stock
Varta armrests
These armrests allow you to easily use the handbrake, as they are easily and simply installed in the rear cup holder. In addition, they are available in black and gray colors with high quality leatherette upholstery (“eco-leather”). Also, these armrests have a removable top cover, under which there is a convenient compartment for storing all sorts of small items!
Universal armrests
As the name suggests, a “universal” armrest should fit any vehicle, regardless of make or model. But in fact, such “versatility” is rather a clever advertising move by armrest manufacturers. In practice, having bought such an armrest, you will most likely finish it yourself and file it, twist it and try in every possible way to fit it into its regular place, which will be quite difficult to do. Therefore, in order to avoid unnecessary waste of money and time, we strongly do not recommend that you buy such armrests.
Price: from 916 rubles - out of stock
Chinese armrests
Chinese armrests delight the eye with their variety and low prices, but you should be careful when choosing them. Thus, on the packaging of a Chinese armrest it may often not be indicated for which car model it is intended or by which company it is produced. However, you shouldn’t completely abandon Chinese armrests. If you want to choose a high-quality Chinese armrest, you can contact our company. We will quickly and efficiently select exactly what you need!
Price: from 300 rubles - out of stock
If you want to be 100% sure that the armrest you choose will serve for a long time and faithfully, then it is best to choose products from Alamar and Varta as the most reliable.
Registration of a car at State Services
The State Services portal allows transaction participants to pre-register for an appointment with the traffic police. To take advantage of the system's capabilities, you must:
- Log in to your personal account on the State Services Portal. To do this, a citizen must have an account. If it is missing, you need to get it.
- You need to click on the Car Registration item.
- From the available list of actions, you need to select Registration of documents when purchasing, leasing or changing information about the owner.
- Fill out the form. Here you will need to provide information about the owners and the car. Additionally, you need to indicate the traffic police department convenient for visiting and the date of the visit.
- Submit your application. You can track its status in your personal account. Notification of processing results will be sent through the communication channel specified during the registration process.
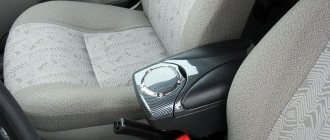
How to install hinges and furniture magnet?
To prevent the lid from constantly opening while driving, you need to hold it with something. We are unlikely to install a lock in the armrest, but a furniture magnet is just right. After installing this element, you can begin installing the hinges. We attach them using self-tapping screws.
View gallery
Next, all elements undergo an alignment procedure, and the cover is finally screwed to the main part of the armrest. But that is not all. In order for the magnet to hold the lid, you need to install a small metal element (plate) on the back of the structure. We place it strictly above the magnet, otherwise it will not bring any functionality. At the final stage, the sharp edges of the armrest are sharpened with a file. The same goes for the lid.
Universal option
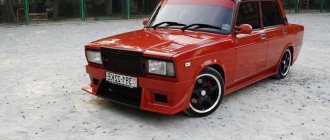
The armrest is a universal type, it is made not only for the VAZ 2114 model, but it is also suitable for the VAZ 2108, 09, 099, etc. The main thing is that the fastening matches.
This part is installed at the seat mounting location and secured with mounting bolts. In size, it can be either for one hand (driver) or for two (driver and passenger).
The advantages of the universal option undoubtedly include its low cost. Also, such an armrest is much easier to sell, if necessary, since it also fits other models.
This part has two varieties: hollow and cast. The first option, in addition to serving as an arm rest, can also serve as a glove compartment. Accordingly, its cost will be more expensive. Sometimes, this element of the interior can be equipped with cup holders.
The universal armrest for the VAZ 2114 car has some disadvantages. For example, it is not always possible to choose the color of a part that matches the overall color scheme of the interior. Also, the quality of the materials from which this interior element is made leaves much to be desired. But, despite this, it is more popular than the standard version of the part.
'); if("undefined"===typeof loaded_blocks_drive){loaded_blocks_drive=[]; function n(){var e=loaded_blocks_drive.shift(); var t=e.adp_id; var r=e.div; var i=document.createElement("script"); i.type=”text/javascript”; i.async=true; i.charset=”utf-8″; i.src=»https://www.drivenetwork.ru/data/»+t+».js?async=1&div=»+r+»&t=»+Math.random(); var s=document.getElementsByTagName("head")||document.getElementsByTagName("body"); s.appendChild(i); var o=setInterval(function(){if(document.getElementById(r).innerHTML&&loaded_blocks_drive.length){n(); clearInterval(o)}},50)} setTimeout(n)}loaded_blocks_drive.push({adp_id:e ,div:t})})(47602)
If the novice driver is a woman
Difficulties in choosing a first car for a woman are due to her lack of awareness in this area and the excessive rationality inherent in the entire fair half. What does a woman value in her first vehicle?
- Ease of control. This automatically excludes Mini cars from the list of potential purchases. Despite the universal love of women, these “babies” are too “responsive” to any vibrations of the steering wheel, which significantly complicates control.
- Modern and healthy filling. A car for a novice woman should have many useful “helpers”: ABS, emergency braking system, parking sensors and an automatic transmission. Its advantages are mentioned above.
- Small dimensions. The size of the car should minimize the difficulties of parking and provide comfortable accommodation for children, girlfriends and numerous purchases.
Device and purpose
The armrest is a product that is designed to support the driver’s right hand, and in some cases, to store personal items (documents, phone, etc.). The device is placed between the two front seats. There are models on sale that differ in the following parameters:
- type of lid (opens, does not open);
- manufacturing materials (plastic, wood, MDF);
- quality of upholstery (leather, substitute, fabric);
- dimensions (width, height, depth);
- design.
In addition, armrests can be factory-made or made independently, which is very common among some car enthusiasts.
How to make an armrest for a VAZ 2114
Of course, you can buy a good product at the auto market or in a specialized store, but not everyone is ready to pay several thousand rubles for lower quality items. Moreover, if you have a great desire and a small amount of time, making it yourself will not be a difficult procedure.
In order to make a high-quality and functional product yourself, you will need a drawing of the armrest for the VAZ 2114. You need it so that the final result is a smooth and neat design.
As can be seen from the figure, the material used for the production of the armrest is eight-millimeter MDF and solid oak.
Next, consider the process of self-production:
- First of all, let's estimate all the dimensions indicated in the drawing in relation to our free space between the seats. You don't want to end up with a frame that won't fit between the seats.
- Purchase all necessary materials. In order to make an armrest for a VAZ 2114 with your own hands, prepare the following tools:
electric jigsaw; coarse and fine grain sandpaper for sanding wooden surfaces; self-tapping screws; screwdriver (if you don’t have one, a screwdriver and a drill will do); pencil and ruler; good, high-quality glue (which is very important); upholstery; foam; nylon threads (if you use stitching); powerful hair dryer.
- Now that everything is ready, we need to make the frame of the structure. To do this, take the material and, according to the dimensions in the drawing, using a pencil, outline the contours of the walls, base and cover of the workpiece.
- Using an electric jigsaw, cut out all the necessary structural parts.
- Take sandpaper and sand the sharp and uneven corners of the workpieces.
- Mark the joints for further fastening of the workpieces using self-tapping screws. Apply markings to organize the internal space in the future armrest.
- Using a screwdriver and self-tapping screws, fasten the component parts of the product together. If you do not have an electric tool, manual screwing will be very difficult. To make the process easier, using a drill with a drill of the required diameter, you can make small guide holes, after which it will be easier to screw in the screws.
- Install the necessary fittings (hinges for the folding armrest).
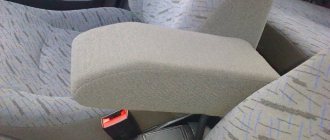
- Now is the time to sheathe the resulting structure. It is recommended to select upholstery materials depending on the texture and color palette used in the interior of your car. Typically used for upholstery: leather, velor, leather substitute, Alcantara. For the top cover, on which the driver’s hand will be located, it is necessary to adapt (glue) a full-size piece of foam rubber (later it will be sheathed).
- After selecting the material, we cover the walls and cover of the armrest. In order for natural or artificial leather to stretch well, it must be heated with a powerful hair dryer and, without allowing it to cool, be pulled onto the frame. In addition, from a practical point of view, it makes sense to sheathe the internal sections of the armrest (so that the objects inside do not rattle when moving). A material such as carpet is perfect for this.
- Now all that’s left to do is install the finished product into the car’s interior.
Video instruction
Sources
- https://autochainik.ru/mekhanicheskaya-korobka-peredach.html
- https://pdd-helper.ru/kak-nauchitsya-ezdit-na-mehanike/
- https://AkppGid.ru/mkpp/mkpp.html
- https://DaciaClubmd.ru/mexanicheskaya-kpp/
- https://auto-self.ru/prednaznachenie-i-raspolozhenie-pedaley-v-mashine/
- https://autoleek.ru/korobka-peredach/mkpp/kak-upravlyat-mkpp.html
- https://mashinapro.ru/813-kak-tormozit-na-mehanike.html
- https://reedr.ru/auto/kak-pravilno-tormozit-na-mehanike-s-vyzhatym-stsepleniem-ili-net/
- https://AvtoMotoSpec.ru/obuchenie-vozhdeniyu/kak-pravilno-tormozit-na-mexanike.html
- https://dtp.help/kak-nauchitsya-vodit-na-mehanike.html
Manufacturing
This work is quite simple for those who have held a jigsaw at least once in their life. If all the measurements were made correctly and you have made a good drawing of the future product, then all you have to do is follow these steps:
- Cut out all the details on graph paper, thereby creating patterns.
- Attach the patterns to the plywood and use a pencil to draw the outlines of the future parts on it.
- Using a jigsaw, cut out the parts from plywood.
- To make it easier to make curves, use hot water or steam to soften the plywood.
- Now it's time to fasten the individual parts with self-tapping screws. It is better not to use glue - the connection is unlikely to be of high quality.
- If you wish, divide the internal space of the product with partitions, thereby creating several compartments.
- Glue a piece of foam rubber onto the top of the lid, which will create a soft and comfortable feeling for your elbow.
The product can be considered almost finished. All that's left is to tighten it up and put it in place.
Differences in exams
It is recommended to pay attention to the fact that the requirements of the traffic police and driving school programs change quite often. Therefore, you need to clarify the nuances immediately before entering and passing the exams.
At the moment, even before the start of the educational process, students have the right to choose not just the make of the car, if the driving school offers different cars, but also the type of transmission on which the training will take place. In general, the procedure for acquiring driving skills with an automatic and manual is not much different: the theoretical part is the same for everyone, exercises on the racetrack and in the city too. The only difference is how the driving happens.
Mechanical box for dummies. 9 important details
Pros and cons of manual transmission
A beginner who has purchased a car with a manual transmission needs to become familiar with the important nuances in handling the transmission and understand some points. Let's start in order. What are the transfers for? In order to choose which one and under what conditions will be best for use in the situation you require (weather conditions, quality of road surface, etc.)
Important! Mastering gear placement. An important point is the synchronous pressing of the clutch pedal while simultaneously switching gears
1. Start the engine. Scheme: “neutral” - clutch - engine start. And nothing else.
2. Correct use of the clutch. Squeeze strictly until the end and no more than 2 seconds. We take care of the car.
3. Commendable coordination and smooth operations. Clutch. Speed (for example, first). We release the clutch (slowly, of course), while just as slowly taking on the gas.
4. "Downshifting"
Simply put, when reducing speed, it is important to lower the gears, just as they were raised during acceleration.
5. Reverse. It is never, under any circumstances, recommended to engage reverse gear until the car has stopped.
Important manual transmission details
6. We park. The engine is stopped, the clutch is depressed, first gear is engaged, the handbrake is in the working position. It's simple.
Incomprehensible, difficult and boring? More practice! Only under the condition of constant and continuous driving will the described principles and subtleties be not just a set of rules or laws, but something natural and understandable.
Tips for mechanical dummies
For inexperienced drivers who have cars with a manual transmission, one important piece of advice can be given - use the clutch only for its intended purpose:
- when starting to move from a standstill;
- if necessary, switch to a higher or lower gear while driving;
- when the car comes to a complete stop, to move the manual transmission lever to the neutral position and then apply the parking brake.
Under no circumstances should you attempt to use the clutch to stop the machine. Engine braking is much more effective and safer than uncontrolled driving with locked wheels.
Nuances
When choosing training in a manual car, the following advantages can be noted:
- The driver's license you receive will not have any restrictions, unlike the license for an automatic transmission; you will be able to drive a car with any type of transmission.
- The acquired skills will allow you to control the ride yourself, the dynamics of acceleration and braking will be completely in your hands. You will be able to choose your driving style yourself, rather than adapting to the operation of the automatic transmission. If necessary, you can lower the gear, putting more load on the engine, but increasing torque, this is important, for example, when driving up a steep hill or if the car is spinning in the mud.
- Obtaining an expanded number of practical skills that can be useful in an extreme situation.
An inexperienced driver who has never driven a car will find it much easier to understand the design, which has only two pedals, i.e. with automatic transmission. He will not have to learn how to perform a complex shift exercise, and there will be no jerking when the clutch is not fully depressed. The car will not stall at a crucial moment if a beginner suddenly releases the pedal. On hills, the automatic machine does not roll back, because it is enough to release the brake and press the gas. At this time, there is no need to change gear, which forces you to drop the pedal; you need to have time to squeeze the clutch. In other words, the procedure included in the exam is much simpler if you perform it with an automatic transmission.
However, despite the great ease of studying for a license with an automatic transmission, it makes sense to enroll in driving courses for a vehicle with a manual transmission if in the future there is a chance that a citizen will need to get behind the wheel of a car with a manual transmission. Classic situations - buying a car with a manual transmission, the need to move the vehicle, the lack of vehicles with automatic transmission in a company providing vehicle rental services.
Decorative paneling
How to cover an armrest with your own hands? The best place to start is by choosing the material. The final choice here depends on the brand and prestige of the car. For example, if you are making an armrest for a Gazelle with your own hands, then it would be wisest to cover it with leatherette. The same applies to domestic passenger cars. It is also recommended to cover a hand-made armrest (VAZ 2107) with the cheapest material. For greater pathos and chic, you can use Alcantura. It is not recommended to use leather as upholstery - it is very expensive, and besides, not every car enthusiast can handle it by covering the armrest with his own hands.
As for the color of the material, in most cases it is black armrests that fit organically into the interior of the car. If you want to be original, experiment with upholstery colors - most often black and gray shades overlap in car interior elements.
The sheathing process itself occurs along the contours using a PVC arched corner. As a rule, this work takes no more than 20-40 minutes of a car enthusiast’s time.