Extraneous sounds are constantly heard in the interior of domestic cars. Soundproofing a VAZ 2112 with your own hands allows you to eliminate a factory defect and add comfort to your trips. The level of noise insulation on the VAZ 2112 is higher than its classic predecessors, but still does not reach the quality of foreign cars.
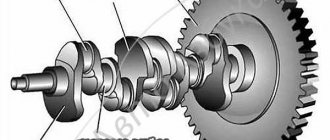
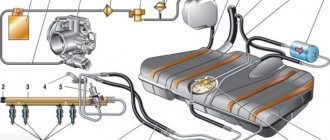
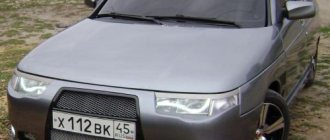
Lada 112 car with injection engine.
Complete sound insulation of the Lada 2112 on your own will require a lot of time and money. Owners of 2112 carry out soundproofing in stages.
Sound insulation of the interior, doors, dashboard, floor, roof, engine panel requires removal of interior elements. In turn, to soundproof the hood, engine, and wheel arches, there is no need to dismantle parts. Most car owners first perform a lighter type of sound insulation that does not require disassembling the interior.
Sound insulation of the hood
Sound insulation of the hood slightly reduces the flow of noise from the engine into the cabin. To achieve a noticeable effect, the operation must be carried out together with insulation of the motor shield.
Proper hood sound insulation is done in 3 layers.
The first layer is a vibration damper. The vibration damper must have a foil layer to reflect heat waves - the temperature under the hood of a running car reaches a high level. The material is applied to the flat surface of the hood between the stiffening ribs.
The second layer is a foil-coated thermal insulation material. The second layer acts as sound insulation and covers the entire area of the hood along with the stiffeners.
The third layer is standard sound insulation.
Photo of the hood of a VAZ 2112 car with soundproofing material.
Hood insulation
Insulating the hood itself does not significantly reduce noise, and some car owners do not work on the hood at all. But together with the insulation of the motor shield, a significant reduction in noise is achieved. While insulating the hood as the easiest element to work with, it is easy to gain experience in handling sound-absorbing products.
The primary coating is a vibration damper of the Vizomat MP, Bimast Super brands, which have a foil-coated coating to reflect thermal radiation; a fairly high temperature regime is created under the hood of a running engine, so the vibration damper must be resistant to high temperatures. It is placed between the stiffening ribs on flat surfaces.
For the secondary layer , products coated with foil that reflects sound waves should be used. It is fixed over the entire surface of the hood, including the stiffening ribs.
For the third coating, a factory soundproofing layer is suitable.
Sound insulation of engine shield
To carry out high-quality sound insulation of the engine panel, it is necessary to remove the dashboard. For this reason, it is logical to combine the procedure with soundproofing the dashboard.
The first layer is applied vibration-proofing material. A vibration damper is ideal. A vibration damper is also applied to the side surfaces and technological holes, but in a thinner layer.
The second layer involves gluing with soundproofing material. The entire surface is covered with “Accent” with a thickness of 10 or 15 mm. Experts recommend sealing the contact points between the instrument panel and the body with 10 mm bitoplast to reduce squeaking.
After soundproofing, a third layer is laid - soundproofing. The front wheel arches are covered with 4 or 8 mm soundproofing material "Spleen".
The fourth layer is the installation of factory sound insulation. If the standard sound insulation continues to be unsuitable, purchase a new one and install it.
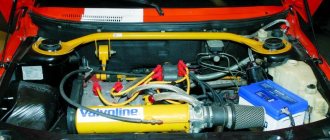
External sound insulation of the VAZ 2112 engine shield.
Second layer
In the same way, soundproofing material (Accent or Splen) is glued on top of the vibration insulation with glue, but here it is advisable to cover the entire area.
Roof sound insulation
The procedure for soundproofing a roof is the simplest and least expensive. For high-quality sound insulation of the roof, 2 layers are installed.
The first layer is vibration insulation. The entire flat surface of the roof is covered. It is best to use Visomat with a thickness of 2 mm as a vibration-proofing material.
The second layer is noise insulating. The ribs of cruelty are covered with Bitoplast 5 or 10 mm thick, the flat surface is covered with 10 mm Accent. The space under the handles and lampshades is filled with 4 mm thick Bitoplast.
Soundproofing the roof using Shumoff M2 on a VAZ 2112.
First layer
We glue vibration-proofing material (Vibroplast or Shumoff) to the inside of the outside of the car door, cutting it into pieces in advance for convenience. We introduce the material through the technological holes in the inner door trim, having previously treated it with a hairdryer for better adhesion. The larger the surface area covered, the better. To avoid the formation of air bubbles, the material is rolled out with a roller or the handle of a screwdriver.
Soundproofing of floors
After disassembling the interior, vibration isolation is installed. Bimast Bomb or Visomat is used to treat the flat surface of the floor and tunnel. When installing vibration-absorbing material on the floor, it is important to seal the vibration dampers.
Noise insulation from the floor of a VAZ 2112 car.
The second layer is sound insulation. For the floor you can use Accenta or Isoton. The thickness of soundproofing materials for the floor must be at least 10 mm. To soundproof the tunnel, 10 mm Bitoplast is used. Splen 8 mm thick is used to soundproof the trunk - the spare wheel niche is treated.
The third layer is the installation of standard sound insulation.
Soundproofing the interior of a VAZ 2110,2112,2111 with your own hands is a broad question. The article describes how to soundproof the floor, doors, ceiling and trunk. The process itself takes no more than three weeks (if you work independently). To get started, you need to purchase materials and prepare tools.
ATTENTION! Now you can buy a completely new Pioneer MVH X580BT processor radio for only 2990 rubles! Don't believe me? Then follow the link and see for yourself! Read more"
Components for soundproofing the interior of the VAZ 2110:
- solvent – degreasing liquid: White Spirit;
- sound-proofing materials: vibration-, sound-absorbing; heat-, sound-proof and anti-squeak;
- in the absence of vibration-absorbing material, mastic (liquid metal or vibroplast) is applied using a spatula;
- bolts and screws of longer sizes (after sound insulation the surface rises);
- clips for attaching the ceiling area (the old ones are unusable after removal);
- industrial hair dryer (heats the material and attaches it to the metal in this way);
Quantity and types of materials for soundproofing the interior of the VAZ 2110.
Components for sound insulation differ in their characteristics, fastening methods and price categories. The assortment is widely represented both in online stores and in car showrooms. The most effective sound absorption materials are isotone and biplast. Isotone sound absorption coefficient: 0.4–0.94 arb. units, and biplast: 85%.
Approximate amount of material required for sound insulation:
- For the floor - 13 sheets of vibration material + 13 sheets of sound insulation, measuring 0.5 m * 0.75.
- For the roof - 4 sheets + 4 sheets of sound insulation, size 0.5 m * 0.75.
- For the trunk of a VAZ 2111/2112 – 10 sheets (0.3m2) + 0.8m2 of sound insulation.
- For doors - 5 sheets of vibration insulation (0.5 m * 0.75) + 0.8 m 2 sound insulation.
Manufacturers, depending on the materials used, recommend sheathing surfaces with a percentage ratio: 60% vibroplast to 40% bimast or vice versa. But many, when doing their own soundproofing, apply 100% of the material to the plane.
CultCars
I decided to post my version of noise and vibration insulation for the two-piece. I’ve been wanting to do it for a long time, when time came I started doing it. The main goal was to make it quieter in the cabin so that it wouldn’t rattle like a tin can and to insulate it, because... In winter, the cabin cools down very quickly. The material was purchased in parts, I didn’t know exactly how much was needed, and in principle I didn’t do everything at once, but did all the elements separately.
At the moment, the following materials have been used: - vibroplast StP Silver 2mm - 10 sheets - vibroplast StP BiMast Super 4 mm - 4 sheets - vibroplast Vicar/Germast C(LT)-FA 1.5 mm - 14 sheets - sound and heat insulator Shumoff P4 (analogous to splen 3004) - 18 sheets - sound and heat insulator Shumoff P8 (analogous to splen 3008) - 10 sheets Sheet size - 0.56x0.75 m - sound absorber Bitoplast 10 - 0.5 sq. m. Exactly 10 thousand rubles were spent on all the material, not counting tools and other things.
Roof I started doing it with the roof, as the easiest part, in my opinion. I took everything apart, cleaned it and degreased it. I glued the vibra StP Silver 2mm, then Shumoff P8. It took about 3 sheets of each for the roof. The upholstery fell into place without any problems.
After gluing the roof, it became noticeably quieter, the rain no longer drums on it, and there is less noise.
Rear doors Next in line were the doors. I also took everything apart, washed, cleaned, and degreased. I didn’t remove the factory vibration from the doors, because... sits tightly, glued on top of it.
I glued it as follows: inside the door - 1 layer of StP Silver 2mm, 2nd layer of Shumoff P8. outside - 1 layer/techn. holes Vicar/Germast C(LT)-FA 1.5 mm, 2nd layer Shumoff P4. Each door uses about 1 sheet of each material, so each door uses about 4 sheets. I glued the remains of the 1.5 mm vibration onto the skins, I think they won’t be superfluous. I glued a strip of bitoplast 10 along the perimeter of the casing.
Front doors The front doors were made in exactly the same way as the rear doors: inside the door - 1 layer of StP Silver 2mm, 2 layers of Shumoff P8. outside - 1 layer/techn. holes Vicar/Germast C(LT)-FA 1.5 mm, 2nd layer Shumoff P4. Each door requires exactly 1 sheet of each material.
Feels like: it became quieter in the cabin, the speakers in the doors really played better, the sound became richer, and “pseudo” bass appeared.
The interior floor and trunk are the most labor-intensive task. I did it slowly for about a week, I’ll explain why later. Following the advice of many friends, I decided not to glue the vibra to bare metal. First, I decided to treat the floor with bitumen-based mastic/anticorrosive. I am aware that vibroplast itself is an anti-corrosion treatment, but if it is installed QUALITATIVELY, i.e. rolled well, without air cavities or bubbles. Since the floor topography is still quite complex, rolling the vibroplast without bubbles, in my opinion, is problematic for a person who is doing this for the first time. Well, everyone has their own philosophy, I do it for myself, so I decided to do this: cover it with 3in1 primer for rust, because... there was a little rust (precisely the result of a vibration that was poorly glued at the factory and water getting under it), then a polymer-bitumen anticorrosive “Cordon”, then a vibroplast and a sound and heat insulator. No sooner said than done.
I disassembled the interior, the factory Shumka was dry, the floor was dry. There was some rust under the front passenger seat in the foot area. I didn’t remove the old vibration, I tore it off where it was poorly glued, where it sat tightly, I didn’t touch it. Next, I cleaned off the rust, treated it with a converter, cleaned and degreased everything. There was no rust in the trunk, only a couple of spots, I also treated and cleaned everything.
Next, the entire floor and trunk were painted with rust-resistant enamel primer. It took a long time to dry, about 30 hours; you could have taken another one with less drying time, but oh well. Then I coated it with anticorrosive in 2 layers, it took about 1.5 kg per can.
Then I glued it with a vibrator. In the cabin on the floor I combined StP Silver 2mm and Vicar/Germast C(LT)-Fa 1.5mm. Under the panel I glued StP BiMast Super 4 mm. In the trunk I combined StP BiMast Super 4 mm and Vicar/Germast C(LT)-FA 1.5 mm.
The last layer is a sound and heat insulator: in the cabin on the floor and under the panel Shumoff P4, in the trunk Shumoff P4 and Shumoff P8.
I taped the joints in possible places where water could penetrate with reinforced tape. I left the factory Shumka, the interior is assembled basically without any problems.
As a result: I was quite pleased with the result, although I haven’t driven much yet, the noise from the suspension was less audible, there was almost silence from behind, there was less noise from the road, you didn’t even pay attention when driving through puddles, it was practically inaudible, the music started playing “more interesting” . In winter, we'll see how the thermal insulation performs. Of course, there is still some work to be done - the trunk lid, hood, fender liners, but this is possible in the future. I did not glue under the panel and do not plan to. The noise of the engine is not annoying, and there is no desire to climb there.
Drive profile: arest.
Soundproofing VAZ 2110, 2111, 2112 – process of applying materials.
Before starting work, you need to dismantle all the elements of the interior: the dashboard, trim, handles, lights, etc. The application of sound insulation layers occurs in three or two stages - vibration material, sound insulation and factory (or vibration insulation). After separating the casing, the factory sound insulation of the VAZ 2110, 2111, 2112 and the vibration-absorbing component will be visible.
Application order:
1. Remove the factory soundproofing and clean off any dirt/rust.
2. Factory mastic (vibration-absorbing material) is not removed - a solvent (White Spirit) is applied to this surface. The surface is completely degreased using a sponge. There is no need to dilute the solution.
3. Allow time to dry the car (no more than 8 hours). The vibration material is not attached to a wet surface.
4. Anti-squeak materials are applied to the surface of the dashboard shield. The components are heated, placed on the surface and leveled with a metal roller to eliminate bubbles. To improve the effect, the wires are wrapped in madeleine.
5. Vibration-absorbing material is placed in the trunk, on the floor, ceiling and interior doors - cut with scissors in accordance with the required dimensions. After this, carefully remove the film and place the preheated part on the surface using an industrial hair dryer. Level with a metal roller to eliminate bubbles. The most difficult to reach places are the bottom of the dashboard and the door. For ease of application, it is better to cut the material into very small pieces.
The resulting trunk result:
Doors:
6. Soundproofing material is applied to vibration-absorbing or anti-creaking material. During the work process, a roller is used. The surfaces of the components are self-adhesive.
Floor:
Doors:
7. We apply factory sound insulation or one purchased by you if the factory one is in poor condition.
8. The trunk trim for VAZ 2111,2112 is glued with madeline.
9. Lay the casing and install the door trims.
10. Install the dashboard and other elements in the reverse order.
To improve the process:
- It is better to label all wires or mark them with multi-colored tape. Also mark the screws and arrange them according to size.
- When applying, avoid gaps - it is better to overlap.
- Do not use a household hair dryer to heat materials.
- It is recommended to start laying the material with solid pieces, then cut off small ones.
- The vibration material is heated until the black side becomes sticky.
- To soundproof the trunk, thinner materials are used.
One of the best radios in its segment. It is a diskless receiver that rationally uses the manufacturer’s developments in the field of digital audio processing. This is a full-fledged processor device, designed taking into account the needs of modern car enthusiasts. More details at the link.
- Matrix LCD display with wide viewing angle;
- Working with a USB drive;
- Built-in microphone, Bluetooth and wireless voice communication system (can connect up to 2 phones);
- Compatible with Android, iPod/iPhone;
- Maximum output power: MOSFET 50W x 4.
What is it for?
Soundproofing today is needed not only by lovers of good music:
- Extraneous noise in the cabin interferes with normal conversation
- In addition, noise has an irritating effect on the driver, reduces his reaction and thereby poses a threat to his life.
- Spending a long time in a cabin with constant noise disrupts nervous activity, increases a person’s irritability, and impairs sleep.
- Finally, loud noise constricts the blood vessels in the body, which increases the load on the heart and can cause angina over time.
- You can’t buy health, so you need to take care right away
- Soundproofing the VAZ 2112 itself will solve all problems
- So that you don’t have to worry about time and money, it is recommended to do it in stages, starting with light areas that do not require disassembling the interior
Let's start with the hood
The hood cover and the engine compartment partition are the simplest areas where you can start and practice at the same time:
Vibration insulation is glued exclusively between the stiffeners
- It reduces the noise level from the engine into the cabin, plus it provides thermal insulation, which the engine needs in winter
- To achieve a noticeable effect, it must be carried out in conjunction with the treatment of the engine shield.
- Competent sound insulation is carried out in three layers
- The first layer is always a vibration damper, as the instructions say
- The vibration damper must certainly have a foil layer to better reflect heat waves, because the temperature under the hood when the engine is running reaches a fairly high level
- You apply the material on flat surfaces between the stiffening ribs, as in the photo above
- The second layer is made of foil insulating material, for example, Splen
- This second layer plays the role of thermal insulation and sound insulation; it covers the entire area, including stiffeners
- The third layer is usually standard (factory, standard) sound insulation
- We process the trunk lid in a similar way.
Let's move on to the engine shield
To make high-quality sound insulation of the engine panel in the cabin, you need to remove the dashboard:
- Therefore, together with the hood, the outer side is processed, which does not require disassembly
- Everything is the same, two layers of the same materials, and in the same sequence
- And the procedure in the cabin is combined with soundproofing the dashboard
- The first layer will also be a vibration-insulating material, Vibroplast or Bimast is ideal
- A vibration damper should also be applied to all side surfaces, as well as technological holes, only a thinner one
- The second layer involves gluing with noise-insulating material, here the entire surface is also covered with Accent (inside the cabin, Accent is more advantageous than Splen)
- The thickness of the sound insulator is ten, or preferably fifteen centimeters
- Experts recommend sealing the contact points between the dashboard and the panel body with 10 mm bitoplast to reduce squeaking, and in places where it does not fit, using a thinner anti-creaking material - Madeleine
- Install factory sound insulation as the next layer, if there is any.
- If standard sound insulation is unsuitable for further use, you can purchase a new one
Third layer
We completely cover the technological holes on the inside of the door with vibration insulation. At the same time, using Madeline, we “hide” all the contact points of the parts (wires, boundaries for attaching the speakers and trim to the door);
Treating the roof
The work of soundproofing a roof is the simplest and at the same time the least expensive:
- Here, for high-quality sound insulation of the roof, it is enough to install only two layers
- As always, the first layer is vibration insulation; you cover the entire flat surface of the roof with it.
- Vizomat is recommended as a vibration-insulating material, two millimeters thick
- The second layer is a noise-insulating layer from Accent
- Bitoplast, with a thickness of 5 millimeters, or 10 millimeters, is applied to the ribs of cruelty, the entire flat surface is Accent, with a thickness of 10 millimeters. In the space under the handles and shades, it is sealed with Bitoplast 4 millimeters
Roof treated with vibration insulation
Soundproofing the bottom
When the VAZ 2112 is soundproofed, you will have to disassemble the interior yourself, remove all the rugs and seats:
- In addition, remove the standard Shumka, if present
- Only after complete disassembly of the interior, the laying of vibration insulation with Vizomat, Vibroplast, or Bimast Bomb (the price of which you like better) begins; you process the entire flat surface of the tunnel, and the bottom
- When installing vibration-absorbing material, it is important to stick it tightly and roll it tightly to remove bubbles
Door noise
First, the door trim is removed (this operation is the same for all doors):
- Then soundproofing materials are installed, first the surfaces are treated with a degreaser (alcohol or acetone)
- An exception will be the lower part of the door, where an anti-corrosion coating is applied.
- Sound insulation will also be made of several layers
First layer
The vibration isolator is glued to the inner surface of the outer side (panel) of the car door:
- For convenience, it is better to cut it into pieces in advance.
- The material is inserted through technological holes in the inner lining, having previously been heated with a hairdryer for better fastening.
- Lay it overlapping
- The more area you cover, the better.
- To eliminate air bubbles, roll out the material with a hard roller or the handle of a screwdriver.
Doors treated with the first layer - vibration insulation
- Then, soundproofing material (preferably Accent) is applied on top of the vibration insulation, however, it is advisable to cover the maximum area
- Then all technological openings on the inside of the door are completely covered with vibration insulation (at least with foil)
- Use Madeline to “hide” the contact points (as well as wires, speaker mounting areas and where the trim fits to the door)
- Some car enthusiasts additionally install Bitoplast on the inside of the trim
- After soundproofing the door, the trim is installed in the reverse order
- We recommend not using the car for about two days after this, you need to let the Shumka stick well
Sheathing glued with bitoplast
Tips for improving the process:
- All wires must be signed or marked during disassembly with multi-colored tape or a marker
- Self-tapping screws should also be marked and arranged by size and order of removal.
- When gluing materials, avoid gaps; it is much better to overlap
- Do not use a hairdryer at home to heat materials.
- Start laying the material in solid pieces, and then cut small pieces as needed
- Heat the vibromaterials until their black surface becomes sticky
- When processing the trunk, use thinner sheets
- Leave holes for fasteners free
- Don't forget to degrease all surfaces
- Additionally, check out our video material
Soundproofing doors
When soundproofing the doors of a VAZ 2112, the door trim is initially removed, and the surfaces are degreased with acetone, solvent, and alcohol. Next, the vibration-proofing material, cut into pieces, is glued from the inside to the door panel, through the technological openings on the inside. The material is laid overlapping onto a surface heated with a construction hairdryer.
To eliminate bubbles, the coating is rolled out with a hard roller or other suitable tool.
Sound-absorbing material is placed on top of the vibration insulation, the best “Accent”.
Next, all technological openings on the inner surfaces of the doors are closed with vibration-insulating material covered with foil.
Treat the areas where the trim meets the door, wires, contact points, and speaker mounts with Madeleine.
After soundproofing the doors of the VAZ Z2112 with your own hands, it is advisable not to use the car for two days.
Extraneous sounds are constantly heard in the interior of domestic cars. Soundproofing a VAZ 2112 with your own hands allows you to eliminate a factory defect and add comfort to your trips. The level of noise insulation on the VAZ 2112 is higher than its classic predecessors, but still does not reach the quality of foreign cars.
Lada 112 car with injection engine.
Complete sound insulation of the Lada 2112 on your own will require a lot of time and money. Owners of 2112 carry out soundproofing in stages.
Sound insulation of the interior, doors, dashboard, floor, roof, engine panel requires removal of interior elements. In turn, to soundproof the hood, engine, and wheel arches, there is no need to dismantle parts. Most car owners first perform a lighter type of sound insulation that does not require disassembling the interior.
Quantity and types of materials
The components used in sound insulation differ in characteristics, methods of their fastening and price:
- The assortment today is wide, both in online stores and in auto parts stores.
- Of these, Isoton and Accent are considered the most effective in sound absorption
- For vibration absorption - Bimast and Vibroplast
- Anti-squeak – Bitoplast and Madeline
- On the bottom – 13 sheets of vibration damper + 13 sheets of sound insulator, dimensions 0.5 * 0.75 meters
- On the roof - 4 sheets of vibration insulation + 4 sheets of sound insulation, dimensions 0.5 * 0.75 meters
- VAZ 2112 trunk sound insulation – 10 sheets 0.3 m 2 – vibration + 0.8 m 2 sound insulation
- On the door - 5 sheets of vibration insulation 0.5 * 0.75 meters + 0.8 m 2 sound insulation
- Madeleine is applied in places, so 1 sheet is enough
- Manufacturers, depending on the materials used, recommend treating surfaces in the following percentages:
- 60% vibroplast and 40% bimast or vice versa
- However, many owners apply 100% of one material to all surfaces
Tools and materials
Proper soundproofing of car doors begins with preparing the tools and necessary materials:
- For vibration isolation - material such as Vibroplast M2 or Shumoff M2
- Sound absorber and heat insulator material Accent 10mm (they can recommend Spleen, but in doors Accent gives a better effect)
- To eliminate squeaks Bitoplast 5mm and Madeline (it is thinner and is useful where Bitoplast will not fit)
- Industrial hair dryer (construction)
- Screwdriver Set
- Shoe knife (can be wallpaper), sharp scissors and marker
- Ruler
- Solvent
- Hard rolling roller
The materials can be bought as a ready-made set (the price is slightly higher), or in sheets, briefly about their properties:
- Viproplast is the most popular and affordable vibration-absorbing material today
- Vibroplast does not require heating during installation if the air temperature is 25 degrees or higher
- Vibroplast is resistant to water and other aggressive environments, does not absorb moisture from the air
- Vibroplast has high elasticity, so it can be conveniently applied to any textured surfaces
- Complete versatility of application of vibroplast (it can be used for sound insulation in any area of the car)
- Vibroplast has anti-corrosion properties and provides additional protection against corrosion
- Vibroplast has excellent sealing properties, so it provides good sealing of surfaces
- Accent is a sound-absorbing porous material with a special improved structure
- High frequency absorption range
- Absorbs about 90 percent of noise
- Excellent thermal insulator
- Covered with metallized film on top
- Bitoplast is a sealing material with sound-absorbing properties
- The mounting layer makes it easier to use
- High wear resistance, durability
- Madeleine is probably the most favorite material among most installers, allowing to compensate for friction and completely eliminate the occurrence of squeaks and other sounds.
- Although it is also “anti-creaking”, it is much thinner than Bitoplast, which allows it to be used in places where the gaps are very small, and the thickness of madeline is only 1-1.5 millimeters
- It is also very simple to install: you just need to stick a piece of Madeleine on one of the two rubbing surfaces, and all friction disappears and squeaks too, so it is simply irreplaceable in soundproofing the doors and interior of any car