During the operation of a car, problems with the starter quite often arise. Moreover, even if the battery is charged and power comes to the starter after turning the key in the ignition, the device still does not work and the engine does not start.
In such a situation, there are only two ways to start the engine:
- starting the engine “from the pusher”;
- attempt to close the starter directly;
Although the second method is less common, in some cases this method is more “convenient”. The main thing is to know how to bridge the starter correctly to start the power unit. Read more in our article.
Main signs of starter malfunction
Despite the fact that the starter is a fairly reliable device, it can also break. Some breakdowns may have symptoms identical to other faults, but there is still something in common when the electric motor malfunctions.
The main symptoms of starter malfunctions:
The solenoid relay does not click (does not operate) and the armature does not rotate.
- Battery discharge (complete or partial) or failure;
- Oxidation of battery terminals and tips connected to it;
- The terminals or tips connected to both the starter itself and the battery have come loose;
- Lack of contact on the terminal bolts, caused by a break in the wires connecting the ignition switch and starter;
- Short circuit, break or breakdown of the solenoid relay windings to ground.
When the electric motor starts and the solenoid relay is operational, the armature rotates slowly or does not rotate at all.
- The contact on the terminal bolts of the solenoid relay is broken;
- High wear of brushes or their jamming;
- Burning or overheating of the collector plates;
- Breakdown of the stator winding caused by insulation failure or interturn short circuit;
- Damage to the insulating layer of the positive brush holder;
- Short circuit of collector plates caused by insulation failure;
The armature of a running starter rotates, but the crankshaft does not spin.
- Overrunning clutch slipping;
- Mechanical damage to the freewheel (buffer spring, underwater ring);
- The starter drive fork is flying out or damaged;
- Difficulty in moving the drive along the thread on the anchor shaft.
After starting the engine, the starter continues to operate.
- Drive fork jamming;
- Damage to the ignition switch spring;
- Jamming of the solenoid relay or starter drive contacts on the anchor shaft;
- Damage or stretching of the springs that return the solenoid relay or overrunning clutch;
- Solenoid relay jammed;
- Warping of the electromagnetic motor caused by unscrewing its fastenings to the internal combustion engine.
Increased noise when the starter is running.
- Increased wear of individual parts of the armature (necks and bushings);
- Violation of the integrity of the starter housing at the drive location;
- Mechanical damage to the teeth of the flywheel or bendix;
- Insufficiently tightened motor mounts;
- Contact of the armature with the pole during rotation due to the weakened fastening of the latter inside the unit.
conclusions
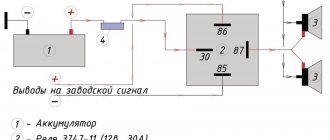
Let's look at Diagram 1 again. If the key is not transferred to the start mark, the S terminal is "hanging in the air." This is done for each vehicle, even if there is an auxiliary relay in the circuit. And yes, there is no need to disconnect the standard wire from terminal S..... And in the case of a VAZ, it is disconnected to access the terminal.
You remove the filter, disconnect the plug, try to short-circuit it.....
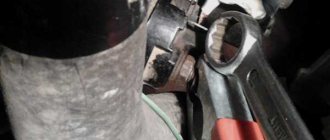
If you cannot remove the engine filter or access is limited by the battery, only the exhaust handle can be used.
It is better to close the contacts not with a screwdriver, but with any key (see photo). It is recommended that the handle be insulated.
The voltage "12 volts" is not dangerous, but an error can lead to blown fuses. Good luck.
For those who do not understand everything: the filter must be removed from the mounts, but not from the “waveguide”. The filter housing is installed on top of the battery.
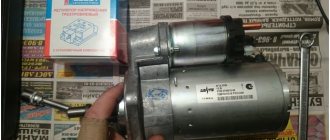
Checking the starter using the battery
Before contacting a car service center, buying a new unit or spare parts for it, you should try to check its performance yourself. With the right approach, it is possible to independently identify problems.
First of all, if you suspect a malfunction of the starting device, you need to check the contacts on the battery and starter terminals, their tightness and the presence of oxidation, the battery charge, since in many cases the problem in starting the internal combustion engine is the above factors.
- Electric motor Daoc u4 wiring diagram
Our advice
- First of all, do not allow short circuit or any other accidental short circuit of power contacts that are different from the control terminal and spade contact.
- Taking into account that direct access to the starter is often provided at the bottom, you must be prepared for the mandatory removal of standard or other protection.
- On many vehicles, the control terminal is similar to a threaded outlet.
- At the end of starting a car engine, you need to check the fuses separately, since it happens that they burn out due to errors.
- Since the traction voltage is 30-50A and higher, the connection points may stick.
- Drivers of older cars in which the switch does not control the voltage supply to the coil should be aware that when the starter is shorted, the coil may stop working.
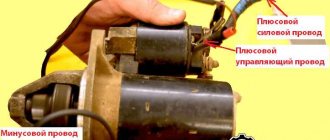
How to test the starter with a battery
Let's start diagnostics of engine starting with the first question that many car owners ask - how to check the starter on the battery and what will such a test show?
This manipulation makes it possible to determine the correct functioning of the starter, since when it is on the engine, apart from clicks (if they are heard, of course), little can be said about the operation of the device. Therefore, by closing the terminals with leads on the starter retractor and the starter housing, you can determine whether there is a malfunction in the retractor relay or the starter itself by seeing whether the relay operates and whether the starter motor turns.
Checking if the starter turns
To test the starter for its ability to extend the gear and turn (as it should work when installed on the car), you can use the battery.
For the test, you need to securely fix the part, connect the “-” terminal to the body , and the “+” terminal to the upper terminal of the relay and its switching contact . During proper operation, the bendix should move out and the gear motor should rotate .
Let’s look at how to check each component of the engine starting device separately, clearly and in more detail.
Scheme, theory and practice
Let's look at the wiring diagram for each electric starter. Contact B is constantly energized.
Starter and its external circuits
In the diagram we see three “positive” contacts and one negative (8), which is always connected to the body. Which should be shorted:
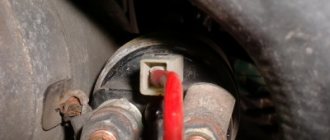
- Before shorting the starter, you need to find the S terminal. It is often made in the shape of a petal;
- How to distinguish between contacts B and M: the first will have the potential “+12”;
- Close contact B with terminal S. This is done briefly and with the “neutral” switched on;
- Do not short circuit terminals M and B.
Let's move from theory to practice. In the VAZ-2114 everything looks simple.
Terminal B here is covered with a rubber band, and tab S is in contact with the terminal in plastic. Before “closing” it is necessary to remove the plastic plug.
Closing the starter contact using a screwdriver
Make sure that the metal of the screwdriver does not touch the relay body when closing it. Failure to comply with this requirement will result in a short circuit between the “+” and “ground” contacts. (dangerous). All work must be carried out with the ignition on.
- B - bold, “thick” wire;
- M - engine;
- S - Start.
How to check the solenoid relay
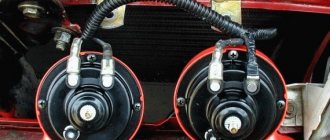
To check the starter solenoid relay, you need to connect the positive battery terminal to it , and the negative terminal to the device body . When the relay is working properly, the Bendix gear will move out with a characteristic click.
Checking the Solenoid Relay Using a Battery
The gear may not extend due to:
- burnt retractor contacts;
- jammed anchor;
- burnout of the starter winding or relay.
Recommendations
Systematic starting directly can lead to malfunctions in the vehicle wiring. This type of connection can be used one time. To correctly close a knot directly, you should follow several rules:
- Select a metal product with a large cross-section. This will prevent the part from heating up and causing a burn.
- It is necessary to close the nuts, not the threaded surfaces. Violating this rule will damage the threaded connection.
- When connecting, do not touch other parts. The mass of a vehicle is its body. Connecting pads and other parts will result in a short circuit.
- Turn off the power immediately after starting the power plant. Untimely shutdown will cause the drive gear (Bendix) to break.
Taking into account these recommendations, you will be able to correctly close the electric starter with a screwdriver or other object.
How to check starter brushes
Brushes can be checked in several ways, the simplest of which is checking with a 12 volt light bulb . To do this, connect one terminal of the light bulb to the brush holder, and the other to the body; if it lights up , then the brushes need to be replaced , since there are breakdowns in the protection.
Checking starter brushes for short circuit to ground
The second way to check the brushes - with a multimeter - can be done on a disassembled starter. The task will be to check for a short to ground (should not short). To check, the resistance between the main plate and the brush holder is measured with an ohmmeter - the resistance should tend to infinity .
Also, when dismantling the brush assembly, be sure to carry out a visual inspection of the brushes, commutator, bushings, windings and armature. After all, when the bushings are worn out, there may be a drop in current during startup and unstable operation of the motor, and a damaged or burnt commutator will simply “eat” the brushes . Broken bushings, in addition to contributing to armature misalignment and uneven wear of brushes, increase the risk of an interturn winding short circuit.
How to check bendix
The operation of the Bendix starter is also quite simple to check. You need to clamp the overrunning clutch housing in a vice (through a soft spacer so as not to damage it) and try to turn it back and forth, it should not rotate in both directions. It turns - the fault lies in the overrunning clutch , because when you try to turn it in the other direction, it must stop. Also, the bendix may not engage, and the starter will turn idle if it is simply stuck or the teeth are eaten away. Damage to the gear is determined by visual inspection, but the occurrence can only be determined by completely disassembling everything and cleaning the gearbox from dirt and dried lubricant inside the mechanism.
Indicator light for checking the starter winding
How to check the starter winding
The starter stator winding can be checked with a flaw detector or a 220 V light bulb . The principle of such a check will be similar to checking brushes. We connect a light bulb up to 100 W in series between the winding and the stator housing. We attach one wire to the housing, the second to the winding terminal (from the beginning to one, then to the other) - it lights up, which means there is a breakdown . There is no such control - we take an ohmmeter and measure the resistance - it should be about 10 kOhm .
The starter rotor winding is checked in exactly the same way - we turn on the control unit in a 220V network and apply one terminal to the commutator plate, and the other to the core - it lights up, which means that the winding needs to be rewinded or the rotor must be completely replaced.
How to check the starter armature
To check the starter armature, you need to apply 12V voltage from the battery directly to the starter, bypassing the relay. If it spins, then everything is fine with it , if not, then there is either a problem with it or with the brushes. It is silent, does not spin - you need to resort to disassembly for further visual diagnostics and checking with a multimeter (in ohmmeter mode).
Checking the starter armature with a battery
Basic anchor problems:
- breakdown of the winding to the housing (checked with a multimeter);
- wiring of collector terminals (can be seen upon detailed inspection);
- interturn short circuit of the winding (checked only with a special PPYa device).
Burnt-out lamellas due to poor contact between the cockerel and the tavern
Very often, a winding short circuit can be determined by a detailed visual inspection:
- chips and other conductive particles between the commutator lamellas;
- burnt out lamellas due to contact between the winding bar and the cockerel.
Also, very often, uneven wear of the commutator leads to brush wear and starter failure. For example: protrusion of insulation in the gap between the lamellas, due to the displacement of the commutator relative to the shaft axis.
The depth between the grooves of the armature commutator must be at least 0.5 mm.
How to check with a multimeter
Often, the average car owner does not have the opportunity to check with a test light or a flaw detector, so the most accessible methods of checking the starter are checking with a battery and a multimeter . We will check the brushes and windings of the starter for short circuits in the megger or continuity modes, and the relay windings for low resistance.
So, how to check the starter with a multimeter - you just need to disassemble it and measure the resistance between :
- brushes and plate;
- winding and housing;
- collector plates and armature core;
- starter housing and stator winding;
- the ignition switch contact and a permanent plus, also known as the shunt bolt for connecting the excitation windings of the starter motor (the condition of the relay pull-in winding is checked). If working properly there should be 1-1.5 ohms;
- the ignition connection terminal and the traction relay housing (the holding winding of the traction relay is checked). It should be 2-2.5 ohms.
There should be no conductivity between the housing and the winding, the rotor shaft and the commutator, the ignition contact and the positive contact of the relay, and between the two windings.
It is worth noting that the resistance of the armature windings is negligible and cannot be determined with a conventional multimeter, so you can only ring the windings for the absence of a break (each lamella of the collector must ring with all the others) or check the voltage drop ( should be the same for all ) on adjacent lamellas when applied to them DC (about 1A).
Finally, we present for you a summary table that contains information on what methods can be used to check this or that part of the starter.
| Tested elements and methods | Solenoid relay | Anchor | Starter brushes | Starter winding | Bendix |
| Multimeter | |||||
| Visually | |||||
| Battery | |||||
| Bulb | |||||
| Mechanically |
I hope this information helped you learn how to test the starter yourself in a garage, having only a battery or a multimeter at your disposal. As you can see, checking the starter for functionality may not require professional equipment or knowledge of electrical circuits. need basic skills in using an ohmmeter and a tester with a control light. But for professional repairs, you also need a PYA - an anchor testing device.
How to connect the starter directly to the battery
Russian motorists and owners of old used cars often have problems starting their cars. The culprit turns out to be not so much the starter as the elements of its inclusion and switching. The question automatically arises regarding how to connect the starter directly from the battery or something else. I wonder if this is possible to do?
How to make a start button instead of an ignition key in a car with your own hands
Oddly enough, this issue very often worries motorists and not only for aesthetic reasons - in the spirit of the times. The contact group located behind the ignition key very often fails, and changing it is far from an easy task.
In older cars, often the wires from the starter itself are connected directly to contacts inside the contact group, which close when the ignition key is turned. When the starter is activated, a very large amount of energy is consumed, which means a large current flows (the contacts strike a spark). Over time, a burnt deposit forms on the contacts or they completely burn out, no longer providing reliable contact. Newer vehicles have a separate relay that closes the starter contacts when the ignition key is turned.
Turning on the starter directly from the battery
ATTENTION! A completely simple way to reduce fuel consumption has been found! Don't believe me? An auto mechanic with 15 years of experience also didn’t believe it until he tried it. And now he saves 35,000 rubles a year on gasoline! Read more"
To make a direct contact with your own hands, you just need to get a piece of copper cable, a connector and an alligator clip. These three components are used to solder a device that will run the starter directly from the battery.
How to connect the starter directly with a separate wire
More details:
- Under the hood of the car, near the right headlight, there is a red wire with a plug that needs to be disconnected and the prepared cable with a connector inserted into it;
- The car is idled;
- The ignition is turned on;
- The crocodile connects neatly to the positive side of the battery.
These manipulations are often enough to start the starter if it is working and has no other problems. After the car starts, the crocodile needs to be thrown off the plus side.
It is recommended to always keep such a homemade device with a connector and a crocodile in the trunk as a last resort. After using it, it is simply pulled out, and the previously removed plug is put back in place. Everything is easy and simple, except for one thing - you need to work carefully so as not to get burned or short circuit something else.
Method two - towing
No less efficient and even more reliable, but you need another machine more powerful than your car. It will be enough to tow the vehicle for a short distance, and then start the engine in the same manner as described above. In this case, I would like to give a couple of practical tips:
- Do not turn off the car after it has started and then go straight to the service center;
- Do not forget that after starting the car, it will pick up speed if it is in second gear and you press the accelerator pedal;
- Don’t forget that after starting, the car towing you will stop. Therefore, you will need to have time to slow down.
Each of the listed options can be used to get to your home or service station. It is highly not recommended to use them every day.