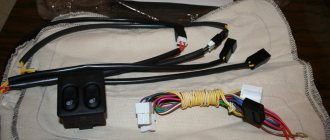
Fog lights are designed to generate a flat and wide stream of light directed above the road surface. This direction of the light beam allows minimizing illumination of the volume of fog in thickness and improves visibility from the driver’s seat. Failure to follow the rules and wiring diagram for fog lights when installing them yourself can lead to accidents.
Purpose and advantages of PTF
Fog lamps are needed to illuminate the road surface during rain, fog, etc. Other purposes for using PTF:
- to illuminate sections of the right edge of the curb;
- to illuminate the area located directly in front of the car hood;
- allows you to get maximum visual information about the condition of the road;
- like daytime running lights.
Advantages of using PTF:
- wide functionality - their inclusion allows you to solve several problems related to lighting at once;
- the best view of car dimensions even at a great distance.
The rules for installing PTFs depend on their type. There are certain connection diagrams that should be followed during installation.
Installation requirements
Most motorists who have diligently studied the theoretical course at a driving school know that they cannot voluntarily install devices on their cars that are not provided by the manufacturer, but the installation of fog lights is prescribed in the traffic regulations.
Even if the car from the manufacturer is not equipped with fog lights, each car owner can install them by removing them separately or by redoing the bumper. It must be remembered that when reworking, serious changes are made to the design of the machine, and this is already considered a partial re-equipment.
Installation rules:
- it is allowed to install two fog lights;
- the maximum distance between the headlight and the side surface is 0.4 m;
- The minimum distance from the PTF to the road is 25 cm.
Installation of PTF is carried out in accordance with the established standards.
On a note!
The PTF may need adjustment, since the angle of incidence of the light flux on the road surface must comply with the rules.
PTF selection
First, determine the location of their installation on the car. Often, foreign cars have niches on the bumper for installing additional lights. Then the fog lights are selected so that their shape and size correspond to these niches in the bumper.
Important! The quality of performance of PTF functions is practically not affected by their power. Therefore, it is advisable to choose low-power light sources - LED lamps.
On SUVs, PTFs are installed at the level of conventional headlights or on the roof of the car. In this situation, PTFs of any size and shape are suitable. The main thing is that they are equipped with brackets that provide reliable fastening.
The main difference between fog lights is the lamps used in them. There are the following types of PTF:
- Halogen. The most affordable option. The downside is the low lifespan compared to other types of lamps. Before you buy these headlights, make sure that you can easily replace them when they break down.
- LED. Their main advantages are durability and efficiency. The downside is the price. If LED headlights are not installed correctly or are poorly ventilated, their lifespan will be shortened.
- Xenon. Pros: good technical characteristics. Such models are durable and effective. The downside is the high cost.
Historical reference
The four-door VAZ 2110 sedan was produced by the Volzhsky Automobile Plant from 1995 to 2007. And unlike the usual Lada cars, the model was positioned as a higher-class car.
In particular, the car was equipped with:
- electronic engine control system (ECM);
- diagnostic unit (on-board computer);
- galvanized metal was actively used in body parts;
- the body was painted using a new, more progressive technology.
Connection options and diagrams
If the car does not have wiring for the PTF, you will have to lay the necessary wires yourself. There are two options - through a relay and through a button.
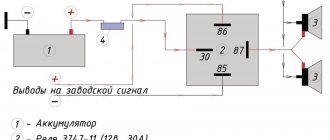
Via relay
To connect fog lights via a relay, you need to stock up on cutting tools and a terminal block. You will also need corrugation, heat shrinkage and electrical tape.
Installation rules via relay:
- Find a place in the car to mount the relay. Attach it so that it can be easily reached in case of replacement or repair.
- Find a place for the button.
- Prepare the power cables. The length should be such that the wires can be laid freely, without tension.
- Install a 10 A fuse. From pin No. 30, lay the finished wire to the “+” terminal of the battery.
- From pin No. 85, take the wire to the power button.
- Connect ground to the relay using pin No. 86.
- Place the PTF on the bumper.
- Connect the “–” wire from the body and the “+” wire from contact No. 87.
- Turn on the headlights and check their operation.
On a note! It is not recommended to connect the PTF autonomously. They will drain the battery in a matter of days.
Via button
If the PTF is connected via a button, any wire with voltage is sufficient. As a rule, power is taken from the “+” dimensions or from the ignition system wiring.
The red wire carries “+”, the black wire carries ground connected to the body. Find a place on the panel that your hand can easily reach, and place the button there.
This connection scheme for PTFs is recommended for motorists who tend to forget to turn them off when stopping the car. They turn off when the driver, having finished driving, takes out the ignition key.
What will you need to install fog lights?
To install fog lights yourself, a minimum set of tools is required. The car owner must have knowledge and skills in working with electrical wiring, since the safe operation of the car as a whole depends on the correct installation.
- color electrical diagram of the car;
- nippers or side cutters;
- wire cleaning knife;
- terminal crimping pliers (terminal block);
- soldering iron
Set of materials required for installation:
- a set of fog lights suitable for installation in standard holes in the bumper or universal ones that are mounted on the surface of the bumper;
- stranded copper wire with a cross-section of 1.5-2 mm² with insulation capable of operating at low temperatures and resistant to gasoline and oil vapors;
- relay for turning on (standard headlight turn-on relays from front-wheel drive VAZ models are usually used);
- remote housing for installing a blade fuse;
- 30 A blade fuse;
- a control key that matches the interior design (preferably with a backlight);
- connectors and terminals for connecting wires to circuit elements;
- heat shrink tube of suitable diameter;
- electrical tape on a polyethylene or fabric basis;
- plastic ties;
- automotive corrugated hose for laying wires.
Set of fog lights for Ford Focus 3
Connection diagrams
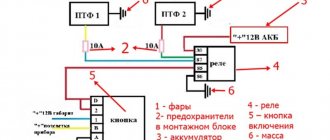
The connection diagram for fog lights is chosen by the car enthusiast at his own discretion. There are two options - serial or parallel connection.
Parallel circuit
In a parallel circuit, the potential difference is supplied only when the engine is started or the ignition is turned on.
The “+” wire is connected to the headlights from the relay element contact. The latter is recorded through a 15 A fuse - its limit is quite enough for most foglights. It is recommended to install the fuse link closer to the battery terminal.
If you connect 12 V to the PTF from the charging control signal wire, then when you turn on the engine, the headlights can turn on automatically.
Connection order:
- The “–” contact from the headlights is connected to the body.
- The “+” terminals are connected to each other and connected to relay terminal No. 87.
- Relay contact “+” No. 30 is connected to the battery.
When switched on in parallel, each headlight is fully powered, which allows you to maintain the brightness of the lamps. The current consumption increases.
Series circuit
This circuit minimizes current consumption, and the bulbs burn less brightly than they could. This scheme is used if PTF replaces the main headlights.
Procedure:
- The “–” contacts of the headlights are connected to each other.
- The “+” terminal of one headlight is connected to the body, the other is soldered into the relay.
- The button and cable “+” from the ignition are connected to terminals No. 85 and No. 86.
- Contact No. 30 is connected to the “+” terminal of the battery.
The fog lights come on when the engine starts and turn off when it stops.
On a note! Modern foreign cars provide special pre-installation electrical preparation - this is judged by the “fog lamp relay” terminals.
P O P U L A R N O E:
Solar battery for charging your phone
Of course, it would be nice if the phone was charged or at least partially recharged from a solar energy source. For some reason, phone manufacturers don't produce self-charging phones. But there is still a phone (Samsung E1107) that, under ideal conditions, can be fully charged from the sun in 55 hours. It’s a pity that so-called ideal conditions do not exist everywhere.
A solar power plant is a modern way to supply electricity to our home. The question of using alternative energy sources arises for many people. And this is not surprising, because the constant rise in electricity prices makes us think about this more and more often. So the question arises: why not use free, inexhaustible natural resources - wind, sun, water? Let's talk today about solar energy, or more precisely about a solar power plant.
Previously, we published charger diagrams for car batteries.
Today we will look at several schemes using the widely used specialized MS TL494.
The charger discussed below is assembled according to the circuit of a key current stabilizer with a unit for monitoring the achieved voltage on the battery to ensure that it is turned off at the end of charging.
Safety and comfort are the main qualities worthy of the attention of a car owner. If you care about yourself and each passenger, choose a fully equipped vehicle. Fog lights are not a mandatory component of the car: manufacturers often ignore this functional and useful element, wanting to reduce the cost of the cars they produce as much as possible. How to install and adjust fog lights will be discussed below.
Mounting options
Before installing the PTF, an electrical wiring diagram is developed - it will eliminate unnecessary wiring and guarantee the functioning of the electrical circuit.
Bumper mounting
There are 3 installation options: in the openings provided by the manufacturer, on a bracket or in a blind bumper where there is no niche for PTF.
To configure, use a homemade template. It is installed at a distance of 5 cm from the PTF. During adjustment, the coincidence line is set at a distance of 10 cm below the center of the lamps. By adjusting the headlights, they provide increased visibility and minimize the likelihood of being dazzled by oncoming cars.
Installation in a blind bumper
This option is labor-intensive; you have to cut out holes for the PTF.
Procedure:
- Remove the bumper and mark where the headlights will be.
- Drill holes around the perimeter, and then cut out a piece of the bumper with a sharp knife.
- Attach the headlights with appropriately sized bolts. Mount the protective cover - attach it to the bumper.
The headlights are adjusted using a special key - it is included in the package.
Other installation methods
PTF can be placed on a bracket made of durable steel. The bracket is fastened in accordance with the PTF installation standards. The part is secured with self-tapping screws. PTFs are installed at the mounting points and the wiring is connected.
Installation in the opening provided by the manufacturer:
- Raise the car by placing a 20 cm thick wooden beam under the front wheels.
- Remove the protective shields that cover the bottom of the bumper.
- Unscrew the fasteners from the plugs provided by the manufacturer.
- After inserting the PTF into the guides, attach them with self-tapping screws.
If non-original headlights are installed, the dimensions and mounting points may not match. Then the elements have to be adjusted.
Common Mistakes
If a car enthusiast does not have experience in electrical installation work, it is easy to make a mistake when installing a PTF. In order to properly connect the headlights, it is recommended to learn in advance about the typical mistakes of beginners.
Disadvantages and problems:
- The problem arises when connecting the PTF to the dimensions. This system is not designed to handle the current that it must carry due to the additional load introduced. As a result, overheating and melting of the wires is observed. If the PTF lights up along with the dimensions, the equipment will quickly fail.
- If the PTF installation parameters do not meet traffic regulations, traffic police officers may file claims against the driver. If they find a violation of established standards, the driver will be fined.
- It happens that a car enthusiast chooses the wrong place for a button. If it is located too far away, it is difficult for the driver to reach it. This can cause an accident.
If you often drive in poor visibility conditions, you should install PTF. Thanks to them, you will be able to better control your car in difficult conditions, which will provide you with a higher level of safety when driving.
STAREXCLUB.RU
Club forum of minibus owners HYUNDAI STAREX, H-1, GRAND STAREX
- Current time: 17 Sep 2022, 03:17
- Entrance
- Registration
- FAQ
- List of forums
- Hyundai GRAND STAREX (2007-2018)
- “Folk Art” - non-standard works of grandees
Connecting PTF as DRL
- Issue a warning
- Information
- Quote
Connecting PTF as DRL
Message: №1 nalapapam » June 13, 2014, 00:54
- Issue a warning
- Information
- Quote
Re: Connecting PTF as DRL
Message: №2 arival52 » June 13, 2014, 03:51
- Issue a warning
- Information
- Quote
Re: Connecting PTF as DRL
Message: No. 3 kalyunin » June 13, 2014, 07:05
- Issue a warning
- Information
- Quote
Re: Connecting PTF as DRL
Message: №4 nalapapam » Jun 13, 2014, 08:09
- Issue a warning
- Information
- Quote
Re: Connecting PTF as DRL
Message: №5 coffeplus » June 13, 2014, 08:16
- Issue a warning
- Information
- Quote
Re: Connecting PTF as DRL
Message: №6 kalyunin » June 13, 2014, 10:21
- Issue a warning
- Information
- Quote
Re: Connecting PTF as DRL
Message: №7 arival52 » June 13, 2014, 11:09
There, DRLs (with a control signal), when “+” is received on the control wire, the DRLs turn off.
- Issue a warning
- Information
- Quote
Re: Connecting PTF as DRL
Message: №8 nalapapam » June 13, 2014, 21:10
In general, my would-be electricians solved the problem: according to them, the control signal was taken from the starter (from the ignition switch). Now the PTFs are turned on only after the engine is started and only with the key. When started remotely, the PTFs are not turned on. I also asked them to install a relay to turn off this entire structure when the dimensions are turned on. Now I have turned on the auto light function and: during the day only the PTF lights are automatically lit, and at night the low beam (+, optional, PTF). For all this “folk art” they made a separate switch. For now we hung it on clamps to the fuse block, under the cover. Because There is no space in the block of standard switches.
Initially, I didn’t want to farm with LEDs for several reasons: 1) Budget: Installing DRLs is a more expensive undertaking than installing two relays. 2) Reliability: with inexpensive LED DRLs it’s like a lottery - you don’t know how long they will last. And since they are installed low, they will probably like Moscow salt. 3) Aesthetics: as they say, all markers have different tastes and colors. Well, I didn’t like all the installation options published in the corresponding topic. It’s difficult to judge from the photos, but, IMHO, the visibility of the car with them is not much greater than without them.
- Issue a warning
- Information
- Quote
Re: Connecting PTF as DRL
Message: No. 9 VikDD » 05 Aug 2014, 08:18
- Issue a warning
- Information
- Quote
Re: Connecting PTF as DRL
Message: No. 10 455651 » 05 Aug 2014, 09:22
- Issue a warning
- Information
- Quote
Re: Connecting PTF as DRL
Message: No. 11 VikDD » 05 Aug 2014, 10:02
- Issue a warning
- Information
- Quote
Re: Connecting PTF as DRL
Message: No. 12 Klopius » 05 Aug 2014, 16:38
- Issue a warning
- Information
- Quote
Re: Connecting PTF as DRL
Message: No. 13 VikDD » 06 Aug 2014, 08:03
- Issue a warning
- Information
- Quote
Re: Connecting PTF as DRL
Message: No. 14 a.sharikoff » 06 Aug 2014, 08:17
- Issue a warning
- Information
- Quote
Re: Connecting PTF as DRL
Message: No. 15 MaksimZenau » May 12, 2015, 12:18
- Issue a warning
- Information
- Quote
Re: Connecting PTF as DRL
Message: No. 16 vbif » May 13, 2015, 00:53
