The manufacturing plant does not install fog lights on all VAZ 2114 vehicles, but only on those that have the LUX complex. But a place for their installation in the general electrical system is provided on all cars without exception. The mounting block also has sockets for their fuses. So the car owner can order the installation of PTF at a car service center, at a car dealership during the purchase, or do it himself if he has the skills to work with electrical equipment. It happens that the fog lights already installed on the VAZ 2114 do not light up. In this article, the reader will get acquainted with the PTF connection diagram and find out the reasons for non-working PTF
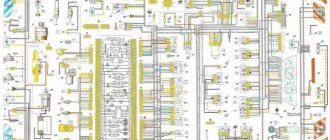
PTF connection diagram
The power source for the fog lights is the battery (3). The wire from the positive terminal of the battery is connected to a relay (4), from which four wires come out: in the diagram, positive potentials are marked with numbers 85 and 87. Two wires come out of potential 87, which are connected through fuses (2) with a current of 7.5 A in the mounting block to the left and right PTF (1). The wires in the relay (4) are connected through a single contact, and this is the reason why both headlights turn on and off at the same time, and if the relay fails, both headlights also do not work. The wire from the positive potential 85 is connected to button 5. The negative potential 86 in the relay is connected to ground. The button, in turn, is also connected to ground by contact A. The standard factory button has a backlit display, its wiring is closed to the positive contact B.
What do they check on the road?
In the Traffic Rules, the list of faults for which driving is prohibited is relatively short:
- failure of the service brake system
- steering failure
- headlights and tail lights not working in the dark or when visibility is poor
- The driver's side windshield wiper does not work in rain or snow.
You still cannot tow a trailer if the towbar is faulty.
Unexpected reasons for non-working PTFs on the VAZ-2110
The most common cause is a blown fuse.
But we will return to it later. There is still a lot that is still unknown in the design of foglights, relays, switches and lamps. For example, a possible reason for the failure of fog lights could be a completely unexpected breakdown.
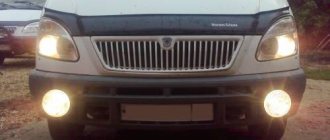
First of all, we check the bulbs themselves; you can get to the left one through the hood.
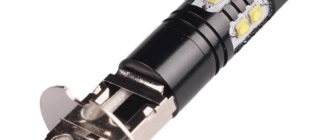
On some versions of the VAZ-2110, a PTF from the Avtosvet plant (Kirzhach) was installed with a socket for the H1 lamp. Stock lamps are not the best quality and they do not like sudden changes in temperature.
It is quite difficult to get to the right fog lamp through the hood; it is easier to remove the headlight itself by unscrewing the screws.
During sudden cooling, when leaving the garage in winter, for example, or after turning off the headlights, the contact leg of the lamp bulb simply fell off the conductor . At the same time, visually the halogen lamp looked absolutely intact. It was enough to apply a plus directly to the leg itself, and the lamp would light up. The fault was due to poor-quality resistance welding, and it is almost impossible to detect the cause without a detailed examination of the lamp itself and its dismantling.
Of course, it is impossible to provide for all failure options, but we will consider the most common ones.
One fog light on VAZ-2110 does not light up
There may be plenty of options here. Apart from damage to the lamp itself or its filament, the picture is as follows:
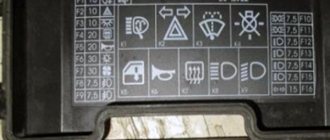
- Fuse . When correctly installing PTF on the ten, as a rule, they use the scheme presented above. F4 or F14, is responsible for the operation of each lamp . They are located in the mounting block, which is located in the niche of the front panel to the left of the driver. When replacing a fuse, we do not use bugs or jumpers, but only new fuses.
The front right fog light is fuse F4, the left one is F14, both are 10A.
We find the wires with blocks coming from the headlights and check their condition.
Two fog lights do not light up at once
If this happens, it is impossible to allow two lamps or two fuses to burn out at once. Most likely, the reason should be looked for elsewhere:
- Oxidation of contacts on connector Ш1 in the mounting block . We remove the connector and evaluate the condition of the contacts. Just in case, check fuses F1, F14, F4.
The connectors are located on the reverse side of the mounting block.
Installation methods
There are several options to equip your car with a fog light system. The choice depends on your personal preferences and capabilities.
Way
Peculiarities
Buying a bumper with built-in PTF
Such bumpers are bought at a tuning studio, where everything will be connected and connected for you. The disadvantage of this option is the high cost
Buying a bumper from a VAZ 2115 and installing it yourself
To do this, you will have to buy a bumper from an older model, which has holes for fog lights. All that remains is to find a suitable set of PTFs and install them
Purchase of PTF and facing elements - glasses
Today this method is in greatest demand because it allows you to do the installation yourself for little money.
The standard PTF kit includes several elements:
- Headlights;
- Light bulbs;
- Switching relay;
- Set of wires;
- Connection diagram;
- Button to turn on/off PTF.
When choosing a set, pay attention to the fact that the headlights match the shape of the glasses, that is, the facing elements.
Standard kit
Today, for VAZ 2114 owners who want to install fog lights, it is recommended to choose rectangular kits from the Kirzhach company. It is used for factory installation of PTF on expensive versions of the model.
Xenon in PTF
Many car owners are thinking about installing xenon lamps in their fog lights. Is it good? Not really.
The thing is that when installing xenon in the PTF, focusing is disrupted. The operating principle of xenon is somewhat different compared to conventional Kirzhach type lamps.
Standard PTFs are designed for certain types of lamps, so they cannot cope with xenon. As a result, excessive reflection is observed in the reflector, rays are refracted, and the light is blurred. Where does this lead? To blind oncoming drivers.
The xenon option is not a practical or successful solution. Therefore, we recommend that you avoid it.
Another option is a combination of xenon and yellow fog lights. You will need H1 xenon bulbs, which are mounted in a bottle cap and only then placed in the headlight. This way the light beam has smoother boundaries, does not blind oncoming traffic, and better illuminates the roads in bad weather. Only after installing this combination lighting, be sure to make sure that your headlights really do not blind oncoming cars.
PTF relay does not work
The VAZ 2114 PTF is turned on through a relay that is installed in the fuse box or in another place that was selected by the electrician when installing the foglights independently. You can check the serviceability of the VAZ 2114 fog lamp relay by turning on the PTF button. If you hear a click inside, then the relay is working; if not, replace it
PTF power button does not work
The fog light switch may also be the reason why the fog lights are not working. Replacing the VAZ 2114 PTF on and off button is quite easy.
Features of PTF operation
These lighting fixtures differ in the light they emit. They can glow with yellow or white light, their main feature is that they do not illuminate the fog ahead, resting the beam on it, but create a flat, wide beam that spreads along the road.
Road lighting
To ensure good visibility in bad weather conditions, the following two rules must be observed:
- Adjust precisely the boundary of the light beam emitted by the optics. The beam should not shine above the specified horizontal plane.
- The lamp must be at a minimum distance from the road surface. Under such conditions, it is easier to precisely adjust the boundary of the light beam.
Adjusting foglights on a car
It becomes clear that these lighting sources are necessary to ensure good visibility on the road in difficult weather conditions.
To ensure high-quality light from the beam, it is necessary to monitor the condition of the surface of the lampshade: polish, remove scratches that reduce the transmission capacity of the glass.
How to connect fog lights on a VAZ 2110 with your own hands (why they may not light up)
If you install fog lights on a VAZ 2110, you can kill two birds with one stone. Namely, to transform the appearance of the car, and increase the level of your own safety, and add comfort to driving at night.
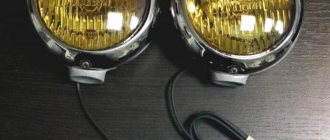
Kirzhach with lamp H1
Therefore, today we will talk about how to connect fog lights on a VAZ 2110, what is required for this and what result you will ultimately be able to achieve.
Towbar
You should not go out on the road with a faulty towbar. A detached trailer is a terrible projectile that can cause a lot of trouble. Therefore, it is important to check not only the coupling device, but also the presence and correct fastening of safety chains and cables.
But with electrics, which often fail in trailers used sporadically, everything is not so simple. Remembering the point about lighting technology, we conclude that during the day you can get to your destination when nothing is lit on the back of the trailer. However, we recommend attaching an open warning triangle to the rear side of the trailer.
to warn drivers behind you.
CAMERAS AND DRLsNow cameras have learned to fine people for not turning on daytime running lights. If your car does not have separate standard DRLs, take a closer look at the operation algorithm of the headlights and dimensions. If they go out completely when you turn off the ignition, just keep the headlights always on - the battery will not run out while parked. If they don’t turn off, it makes sense to install a system for automatically turning on headlights or foglights in DRL mode to avoid violations and fines. If the lamp in the headlight burns out, turn on the fog lights and change the lamp as quickly as possible. As a last resort, if there is bright sun or a bright day outside, you can get there by turning on the high beams in your headlights instead of the low beams. |
Question about glass color for fog lights
On older cars, the fog lamp glass was yellow . therefore, many believe that this should be the case now, it is more correct and more effective.
In reality, everything is different. Today, auto industry leaders use exclusively clear glass for fog lights, which are superior to yellow ones in many components.
The current fog lights on the VAZ 2110 are available in two versions - transparent and corrugated. Most people choose transparent glass, although in fact, corrugated glass is better. They provide a clear directional beam that can show its best side during fog or rain.
Video “Replacing PTF”
This video demonstrates how to remove fog lights and how to replace them (the author of the video is Sergey Glazyrev).
Fog lights are a very useful option; driving with them is much more comfortable not only in bad weather, but also just at night, as they illuminate the road well. But sooner or later you have to face the fact that the light bulb in the fog light has burned out and needs to be replaced. This is not so easy to do, because sometimes, in order to get to the light bulbs, you have to remove the front bumper. Let's try to figure out whether this can be done without removing the bumper?
Hard to reach places
The whole problem is that the fog lights are screwed to the bumper from the back side and it is very difficult to get to them. Access from above blocks the engine cooling radiator and the body itself. And at the bottom, as a rule, the engine protection and other plastic boots are installed. And it’s not so easy to find an accessible overpass so that you can safely dig around under the car. But there is one way that motorists simply forget about - climbing through the wheel arch.
Removing the fender liner
On most modern cars, the fender liners in the front wheel arches can be easily removed, allowing access to the front of the car. All we need is a basic set of tools, a jack, new fog light bulbs and a little time. First of all, we twist the steering wheel all the way, so that the wheel does not interfere with us removing the fender liner. Then we put stops under the wheels and raise the body on a jack. We remove the plastic covers by snapping their clips off the bumper.
Once you remove all the plastic, you will have access to the front bumper. For greater convenience, you can illuminate your workspace with a flashlight. You can reach the fog light with your hand, remove the old bulb from it and insert a new one. Then we put everything back together and rejoice at the work done and the money saved on visiting a car service center.
Tools:
- Mini washer
- Medium flat screwdriver
- Medium Phillips screwdriver
- Ratchet wrench
- Head 10 mm
- Curved round nose pliers
- Knife
Parts and consumables:
- Front fog lamp assembly with bulb for vehicles produced before 08.2009 (MN142091/8321A285, if necessary)
- Front fog lamp assembly with bulb for vehicles produced from 09.2009 with engines 4B11/4B12 (8321A353/8321A466, if necessary)
- Front fog lamp assembly with bulb for vehicles produced from 09.2009 with 6B31 engine (8321A354/8321A467, if necessary)
- Front fog lamp for vehicles produced before 08.2009 (8321A034/8321A286, if necessary)
- Front fog lamp for vehicles produced from 09.2009 with engines 4B11/4B12 (8321A370/8321A482, if necessary)
- Front fog lamp for vehicles produced from 09.2009 with 6B31 engine (8321A371/8321A483, if necessary)
- Front fog lamp glass BR201-1013N/RNMEG03-080-Z (if required)
- Sealant (clear or black)
Note:
Replacing the fog light is necessary if it is damaged while driving.
Replacing the front fog lamp
1. Remove the front bumper as described in this article.
Note:
In later versions (from 09.2009) there is no need to remove the bumper, because the fog lights are mounted externally. You just need to remove the headlight frame by turning it counterclockwise a few degrees, and then do steps 2-3 in reverse order. Removing PTFs of new versions is described in more detail in the glass replacement subsection.
2. Press the lock of the front fog lamp wiring harness block and disconnect the block from the lamp socket connector.
3. Remove the four (three, depending on the version) screws securing the fog lamp to the front bumper bracket.
4. Move the fog light power wiring harness aside and remove it from the bumper.
5. Install the new fog light into the bumper.
Note:
If the lamp is also damaged, replace the headlight and lamp assembly. The headlight marking is located on its back, near the base.
6. Reinstall the bumper in the reverse order of removal.
Replacing the front fog lamp glass
Note:
The fog lamp glass is subject to extreme heat and may break if exposed to snow or cold splashes. In this case, it is necessary to replace the PTF glass, but the original Mitsubishi catalogs offer to replace the entire PTF, and the price is high. Therefore, if there is no damage to the fog lamp housing, only its glass can be replaced. Replacing the fog lamp glass is shown on a car produced from 09.2009.
1.1. (manufactured before 08.2009) Remove the fog lamp as described above.
1.2. (issue from 09.2009) Unscrew the fog lamp frame counterclockwise a few degrees and remove it.
2. (release from 09.2009) Unscrew the three screws securing the headlight.
3. (issue from 09.2009) Remove the fog lamp from the front bumper and disconnect the wiring harness from the lamp socket connector. Disconnect the wiring harness and remove the lamp by turning it counterclockwise approximately 45°.
4. Using a screwdriver, remove the broken PTF glass.
5. Clean the fog lamp groove from any remaining old sealant.
6. The new glass on the rim has a protrusion that is located on the side (note the inscription “TOP” - this is the top). On the original glass, the protrusion was at the bottom. This is the difference from native glass. Using a knife, cut a recess into the side of the fog lamp housing for this protrusion.
7. Next, degrease the PTF groove and the glass, wipe the PTF reflector and the glass from the inside so that there is no dirt or streaks left.
8. Apply sealant to the headlight groove.
9. Place the glass in place and press firmly.
Note:
Buy black or clear sealant because, for example, blue will be very visible after installing the glass.
You can insert the lamp inside the bumper, turn it on and hold it at a temperature - it will dry faster.
10. Reassemble everything in the reverse order of removal.
The article is missing:
- Photo of the instrument
- Photos of parts and consumables