Cars of the Kalina-2 family are equipped with a steering rack similar in design to the Granta rack. This part transmits force from the steering wheel to the front suspension links. If you feel a knocking sound from the rack while driving, it needs to be adjusted (tightened) correctly. The effect described here can be observed after 10-15 thousand kilometers, and more often it makes itself felt on uneven roads. Next we consider how this problem is solved in practice. And the solution comes down to turning one nut.
A little theory: front suspension design
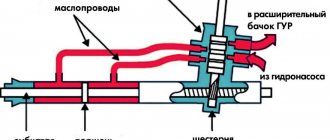
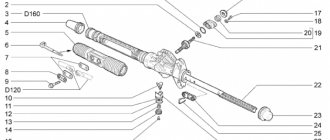
Before attempting to fix any problem, there is a tendency to look at the blueprints or repair manual. It is known that the VAZ-2192 parts catalog contains the following object:
This is what the steering rack looks like in the drawing
Whether the knock will remain in the steering rack of Kalina-2 depends on the following: how accurately element “14” is adjusted. The adjusting nut, marked “14”, looks almost invisible here. But first impressions are deceiving. In the catalog, by the way, the element is called “Stop Nut”.
It is important to know that the thrust nut has external threads. And it spins clockwise. And the words “tighten the rack” mean screwing in the specified nut, and nothing more.
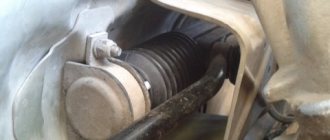
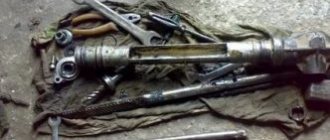
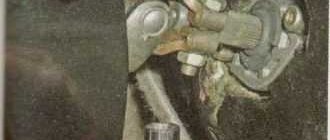
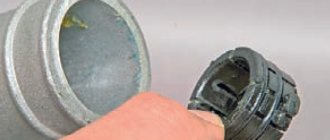
Now let's move on to practice and see what the node in question looks like in reality:
If you remove the rail, it looks like this
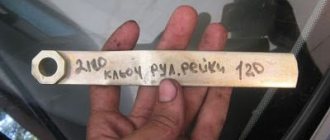
The nut has a non-standard notch, and it can only be rotated with a special tool. By the way, the recess will be closed with a cap. In the catalog it is designated by the number “15”, and now, let’s look at the appearance of the special key:
Rack adjustment key
The thrust nut is turned at small angles. We are talking about values of 10-15 degrees. What happens if you overdo it with tightening the rack? The knocking noise will disappear, but the steering wheel will turn with difficulty. Therefore, if necessary, the nut can be pulled back.
Consequences of untimely troubleshooting
Neglecting the problem can lead to even more unpleasant consequences. Driving the car will become difficult due to the increasing play - the car will begin to “float” when moving. Elements of the part will begin to collapse, which can lead to a wedge in the steering wheel. At the same time, late repairs will be more expensive, since they may require the purchase of a new unit.
The described process may take a long time, but ultimately it can lead to an emergency situation on the road. That is why you should solve the problem in a timely manner - this way you can save time and protect yourself.
At the same time, you should not take on work without experience - it is better to contact specialists who will identify the malfunction and promptly fix it.
Lyrical digression
In Lada Kalina, the steering rack never makes a knock when we are talking about a new car. This is also true for the break-in period. Let's say in your case this is not done. Then, do not try to repair anything, but go straight to the dealer. According to reviews, the defect in question is covered under warranty, and most car dealers do this: the steering rack assembly is replaced with a new one.
This is what the replacement unit looks like, the rack assembly
There is a logic here. At the factory, adjustments are made correctly (this is true in 99.9% of cases). If a defect appears, the dealer replaces the assembly without expecting that adjustment will solve the problem. The owner does not need to hope for this either. The choice is yours.
Gur and eur: do-it-yourself installation
The electric booster first appeared on Kalina, then on Grant and on the new Priora.
You can drive a car without an ESD. But if a car owner previously owned a car equipped with a hydraulic or electric booster, then, at a minimum, he will experience great inconvenience. On the Lada Granta in the minimum configuration, the manufacturer does not install electric power steering, so many owners of such cars decide to install the power steering themselves. This procedure is not the easiest, and the unit is not cheap. But its presence means a comfortable ride, maneuverability and safety.
Installation does not require any special knowledge or skills; minimal experience and a set of tools are sufficient. If, nevertheless, the question arose about installing electric power steering on the Lada Granta, then when purchasing an electric power steering unit, you should pay attention to its number.
The set of numbers contains a definition of the place of production, these are the last two digits:
- 00 – made in Makhachkala (not the highest quality, has many negative reviews);
- 04 – Korean amplifier, you can buy it in a store, a rare copy at auto wrecking yards;
- 02 – made in Kaluga, a good medium option.
To install the amplifier you will need a set of wrenches, screwdrivers and an angle grinder (grinder). Before proceeding with installation, the steering wheel, all steering column switches, the ignition switch, and the steering column with cardan must be removed. The further algorithm of actions is as follows.
- Knock out the bolts from the removed bracket in the form of a plate and cut off about 3 cm from the top with a grinder.
- Drill holes in the plate to mount the electric amplifier.
- Fix the cardan to the EUR.
- Place washers under the bracket (where the electric booster is mounted), and you can use them to adjust the steering wheel.
- Attach the electric booster, and then install the cardan into the rack.
After this, all that remains is to connect the EUR to the wiring according to the electrical diagram supplied with the amplifier. Using washers you need to adjust the steering wheel deflection in different positions. No further maintenance of the electric amplifier is required. Those who decided to replace the electric power steering with a hydraulic booster should understand that this idea is pointless.
The steering mechanism of the Lada Granta is reliable and simple to use. With timely diagnosis of faults and periodic maintenance of mechanisms, the rack and other components will last a long time without any serious problems.
Making adjustments yourself
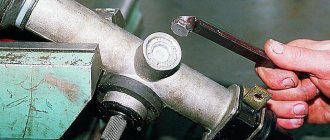
You can access the adjusting nut from the engine compartment, but to do this you will need to remove the battery, as well as the battery mounting pad. It is better to drive the car into a pit and then remove the crankcase protection (engine mudguard). If you look from under the bottom, the required element is immediately visible:
You need to turn this nut
And when you open the hood, you can feel the nut, but not see it. Its location is marked in the figure:
To make adjustments, place the key here
Before adjustment, remove the rubber cap from the recess. Its appearance is shown in the photo:
Remove the cap and install the key
If it is not entirely clear what exactly needs to be done, it is better to contact the service. The key is installed in the recess and then rotated 10-15 degrees.
When looking at the rack from above, turning the key clockwise corresponds to unscrewing it. The handle of the key comes from the center of the car - which means tightening is being done. By the way, the latter is true provided that the handle faces forward.
How to tighten the electric power steering rack?
The appearance of a knocking sound in the operation of the electric power steering is associated with the need to tighten the steering rack.
How to do it right:
- First you need to disconnect the battery; to do this, disconnect the terminals from it. Unscrew the battery mount; to do this, you need to unscrew two more nuts located at the edges. After this, the battery is removed and put aside.
- Then you need to lift the plastic stand, there are four more screws under it, they can also be unscrewed.
- Having done this, it is necessary to move this stand forward until the platform is disconnected from the air filter housing retainer pad. After this, the trim can be moved back, this will provide freer access to the rail itself.
- At the next stage, you will need to crawl your hand under the rail. Directly below it, as shown in the photo, there is a rubberized cap; it will need to be removed, this will allow the key to access the adjusting nut.
- To perform adjustment work, you will need a special wrench to tighten the rack; without it, the adjustment procedure will not be possible. Using this wrench, you need to crawl under the car rail to install the tool in the required hole.
- When adjusting, be careful not to overtighten the rack. If its tightening is very strong, then when cornering the rack will bite, and this, in turn, may affect the safety of movement. The angle of adjustment is always different, it depends on how much the nut is loose, but usually when performing such work the nut is tightened by approximately 30 degrees. This should be enough to get everything right. After the adjustment is completed, it will be necessary to check that this task was performed correctly. That is, you will need to make sure that the steering wheel turns normally to any position all the way and there is no knocking. If the knock remains, then the adjustment continues.
Preparatory actions, dismantling unnecessary parts
To remove the crankcase protection, you need to unscrew 4 screws located in one row near the bumper. Also, unscrew two screws having a standard size of M6x16. In some configurations, the protection consists of two parts, but in this case they are attached only with self-tapping screws. These words are illustrated by the following photo:
This is how the crankcase protection works in different configurations
First, unscrew the “10” screws, and then the two “18” screws. In the second case, there will be more screws (eight).
Now let's look at how to remove the battery. First of all, disconnect its terminals. Then, you need to move the additional fuse box to the side. In general, actions are performed according to the photo:
Unscrew the terminal fastenings Dismantle the mounting bracket by unscrewing 2 nuts Remove the battery and plastic pad Continue dismantling by unscrewing 4 bolts
You also need to remove the mounting platform itself, for which you unscrew 4 screws. You will need a 13mm wrench, as well as a 10mm spanner. We will repeat the entire sequence again:
- Unscrew the nuts holding the battery terminals using a wrench 10;
- Remove both terminals;
- Move the fuse box to the side by unscrewing 2 fastening screws;
- Unscrew the nuts with a 10mm wrench and remove the battery;
- Unscrew the screws with a 13mm and remove the metal plate.
Just in case, here is a look at the fuse box mountings:
Mounting screws are located under the casing
Manuals usually recommend removing the negative terminal first. But when it comes to dismantling both terminals, the order in which they are disconnected is not important.
Diagnostics
To check the amplifier in a car, you need to remove the plastic trim on the steering column; to do this, unscrew the bolts securing it from the bottom.
Then you will need to get to the 8-pin plug, its pinout is as follows:
- The blue contact is connected to the ignition switch, this is 12 volt power;
- the red-brown contact is the connection cable to the tachometer;
- the gray contact goes to the car speed controller;
- white and pink wire - amplifier control indicator;
- black-yellow contact is a diagnostic line;
- the next contact is empty, the wire is not connected to it;
- brown contact is ground;
- empty.
More accurate results will be obtained by checking the amplifier using a scanner. But since such equipment can usually only be found at service stations, you can try to check the operation of the system with a paper clip.
To check you need to do the following:
- First the ignition is turned off.
- Then, using a paper clip, you need to close contacts numbered 6 and 7 of this plug, while the plug itself does not need to be removed.
- Next, the ignition must be turned on.
- After completing these steps, the EUR failure indicator located in the dashboard will begin to blink; by the number of blinks, you can determine whether the system is broken (the author of the video is Gosha Vakhromeev).
How to understand where to look for the cause by the blinking indicator icons:
- one long signal and one short signal - the electric amplifier is working;
- one long and two short - no engine speed signal;
- one long and three short - the torque controller is out of order or there is no power supply;
- one long and four short blinks—problems in the operation of the electric power steering motor;
- one long and five short - the steering shaft position controller has failed;
- one long and six short - the motor rotor position controller has failed;
- one long and seven short - problems with the electrical network - the voltage is either too high or very low;
- one long and eight short - the control module of the electric amplifier has failed;
- one long and nine short - the speed controller is broken.
Tools for work
To make it easier to carry out all repair work, you need to ensure that you have the following tools:
- The key is "10".
- 13" socket and wrench.
- Special key for tightening the rack. (Marking for VAZ 2110 – approx.).
The cost of such a key in stores is about 100-150 rubles
We solve the problem of knocking steering rack of Lada Granta, Kalina or Priora
07 July 2022 Lada.Online 215 479
Lada cars are famous for their “sores”, one of them is related to the steering mechanism. A knock in the steering rack of a Lada Kalina, Grant or Priora may appear after the first thousand kilometers. Next, we will look at the main reasons for this knocking noise and how to eliminate them.
A knocking sound when turning the steering wheel, or when driving on an uneven road, may come from the steering mechanism (rack). Most often, to eliminate it, it is enough to adjust (tighten) the steering rack using a special wrench.
If the knocking noise remains after adjusting the steering mechanism, you should pay attention to the steering shaft crosspiece. To make sure of this, you should lift the car on a lift and shake the steering wheel from side to side with one hand, and hold the steering universal joint with the other.
If the car has high mileage, then the steering rack may need repair. Diagnostics in this case is quite simple, you should open the hood and grab the steering rod with your hand in the area where it is attached to the rack. If you pull the steering rod up and down, there should be no play.
A knock when turning the steering wheel may not always be caused by the steering rack; sometimes extraneous noise is produced by the electric power steering.
Keywords: Lada Granta steering wheel | Lada Kalina steering wheel | Lada Priora steering wheel | steering mechanism Lada Granta | steering mechanism Lada Kalina | steering mechanism Lada Priora | soundproofing of Lada Granta | sound insulation of Lada Kalina | sound insulation of Lada Priora
Share on social networks:
Found an error? Select it and press Ctrl Enter..
Guests cannot leave comments in the news, please log in.
Repair, price
A lift is a fairly simple and quick way, but often it is only a partial, temporary solution to the problem. After all, the appearance of play can be caused by various reasons - the boot may be damaged, gaskets may leak and who knows what else, that is, there is a high probability that the steering rack is running dry. In this case, there is a risk that a short time after tightening it may simply jam. Therefore, troubleshooting the rack will be very useful, at least an external inspection, it will make sure that the anthers and corrugated casing are not damaged.
If you suspect the need for repairs, consider whether you can handle it yourself. Get ready for the fact that you will have to spend the whole day in interesting positions, and you will also need an assistant to perform some operations. Do you know how to install the rack so that the steering wheel is level? If not, you risk having to do the installation again.
An alternative is a service station. They will charge you around 3,500 rubles for repairs, 200 rubles and another 200 will be spent on anthers and so on.
The easiest option is to buy a new rack, complete with rods for about 6,000 rubles, there are, of course, racks with bells and whistles (short-stroke, sports, etc.), these cost about 10,000 rubles, the choice is yours.
Love and respect your steering rack and it will love you back!
Changing the EUR on the Lada Kalina
The electric power steering is mounted on the steering column and is removed along with it. First you need to turn off the power to the car by removing the battery terminal and position the front wheels straight. To dismantle the Kalina steering wheel, remove the lower cross member of the instrument panel, disconnect the wires from the EUR control unit and the switches located on the column, and then lower the steering wheel to the floor.
Now it is convenient to unscrew the nut of the bolt securing the lower universal joint to the steering gear shaft. Then we open the joint connection, use a flat screwdriver to remove the intermediate cardan from the pinion shaft of the RM Kalina and dismantle the column along with the electric power steering. After replacing the EUR with a new one, installation is carried out in the reverse order to that described above.
New Lada: Lada Kalina engine overheats reasons
For safety reasons, replacement of various components and mechanisms should be carried out only with those approved by the Kalina manufacturer. If the vehicle requires repair, it must be carried out immediately, otherwise the risk of creating dangerous situations on the road increases. If damage is detected or there are irreparable faults, the mechanism must be replaced.
- Posts: 10185
- From: Angarsk
- Lada Niva 2131M Nissan Patrol
March 21, 2022, 08:57 #76 123 1
igorkmailru, March 20, 2022, 11:18 pm
I didn’t see any good advice on this site, only “. don't save money, buy a new one. “So I’ll look elsewhere.
And on the other side, what kind of help will they give you? Like, come, we’ll fix it?
- Posts: 3613
- From: Tolyatti
- VAZ 2109
March 26, 2022, 12:29 #77 123
igorkmailru, March 20, 2022, 11:18 pm
I didn’t see any good advice on this site, only “. don't save money, buy a new one. “, so I’ll look on others. What kind of Russian ferrous metal is that began to crumble after 2000 km of run. Maybe I should immediately buy new raspberries for spare parts? I’ve had classics, 9s, 12s, but this is the first time I’ve encountered such a viburnum firewood. If I hadn’t serviced it myself, I would have gone broke on services long ago. Once upon a time I started with Tavria. Kalina and Tavriya are twins.
I love doing everything myself and it really saves money. Machines have weak points that need to be monitored. There are also “rotten” places that cannot be corrected, and you have to live with them. It happens that they collected it in such a way that there were only refusals. Nevertheless. All the flaws appear over time, and you get a car that you enjoy driving.
If you have the opportunity to change the unit yourself, find a simple steering unit. The cheapest option.
- Posts: 6954
- From: Ekaterinburg
- Renault Megane Extreme
March 26, 2022, 18:40 #78 123
igorkmailru, March 20, 2022, 11:18 pm
I didn’t see any good advice on this site, only “. don't save money, buy a new one. “, so I’ll look on others. What kind of Russian ferrous metal is that began to crumble after 2000 km of run. Maybe I should immediately buy new raspberries for spare parts? I’ve had classics, 9s, 12s, but this is the first time I’ve encountered such a viburnum firewood. If I hadn’t serviced it myself, I would have gone broke on services long ago. Once upon a time I started with Tavria. Kalina and Tavriya are twins.
Why a new one straight away for spare parts? Maybe drive it first, maybe you'll be lucky and the steering wheel won't knock. And even without an amplifier, the rack of all vases knocks, so it’s better with an amplifier.
- Posts: 3613
- From: Tolyatti
- VAZ 2109
March 26, 2022, 19:30 #79 123
I have a nine. There are no knocks, although they showed how it happens. The car was under warranty, the knocking noise was removed at the service center, but I don’t know how. Lost contact with the person.
- Posts: 6954
- From: Ekaterinburg
- Renault Megane Extreme
March 26, 2022, 20:24 #80 123
The rail was pulled up in about three seconds. Only the knocking always remains, some people feel it, but others are happy with it anyway, so they say that there is no knocking. Both my nines and tens behaved the same in this regard. The knocking started to be noticeable at 15 thousand, then I constantly tightened the rack stop at least once a year, I also changed the ball joints, but I still felt gaps in the steering wheel on uneven surfaces.
- Posts: 1
- From: Bakal
Design features
The structure of the Lada Kalina steering unit includes:
- electric amplifier;
- steering column, adjustable for reach and tilt;
- electric power steering rack with gear ratio change mechanism;
- rods with tips, as well as rotary levers.
In the mechanism housing there is a unit with mechanical gearing, where the main operating element is a helical gear, the pitch of the teeth of which varies depending on the length of the rack.
The figure shows the design of the Lada Kalina rack and pinion unit.
The pressure in the rack-and-pinion pair is carried out by means of a spring, and the plastic liner present is designed to reduce the friction force. The compression level of the spring element is adjusted using a nut. The factory gap between the steering shaft and the rack is 0.1 mm in the LADA Kalina model.
If a knock appears inside the unit, it can be eliminated by adjusting the gap with your own hands. The steering shaft is centered using two bearings, one of which is located in the column bracket, and the second is located inside the electric power steering housing. The bracket is connected both to the pedal mounting unit, or rather to its front part, and to the body. Structurally, the bracket together with the pipe forms a hinged connection from a pair of plates. This unit provides a change in the position of the steering wheel, where the width of the range of movement is limited by slots in the designated plates.
The specific position of the pipe is fixed by a lever, which is connected to a special bushing that performs an adjustment mission. It is screwed onto a coupling bolt located just in the slots of the plates. When the lever is turned, the sleeve rotates synchronously. At this moment, the fixation of the plate weakens, and the steering wheel begins to change its position. Springs located in the middle of the bracket and plates, when the fastening is loosened, pull the pipe in the upward direction.
Let us repeat, the steering unit of the Lada Kalina has two rods and rotary levers. The rod design includes two tips, one of which is external, and the second is internal. The process of adjusting the length of the rod is carried out by rotating the threaded bushing present here. Having completed the adjustment manipulation, the position of the tips should be fixed with specially designed bolts. The outer rod end is connected to the swing arm bracket via a ball joint.
The power steering mechanism, operating on an electric drive, changes its degree of gain depending on the driving speed. When the car is stopped, the amplifier produces maximum torque, and the steering wheel turns very easily. As the speed increases, the force on the steering wheel of the Lada Kalina increases, which is facilitated by a decrease in the torque generated by this unit. The mechanism is based on an electric motor, which transmits rotation through a gearbox “hidden” under the column casing. The amplifier is controlled using an electronic unit, which is supplied with impulses from speed sensors, recognizes the amount of force when rotating the steering column shaft, and also reads the number of revolutions of the engine shaft. The instrument panel has a special indicator that allows you to monitor the operation of the amplifier.
Should I repair it myself or at a car service?
Great! The steering rack is in your hands. Now you need to carefully cut off the plastic clamps from the anthers without damaging the rubber bands themselves if you plan to reuse them. The left clamp securing the rack to the body can be left untouched, but the right one must be removed along with the rubber band: this is necessary to replace the central corrugation.
You can also remove the gasket located at the point where the rack contacts the hole in the engine shield.
We remove the left and right anthers, and then the corrugation. Look at the picture I discovered when I removed the left steering rack boot. There was grease here, but mixed with dirt.
https://www.youtube.com/watch?v=13qasRZk8gA
On the right side, on the contrary, there was no trace of lubricant, but a whole mountain of rust spilled out from there.
The central boot is reluctantly, but still removed from the steering rack housing.
The right end of the rack was covered with a thick layer of rust without the slightest hint of lubrication. Not surprisingly, it dangled loudly in the broken bushing.
Soak the stop nut with kerosene or WD-40, and in the meantime you can try to remove the worm shaft.
Having unscrewed two hexagon bolts, I found a bearing and a disc spring, but I could not remove the worm shaft, no matter how much I knocked the rack body against a piece of wood.
As a result, I realized that I didn’t need this, because I could wash and lubricate the insides of the rail without even completely disassembling it. Having thoroughly lubricated the bearing, I returned the cover to its place and began to unscrew the stop nut. To do this, you will need a very good key, I came across this one.
Having unscrewed the nut, I saw the same picture as in the rail itself. Everything was covered in grease mixed with dirt, or maybe the grease had become unusable over time.
We take out the spring and rubber band, turn it upside down and hit it against a wooden block until the stop pops out.
When I took out the stop, I discovered that it was covered in dirt, like everything else inside the rack housing.
Compare the new stop with the old one: the plastic lining has worn off, the rack has become less pressed against the worm shaft, and now it is clear how the play in the steering arose.
But the rumble when driving over small irregularities comes from the steering rack bushing. To get out the old broken bushing, you need to use a thin long screwdriver to bend inward each of the two protrusions that hold onto the recesses inside the rack body, and pull the bushing out of the body using a steel wire hook.
So, we have disassembled the steering rack, and now it’s time to wash it properly. To do this, you can use gasoline, diesel fuel or kerosene, as well as dry rags and something long and thin to clean the insides of the steering rack housing. By moving the rack inside the case and cleaning out the remaining old grease and dust from it, I achieved almost perfect cleanliness of both the rack itself and the case, and also cleaned off the rust as much as possible.
If you want to bring the rack to a perfectly clean state, then right now you need to blow it with carburetor cleaner. Do not forget to rotate the worm shaft to blow out all the dirt from its reverse side. After such a wash, the rack looked almost like new, all internal surfaces shone with a dazzling shine and newness.
Now we wipe everything down, lubricate it generously and assemble it. We turn the worm shaft and lubricate it.
We do not spare grease on the toothed part of the rack - it is here, between the worm and the rack, that the main friction occurs.
We also coat the right end of the rack with lubricant, which will not only play the role of a preservative here, but should also extend the life of the new bushing.
Having thickly lubricated the right end of the rack, check whether the bushing fits onto it. It must be put on with some effort, only in this case the repair will bring silence when driving over small irregularities.
The bushing must then be removed from the rack and carefully inserted into the pre-lubricated housing. The locking protrusions on the bushing must fit into their seats on the inner surface of the rack body.
Now screw in one of the bolts that secures the tie rods to the rack, and with the rack housing with the bushing facing down, being careful not to damage the bushing, insert the rack into it. The rack should fit tightly, but with a certain force applied to the bolt, it should still move.
Attention! The following actions will determine whether you will be able to assemble everything so that the steering wheel faces straight. First of all, you need to find the middle of the window in the frame body, mark it, for example with a file or marker, and set the frame to the middle position. In this case, the central hole should be opposite your mark.
Since the stop is not yet inserted and does not press the rack against the worm shaft, by turning the rack body over with the stop hole up, we can put the worm shaft in any position we need. Install the shaft as it was when you removed the rack from the car. My groove on the shaft was on the right and was almost vertical.
New Lada: The concept of a new “penny” was shown online - VAZ-2101
Having installed the shaft in the desired position, make sure once again that the rack is in the middle position and then, through the hole in the rack stop, press the rack to the worm shaft. In this case, neither the worm nor the rack should change their position.
Now lubricate everything generously and install the new stop, spring and rubber sealing ring in place, and screw it all on top with the stop nut.
Next, use a special wrench to tighten the nut by hand, and then unscrew it back 2 notches, which will correspond to 24°, as indicated in the instructions.
When you install the rack on the car, the steering wheel may seem a little heavy to you, but after a couple of hundred kilometers the stop and rack will break in, and you will get perfect steering.
Now we assemble everything in the reverse order, and do not forget to put all the removed parts back in their places. Secure the anthers with nylon ties.
Product delivery options
Note! Below are the shipping methods available specifically for this product. Payment options may vary depending on the shipping method. Detailed information can be found on the “Delivery and Payment” page.
Parcel by Russian Post
Available payment methods:
- Cash on delivery (payment upon receipt)
- Using cards Sberbank, VTB, Post Bank, Tinkoff
- Yandex money
- QIWI
- ROBOKASSA
Shipping throughout Russia. Delivery time is from 5 to 12 days.
Parcel by Russian Post 1st class
Available payment methods:
- Cash on delivery (payment upon receipt)
- Using cards Sberbank, VTB, Post Bank, Tinkoff
- Yandex money
- QIWI
- ROBOKASSA
Shipping throughout Russia. Delivery time is from 2 to 5 days. More expensive than regular delivery by Russian Post, approximately 50%. Parcel weight up to 2.5 kg
Express Parcel EMS
Available payment methods:
- Cash on delivery (payment upon receipt)
- Using cards Sberbank, VTB, Post Bank, Tinkoff
- Yandex money
- QIWI
- ROBOKASSA
Shipping throughout Russia. Delivery time is from 3 to 7 days. More expensive than regular delivery by Russian Post, approximately 100%.
Completion of work
After the rack is tightened, check the pitch of the steering wheel until it stops, as well as the presence of play using the steering wheel. If everything is in order, replace the plug, pad and the battery itself.
Cars of the Kalina-2 family are equipped with a steering rack similar in design to the Granta rack. This part transmits force from the steering wheel to the front suspension links. If you feel a knocking sound from the rack while driving, it needs to be adjusted (tightened) correctly. The effect described here can be observed after 10-15 thousand kilometers, and more often it makes itself felt on uneven roads. Next we consider how this problem is solved in practice. And the solution comes down to turning one nut.
Tips for use
A complete replacement and repair is a series of actions, for the implementation of which you need to have not only special knowledge, but also a considerable amount of free time, so if the car owner does not have either the first or the second, it is preferable to go to the nearest service station.
It is better to entrust steering rack repair to service station specialists
At the same time, in order not to become their regular guest, you should know some secrets for operating the steering rack, which can significantly extend its service life.
- We strongly do not recommend “jumping” your car on curbs, or driving at high speed on rails, since each such trip causes cracks to appear on the rack itself, as well as deformation of the shaft that is part of the steering mechanism.
- It is not recommended to frequently turn the steering wheel all the way. Of course, in this case it will be very difficult to demonstrate your maneuvering capabilities, but this will significantly increase the life of one of the most important parts of the machine.
- Carefully monitor the condition of the protective anthers, which must maintain their tightness. Replacing anthers is several times cheaper than replacing the entire rack.
- It is also worth monitoring the level and condition of the hydraulic fluid, since its decrease or change in color is associated with problems in the vehicle’s hydraulic system, which can result in rack failure.
From time to time you need to undergo a full maintenance, which will allow you to eliminate faults in advance, which can cause irreversible consequences, injury to yourself, your loved ones and other road users. And also, if problems are detected in the operation of the car, it is better not to take risks and go to the nearest car service center as quickly as possible.
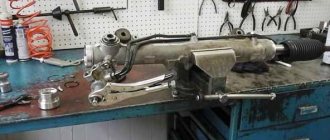
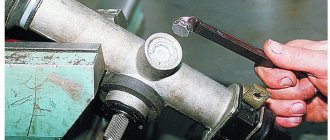
Tightening process, video
There are several tightening methods. Some of them are the method of removing the slats. The removed rail is clamped in a vice and then, using a special wrench, the nut is tightened 10-15 degrees by turning it counterclockwise.
Adjusting the steering rack on the Lada Kalina
This is how I adjusted the steering rack
, ask anything, I’ll show you everything, I’ll tell you what I can do.
How to remove a knock in the steering rack of LADA Kalina
Remove knock in steering wheel
rack LADA
Kalina
.
This is followed by a check for backlash and, if necessary, the procedure is repeated, since the backlash can be more or less. It is not advisable to overtighten, it will be difficult to rotate the steering wheel. The advantage of this method is the ease of adjustment, but the disadvantage is that you have to remove and then put the steering rack back in place, and this requires time, certain knowledge and skills.
The second method is simpler, it does not require removing the steering rack, you just need to remove the battery and the platform under it with four bolts, but it is much easier and faster than removing and installing the steering rack. This way we gain access to the steering rack and steering rods.