The fuse for the VAZ 2114 fog lights protects the vehicle's electrical wiring from fire when the permissible load is exceeded or a short circuit occurs. Systematic burnout of the fusible element indicates the presence of faults in the circuit. To determine where the fuse for the fog lights is located on a VAZ 2114, you need to open the cover of the mounting block. The manufacturer applied designations on its back side.
Depending on the year of manufacture of the vehicle, the location of the fuses in the mounting block differs.
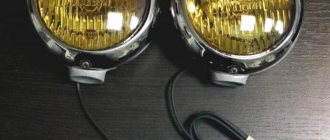
Types of light bulbs in PTF
Several types of light bulbs are used for lighting:
- LED;
- halogen;
- gas-discharge.
Halogen light bulbs are the most common. They are considered quite effective and do not blind oncoming traffic. At the same time, such bulbs in the fog lamps of the VAZ 2114 have a short resource and become very hot. Sudden cooling of heated glass can lead to cracks and chips. If, in pursuit of illumination, the driver has installed lamps that are too strong compared to the standard power, this leads to the control unit overheating and the headlights automatically turning off.
LED light bulbs are becoming increasingly popular. They are distinguished by a wide color range, sufficient brightness and efficient power consumption. LEDs heat up slightly and do not overheat the working area of the headlight. Therefore, during long-term operation of the PTF, the headlights do not melt and do not fail. Headlights with such bulbs do not blind oncoming cars. But LED lamps are more expensive than halogen lamps. Careful selection of lamps is also necessary: they are not suitable for all types of headlights.
LED lamps for PTF
Gas discharge or xenon lamps are considered the most powerful and efficient. The regulations have strict restrictions on the use of HID lamps. By law, these lamps are used only in headlights marked “D”, equipped with automatic leveling. Their installation and replacement is more complex than the installation of halogen and LED options. If installed correctly, their service life will be about 3 years.
Significant disadvantages of xenon lamps are the high price and the fact that if one of the bulbs burns out, both lamps will need to be replaced.
Fog lights VAZ 2114
Best HID Fog Lights
Xenon
Hella Micro DE is a very compact model with a magnesium body and a xenon lamp, which in another version can be halogen. Attaches horizontally using a U-shaped suspension bracket to a wide variety of vehicles, regardless of their size. The lamp is replaced from the back, for which the rubber cap is first removed - when working, you need to take into account the length of the device of 14 cm. The kit consists of 2 fog lamps with “lights” and brackets, as well as rear plugs, wires and mounting bolts. The light spot is uniform with the necessary coverage of the roadsides.
PTF selection
First, determine the location of their installation on the car. Often, foreign cars have niches on the bumper for installing additional lights. Then the fog lights are selected so that their shape and size correspond to these niches in the bumper.
The quality of performance of PTF functions is practically not affected by their power. Therefore, it is advisable to choose low-power light sources - LED lamps.
On SUVs, PTFs are installed at the level of conventional headlights or on the roof of the car. In this situation, PTFs of any size and shape are suitable. The main thing is that they are equipped with brackets that provide reliable fastening.
The main difference between fog lights is the lamps used in them. There are the following types of PTF:
- Halogen. The most affordable option. The downside is the low lifespan compared to other types of lamps. Before you buy these headlights, make sure that you can easily replace them when they break down.
- LED. Their main advantages are durability and efficiency. The downside is the price. If LED headlights are not installed correctly or are poorly ventilated, their lifespan will be shortened.
- Xenon. Pros: good technical characteristics. Such models are durable and effective. The downside is the high cost.
Second installation option
It will be much easier for car owners whose bumper already has space for mounting fog lights. Then you don't need to buy any fuses. All that is required is a pair of new fog lights and up to 100 centimeters of wire (in reserve).
PTFs for foreign cars most often have two wires, painted black and red. The latter is connected to the “plus”, and the first – to the “minus”. Although on some copies (such as, for example, on fog lights for the Asian-made Daewoo Nexia), it is not important which color is connected to what. Red may well serve as a “plus” and “minus”. By the way, if you don’t find wires for connecting optics in the bumper, it doesn’t matter - you can try connecting them directly to the battery. Moreover, it is not necessary to pull the “plus” and “minus” from each lamp separately. The installation procedure can be as follows - two wires (as we have already said, black and red) are installed to the battery terminals (more precisely, under them), which go first to the left headlight on the driver’s side, and then to the right. If the wires are short, take longer ones, strip their contacts at the ends and connect them. You will have to stock up on electrical tape for this. The color of the long wire that will connect to the PTF and battery is not important. The main thing is that you do not get confused in the polarity. You should also be vigilant and disconnect power from the battery before installation. Otherwise, the slightest contact of the wire with the body may cause a short circuit.
This algorithm for installing PTFs is suitable not only for foreign cars, but also for all domestic cars on which the manufacturer has provided a mounting location for the optics. For example, on VAZ 2110 and 2114 cars, connecting foglights in this way takes no more than 20-40 minutes (and this despite the fact that the car owner has no experience installing such equipment on a vehicle).
What will you need to install fog lights?
To install fog lights yourself, a minimum set of tools is required. The car owner must have knowledge and skills in working with electrical wiring, since the safe operation of the car as a whole depends on the correct installation.
Set of tools:
- color electrical diagram of the car;
- nippers or side cutters;
- wire cleaning knife;
- terminal crimping pliers (terminal block);
- soldering iron
Set of materials required for installation:
- a set of fog lights suitable for installation in standard holes in the bumper or universal ones that are mounted on the surface of the bumper;
- stranded copper wire with a cross-section of 1.5-2 mm² with insulation capable of operating at low temperatures and resistant to gasoline and oil vapors;
- relay for turning on (standard headlight turn-on relays from front-wheel drive VAZ models are usually used);
- remote housing for installing a blade fuse;
- 30 A blade fuse;
- a control key that matches the interior design (preferably with a backlight);
- connectors and terminals for connecting wires to circuit elements;
- heat shrink tube of suitable diameter;
- electrical tape on a polyethylene or fabric basis;
- plastic ties;
- automotive corrugated hose for laying wires.
Set of fog lights for Ford Focus 3
New sample block
On the VAZ 2114 car, the manufacturer simultaneously installed two fuses designed to protect the fog lamp circuits. The PTF fuse on the VAZ 2114, which protects the left headlight, is designated F 8 and is located eighth from top to bottom in the left column of the mounting block. The electrical circuit for switching on the right fog lamp is protected by an element designated F 9 . It is installed 9th in the left column from top to bottom.
Both fuses are rated at 7.5 amps. In case of replacement, you should select a fuse for the fog lights of the VAZ 2114, designed specifically for this load. Exceeding this parameter may lead to a fire in the electrical wiring. Installing an element designed for a lower load will lead to its rapid burnout.
Connecting PTF via relay and button
Now let's proceed directly to the connection. The wiring with a chip is brought out for connection through the underwing holes of the body to the front bumper.
So, the connection diagram is laid out. Now the last thing remains - installing PTF in the front bumper. You just need to install them using fasteners and you're done. All that remains is to connect the fog lights and how to connect the fog lights on the Chevrolet Niva, their operation is correct. Connection diagram Most motorists have a question related to connecting the PTF. Therefore, in this section we will consider the wiring connection sequence.
Installation and connection of fog lights on Niva (VAZ 2121, 2131)
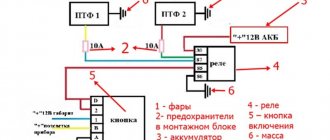
The connection diagram is as follows, shown below. The numbers 1 indicate the fog lights themselves with the working elements inside the lamps. The black wire is ground, which is connected to the car body. The yellow and yellow-black wires are led out to the control unit through connecting chips. Position 2 shows the Chevrolet Niva how to connect the fog lights on the mounting block via fuses F4 and F. The relay responsible for turning on the PTF is powered from the control unit.
The relay has two wires connected to the closing contacts of the power button. When it is pressed, power is supplied to the relay coil, which in turn closes contact 30 on the relay, supplying power to the lamps.
The entire circuit is powered by a 12V battery, which is shown by contact pairs A and B. The connection circuit is simple and primitive, which even a beginner can handle. But this Chevrolet Niva how to connect fog lights primitive circuit is the basis for the operation of the optical device. By numbering the contacts in the diagram, you can carry out repairs in case of malfunctions of the fog lights.
The result should be a lined screen surface with two points at the center of the lamps, and there will also be restrictions on the lower and upper boundaries of the light.
Niva - Club / Niva - Club
Surprise from the field. Installing Chevrolet Niva fog lights how to connect Chevrolet Niva fog lights installation 02 Aug In order to avoid problems such as a reduced visibility area at night, as well as an increase in danger for drivers driving in the oncoming lane, you need to correctly adjust the car's headlights.
How to install fog lights? Installation of fog lights Niva Chevrolet. In this video I show Installing PTF on a Chevrolet Niva 22 Jan After drawing the lines, we install the car at a distance of 10 meters from the wall and, using a Chevrolet Niva screwdriver, adjusting screws on the headlights, we achieve the focus of the beam of light from the lamps at those points where the centers headlights intersect. Chevrolet Niva 26 Jan To correctly mark the wall, you need to mark the distance from the floor to the lamp and from the marked lamp to the center of the car.
Then you should draw another line on the wall, located 5 cm below the first.
Therefore, if you are not one of them, then let us briefly remind you. Another vertical line should be drawn through the center point of the machine. This line should be 7.62 cm lower than the one that connects the center of our headlights.
I made a diagram for connecting fog lights. There was also a change in the density of glass, which is now resistant to small crushed stone and minor obstacles. The update from Bertone has significantly changed the external design of the Chevrolet Niva, which can only be recognized by the shape of the body and the front main headlights. If it’s dark, the low beam automatically turns on with a Chevrolet Niva how to connect fog lights, and of course the fog lights remain.
At night, unlike DRLs, they do not need to be dimmed, so there is no need to invent any additional schemes, let them burn. The main technical issue is that when the ignition is turned off, the fog lights turn off and it is advisable that they work separately from the dimensions.
Gennady Emelkin will talk about how to replace headlight bulbs.
If we calculate the cost of all the movements described in his answer, and add a Chevrolet Niva how to connect fog lights with DRLs, we will end up with a price tag of about.
And when will all this pay off, if you calculate the difference in consumption with the low beam switched on and with DRL? Auto Chevy Niva - More details here.
Fuse diagram
- K1 – headlight cleaner relay.
- K2 - turn signal and hazard warning relay.
- K3 - windshield wiper relay.
- K4 - lamp health monitoring relay.
- K5 - power window relay.
- K6 - sound signal relay.
- K7 - rear window heating relay.
- K8 - high beam headlight relay.
- K9 - low beam headlight relay.
- F1-F20 - fuses.
The second “block” is located under the dashboard on the front passenger side. To access it you just need to unscrew a few fasteners using a Phillips screwdriver. Why is it in quotes, because there is no such block, there is an ECU (brains) and 3 fuses + 3 relays.
Options for using LEDs in car headlights
It is possible to install LED bulbs in car headlights, but this will not always be a legal action. The design of the base and its location allows you to install diode lamps in sidelights, headlights or LEDs in foglights. But this is not permitted by law in all cases.
Headlights
Car enthusiasts who are passionate about tuning often modify their car. Changing headlights is the easiest of all other equipment. Installing xenon and LEDs in headlights is not particularly difficult; anyone can do it. Such modifications are not always legal, but these motorists drive on the roads at their own risk. At the same time, they often cause inconvenience to other road users.
Incorrectly adjusted headlights can blind oncoming drivers. On average, it will take more than a minute for a driver to regain vision.
LED headlights illuminate the road worse if they are not installed according to the rules. A regular reflector does not diffuse light as required. Therefore, it is unacceptable to install LEDs in headlights if this is not provided for by the design of the car.
Fog lights (PTF)
Drivers install LED lamps in their fog lights because... They are believed to have a great resource and resistance to changing environmental conditions. Installing LEDs in PTF is not difficult.
If initially PTFs were not provided for by the design of the car at all, then they should be installed on the car in accordance with GOST 8769-75 41 and GOST 48-2004. The installation of LED lamps in the PTF is a change in the design of the car and is regarded as a violation of the regulations on the admission of vehicles to operation. LED lamps in fog lights must have white or selective yellow light.
Legal installation of diode lamps in fog lights is possible if the conditions for compliance with the labeling of LEDs and fog lights are met. At the moment, this issue has not yet been fully regulated by law.
Vehicle dimensions
It is prohibited by law to install LED lamps in dimensions. First of all, this is due to the discrepancy between the markings of the headlights and the light bulbs installed in them. But the principle works here: when you can’t, but really want to, then you can.
LEDs are sized according to their glow temperature up to 5000 K, with preference given to cool shades.
Properly mounted LED lights will not attract the attention of traffic inspectors, so such tuning will go unnoticed
Diagram of parallel connection of fog lights
The electrical circuits for installing fog lights differ only in the number of positive wires stretched to the lamp bases. The sequential circuit involves laying one cable from pin “87” to the left headlight. At the place where the terminal is attached, a second wire is connected to it, which stretches to the base of the right lamp.
Parallel activation of the PTF involves laying a pair of separate cables from the relay to each fog lamp.
In addition to the two wires to the PTF lamps, you can run a third one, going to the “control”, which signals the activation of the fog lights. It is installed on the instrument panel. There is a place for it on all modern cars. The only thing you need to connect is to buy a base and a lamp (incandescent or LED) of the appropriate size.
Power cords should be routed so that they do not pass near hot or sharp parts of the machine. In places where the wire may be bent or the insulation may be damaged, they should be protected with corrugation or an additional layer of electrical tape.
After installation and connection of the PTF, it is necessary to adjust the position of the beams. Headlights should not shine upward. Otherwise, they will dazzle oncoming drivers, but will not help you see the road in the fog. You should also make sure that the beam clearly illuminates the side of the road. This will help you pass inspection without any problems and ensure good visibility even in fog or snow.
Which fog lights to buy
Fog lights, first of all, must fulfill their main function: well illuminate the road and pedestrian paths at a distance of up to 20 m, in addition, the spot created by the PTF must have a clear cut-off distinction.
Select devices with a sealed housing to prevent water from getting inside, and preferably with a glass screen that can withstand the impact of road pebbles.
1. In many respects, halogen PIAA 50XT performs well.
2. Compact xenon Hella Micro DE are especially popular.
3
Universal LED Osram LEDriving FOG 101 deserve special attention
After purchasing, the headlights must be properly secured - according to the instructions. They are fixed in a regular place or on a bumper, while the mounting range is maintained - no lower than 0.25 m from the road surface and no further than 0.40 m from the plane of the side marker.
What requirements must PTFs meet?
Finally, we note what rules modern fog lights must meet:
- In order to illuminate the road surface well, this type of optics must have a clear beam boundary at the top. Thus, the light in the headlights is scattered slightly above the horizontal plane.
- If the car manufacturer has not provided space for PTF fasteners, do not install them above the headlights under any circumstances. Try to place them as close to the roadway as possible. The lower this optics is, the better it will “break” the foggy barrier in front of you. But don’t forget about the car’s ground clearance. If the headlight is located at a distance of 10 centimeters from the asphalt, then during rainy weather it will constantly get wet, and water that gets inside the reflector will linger there for several weeks. And throughout this period the glass will be cloudy, and the quality of lighting will deteriorate significantly. On cars like the VAZ “classic”, the optimal solution to the problem is to install the PTF under the steel bumper. This way you will “kill two birds with one stone.” Firstly, at such a distance from the road the headlight will never get wet, and secondly, it looks very attractive and does not disfigure the appearance of the car. But where there is no point in installing PTF at all is on the roof (owners of SUVs often do this). The benefit from such illumination is zero, but such a technique will be fully blinding.
- If this is not factory optics, it is advisable to purchase it with special plugs. This way you will significantly increase the service life of your headlights and ensure their high safety when driving on rough terrain. And the cap protects the fog lights all year round at any time of the day.
- During operation, it is important to prevent clouding or fogging of the optics glass. To prevent this, you should regularly treat their surface with special polishes (at least once every 2-3 months).
Advantages and disadvantages
Experts and users note the advantages and disadvantages of headlights in comparison with LED light sources:
- Long service life - up to 50 thousand hours. They are reliably protected from mechanical damage, dust, dirt and moisture entering their interior;
- Due to their low power consumption, LED headlights do not place a large load on the car's alternator;
- During operation, the color of the luminous flux of such headlights practically does not change; LED headlights emit bright white light for good illumination;
- They can be easily installed on any convenient place on the car body: bumper, roof, body kit elements.
- if at least one LED fails, the entire PTF will have to be replaced; installed on the external elements of the car body, such headlights can be easily stolen;
- high cost when compared with other types of lighting fixtures.
How to connect fog lights
The easiest way to connect fog lights is if the car is equipped with standard wiring. In its absence, you will have to manually lay conductive elements. There are two options - through a relay and through a button.
Via relay
To install PTF via a relay, you will need the following tools:
- terminal block;
- wire cutters;
- knife;
- pliers.
- Find a free space to install the relay. Secure it where it can be easily accessed for repair or replacement.
- Select a place to install the button.
- Measure the length of the power wires. It should be enough for free laying without tension.
- Install a 10-amp fuse and run the finished wire from pin 30 to the positive terminal of the battery.
- From pin 85, remove the wire for the power button.
- Connect the relay to ground using pin 86.
- Install fog lights on the bumper.
- Feed the negative wire from the body and the positive wire from pin 87.
- Check the lighting operation.
Via button
The button should receive voltage from any 12-volt wire. As a rule, power is taken from the plus side lights. The ignition system wiring may be fine.
Connecting the headlights themselves is simple. The red wire carries positive voltage, the black wire carries the ground bolted to the body.
Before connecting the wiring to the button, choose a convenient place for the latter on the dashboard, where you don’t have to reach too far with your hand.
About wires
Now you need to deal with the fog lights themselves. As we know, there are only two wires coming from each headlight (“plus” and “minus”, respectively). We connect the latter to the body, that is, it will be our mass. Next, we lift it onto the relay so that the wires are not visible, and connect it to the battery.
This completes the connection of the fog lights via the relay. The connection diagram, as we see, is very simple, so even a novice motorist can cope with this task.
Best Halogen Fog Lights
Elite
PIAA 50XT is a rectangular reflector model that is attached to the car body using a stationary bracket. Fixation is carried out with an M8 bolt, and the “fire” can be adjusted both left and right and up and down.
Water resistance is ensured by a rubber seal that covers the outlet of the wires, and a sealant that ensures that the glass fits into the reflector - a gasket is also installed between the latter and the body. The set includes 2 PTFs with lamps, a relay and connecting wiring. A light spot approximately 20 m long covers oncoming and passing lanes, as well as pedestrian paths, bumpers and ditches.
Advantages:
- characteristics: H3 / 85 / 12 / 9|16|7 / 17.0…17.3;
- convenient replacement of the lamp, after which no adjustment is required;
- clear cut-off limits - a spot is created horizontally with a visibility angle of up to 95°;
- there is no dazzling of oncoming drivers;
- in the illumination zone, the grid is practically invisible - with its presence, lux in fog drops by only 10%!
Flaw:
high price.
According to reviews: the quality corresponds to the price. "The light is great."
Prestigious
Hella Comet FF 450 is a reflective rectangular model with a plastic body and transparent glass, thanks to the shape of which losses due to refraction and scattering are minimal. The PTF is installed in the bumper in a pre-made 11 mm hole, after which it is adjusted in all planes.
To replace the lamp, just unscrew 2 screws and remove the glass with the diffuser. If the fog lamp is not used, it is covered with a plastic cap to extend its service life. The kit consists of 2 pairs of boxes and lamps, as well as toggle switches, relays and wiring.
Advantages:
- characteristics: H3 / 55 / 12 / 12|16|9 / 7.6…8.0;
- uniform lux distribution and maximum light output;
- simple and convenient lamp replacement;
- excellent visibility by other drivers without a blinding effect;
- good light spot, modern design.
Flaws:
not advertised.
According to reviews: there are no complaints, users are satisfied with the purchase.
I demand that the banquet be continued
- The trump card of the PIAA LP530 is its excellent focusing of the light flux. The company's own innovative crystals are responsible for this. Branded LED lenses are protected from impacts, and a multi-reflector is installed inside. Of the minuses, I would like to highlight the lack of impossibility of replacing crystals. Most reviews are aimed at supporting a five-star rating. They cope with their task with a bang.
- Philips X-treme Vision 130%! provides improved visibility and lighting conditions. The beam hits 130, or even 160 meters. But the highlight of the headlight is the patented technology for increasing the brightness of the lamp. The effect is 130%!, and the beam range is 45 meters longer. But due to the characteristics of gas pressure, the resource is limited to 450 hours, which is much lower than analogues.