Budget segment car manufacturers rarely equip their cars with fog lights. This fate befell Vesta and X-Ray in the minimum configuration, but many owners solve this problem by buying non-original Lada Vesta PTFs.
The market for auto parts and additional equipment sells many parts from unofficial manufacturers. Their purchase and installation allows you to save money, but there may be a risk of a factory defect or poor-quality assembly, in which case it is necessary to choose equipment from trusted manufacturers with a guarantee.
Over the 5 years of production of the Lada Vesta, some models of foglights have already proven themselves well during long-term use and are in high demand among owners.
How do fog lights work?
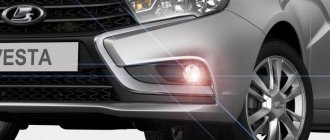
The presence of fog lights in a car gives the driver the opportunity to feel calmer while driving in poor visibility and fog. Due to the location of the PTF in the lower part of the bumper and below the level of the head light (and fog, as you know, spreads above half a meter from the road), the light passes through the curtain and is visible to other road users.
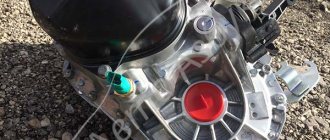
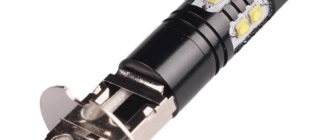
LED fog lights for Vesta. Photo source: https://www.drive2.ru/l/476399147935597172
Also, such headlights have a clear cut-off line due to their placement and the shape of the reflector, and the light-optical design has a screen of direct rays that prevents light from scattering and reflecting from small drops.
Installation of the Lada Vesta headlight unit and replacement of low and high beam lamps
The Lada Vesta headlight unit has a complex architecture, but access to replacement lamps from under the hood is quite comfortable. To replace the lamps, no additional tools are needed; however, it is advisable to carry out the work using clean knitted gloves. This is explained by the fact that when you touch the bulb of any halogen lamp with your fingers, microscopic particles of fat remain on it.
At high temperatures, the fat begins to burn out, and the flask at the point of contact darkens and, due to uneven heating, bursts over time. Therefore, if we accidentally touch the flask with our fingers, it must be wiped with a soft cloth soaked in alcohol.
Layout of lamps in the Vesta headlight
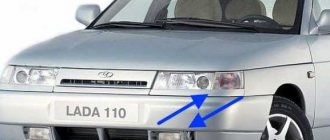
The Vesta headlight unit is designed as follows. The plastic housing contains reflectors and lamp mounts. Under cover 1 there is a high beam lamp, under cover 2 there is a low beam lamp, the direction indicator is in socket 3, and the DRL and clearance lamp is in socket 4.
Which lamps are better for high beam Lada Vesta
As we have already found out, lamps with H1 and H7 sockets for high beam are suitable for the Vesta headlight. According to user reviews, these types of lamps and brands have become the most popular. For low beam lamps with H1 socket:
- Series of Korean MTF lamps. Very good quality at a reasonable price. The MTF Light MAGNESIUM H1 100W model is distinguished by a high resource (more than 550 hours), warm white light, and has a two-layer interference coating.
- MTF Light PALLADIUM H1 55W, good lamps from the same Korean company with a bright bluish light. They have one minor drawback - after 400-450 hours of operation they lose brightness.
- Osram H1 Cool Blue 4000K 64150 CB, for those who love xenon light. German quality, a little more expensive than Korean ones, but they work well. Under normal conditions, they work their 500 hours without loss of efficiency. Color temperature: 4000K.
- Osram H1 Night Breaker + 90% 64150 NBR, the manufacturer claims that the light cone extends 35 m further than analogues, has a bright white light and is popular with dozens of owners.
- Philips H1 Crystal Vision (4300K), another very popular model. Color temperature: 4300K, which makes their light similar to xenon, but the cone of light is more saturated, which makes the readability of signs and markings better.
- Philips H1 NightGuide DoubleLife, a new series, but is steadily in demand in 2017-2018 due to its three-color lighting technology - bright white, cool white and warm white colors are distributed across zones, increasing the readability of markings and preventing the glare of oncoming traffic.
Optimal lamps for low beam Vesta
The most popular low beam lamps with H7 socket are the following:
OSRAM H7 12V 55W PX26d
One of the leaders among users of second-generation Ford Focus halogen headlights. Excellent quality, German assembly and high lamp life are confirmed by reviews. According to the manufacturer, the lamp life is about five hundred hours, which is very good compared to competitors.
Philips H7 12V 55W PX26d LongeLife Ecovision
This is one of the brightest lamps in the rating. The resource is also good. At least the manufacturer claims a service life of 100,000 km. It’s hard to believe, but quartz glass and resistance to temperature changes put this lamp in second position.
Philips Vision H7
And again Phillips. This lamp promises a brighter and longer beam of light while keeping the price within the budget range. The flask is also made of quartz glass, the spiral is stress-resistant, protected from sunlight by a special coating.
Bosch H7 12V 55W PX26d ECO
New German PX26d lamp with increased luminous flux. This is one example of how a manufacturer should behave with a buyer. The PX26d does not promise a hundred-kilometer beam and the brightness of a borderline spotlight, but it gives good value for its money. Moreover, its service life, according to user reviews, is at least 70,000 km. Only then does the light become dimmer.
MTF Iridium H7
A good budget option with one drawback - the blurred border of the light spot. A filament with improved characteristics, which affected the brightness of the light beam. This figure is approximately 25-30% higher than other lamps in this price category. In addition, the lamp uses space zoning technology.
Which fog lights to choose for Vesta
Owners of Lada models: Vesta, SW Cross from 2022, X-ray are faced with the lack of standard foglights in all trim levels except Comfort Winter, Luxe and Exclusive. According to forecasts, restyled cars will also not have PTF. Owners of the “classic start” and “comfort” versions have to select and install the necessary equipment themselves. So far, no leader has been identified on the market, so the choice of model depends on the budget and specific wishes. Among the popular brands of foglights on Vesta are:
- Wesem;
- Gamma;
- Luch;
- NSP
- Valeo;
- Vestatec;
- "Osvar"
- "SeViEm" ("Sivy").
In addition to the brand, the owner needs to choose the light source of the headlights. There is no definite correct option here either, since many people prefer to install halogen lamps due to affordability, but LED LED lamps are considered more technologically advanced. Opinions agree on one thing - xenon and bi-xenon with a bi-module, installed in Vesta fog lights, not only do not work according to the standards, but also blind oncoming traffic, so their installation is prohibited by law.
There is also a choice between single-mode and dual-mode headlights, which are often represented by diode lensed PTFs. When turned on they shine with a rich white light, but when turned off and re-activated they switch to yellow diffused lighting.
Selection of fog lights
The standard PTFs of the luxury Lada Vesta configuration are equipped with H16 lamps with a power of 19 watts, which cannot be called the optimal option. The fog lights listed in the table below have higher performance and, especially Valeo, have proven themselves when installed instead of standard ones.
In addition to headlights, you must purchase the following materials:
- 4-pin relay – 1;
- headlight on/off button - 1;
- protective corrugated cover (tubing) for wire - 5 m;
- wire - 5 m;
- 16 A fuse - 1.
Review of Manufacturer Prices
Lada Vesta fog lights vary in characteristics and price. Often the difference in cost can be due to the popularity of the brand, as is the case with Valeo. For information, you can refer to the site with reviews, the DiaLUCH catalog with detailed photos or videos, reviewers, for example, Kulagin. There are prices and article numbers of different PTF models:
- for PTF Wesem on Vesta, sellers ask from 1650 rubles (article number - 46100);
- Gamma – 980 (GM-FL-15432);
- "LLC Luch" - 1650 (132532123);
- NSP – 1900 (nsp07261500097r);
- Valeo – 3800 (088358);
- "Osvar" - 1940 (36020374300000);
- "SeViEm" - 1700 (261500097).
All prices indicated are approximate and are calculated for a set of 2 headlight brackets, wires and trims, chrome or plastic. It is better to find out how much the price of fog lights for Vesta will be in stores.
↑ Removing the bumper
Before installing brand new fog lights on the Lada Vesta as standard, you will have to dismantle the bumper. Removing the bumper on the Lada Vesta does not seem difficult; it is easy to do, observing caution and the recommendations given. Perhaps it will be even easier than dismantling the hood, replacing mudguards, towbars and front body kits.
The whole process looks like this: a carefully removed bumper is marked in the places where the fog lights are installed. To install plastic fog lights in a Lada Vesta, you will have to cut the windows to fit the optics; other elements of the front unit do not need to be modified.
Cost of installation kit for connecting PTF
Many drivers, wanting to install additional equipment on their car, try to save money and do not turn to official dealers, but do everything themselves. To ensure that installing a PTF on a Vesta with your own hands does not turn out to be a failure, auto tuning companies or additional production companies. equipment and other components are produced in mounting kits. They include detailed instructions for proper installation and connection of headlights, wiring harnesses, connection board, standard center console switch button and power relay.
The following sets are common:
- set with article number 235816;
- “Assemble it yourself” set with active block (7ml19121801302);
- kit "DiaLUCH" (pv273-v1).
Using catalog kits helps you avoid buying counterfeits, gives you an understanding of headlights, and teaches you how to do it yourself, which can save you money.
Beginning the installation of the lighting kit
We remove the front bumper, carefully cut out holes with a diameter of 76 millimeters in the places where the plugs are located.
Requires a 76 mm cutter
A sharp knife with a harder blade or a metal crown of the appropriate size will come in handy. We insert the headlights into the holes, securing them to the right and left brackets using self-tapping screws 15–20 millimeters long.
We install a switch button inside the car; you can use a standard VAZ one from LADA 2114, placing it next to the vertical adjustment wheel for the optics. You can draw a conclusion to the standard switch from Vesta, which will be without fixation, located just below the audio system.
Installation of PTF lamp wiring.
We lead the wiring from the headlights through a metal corrugated box to the hole located in the area where the pedals are located. From there we draw output to the button.
How to turn on the fog lights on Vesta
Depending on the configuration of the Vesta, the foglights will be controlled differently. In the top version of the car, you can activate their operation by turning the ring on the left steering column switch. When you turn one notch, the headlights start working, and when you turn two, the front and rear lights start to work.
Fog lamp. Photo source: https://spares63.ru/catalog/optika_vaz/protivotumannye_fary_vaz/protivotumannye_fary_na_lada_vesta/protivotumannye_fary_na_lada_vesta_xray_original.html
In trim levels where there is no PTF in the database, owners have a choice of how to connect the PTF. The most common option is to connect via a button on the center console. For this purpose, the installation kits contain a block of buttons and a frame so that the owner himself can assemble and adjust the operation of the headlights. Another option for non-luxury versions is to buy a steering column switch assembly from the top-end Vesta.
Difficulties with installation
In this respect, Vesta is strikingly different from other models - Granta, Kalina and others. It is no secret that car owners do not want to lose their warranty, so they often turn to the dealer for installation. However, the price for such a service is excessive - it usually ranges from 64,000-70,000 rubles!
Dealer installation is too expensive.
The reason for the high cost is that in order to install PTF and maintain the right to warranty service, it is necessary to retrofit the sedan to a top-end configuration. Such measures involve the purchase of a whole set of components, some of which are quite expensive:
| Component | vendor code | Price, rub.) |
| Fog lights (2 units) | 261500097R (as an analog – FCR220029) | 3000 |
| Brackets (2 units) | 8450006276 and 8450006277 | 520 |
| Steering column switch module | 8450006924 | 6800 |
| Wiring Harness (Front) | 8450006983 | 13000 |
| Dashboard Wiring Harness | 8450030715 | 22100 |
| Add. electronics unit | 231A08052R | 3380 |
As you can see, the amount is impressive, even without taking into account the cost of the work.
The reason for this high cost is the complexity of installation, since the design of Vesta’s electronic equipment is strikingly different from those used on Priors, Kalinas and Grants. In the top version, sedans are equipped with fog lights, but they are controlled via a steering column switch, and it does not have a fixed position indicating the inclusion of fog lights.
Connection in the cabin is carried out according to all the rules - via the steering column switch.
Another complication is the additional electronic unit of the EMM type, which is available exclusively in the Luxury package. It is this that first receives information about turning on the PTF, and not directly to the headlights, as before. After this, via the CAN bus signal, information about the headlights being turned on is displayed on the dashboard.
Naturally, this option is too complicated and expensive, so car owners are not satisfied with it, and they are looking for a way to install it themselves.
How to adjust PTF on Vesta
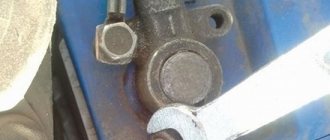
A new car usually doesn't need any adjustments, but over time something goes wrong and the light hits the road unevenly. To correct this situation, the designers have provided the ability to adjust the PTF light level using an adjusting screw, accessible through a hole in the bumper. You can do this yourself by following the procedure:
- Place the car with the light on opposite the wall at a distance of about 5 meters.
- Place an assistant in the front seat or place a load weighing 70 kg.
- You need to make markings on the wall or place a screen to adjust the light.
- Cover one of the fogs with a sheet of cardboard to properly adjust the second one.
- Turn the adjusting screw through the hole in the bumper and align the upper limit of the light with the horizontal marking line.
- The same operation with the second fog.
If the adjustment is unsuccessful, you need to check the correct installation of the bumper, the housing of the fog lights and the light bulbs themselves and, if necessary, replace them.
Preparation for equipment installation
The main difficulty is that the electrical system design of this machine is significantly different from previous versions.
You will have to cut a hole for the button to turn on the fog lights.
The lighting will be controlled using a switch mounted under the steering wheel, but does not have suitable positions for fixing the light output. The electrical signal comes from the lever through an additional unit, available only in the luxury version. So the most acceptable solution is to install a kit with a separate connection and a special button output.
List of tools needed for installation:
- pliers;
- screwdriver with Phillips bits;
- self-tapping screws;
- 76 mm bit for drilling holes;
- stationery knife;
- a set of keys for removing the bumper and installing optics.
How to install fog lights on Vesta with your own hands
Replacement or initial installation of PTF on Vesta should be carried out in specialized workshops, but if it is not possible to go there, then you can do the work yourself:
- Remove the button cover on the central panel above the climate control and dismantle the board.
- Replace the board with a four-button one and install all the buttons in place, including the new one for controlling the fog lights
- Remove the bumper by unscrewing 2 screws on the fender liners, 4 screws near the wings and the same number in front of the protection below.
- Next, unscrew the 2 screws numbered and 5 under the hood, but leave one to hold the bumper.
- By removing the clips under the headlights and disconnecting the ambient temperature sensor, you can unscrew the last screw of the bumper and remove it completely.
- In place of the plugs, install the cladding assembly.
- Attach the brackets to the press washers, and the headlights themselves to the screws, but the bottom one should be shorter so as not to damage the frame.
- First install the bumper and, using a set of radio components and electrics, connect the wiring according to the formula.
- Install a square-shaped relay, pulse if desired, into the fuse block, making a tap from fuse f10.
- Finally install the bumper.
When performing these operations, inexperienced car enthusiasts may encounter a number of problems.
Tuning daytime running lights
On the Lada Vesta, the manufacturer uses double-filament lamps in the side lights and daytime running lights. If instead of them you install LEDs modified in a certain way, then the yellow color of these lights, which is ineffective during the day, will change to a brighter white with blue.
Before performing this operation, you need to familiarize yourself with the pinout of the Lada Vesta daytime running lights sockets, since on this sedan it is non-classical:
- on one side of the cartridge there should be a “-” in the form of two contacts or one common one;
- on the opposite side - “+” for side lights and “+” for daytime running lights.
When purchasing LEDs, you must ensure that the polarity of the lamp base and the Vesta socket match. If such LEDs could not be found, a way out, which is not always harmless, may be to bend the contact pins of the elements according to the indicated pattern.
This procedure may result not only in the failure of the fuse, but also in damage to the vehicle’s electronic components, which can lead to a complete loss of the right to warranty service.
The desire to make your car better is familiar and understandable to any motorist. However, when deciding to carry out tuning on your own or even with the help of professionals, but before the expiration of the warranty period, you should carefully weigh the feasibility of performing this work and the consequences that are often inevitable with unqualified intervention.
Most cars are equipped with additional accessories already in the factory configuration. This applies both to devices that do not particularly affect the performance, and to useful ones, for example, headlights for driving in conditions of poor visibility (fog). This material is devoted to how you can install a kit for connecting PTF on a Lada Vesta without resorting to the help of specialists. At the same time, the reader will find out whether fog lights are needed at all.