Hello again everyone.
Series: “Modern instrument lighting for VAZ-2106 (VAZ-2103)
I think this was to be expected, because before I had recently finished changing the backlight in the 2105 voltmeter, a plan for illuminating the Instrument Panel itself was already forming in my head.
.
tried this before.
...did.
Back in 2010, I was already playing around with instrument lighting on my 2106
... exactly when the LED strip “boomed.”
But it turned out badly, of course I got the “WOW effect”... but I quickly turned it off because it was blinding.
I still watch how “youth” sculpt and farm LED strips
where you can and where you can’t... but that’s already passed.
We will reach a higher level)
I’ll also add that I wanted to remake the instruments (namely the SCALE) for one reason:
— I have an injector, and therefore the
“choke”
needs to be replaced with the
“check engine”
)
So, let's start with small devices.
.
By analogy with voltmeter 2105
, we are developing boards based on smd 1206 lights:
And here's the first snag
: The uniform illumination of the scale
will be interfered with by the “barrel” of the warning lamp for low gasoline level and low oil pressure...
I came up with an option, move the “control” further away, and determined a good place for it:
Preliminary test passed successfully:
The next step was to make a scale
.
Using the same ancient method of film-plotter cutting, we get what we want:
We assemble the final version, the rest of the small devices - by analogy:
It’s easier with a temperature indicator - there is no “control” there.
Next we move on to BIG appliances.
.
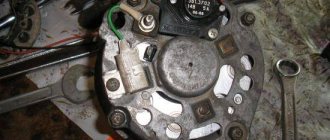
We also develop and manufacture backlight boards
:
A special point in obtaining a COMPETENT result
, I had
control symbols for indicator lamps
.
I set the task to make them as clear, larger as possible
... and most importantly,
invisible without highlighting
!
To do this, they had to modify their wells:
Of course, we also make scales for large devices:
We pay great attention to control characters
…
Constant and annoying adjustments, reconciliations, alterations...
To implement such an important aspect for me as the absence of light on the side of the scale
, turned to the collective farm method:
I glued a rubber seal around the perimeter
(construction sealant).
Well, in the end, this is the result:
Final view of the tachometer:
And also the speedometer:
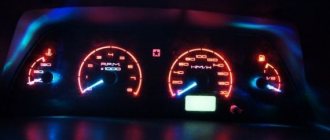
Well, a comparative photo of the finished tidy
with stock lighting, and with converted
internal LED lighting
:
Well, here's the thing...
In the second part we will:
—
Place the device on the car
—
Connect and determine the location for the remote board of the “brains” of the tachometer.
—
It is possible to install a simple dimmer, because I think that the brightness is still high...
For the “first version”
I think the result is not bad... If I have the time and desire, I will think about the arrows, because there are really not enough of them for a complete “minced meat”... But the problem is that you can’t put PROPERLY (!) luminous arrows on small devices without their subsequent breakdown...
Task: make the instrument panel lighting with your own hands for the VAZ 2106.
I still watch how “youth” place LED strips where they can and where they can’t... but that’s already passed.
No more tapes. We will reach a higher level. I’ll also add that I wanted to redo the instruments (namely the SCALE) for one reason - I have an injector, and therefore the “choke” symbol needs to be replaced with the “check engine” icon.
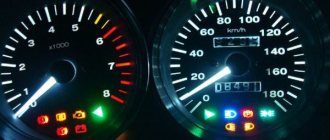
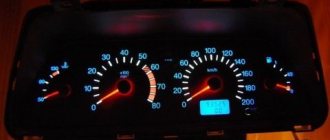
Instrument panel VAZ 2106
The standard instrumentation provides control of readings and displays the status of the main parameters of the car.
The standard dashboard of the VAZ 2106 has 5 dial indicators, provides control of readings and displays the status of the main parameters of the car
The product consists of the following list of elements:
- 5 pointer instruments;
- 2 digital indicators;
- 9 indicator lights.
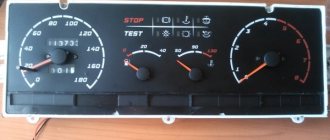
Instrument panel VAZ 2106: 1 - fuel level indicator; 2 — fuel reserve warning lamp; 3 — liquid temperature indicator in the cooling system; 4 — oil pressure indicator; 5 - warning lamp for insufficient oil pressure; 6 — tachometer; 7 — speedometer; 8 — daily counter of the distance traveled; 9 — odometer; 10 — control lamp for turning on the high beam headlights; 11 — control lamp for direction indicators and hazard warning lights; 12 — control lamp for turning on external lighting; 13 — handle for resetting the daily trip meter; 14 — control lamp for covering the carburetor air damper; 15 — battery charge indicator lamp; 16 — indicator lamp for turning on the parking brake; 17 — rear window heating switch; 18 — fog light switch in the rear light; 19 — external lighting switch
The following devices and indicators are installed in the panel:
- speedometer;
- tachometer;
- battery charging indicator;
- engine temperature sensor;
- odometer;
- resettable mileage counter;
- oil level sensor;
- oil pressure gauge;
- fuel presence sensor.
What kind of dashboard can be installed
If for some reason the standard dashboard does not suit you, you can update it in several ways:
- modify the dashboard by improving the backlight and gluing modern instrument scales;
- install a tidy from another car;
- make a homemade shield with installation of the necessary devices.
Depending on the chosen option, both the costs and the list of work that will need to be performed will depend. When choosing a dashboard from other cars, you need to take into account that many models on the VAZ 2106 may simply not fit not only in size, but also in connection.
From another VAZ model
Due to the unique design of the “six” instrument panel, it is quite difficult to choose a suitable replacement option. Some car enthusiasts are installing a device from a VAZ 2115, for which they change the standard front panel to a “seven” one and build a new dashboard into it. Such modifications will require the purchase of additional components (speed sensor, wires, connectors), as well as the correct connection of the standard wiring to the new dashboard.
On a VAZ 2106 you can install a device from a VAZ 2115
From "Gazelle"
If you have thoughts about introducing a device from the Gazelle into the VAZ 2106, then you should take into account that the products have different connection diagrams, sizes, and in general they are very different from each other. Therefore, you first need to think about the feasibility of this kind of modification.
To install the dashboard from the Gazelle on the “six”, a serious alteration will be required
From a foreign car
An instrument panel from a foreign car, even from an old one, will make the front panel more beautiful and unusual. However, you need to be prepared for the fact that along with the tidy, you may need to replace the entire front panel. Most often, dashboards from BMW e30 and other foreign-made cars are installed on “classics”.
For the VAZ 2106 it is necessary to select the most suitable torpedo based on instruments and indicators
Step-by-step instructions for installing the dashboard trim
There is a fourth modernization option: installing a trim on the torpedo. Let's take a closer look at how to do this yourself. The special trim performs not only decorative, but also protective functions for the torpedo. To perform this work better and more efficiently, first dismantle the torpedo by unscrewing the mounting bolts.
Then proceed according to the instructions.
- Wash the part thoroughly using a soft sponge to avoid scratching the surface.
- After drying, apply a degreasing compound to the mating surfaces.
- For greater adhesion of the glue to the surfaces, sand them with fine-grained sandpaper.
- An excellent result will also be ensured by priming the mating surface of the lining with a uniform thin layer using compounds for plastic.
- Apply glue and connect the trim to the torpedo. Allow time for the glue to dry completely and set.
For more reliable fastening in inconspicuous areas, use self-tapping screws, since with weak contact the pad may make squeaks when driving. This is a fairly durable tuning, but it is also imperfect: under the influence of high temperatures, the lining may become slightly deformed over time.
Additional interior lighting for VAZ 2101, 2106, 2107 classic
Installation of LEDs in the VAZ 2107 trauma panel
Everyone knows that Lada cars have very big problems with interior lighting. Sometimes it’s not easy to look for something in the dark, with only poor lighting on the stands. Despite the fact that I have LED lamps with nine triple diodes in the racks, which illuminate very well, there was still not enough light. This had to be resolved. Initially, the idea was to buy a lampshade from Kalina or a gazelle, but it’s all money and time. There was no desire to go to the analysis, where you wouldn’t find anything else and where they would definitely ask for a hefty price tag for this matter. Plus, there were LEDs lying around the house that I wanted to put in the rear bumper and connect to the reverse lamps. But I didn’t want to drill into the bumper, nor did I want to pull the wiring there, and with the H3 in reverse, the need for additional lighting completely disappeared. Therefore, I decided to use these diodes for interior lighting. It turned out that it was not in vain. Round power buttons were purchased to at least somehow maintain the style (but who am I kidding).
I removed the trauma panel and marked out future holes for buttons and diodes. After half an hour of work with a knife, a 10mm drill and a soldering iron, everything was done.
It turned out that removing the trauma panel was much easier than putting it back. In principle, it’s not a problem either, first I just screwed it to the handle on the roof on the passenger side and placed the panel on the steering wheel, then I climbed in from the back side and tightened the screw under the plug, and the trauma panel can be easily screwed on. Naturally, you need to remember to route all the wires. LEDs, as it turned out, cook as they should. There was more than enough lighting in the cabin and I didn’t have to worry too much about all the curly shades from the viburnums. And in general it turned out very minimalistic and not intrusive.
How it shines: a little blurry, but overall the picture is clear.
How it looks in the panel.
Thanks to the lenses, by the way, these lamps do not blind the driver when you turn them on. You can even safely travel with them. It was a good idea
Installation of LEDs above the visor of a VAZ 2107
For a long time I wanted to install additional lighting in the interior, but I didn’t want to embed a lamp, etc. into the ceiling. The idea, as they say, came on its own. And the reason for this was the recently purchased LED strip (at the ATB store) with 24 LEDs.
LED strip, ATB
The tape was lying in the glove compartment for a couple of days. and my thoughts were still spinning, how to screw it into dimensions... where would be the best place to put it. than to glue. and how it will all shine. Maybe I would have tried it, but the frost outside was minus 15, so I thought about postponing all this until spring. So, the LEDs lay quietly, and I kept thinking about where to attach them. There was an idea to place them in the salon, but I didn’t know where yet. Then he took it and just stuck it over the visor
It just turned out that the LEDs do not shine down, but into the interior. more precisely in the eyes of the passenger.
I rode around for half a day and thought about how to position it in a more civilized way, so that it would shine down. I definitely didn’t want to glue it to the visor. Then a plastic corner came to hand and less than three minutes passed from idea to implementation.
"Six" instrument lighting control
To initiate and adjust the lighting mode of the instrument scale, a two-position VAZ 2106 instrument illumination controller is integrated into the lighting system, which operates in a low-current network of 12 V with a nominal current of 1.5 A and a weight of 50 g.
This product is an ordinary variable resistance resistor operating on the principle of a potentiometer. Only if in a potentiometer a change in resistance values occurs due to a change in the length of the switched-on section of the circuit, then here the change in this value occurs by changing the length of the coil, as a result of which the value of the rated voltage also changes.
However, in the “six” the instrument backlight most often does not light up due to the failure of this regulator, so the procedure for replacing it is as follows:
- Disconnect the negative contact of the battery;
- We pry off the retaining fasteners of the liner with a screwdriver and dismantle the dashboard;
- In order to replace the instrument backlight regulator, disconnect the wiring and mark (if necessary) the wiring with a marker;
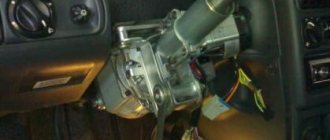
- We dismantle the decorative handle of the device, simply pushing it in our direction, and using a key, first remove the fasteners, then the product;
- Collect everything using the reverse algorithm principle.
Electronic speedometer for VAZ
Particular attention is paid to the speed indicator on the instrument panel. It is located next to the tachometer, which shows engine speed. Removing this element is somewhat more difficult than other devices. To remove the speedometer, you need to release the panel latches and move the structure toward you. Then unscrew the cable of the device located in its rear part. Then the fasteners are disconnected and the cable of the mileage mechanism is carefully removed.
Upgrading the device can be done using LEDs and replacing scales with arrows. As an alternative, the standard speedometer is replaced with an electronic version. In this case, the cable will be an unnecessary element; it is simply removed. To install a new device, you will need a pulse-type sensor with wiring and M-18 thread. Considering the connection diagram, additional soldering will be required. When installing the part, it is important to ensure that the pluses of the tachometer and speedometer are connected together to ensure synchronous readings.
Tuning the illumination of the “six” devices
Typically, tuning the backlight of VAZ 2106 instruments is carried out in order to improve the driver’s perception of the parameters of the instrument panel indicators and to decorate the instrument panel.
Such work should be carried out independently, in order to avoid unnecessary financial costs and to implement your own version of the VAZ 2106 instrument lighting design, which will be a unique and unique project.
As an option for making the illumination of the VAZ instruments of the “sixth” model with your own hands, you can, together with replacing conventional light bulbs for lighting the instruments, retouch their instrument scales to bright colors that are dissonant with the color of the car’s dashboard. This color scheme includes neutral white, bright red and calm blue. The color can be chosen depending on the taste preferences of the vehicle driver.
If the car enthusiast has chosen the option of multi-color LED instrument lighting bulbs for the VAZ 2106, which are offered in seven colors, then an LED strip and a private control unit are installed, which is controlled remotely, and the light range can be changed daily or as needed.
Such an LED “garland” can be found in specialized retail outlets that sell products of this type. The price of such an LED chain of lights is low. All that remains is to select a color palette and start replacing.
Installation of such lighting for VAZ 2106 devices can be viewed in a video on our Internet portal.
The process of replacing instrument lighting itself is a simple operation, because the LED base is absolutely identical in size and mounting to ordinary lamps.
Typical malfunctions of the instrument panel
Deviation of the scale arrow indicates a malfunction of the device and damage to the wire that connects the sensor to the pointer.
The following malfunctions of the instrument panel elements are possible:
- the arrow on the scale of the coolant temperature sensor is constantly either in the initial position or in the red zone;
- the fuel gauge needle: does not leave the initial position even with a full tank, always lies at the end of the scale, moves jerkily and often returns to the beginning of the scale;
- The fuel reserve indicator light is constantly on or does not light up;
- The oil pressure indicator does not light up when the ignition is turned on, it lights up constantly, and goes out at high engine speeds;
- speedometer, tachometer faulty;
- The flexible speedometer drive is noisy.
Device malfunctions are eliminated by replacing sensors, contacts, devices, and restoring wiring.
In conclusion
Knowing how to tune the instrument panel on a Zhiguli car yourself, you can save a lot. In addition, any owner approaches the processing of his cars responsibly at every stage. The cost of similar services in specialized centers is much more expensive, and the quality is not always guaranteed. The simple manipulations and recommendations given above will allow you to radically change the “tidy”. In addition to improving the appearance, you will receive additional protection and some useful options that will be useful for the domestic “six”.
General tuning aspects
The simplest tuning of the VAZ 2106 dashboard is to purchase a ready-made set of accessories and replace standard instruments. You can install it yourself using the instructions included with the kit. More labor-intensive is the tuning of individual devices, which involves replacing stickers and arrows.
When changing arrows and stickers, you need to be careful, as these parts are very fragile.
Tuning the VAZ instrument panel can be done by replacing the meter dials with white ones and installing overlays on the panel. You can cover the panel with artificial leather or leather if you have sufficient funds. Before stretching the material, the surface of the shield must be cleaned and then adhesive must be applied in an even layer. Next, press the leather or substitute over the entire surface and wait until the glue dries. At the last stage, you need to process the edges, giving it an aesthetic appearance.
Lada 2106 A NeW sTyLe › Logbook › 2.- Installing LED lighting in the legs
: 1) LED strip. I took 5 meters at once (cheaper in terms of money, since a roll of 5 meters costs from 700 rubles and above, and slices of santas of 30 each cost around 300-500 rubles)
First, I’ll post a photo of what it looks like so that you have an idea of what we’ll talk about next)
It looks like this) White LED strip with a blue tint.
Let's proceed directly to the installation. 1) Select a location for installation: 2) Measure. Mode. We solder.
This tape can be cut as much as we need. There are places for soldering wires on it. Therefore, the mode is the size we need, solder the wires (tails), rewind the solder area with electrical tape)
3) Connection.
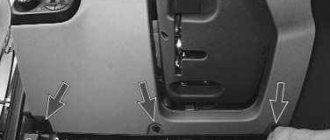
We open the side panel on the driver's side, where the bundle of wires goes to the doors and to the rear lights. We need White-Black(-) and White(+) wires. White-Black (-) is the wire from the door sensor (shank), that is, when the door is opened, the backlight will work. White (+) is the interior lighting wire. We attach the tape to these wires, observing the polarity (otherwise the tape will not work).
We are happy with the work done)
And now a little from me about controlling the interior lighting.
I made a button to turn off all interior lighting. This is convenient if you like to travel outdoors. We all like to come to nature and lay down some music, open the doors and trunk in which someone has a Subic))) or just to make it louder)) (my trunk lighting is also powered by the interior lighting).
Well, I don’t know why there are different situations)
The point of the button is that it turns off all interior lighting. I took the fog button as a basis. And broke the circuit (+) of the interior lighting White (+)
The wire is located behind the dashboard and goes under the dashboard on the driver's side. Nothing complicated at all)
Lada 2106 › Logbook › Bright LED bulbs in the interior lampshades
I was sick of the interior lighting, I realized that I needed to make it brighter. From the moment I bought the car, the interior lamps had Narva 18010 LED bulbs, like the brand, they should shine well... but they shine badly. Sinfully, I was already thinking about putting an LED strip under the feet of the driver and passenger, but then I thought again and ordered very inexpensive and fairly bright light bulbs with LED matrices from the Chinese brothers on Ali:
I checked it before installation, the actual power is 12V x 0.090A = 1.08W, which is already more than the old Narva bulbs, which, according to the manufacturer, show a result of 0.35W.
Disadvantages: intense heat
, after 5 minutes of continuous glow the light bulb becomes very hot, after 7 minutes it hurts to touch it. Since this fact can significantly reduce the service life, I decided to slightly increase the heat dissipation and cut out two aluminum plates; they cannot be called a full-fledged radiator, but the heat will be dissipated somewhat better than without them:
I glued it to a regular sealant; with such a low power, the thermal conductivity of the sealant does not play a significant role.
There remains one more stumbling block to the long service life of these LEDs, namely: they do not have a current or voltage stabilizer, the LED matrix is connected in series with a quenching resistor designed for 12V, and when the engine is running, the voltage in the on-board network can be within
14V, which will cause the bulbs to overheat. As a good idea, you need to install a 12V stabilizer (such as 7912CV or an analogue), there are many entries on the drive (1,2,3) who have already done this, but I didn’t bother. If they burn out in a month, then I’ll install them, but I think they’ll work anyway.
Regarding the brightness and temperature of the glow
There’s nothing to say here, “the bad ones beat you.” Very, very bright, despite the rather unfortunate placement of the lampshades in the VAZ classic, these bulbs allow you to find a lost thing under your feet, which was not possible to do with the old Narva ones. The temperature of the light is very “cold”, not for everyone. Based on the photos from Aliexpress, when I ordered it I thought that it would light up white, but this is not the case.
There is a photo from the moment of installation in the daytime, but it’s hard to understand anything from it: