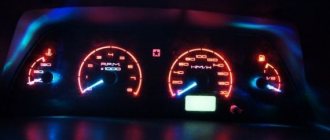
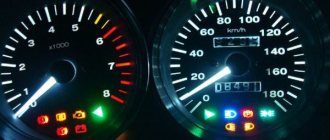
Operating a car without working instrument lights becomes uncomfortable, so in this article you will find 5 reasons why the lights may go out. In a situation where the backlight of the VAZ 2114 instrument panel does not light up, it is difficult to track the readings of engine temperature, fuel level, tachometer and speedometer, so the problem should be resolved promptly.
Useful video:
Reasons for turning off the dashboard on the VAZ 2114
Turning off the dashboard lights does not bode well for either the driver or the car. Because this malfunction is usually followed by others. Therefore, the backlight should be repaired immediately.
Many drivers install LED lights instead of standard incandescent lamps. It should also be understood that if the lights on the dashboard go out, then the problem must be looked for somewhere in the on-board electrical network. This means you can’t do without a multimeter, a soldering iron and electrical tape. Here are the main reasons for turning off the backlight:
- fuse burned out;
- the light bulbs have burned out (or LEDs - in later VAZ 2114 models the panel is illuminated by them);
- the wiring in the on-board electrical network is damaged;
- The common contact board of the instrument panel burned out.
Let's consider these points in more detail.
[custom_ads_shortcode1]
Main conclusions
If the instrument panel backlight on a VAZ 2114 car does not light up, most likely the light bulb has burned out or the LEDs have failed. However, there are several other possible causes for this problem:
- The wiring is damaged.
- Oxides have formed at the contact points.
- The safety side has failed.
- The electrical circuit burned out.
To establish the exact reason why the backlight does not light, you must, following the instructions, carefully disassemble the instrument panel and sequentially ring the entire circuit using a tester. The found faulty element, depending on the degree of damage, must be repaired or replaced with a new one.
Previous
Car lightPurpose, selection and replacement of bulbs in the dashboard
Next
Car lightReplacing low beam lamps Ford Focus 3
Burnt fuse
80% of cases when the backlight turns off is due to a blown fuse. It is located in a safety block installed under the steering column of the car. Usually the fuse indicated in the documentation as F10 is lit.
In the block, the fuse is located on the right and is designated as F10. It is responsible for the dashboard illumination, the operation of the side lights and the license plate lighting. On early VAZ 2114 models, fuse F10 was brown or red.
On early VAZ 2114 models, F10 fuses were brown; later cars began to have green fuses. It is not difficult to understand that the fuse has blown. It's enough just to inspect it. The housing of a blown fuse may be slightly blackened or melted, and the conductor inside the housing may be severed. The faulty fuse is replaced with a new one. Typically this solves the problem.
[custom_ads_shortcode2]
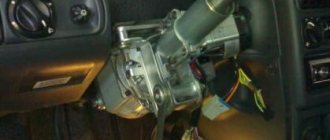
Diagnostic procedure
In order to remove the instrument panel, you will need a set of screwdrivers and two wrenches - 8 and 21.
The entire procedure is performed in the following order:
- Unscrew the three screws and remove the trim.
- Unscrew the five screws on the right side of the console and remove the screen.
- Disconnect the negative cable from the battery.
- Disconnect the wiring harness that goes to the cigarette lighter.
- Disconnect the heater fan mount.
- Unscrew the bolts responsible for fixing the steering block brackets.
- Remove the light bulb sockets, light guide and decorative insert.
- Remove the lamp responsible for illuminating the hydraulic corrector.
- Unscrew the screws of the top and bottom rows of the panel and completely dismantle it.
At this point, dismantling the panel can be considered complete. Now you can move on to finding the reasons why the instrument panel of the VAZ 2114 does not light up.
Once the panel is completely removed, you should cover the electrical circuit of the wires with protective material to prevent dirt and debris from getting on it.
Checking the electrical panel backlight system is performed as follows. First, all light bulbs are checked for functionality. If they are in good condition, all connector contacts are cleaned of oxides (they can be treated with kerosene or WD-40). After this, the serviceability of the wiring itself is checked - to do this, it is necessary to “test” it using a multimeter.
If the test results show that all elements of the system are operational, but the backlight still does not work, then the problem lies in the fuse box - it should be checked and replaced with a new one (if necessary).
The fuse block is replaced only with a similar factory-made block. Using instead blocks designed for a different amperage, as well as various homemade spacers, is strictly prohibited. This can not only cause the failure of all electronics, but also lead to a fire.
It is also worth noting that replacing the fuse box should be done very carefully, without jerking, using special dielectric tweezers.
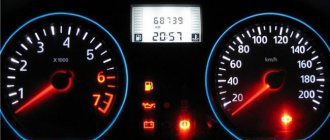
Burnt out light bulbs
Dashboard lights operate under less than ideal conditions. They are regularly exposed to shaking, power surges in the car's electrical network and temperature changes. All this significantly reduces their service life.
Especially if these are not LEDs, but ordinary incandescent lamps, which were equipped with the first VAZ 2114 models. There are a total of 19 lamps (but this number also varies depending on the year of manufacture of the car, and the number of lamps should be specified in the technical documentation for the car).
Another reason for light bulbs to burn out is their improper installation. This is most often observed on early VAZ 2114 models, where drivers decide to independently replace obsolete incandescent lamps with new LEDs, making some changes to the electrical circuit. Without proper qualifications, this operation is not so easy to perform. Here's what the sequence for replacing light bulbs looks like.
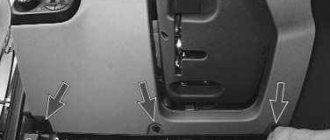
- The steering column is lowered to the bottom position until it stops. Above it is the dashboard cover with four mounting screws. They are unscrewed with a Phillips screwdriver. To move the dashboard cover, just unscrew 5 bolts
- To the right of the panel there is a row of buttons. Next to it there is another screw hidden by a plastic plug. It is pryed off with a knife (or a flat screwdriver). The screw is unscrewed.
- Now you need to remove the car radio from the niche by unscrewing its mounting bolts, and also remove the plastic handles from the heater controls.
- The instrument panel casing is freed from its fasteners. It should be pulled towards you, extending it 15–20 cm. This will be enough to gain access to the rear wall of the instrument unit.
- A number of recesses with light bulb sockets are visible on the wall. They are removed manually. To do this, the socket together with the lamp is turned counterclockwise until a characteristic click is heard. The arrow on the back wall shows the socket with the light bulb; it is unscrewed by hand
- Burnt out lamps are replaced with new ones, then the instrument panel is reassembled.
[custom_ads_shortcode3]
Why lamps burn out or stop working: causes and consequences
Burnt-out lamps complicate driver control over car instrument readings
We recommend: Car wheel balancing
The backlight operating conditions are not ideal: shaking, temperature changes, possible power surges in the on-board network, and so on. When driving, you must turn on low beam headlights. Along with it, the instrument lighting also turns on. This can shorten the life of the lamps, and over time, not the entire panel is illuminated evenly.
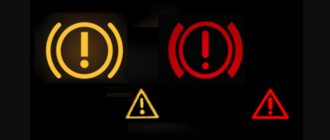
The main danger of lamps burning out in the instrument cluster is that some of them are control lamps. In this case, you may not know about the failure of individual machine components. And uneven illumination looks ugly.
Wiring damage
Problems with electrical wiring are the worst case. To figure this out on your own, the driver needs to have serious knowledge of electrical engineering. In particular, he must be able to read automotive electrical circuits well. Not all car enthusiasts can boast of such skills. It is for this reason that it is better to entrust the search for a damaged section of on-board electrical wiring to a qualified auto electrician.
His actions boil down to the following: he determines the key sections of the circuit and sequentially “rings” them using a multimeter until he finds a broken section of the wiring. Completing this work may take several minutes or several hours - it all depends on where exactly the circuit break occurred.
[custom_ads_shortcode1]
Signs of trouble
As mentioned above, the reasons why the dashboard does not light up are electrical circuits. But where exactly? For example, in:
- fuse;
- wiring;
- damage to the board;
- problem with the fuse box.
You can also look for a fault in the backlight bulbs and their electrical circuits.
It is up to the owner to decide whether to take the car to a service center or do it yourself. If the choice fell on the second option, the problem must be found and fixed.
Panel contact board problems
If all of the above measures do not lead to anything, the last option remains: damage to the contact board in the dashboard. This part is a combination of several microcircuits. It is not possible to repair it in a garage without special diagnostic equipment. So the car owner has only one option - to replace the entire board. You can purchase it at any auto parts store. It costs about 400 rubles. Let us list the stages of its replacement.
- First, all the steps mentioned above in the paragraph on replacing light bulbs are performed.
- But instead of unscrewing the bulbs, you should unscrew the four bolts at the corners of the rear wall of the dashboard.
- The rear wall is carefully removed along with the board, which is attached to the wall with plastic latches. The contact board in the VAZ 2114 dashboard is held on by simple plastic latches
- The latches are bent with a knife, the damaged board is removed and replaced with a new one. The panel is then reassembled.
So, the owner of a VAZ 2114 can solve most problems with the dashboard lighting on his own. All that is required is the ability to use a screwdriver. The exception is the case of damaged wiring.
It is strongly recommended that you contact an electrician to identify the damaged area. This will save a lot of time and nerves, which, as we know, are not restored.
How to replace the backlight
Sometimes it is necessary to disassemble the dashboard if a car enthusiast decides to modify it. The backlight may simply not suit the car enthusiast with the color of the lamps and the intensity of their work. In order to completely update the backlight, you will need to calculate the number of lamps for each sensor and purchase them.
When installing LEDs into sockets, it is important to observe their polarity. You may need to carefully grind down the sockets to get the bulbs to fit into place. After you assemble the new backlight, check its functionality by connecting it to power. You can check the build quality with a special device.
The next step is to connect the new backlight to the main board and to the lamp circuit. Carefully secure the LEDs so that they do not interfere with your installation of the panel. When assembling, check the position of the instrument needles; they must be set to zero during assembly. The arrows should not bend or deform.
Next, all you have to do is secure the entire structure with screws and carry out the final reassembly. It is important not to try to assemble the panel completely at once; do not fasten the decorative parts so that you do not have to remove them again. After connecting the instrument panel to the electrical circuit, check the build quality and operation of the sensors using the on-board computer. If everything is normal, then finally secure the panel and complete the assembly.
Troubleshooting steps
To diagnose and repair the backlight system for the instrument panel on a VAZ 2114, you will need a pair of wrenches, sizes 8 and 21, and a set of screwdrivers. The general procedure for dismantling and adjustment work boils down to the following steps:
- Remove the trim by first unscrewing the three fastening screws and removing the protrusion from the body part bracket.
- Remove the five mounting screws from the right side of the console and remove the screen.
- Disconnect the terminal with the battery suitable for the negative power source, as well as the block with the bundle of wires from the cigarette lighter system.
- The handle of the lever mechanism is removed.
- The stove ventilation system clamp is dismantled.
- The screws securing the steering column brackets are removed.
- The sockets are unscrewed, the light guide and the decorative panel insert are removed.
- The light bulb for illuminating the hydraulic corrector is removed using a 21 key.
- Finally, the screws that secure the top and bottom of the instrument panel itself are unscrewed so that it can be removed.
Once the instrument panel is removed, you can begin to find the reason why the backlight is not on. First of all, it is customary to check the lamps on the VAZ 2114. If they are working properly or after replacing the damaged unit the system still does not work, you should clean all contacts from the oxide film. To speed up the process, it is better to use special mixtures such as VD-40.
Upon completion of all these manipulations, it is necessary to perform a wiring test to detect a break. For this you will need a multivoltmeter or tester. If all the checked elements are in working order, but the backlight does not light, the safety module is to blame. It needs to be replaced with a unit with similar technical characteristics (and preferably from the same manufacturer).
Upon completion of the repair work, all equipment must be put back in place, following the reverse sequence described in the instructions for the VAZ 2114. In this case, special care must be taken not to damage the connected diodes, not to deform the instrument needles and not to disconnect the conductors.
Note! If the backlight has disappeared, but the car radio and other electrical appliances remain fully functional, most likely the cause of the malfunction is in the fuse box, it needs to be replaced with a new one.
[custom_ads_shortcode3]
Solutions
First of all, you need to check the backlight bulb; if it does not work, it needs to be replaced. Also, the reason that the instrument panel does not light up in the VAZ 2114 may be a violation of the integrity of the wiring. She should be called. A damaged fuse and electrical circuit, as a rule, cannot be repaired - they simply need to be replaced. Let's look at quick ways to solve these problems.
One or more light bulbs do not light up
One of the most common reasons why the instrument panel lighting on a VAZ 2114 stopped working is burnt out light bulbs. The electrical circuit in this model is designed in such a way that if one light source fails, all of them stop working. To determine exactly what is broken, you will need to ring the entire system using a tester. Another reason for the lack of lighting may be the independent installation of LEDs instead of standard incandescent lamps. In this case, an error is often made in the distribution of power or the electrical parameters of the led elements are calculated incorrectly.
Do-it-yourself relighting of the VAZ 2107 tidy
The most effective and simplest way is to replace stock light bulbs with diode analogues. The driver can choose the color of the diodes at his discretion. The remodeling procedure usually looks like this.
- First you need to buy the necessary light bulbs.
- The device is disassembled, and the old illuminators are removed from their seats along with the cartridges.
- Now you need to replace the old lamps with new ones.
- The assembly of the structure is performed in the reverse order.
Tidy illumination circuit 2107
- Fuel level.
- Instrument lighting.
- Speed meter.
- Choke light.
- Direction indicators.
- Battery charge.
- Standard tachometer.
- Economizer (if available).
- Coolant temperature indicator.
- Checking the oil pressure in the power unit.
- Handbrake light.
- Turning on the main beam of the headlights.
- Outdoor lighting indicator.
- Standard voltmeter (if available).
If a description of the connection of indicators in the form of a diagram is required, the form can be seen below.
Replacing light bulbs with LEDs
To install LEDs, follow these steps.
- Select diode light bulbs of the appropriate size and color in the store.
- Disassemble the device and remove the standard light bulbs.
- Next, you need to install diode illuminators in their place and assemble the structure in the reverse order.
LED strip in panel
A special feature is the overexposure method, when the driver uses a diode strip.
Here the principle of action is similar to installing simple elements, but with its own nuances. The essence of the procedure is to place the tape in a solder between the main illuminators (diodes). It's done like this.
- Find the plus and minus of the diodes/strip and connect them into a single circuit, observing the polarity.
- Next you need to prepare the place where the tapes will be attached. This can be done by drilling through the panel board from the inside.
- After this, the light bulbs are pulled into pre-drilled holes and fixed there.
- Now you should find a plus and a minus on the lighting tracks, where the piece of tape will be soldered through a splice.
- For successful soldering, you need to clean the tracks and treat them with solder.
Glowing arrows on the tidy 2107
The design of devices with luminous indicators is presented below. Ready-made options can be found in the store, but this is not our method.