What kind of steering wheel can be installed on a VAZ 2114
From its very production, the steering system of the VAZ 2114 car assumed the possibility of installing power steering using an installation kit.
This also applies to electric power steering or simply EUR. This modification will make it easier to turn the car and increase comfortable handling. This is especially true for drivers who drive in the city most of the time.
The main difference between power steering (power steering) and electric power steering is that the strength (efficiency) of the former directly depends on the speed of the engine. At high speeds, turning the steering wheel is too easy. This affects both ride feel and handling.
To overcome such problems, the power steering is not connected directly to the motor, but using a gain regulator. This is exactly the functionality that an electric amplifier has. The operation of the electric power steering is not characterized by a direct connection between effort and motor power, which allows it to be used as much as necessary in a specific situation.
For the VAZ 2114, a similar EUR is suitable as for the Lada Priora.
Additional advantages of using an electric booster instead of power steering:
- Less maintenance requirements (no need to monitor oil, connections).
- In cold weather there is no need to warm up, as when using power steering.
- Installing the EUR is much easier (no need to interfere with the engine compartment).
- High reliability.
- The only downside is the lower power, although on passenger cars like the VAZ 2114 this is not at all noticeable.
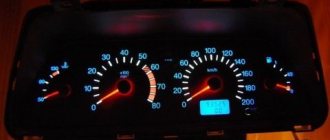
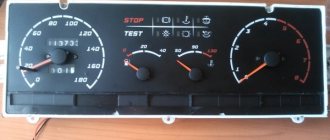
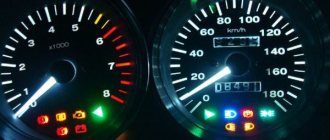
Designations of light bulbs, indicators, icons and buttons on the instrument panel of VAZ 2114, 2115
First, let's look at the descriptions and meaning of the panel icons and buttons, regardless of whether the car is equipped with an injector or a carburetor.
Instrument panel diagram VAZ 2114, 2115
1 - Control sensor that measures the temperature of the coolant in the engine cooling system. During normal operation of the power unit, the antifreeze temperature should not exceed 90 degrees. But minimal deviations are sometimes acceptable. If you notice that the engine begins to overheat frequently, be sure to contact a car service center for help. Sometimes the sensor itself may give incorrect results.
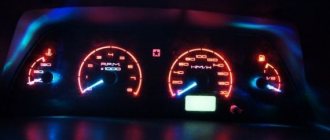
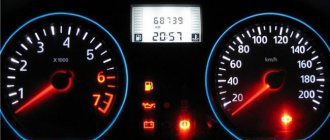
2 - A device such as a tachometer processes information that comes from the crankshaft and displays it on the panel. The tachometer readings indicate the number of engine revolutions.
3.4 - Turn indicators. If the indicators flash simultaneously, but slowly, this may indicate a possible problem with the bulbs themselves or in the electrical wiring network.
5 — The most basic element of any instrument panel is the speedometer. Thanks to it, the driver can determine the speed of movement. A slight error in the indicators is allowed, but it should not exceed the indicator by more than 5 kilometers. If such readings differ significantly from the real ones, then most likely the problem is in the speedometer.
6 — Fuel level sensor in the fuel tank. When the level in the tank drops to 6-7 liters, a red light comes on, indicating that the car needs to be refueled.
7 - Low fuel level indicator.
8 — Symbol indicating the light is turned on. It is triggered when the low beam and parking lights are turned on.
9 — The brake light indicates that the vehicle’s brake system is not working correctly. Most often it lights up if there is not enough brake fluid in the car.
10 - A blue light indicates that the high beam headlights are on.
11 — Button for resetting the daily mileage. The total mileage of the car is shown at the top, and the daily mileage at the bottom.
12 - on-board computer display with mileage indicators.
13 — Alarm activation symbol (light). When the emergency light is turned on, the light begins to flash red.
14 — “Check” symbol. It is triggered in case of possible problems with the car’s power unit. There can be many reasons for this, from problems with mixing the combustible mixture with air, to breakdowns of various engine power components. In any case, you need to contact the service for computer diagnostics or repairs.
15 — External air temperature sensor and time indicators. The daily mileage reset button allows you to scroll from the temperature readings to the time readings when scrolling.
16 - Battery charge sensor. Most often it lights up when the battery is almost completely discharged. If the indicator light is very weak or, on the contrary, bright, then the problem may be in the generator.
17 - Handbrake activation icon. It lights up both when the engine is on and vice versa.
18 — Icon showing engine fluid pressure. Usually its appearance indicates an insufficient amount of lubricating mixture. In such a case, be sure to check the oil level. Sometimes the problem can be caused by the oil pump not working properly.
19 - If the engine is equipped with an injector, then there is a reserve icon on the dashboard. Well, if the engine is carburetor, then this is a suction indicator.
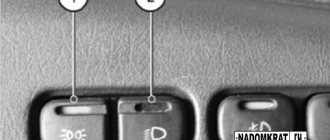
Buttons on the instrument panel
- Dimensions switch
- dipped headlights
- Front fog light button
- Rear fog lights
- Heated rear window
Installation instructions
When installing an electric power steering, it is necessary to take into account that it will be necessary to replace the steering column of the VAZ 2114 with an “electrically driven column”. To do this, let's start with the wiring. You will need to deal with the pads. There will be no need for any “twists”. There is a terminal in the block that we need to remove and insert into the block in the harness.
We insert the free terminal of the harness exactly into the place where the standard wire was. You don't need a special harness for this. Connect two 4 square wires to the battery. Don't forget to connect a 50A fuse. The “weak point” will connect to the tachometer, speed sensor, ground, K-line and wiring to the warning lamp. Don't forget to check the presence of speedometer and tachometer signals.
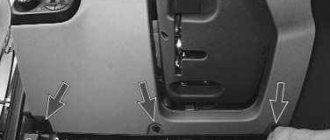
- Remove the casing with switches and ignition switch.
- Unscrew the bolt on the rail and remove it. We need to determine how much larger the “native” part is than our new one.
- We install the shaft on the EUR. After this we attach the shaft itself in its place.
- Setting up the wiring. We stretch two cables to the battery from the passenger compartment, preferably through the left wing. To conduct wiring you can:
- First remove the washer fluid reservoir.
- Take a solid wire and drag it through, trying to get to the hood.
- As soon as it appears near the hood, we attach our wires to it.
- We pull it out together with our wire.
- We connect the EUR electronics. There is a red connector under the instrument panel with an orange wire in it. It is to this that you need to connect the electric amplifier.
- Similar procedures must be done with the gray wire.
- We connect the power ends. In the battery we connect the pink one is a plus, and the black one is a minus.
The installation is now complete. If you did everything carefully according to the instructions, you will enjoy the ease of driving the VAZ 2114.
Installation and connection of the EUR steering wheel from Priora in VAZ 2113, 2114, 2115
I rode my father’s viburnum and realized that there was no escaping progress, especially since I plan to change the rack by 3.2, or even 2.5 turns, and without an amplifier there will be no life at all. I bought it at Stinger. The kit includes everything you need: 1. The amplifier itself (a new model, not glitchy in short). 2. Adapter. 3. Steering shaft. 4. Wiring. From myself: 1. I don’t see any problems with the mechanics. 2. For electrical purposes, you need to look for a connection diagram.
I started to disassemble: 1. Removed the steering casing (nothing complicated). 2. Disconnected and removed all switches (wipers and lights). 3. Removed the ignition switch (the first problem is that you need to unscrew the bolts with a chisel, since there are no edges (!). 4. Use a chisel to straighten the clamp securing the shaft and steering rack (at the engine shield). 5. Use a chisel to unscrew the two bolts securing the steering column (also quite inconvenient). the adapter is attached, I'll clamp it in a vice and knock it out through the sleeve). 10. Measured so that only a little bit came out of the nut and sawed it off (you can use a grinder, I made do with a saw and a file). EUR to the adapter (four nuts for 13 plus growers). 14. Replaced the ignition switch (I used hex bolts, it’s more convenient).
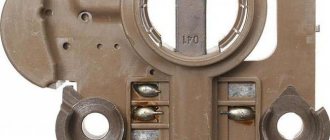
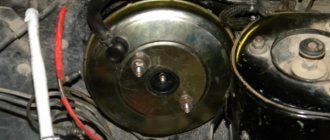
Photo: 1. Standard steering column without casing. 2. Steering column mount. 3. EUR in place).
Mechanically: I bought: 1. Adapter for steering wheel (for Priora). 2. Steering column switch block (also from Priora) 3. Steering column cover from Priora (not yet available). I installed everything, although I haven’t figured out the sound signal yet, but I’ll do that one of these days)). Electrics: 1. Extended the power wires to the battery (plus with a fuse, minus just a wire). 2. Tightened the ground (black thin wire for controlling the power steering, screwed under the instrument cluster). 3. Connected the wires to the instrument cluster. 3.1. The orange wire from the red block to the first from the EUR block is double yellow-red (photo 2). 3.2 Gray + yellow wires from the red block to the third from the EUR-blue block (photo 4). 3.3 Brown-red from the white block to the second block from the EUR-brown block (photo 3). In photo 5 from bottom to top: 1. Yellow-red. 2. Brown. 3. Blue. 3.4 There are also wires there, for k-line and so on, I didn’t connect them (wiring for Priora is not provided in Samara). 4. Collected everything.
Now the feelings: 1. Yes, everything is super 2. At low speeds it’s just a fairy tale) 3. As the speed increases, it turns off and the car steers as before (that is, clear and intelligible feedback). 4. Unlike the early Kalinovsky EURs, this one, when turned off, does not betray its presence in any way (I don’t feel it at all).
Disadvantages: 1. Because of the adapter, the steering wheel dropped (not fatal, but still). 2. The bullet column has lengthened, the steering wheel has become closer to the driver (in principle, everything can be treated by adjusting the seat and I, at 186 cm, did not experience any inconvenience). 3. The steering wheel covers the instrument cluster.
To the diagram: 1. Power steering harness; 2. EURU power supply circuit fuse; 3. Diagnostic contacts of the EURU harness; 4. EURU; 5,6,7 - connecting blocks of the electrical power steering harness, connected to the wires of the instrument panel harness, disconnected from the blocks to the instrument cluster; 8. Block (red) of the instrument panel harness to the instrument cluster; 9. Block (white) of the instrument panel harness to the instrument cluster; 10. Alarm block; 11. Ground terminal.
From myself: THE COLOR OF THE EUR WIRES MAY DIFFER.
1. Button: well, it’s not realistic to put it in its regular place, so I had to think about it. The task was to save the button, not to cut the wiring and place it in a convenient place - as a result, it is now on the panel. I am comfortable. 2. Tilt of the steering column: I placed washers under the far fasteners (which are closer to the engine compartment) of the EUR with an adapter, with them the angle of the steering column changed and the steering wheel stopped blocking the instrument cluster
https://www.drive2.ru/l/288230376152839628/, https://www.drive2.ru/l/4899916394579278194/, https://www.drive2.ru/l/4899916394579281273/
Installation of steering rod opening plugs in VAZ 2113, 2114, 2115
I have long dreamed of closing the steering linkage openings, and I came across factory plugs in a store.
Adjusting the steering wheel position
If you don’t like the height and position of the steering wheel, then you will need to grind the edges of the shaft to the size you need or install gaskets between the plate and the body. It is worth remembering that the electric power steering is automatically switched off at speeds above 50 km/h, unlike the same power steering.
Installing electric power steering on your own is quite possible. You just have to remember that even for an experienced driver it will take a lot of time and effort. But for a lover of comfortable driving, the result will justify all costs and hopes.
Steering wheels on a VAZ. Which one should I replace the standard one with?
The VAZ car became the best in the Soviet automobile industry, and its popularity is still quite high. This is partly due to the high saturation of the market with these cars. They are available to almost every resident of the country, which is why they have become the “people's working” transport.
Today, spare parts for VAZ are in demand, because so many cars needing maintenance require a large volume of parts. Among them is the steering wheel, some buy it simply to replace the old one, while others decide to embellish the interior a little, buying the steering wheel only for the purpose of some kind of tuning. It is important to consider that almost all steering wheels are interchangeable; in some cases you just need to use additional bushings.
CAR LOVER EXPERIENCE
There are buttons with both lamps and diodes, there is a choice. Resistors are soldered directly into the diode, this is AvtoVAZ know-how