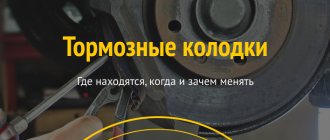
How to change the front pads on a Niva?
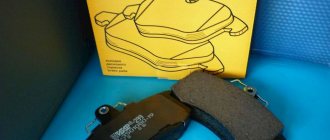
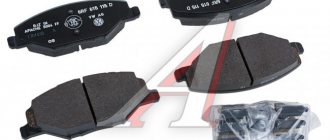
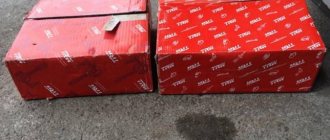
Brake pads for Lada Largus
Not only the quality of the ride, but also the safety of driving the car depends on the condition and serviceability of the parts. A special role among the large detailed components in the car is played by the braking system. Malfunctions in it, its complete failure make movement by car not only dangerous, but in some cases impossible.
When thinking about repairing the brake system, many decide to do the work themselves, especially if all external signs indicate not very serious problems, for example, wear of the front pads. The practice of self-repair is popular among owners of domestic cars or imported models that are similar in design to Russian ones. Niva owners are no exception. Therefore, it is quite logical for them to ask the question “How to change the pads in the field.”
Replacing front pads in the field: features of the process
Replacing a part such as pads is often done independently, without the help of car service specialists, for several reasons:
- It takes no more than 2 hours to complete the work;
- The caliper has a simple design;
- Removing and installing the pads does not require special skills: both men and women can handle this work;
- Replacement is carried out using a jack and standard tools from the driver’s kit (hammer, screwdrivers, etc.).
An important rule to remember: diagnosing wear and malfunction of one of the pads makes it necessary to replace both parts (front pads). That’s why the manufacturer offers them as a set
This state of affairs ensures high quality operation of the car’s braking system, whereas after replacing one (damaged) pad this fact is not observed.
Removing parts
Replacing front brake pads in the field: removing the part
Niva owners can rest assured: the procedure for removing the front pads is the same on all cars, regardless of their brand. There are specific features, but in general the algorithm is identical:
- Setting the car to the manual parking brake;
- Installation of supports/ supports/ rollbacks for all wheels;
- Removing the bolts from the wheel;
- Installing a jack under the front part of the Niva;
- Unscrewing nuts;
- Wheel removal;
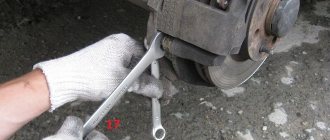
- Unscrewing the caliper.
Working with the caliper requires special attention, because unscrewing this part has some features:
- Removing the cotter pin, which acts as a position lock for the clamping brackets;
- Removing staples by knocking them out (a hammer and a punch will help with this).
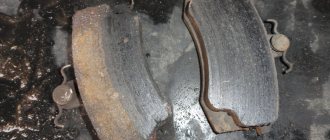
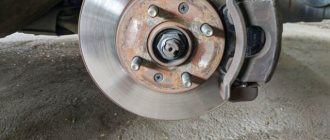
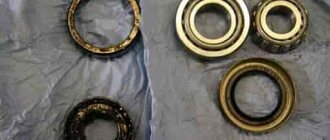
After removing the caliper, the pads are removed. They are visually inspected
Particular attention is paid to their thickness. Detection of reaching the minimum thickness of the front pads indicates their immediate replacement
Part installation
How to change front pads in the field: installing a new part
The return of repaired and installation of new front pads on the Niva is carried out in the following way:
Piston squeeze. A piston is one of the elements of a car’s braking system. To press it out, use a screwdriver. The long version is best; Installation of pads
At this stage, it is important to install the pads in exactly the position in which the old ones were removed; Installing the caliper. The algorithm is identical to its analysis (discussed above), but is performed in reverse order
At the stage of installing the clamping brackets, use a lubricant, which will make the secondary knockout of the clamps easier; Installation of spring clamps fixing the position (simultaneously checking the degree of their elasticity); Wheel installation; Repeat the steps to replace the second pad; Bleeding the brakes. This is done to pump air out of the braking system.
Preventative work
Front brake pads on the field: prevention
The brake system, like any other part in the car, must always remain in good working order. This will ensure a high-quality and safe ride at any time of the year. The condition of the front and rear brakes must be monitored. If characteristic signs of their malfunction occur, immediate intervention is required to eliminate it.
https://www.youtube.com/watch?v=pTi_AXhGtpA
Prevention is the best measure to prevent parts from breaking. If the car is used in the average frequency range (from 3 to 4 times a week), the condition of the pads, including the front ones, is checked and monitored on Niva once every 2 years. If the machine is used daily - once a year.
At the same time, when visually inspecting the pads, special attention is paid to their thickness: during braking, it tends to wear out. Loading…
Loading…
How to replace brake pads on a VAZ 21213 yourself
The braking system is very important for driving safety. Therefore, it is necessary to monitor its serviceability. One of the main elements of the brake system are brake pads (BC), which, due to friction, slow down the rotation of the wheel. Naturally, over time they wear out and require replacement. You can perform the operation of replacing the TC on a Niva yourself in a garage.
https://www.youtube.com/watch?v=bXM2A6eFKIM
All elements of the car wear out to varying degrees during operation, depending on the load experienced. The wear of brake pads is influenced by many factors, so the frequency of replacement for each Niva will be different.
SUVs are used in difficult off-road conditions, so they are replaced after 15-20 kilometers. The reason for rapid wear is the nature of the road surface on which the vehicle has to drive: sand, water and dirt.
The wear and tear of the roadway depends not only on the quality of the road surface, but also on other factors:
- climatic conditions of the area where the SUV is operated;
- driver's driving style;
- quality of consumables.
The manufacturer recommends replacement after an average of 30-50 thousand. But given that wear varies, experts strongly recommend checking the brake system every 10 thousand kilometers.
When checking, you need to pay attention to the presence of creaks, other extraneous sounds, and smooth braking. When replacing, in parallel, you should check the integrity of the anthers on the guides, brake hoses, rubber covers, and the degree of wear of the brake discs. This is necessary for timely identification and elimination of faults.
The front axle bears the main load, so the front axles wear out faster than the rear ones. On average, for every rear pad replacement there are two front pad replacements. Any driver can understand that there is a problem with the brake pads if he pays attention to the characteristic symptoms:
- increased braking distance;
- knocking noise when braking hard;
- ineffective brake operation;
- creaking when braking;
- metal shavings on brake discs or pads.
If at least one of the signs appears, it is necessary to check the brake system and replace worn parts if the following signs of wear are found:
- cracks and delaminations of the TC are visible;
- defects in the form of chips and scratches were found on the surface of the block or lining;
- a protruding rim has formed along the edge of the disk;
- the thickness of the linings on the pads is less than the required technical specifications;
- uneven wear of the TC.
The pads must be changed in pairs: two front, two rear. When replacing the pads on only one wheel, the driver will not be able to brake effectively; the car may pull to the side when braking, which threatens to create an emergency situation on the road. The thickness of the overlay is measured using a caliper. The minimum thickness allowed is 1.5 mm.
To carry out the replacement you will need the following tools:
- jack;
- wheel wrench;
- a set of keys;
- pliers;
- gas wrench or sliding pliers;
- flat blade screwdriver;
- hammer;
- mounting blade;
- support post;
- calipers.
Naturally you need to buy new brake pads. It is advisable to have WD-40 penetrating fluid to relieve stuck fasteners.
Changing the pads of the front wheel pair
To make it convenient to work, we place the SUV on a flat, horizontal plane. We place wheel chocks under the rear wheels and set the handbrake. Before dismantling work, we treat the threaded connections with WD-40. We perform the replacement according to the following algorithm:
- We tear off the wheel mounting bolts with a spray bottle. Let's jack up the side of the car on which we will carry out the replacement. We install the car on a support stand for safety.
- We unscrew all the bolts and remove the wheel.
- Using pliers, pull out the cotter pin of the pressure lever (PR) of the lower axle.
How to independently replace front and rear discs on a Niva Chevrolet
Brake pads for Lada Kalina
At the initial stage, we carry out diagnostics, determine the source of the breakdown, and calculate the number of spare parts, time, effort, and money.
We carry out the inspection on our own, since the procedure is not at all complicated. We jack up each side of the car one by one and remove the wheel. We use a caliper to measure the actual thickness of the disc; in this case, it is not at all necessary to disassemble the caliper. We compare the obtained data with the parameters in the operating instructions. If the thickness is less than 9.5 mm. — the disk must be replaced with a new one; subsequent use of the machine is unsafe.
Also interesting: The best ball joints for a car
Before changing elements of the brake system, you need to treat the cotter pin and caliper with a special anti-corrosion lubricant, for example, WD40, since problems may arise during removal due to rust. If upon inspection it is clear that there is uneven wear, this may indicate that there are problems with the caliper.
- Using pliers, pull out the cotter pin from the bottom finger.
- Take a thinner screwdriver and push out the cotter pin itself
- We remove the clamping lever with two springs
- Take a screwdriver and hook the caliper, lifting it up
- We remove the worn pads and inspect them; if there is wear, replace them with new ones.
- We recess the pistons onto the caliper as deeply as possible so that the new ones will fit in without problems since they are thicker and simply won’t fit.
- When you have installed the new pads, we begin to assemble everything in the reverse order.
After changing, press the brake pedal a couple of times so that the pistons take their working position. You should also check what level the brake fluid is, since after replacement the level of brake fluid may increase. Replacing these elements on a Niva Chevrolet SUV takes no more than four hours and can be done independently.
Design and repair of the rear wheel brake mechanism of Niva Chevrolet
Figure 1 The rear wheel brake mechanism (Figure 1) is drum-type, with automatic adjustment of the gap between the shoes and drums. The automatic clearance adjustment device is located in the working cylinder. Its main element is a split thrust ring 9 (Fig. 2), installed on the piston 4 between the shoulder of the thrust screw 10 and two nuts 8 with a gap of 1.25–1.65 mm. The thrust rings 9 are inserted into the cylinder with tension, providing a shear force of the ring along the cylinder mirror of at least 343 N (35 kgf), which exceeds the force on the piston from tension springs 2 and 8 (see Fig. 1) of the brake pads. When, due to wear of the linings, the gap of 1.25–1.65 mm is completely removed, the shoulder on the thrust screw 10 (see Fig. 1) is pressed against the shoulder of the ring 9, as a result of which the thrust ring moves after the piston by the amount of wear. When the braking stops, the pistons are moved by the force of the tension springs until the cracks stop against the shoulder of the thrust ring. Thus, the optimal gap between the pads and the drum is automatically maintained.
Replacing Chevrolet Niva front brake pads
How to change the front and rear brake pads on a Skoda Octavia A5 yourself
Tools:
- Sliding pliers
- Pliers
- Medium flat screwdriver
- Small hammer
- Wheel chock
- Rolling jack
- Rubber bulb
- Brake fluid container
- Punch
- Wire brush
- Mounting blade
Parts and consumables:
- Front brake pads
- Graphite grease
- Aerosol lubricant type WD-40
- Brake fluid
Note:
The minimum permissible thickness of the friction linings of brake pads is 1.5 mm. Replace the pads in the following cases:
– the thickness of the linings is less than 1.5 mm;
– the surface of the linings is oily;
– the linings are not firmly connected to the base;
– the linings have deep grooves and chips.
If for some reason you have removed the front wheel, check the condition of the pads through the hole in the brake caliper housing. If the thickness of the friction linings is about 2 mm, replace the pads. If the car pulls to the side when braking or you hear strange noises, remove the brake pads and check their condition.
Attention:
Loosen and tighten wheel nuts only with the vehicle on the ground. Do not use gasoline, diesel fuel or any other mineral solvents to clean brakes. The brake pads on both front wheels must be replaced at the same time. It is not permissible to replace the inner and outer pads between each other, as well as between the left and right wheels. This may result in uneven braking.
1. Brake the vehicle with the parking brake and install wheel chocks under the rear wheels.
2. We hang and remove the front wheel.
3. Clean the brake mechanism from dirt. To facilitate disassembly, apply WD-40 type liquid to the joints of the pins with the caliper and clamping arms.
4. Pump out some of the fluid from the reservoir if, before replacing the pads, the brake fluid level in the reservoir is at or close to about zero.
5. Using pliers, remove the cotter pin of the lower clamping arm axis.
6. Using a drift, we touch the axis of the clamping lever.
7. Holding the lever, use pliers to remove the axle.
8. Remove the clamping lever.
9. We remove the two clamping lever springs from the pad guide so as not to lose them.
10. Using a screwdriver, lift the brake caliper.
11. Place the caliper with the cylinder block on the steering knuckle.
12. Remove the brake pads from the guide.
13. Before installing new brake pads, it is necessary to move the pistons as far inside the cylinders as possible. Using sliding pliers (or a pipe wrench), press the pistons into the cylinders.
You can recess the pistons into the cylinders in another way. To do this, insert the outer block into the guide and install the caliper in place. Use a spatula to press the pistons into the cylinders.
14. We carry out further assembly of the unit in the reverse order. To make it easier to install the axis of the clamping lever, use a file or emery to grind the end of the axis like this.
To make a cone.
15. Before installation, lubricate the axis of the clamping lever with graphite grease.
16. Pressing the lever, insert the axle.
17. After installing the brake pads, you must press the brake pedal several times so that the cylinder pistons move the pads to the brake disc.
18. Check the brake fluid level in the reservoir and, if necessary, top up to normal.
Attention:
After replacing worn brake pads with new ones, do not rush to immediately drive onto busy highways. It is possible that at the very first intensive braking you will be unpleasantly surprised by the low efficiency of the brakes, although you have installed branded pads. The brake discs also wear out, and the new pads only touch them at the edges, practically without braking. Choose a quiet street or passage without cars and brake smoothly several times so that the pads get used and begin to fit the entire surface. At the same time, evaluate the effectiveness of the brakes. And try not to brake sharply for at least the first 100 km. When unused pads become very hot, the top layer of their linings burns, and the brakes will not be as effective for a long time.
The article is missing:
- Photo of the instrument
- Photos of parts and consumables
- High-quality photos of repairs
carpedia.club
Chevrolet car repair manuals and tips
Guide for removing and installing rear pads on a Chevrolet Niva
Chevrolet Niva is a car from the SUV class. And for an SUV, the condition of most control systems is the key to successfully passing an obstacle. Thus, an important role is played by the braking system and the parking brake, which performs the function of blocking the wheels while stationary. Blocking or braking of the rear wheels of the car is performed by drum brakes. The most important elements of these brakes are the rear pads of the Niva Chevrolet. Actually, this article will tell about them.
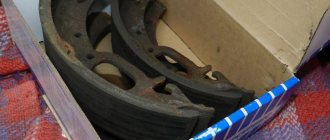
Removing the drumWhat are pads
The brake pads are arched in the shape of the letter “C” and are installed in the rear wheel drums, where they do their work. The brake pad consists of the following elements: 1. the main part, made of special steel; 2. friction lining applied to the brake pads from the back of the head; 3. fastening elements, which are various holes.
Rear brake pads
Let's briefly consider the principle of operation of the rear pads. So, the brake pads are located in the rear wheel drums, two in each. They are located with the inner side facing each other, and the outer one, with a friction layer, interacts with the wheel drum. The resulting interacting force, which is accompanied by the release of energy, ultimately leads to the car stopping.
When you press the Niva Chevrolet brake pedal, pressure is created in the brake system, which acts on the pistons in the working cylinder. The so-called extrusion of the pads occurs; the friction part interacts with the moving wheel drum and leads to its braking. As the pads wear out, the friction layer wears off. The inside of the drum is also erased.
When is pad replacement necessary?
Before replacing the rear pads, an inspection must be carried out. A malfunctioning handbrake does not mean that the brake pads are urgently needed. They change in the following cases:
1. If the thickness of the friction layer is less than the permissible value, that is, less than 1.5 mm. 2. There is oil or other liquids on the lining. 3. There are cracks, gouges or chips on the layer. 4. The connection between the gasket and the base is weak.
Removing the brake drum
Only disassembly and detection of one of the above damages indicates the need to replace the pads.
Replacement of brake system elements
Replacing elements requires the availability of basic tools and careful implementation of repair actions. 1) It is necessary to place the Niva Chevrolet car on a flat surface and set second gear to the gearbox. Bars are placed under the wheels to secure the car in a stationary state. Set the handbrake to its lowest position. 2) Using a jack, lift the rear part and remove the wheel. Next, the drum is removed and a picture of the arrangement of the elements of the rear brake system is observed. Now you can remove the brake pads in two ways, let's look at both:
Disconnecting the spring
First extraction method: 1. One of the ends of the upper spring is pryed up with a screwdriver and removed. 2. The spacer bar installed below the spring is removed. 3. The support post, located in the middle, is held by hand on the back side of the shield and, using pliers, the outer post of the front block is rotated until the slots coincide with the protrusions. 4. The tension spring with both cups is removed and the stand located on the reverse side is removed. 5. The upper part is slightly retracted and the lower spring is removed. 6. Next, retracting the rear part, the drive lever is pulled out and freed from the tension cable. Second extraction method: 1. The support posts are removed from both edges. 2. The rear block is pryed up with a screwdriver and removed, first removing the spacer plate. 3. The upper fastenings are removed from the working cylinder. 4. The lower spring and both elements are removed along with the spacer bar and the spring. 5. The tip of the cable is removed from the lever, and the brake pads, complete with bar and spring, are removed. 6. Now holding one element, the spring and spacer are removed.
Replacing the front brake pads of a VAZ 2121 Niva 2131
The removal and subsequent replacement of the front brake pads on a VAZ 2121 and Niva 2131 is carried out in case of wear, when the thickness of the friction linings has become less than the maximum permissible, when mechanical defects have appeared on the surface - chips, cracks, etc.
It is recommended to replace the pads on both sides at once, regardless of the condition of the other pair, in order to maintain the quality of operation of both wheels and not violate the basic characteristics. We hang the side to be repaired with a jack and remove the wheel.
After removing the wheel, we clean the brake mechanism from dirt using a wire brush or blow it with compressed air.
Now we need to pull out the cotter pin of the lower axis of the clamping arm. To do this, using pliers, you first need to remove the locking plate that secures it from spontaneous removal, then remove it from its place using a hammer and a stop of suitable diameter.
We grab the cotter pin with pliers and at the same time, holding the lever from falling, remove the cotter pin and remove the lever from its seat.
Remove the two lever pressure springs from the pad guide.
Then we pry up and lift the brake caliper.
Place the caliper on the steering knuckle with the pads facing up. Then we remove them from their seats.
Now that the pads have been removed, we replace them, and then proceed to installation. But first you need to recess the brake pistons into the cylinders; for this you can use sliding pliers, or install the caliper with one outer old pad back in its place and insert a small mounting blade between the disc and the pad and recess the piston.
- Also, before installation, it is recommended to grind down the end of the clamping lever axle to make it easier to install into place and lubricate it with graphite lubricant.
- We carry out all subsequent assembly in reverse order.
- At this point, the repair work to replace the front brake pads on the VAZ 2121 Niva 2131 has been completed.
Preparatory stage
The process of removing the front brake pads of a car from a Chevrolet Niva:
- Put the car on the handbrake. It is also recommended to set the vehicle to maximum speed.
- Install chocks under the wheels.
- Remove the bolts on one of the wheels. Sometimes this process turns into an almost impossible task. What could be the problem:
- Deformation of parts or joints. This can happen after a strong impact.
- Applying physical force when tightening bolts without getting into the threads.
- Formation of rust or oxidation of parts.
- Raise the “working” side with a jack.
- Remove the wheel.
- Unscrew the caliper:
- get rid of the fixing cotter pin;
- remove the clamping brackets. It is also advisable to lubricate them on both sides.
- Remove the brake pads. This can be done using a flathead screwdriver. You need to pry it off from both sides of the disc, helping with your hands if necessary.
- Get rid of burning particles.
- Check the condition of the dust protection cuff.
Don't forget to clean the brake pad housings. This can be done using a pipette or syringe. The sockets also need to be lubricated with copper grease.
Tips for caring and maintaining the brake system
- Strictly adhere to the technical inspection schedule. The manufacturer recommends an interval of 15,000 km;
- Buy and install only original spare parts and consumables;
- Maintain a moderate driving style. For systematic off-road use and mountain serpentines, install brake discs of the class with notches and a perforated surface.
If you still don’t know how to replace brake system components yourself, read the instructions and watch the video. If you do not have enough time to service your Niva Chevrolet, contact the service center to order a paid service.
Advantages and disadvantages of the braking system
Reviews from car enthusiasts about the brake system on the Chevrolet Niva show that it is generally quite reliable and effective, fully consistent with the class of SUV cars. The advantage is ease of control, ease of maintenance, adjustment and replacement of parts. The disadvantages are due to the use of a pressure regulator, the operation of which in some cases can manifest itself in the form of uneven braking, the appearance of vibration when braking at certain speeds, and an increase in braking distance.
Effective brakes on the Chevrolet Niva, as the main condition for the safety and controllability of the car, help maintain the high popularity of this model for many years.
How to Identify Brake Problems
No one will argue that a working brake system is a guarantee of safety. With serviceable brakes, you can compensate for the breakdown of any component in motion. Therefore, regular monitoring of these nodes is a mandatory procedure. Replacing brake pads on Niva 21214 occurs in the following cases:
- increasing the braking distance when you press the pedal;
- car drifting away from a straight line when braking;
- extraneous sounds when the brakes are applied;
- overheating, defects in the brake system elements;
- long travel of the handbrake lever and/or pedal;
- change in force when pressing the pedal;
- independent operation of the brakes;
- the hand brake does not apply on slopes;
- wear of brake pads less than 1.5 mm.
Replacing components is not a problem even for beginners in repairing their own car. The main thing is to strictly follow the instructions and check the new system after assembly to eliminate possible problems while driving.
When to replace pads
The main signs of brake pad wear include:
- Increasing the duration of the braking distance. This occurs when the friction material is depleted, friction between the pad and the discs occurs with the metal part, leading to a decrease in braking coefficient.
- Not linear braking. This happens if one of the discs is clamped tighter during braking.
- Brake pedal damping. When the brake pads are completely worn out, the brake pedal loses its shock-absorbing properties and does not return to its original position.
- Low brake fluid level.
- Extraneous sounds during braking. A sign of complete wear of the friction linings.
- Dust on wheel rims. The dust can be dark or metallic. Dark dust occurs as a result of abrasion of the friction material, metal dust is a sign of abrasion of the discs.
How to Remove a Brake Drum on a Chevrolet Niva
Societies ›Chevrolet Niva› Blog ›How to remove rear brake drums?
Hello everyone, I now wanted to change the rear pad brake. It's sad, but I couldn't take off
drum. How competent are they to take off? Thanks for the advice on hanging and warming up the drum. I would like to add that there is a little play in the heels, so the cool wheel moves back and forth a little later. Thanks again, I listened for half a day today. Along the perimeter through the tree, the bowl is still a little loose
It’s better to summarize: 1. VD-40, 15 minutes, VD-40, 15 minutes. 2. Try the trick with suspension and acceleration, braking. It is not so tight (if everything is oiled, then the heel moves somewhere around 0.5 mm.) 3. Knocking on wood, but it is more convenient for two, because there are not enough hands. Piece of wood on drum
, put the installation on top and hit it - it turns out more evenly than with a piece of wood.
Everything worked with this technique :)).
Eventually you will install the back end of the head and hammer the setup. At the station I was hit by peeling drums
Remove acidification of brake drum VAZ 2123 / Russian crazy car service
In this video I will show you how to take off
half rotten drum
. Special pullers couldn't handle it.
learned from “bitter” experience on the previous 10, they kicked the stitch out of the salon with the first thing that he removed the drums. covered the seat with graphite. Such questions no longer arise! ! ! and also, in turn, unscrew all the brake pipe nuts, including the ABS unit. It is permissible to lubricate the contact brake nut/tube.
How to remove a brake drum on a Chevrolet Field.
To remove the drums, try collecting vinegar essence in a syringe and carefully soaking the needle between the drum and the axle shaft through the needle. concentrated essence will absorb corrosion
see here www.autoprospect.ru/chevr…anizmy-zadnikh-koles.html
Trying to knock down the clamping drum with a sledgehammer and a metal spacer will deform the aluminum edge and even break. On the old woman 2121, this method gnawed my drums
Gray as advised and gently tapping the wooden block in a circle. First of all, in the area stuck up to half the axis of the symptoms, and then along the edge along the wheel protection from under the car
You put it in place, and then put it on the mating drum - axle shafts, graphite lubricant. It will be easier again.
Position the metal space correctly so that the edges remain intact.
I beat the drums on wood. First tap the wheel, then circle and go down. There are also pullers with 3 legs and a rest center - their price is 350-500 rubles, the size is just
The caliper jams on a Chevrolet Niva
The brake pipe fittings are screwed into the holes on the right side of the cylinder: The elasticity of the ring is selected in such a way that it does not move along the cylinder mirror from the force of the tension springs of the pads, but only from the force of the pistons.
Features of the Niva Chevrolet brakes. The car is equipped with two independent braking systems: working and parking (Fig....
Otherwise, replace the valve. This operation can be performed as follows: The elasticity of the ring is selected in such a way that it does not move along the cylinder mirror from the force of the tension springs of the pads, but only from the force of the pistons.
Maintenance of the mechanism From time to time, any brake system may malfunction. No car is protected from malfunction, especially if it is not always used correctly.
A very common maintenance procedure that you will encounter is bleeding.
With the help of the latter, you can get rid of air bubbles in the brake fluid, which interfere with normal braking, or even lead to system failure.
Check the condition of the pads through the hole in the brake caliper body. If the thickness of the friction linings is about 1.5 mm, replace the pads.
To check the degree of wear of the brake pads of the rear brake mechanism, remove the rubber plug from the hole in the brake shield and 5.
Replace the pads in the following cases: Check the pressure regulator with an assistant from below the car mounted on a lift or inspection ditch.
Have an assistant press the brake pedal. When you press the pedal with a force of 70-80 kgf, the piston should move out of the body, twisting the torsion arm.
To adjust, lift the rear axle of the car. Loosen locknut 1 of adjusting bolt 2.
When turning the adjusting bolt with wrench 1, achieve light contact of the bolt with piston lever 2. Turn the adjusting bolt one more turn and tighten the locknut. With proper adjustment of the rear brake pressure regulator drive, the rear wheels should lock during hard braking somewhat later than the front wheels.
Place the ruler next to the pedal with its end on the floor, oriented in the middle of the pedal pad. Mark on a ruler or remember the position of the pedal. The vehicle is equipped with a vacuum booster located between the pedal pusher and the brake master cylinder. It is attached with two studs to the pedal bracket. The amplifier is non-separable; if it fails, it is replaced.
If the amplifier is working properly, after starting the engine the pedal should move forward.
Remember that failure to operate or insufficient efficiency of the vacuum booster can also be caused by a leak in the hose that takes the vacuum from the receiver.
The brake master cylinder is attached to the vacuum booster housing with two studs. At the top of the Chevrolet Niva master brake cylinder there is a reservoir from which brake fluid enters the cylinder.
The tank has markings for the maximum and minimum liquid levels, and a warning device with a float is mounted in the lid, which closes the contacts when the liquid level drops. The brake pipe fittings are screwed into the holes on the right side of the cylinder: The front wheel brakes are disc brakes with a three-piston floating caliper.
The pads are located between the cylinder block and the caliper: The caliper can move in the pad guide, being pressed against it by two spring-loaded levers. The pad guide is rigidly attached with two bolts to the steering knuckle.
When unscrewing, the bolts are secured by the edges of the protective casing; they are bent back at the edge of the bolts after tightening. Brake discs are cast iron.
The automatic clearance adjustment device is located in the wheel cylinder and consists of two elastic steel split rings, one for each piston, installed on the pistons with an axial clearance of 1.65 mm.
The elasticity of the ring is selected in such a way that it does not move along the cylinder mirror from the force of the tension springs of the pads, but only from the force of the pistons. As the pads wear, the pistons move the rings along the cylinders during braking, maintaining a constant design gap between the pads and the drum. In this case, it is necessary to replace the cylinder and brake fluid.
The nominal inner diameter of the drum is mm. It is allowed to groove the working surface of the drums when worn.
The largest permissible diameter during wear or after grooving is mm. The pressure regulator serves to reduce the braking force on the rear axle, which prevents the car from skidding when braking.
Choosing pads
The front wheels of the Niva Chevrolet use disc brakes, and the rear wheels use drum brakes. Accordingly, the pads on them are different. Pads are the main working part of the brakes, which carry the most load and wear out the fastest. If the car is used intensively, the condition of the pads should be checked at least once every six months. Today there are many different domestic and foreign manufacturers of pads for Niva-Chevrolet cars.
- low heating temperature during braking;
- do not require heating in winter;
- they do not creak or squeal even during sudden braking;
- have a longer service life compared to other models.
Also interesting: Where is the Niva Chevrolet ignition relay located?
The only disadvantage of these pads is the high cost, but the price corresponds to the quality.
If you need information about replacing front pads, this is the place for you.
The choice will depend on what your preferences are and what your budget is, since there are at least six different types from different manufacturers.
All the options given above are suitable for both a regular Niva and a Chevrolet Niva, since they have identical calipers.
What front pads can be installed on a car?
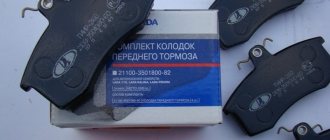
According to the AVTOVAZ catalog data for the VAZ 2123, the front pads are assigned the number 2123-3501090. The average price of original pads is 550 rubles.
Due to the low quality of most original products, we will consider analogues:
Based on the proposed substitutes, we conclude: for a small additional payment it is better to take a high-quality analogue from a world-famous manufacturer. Improved braking performance and safety may come at the cost of reduced brake rotor life.
Replacing pads on the rear axle
To replace the rear pads, you will need to carry out the same preparatory work, after which the first thing you need to do is loosen the handbrake. Subsequence:
We remove the spring near the lever from which two cables go.
Using two “13” keys, you need to unscrew the bracket nuts, after which the cables weaken and do not affect the pads.
You can start directly replacing the pads
You need to remove the drum from the axle shaft using a “12” key by unscrewing two bolts. The drum often sticks, so you need to tap it with a hammer around the entire perimeter.
The working cylinder must be pushed inward on both sides using a flat screwdriver.
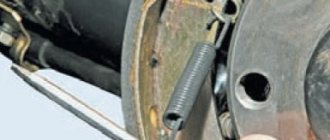
- You need to pry the tension springs by pulling them out.
- The block must be moved to the side opposite to the other block by the lower part, after which the two blocks are removed from the shield.
After removing the pads, the brake flap and drum must be cleaned and degreased and checked for the presence or absence of cracks.
What are pads
The brake pads are arched in the shape of the letter “C” and are installed in the rear wheel drums, where they do their work. The brake pad consists of the following elements:
- main part made of special steel;
- friction lining applied to the brake pads from the back of the head;
- fastening elements, which are various holes.
Rear brake pads
Let's briefly consider the principle of operation of the rear pads. So, the brake pads are located in the rear wheel drums, two in each. They are located with the inner side facing each other, and the outer one, with a friction layer, interacts with the wheel drum. The resulting interacting force, which is accompanied by the release of energy, ultimately leads to the car stopping.
When you press the Niva Chevrolet brake pedal, pressure is created in the brake system, which acts on the pistons of the working cylinders of the front and rear wheels. Next, the so-called extrusion of the pads occurs; the friction part interacts with the moving wheel drum (or disk) and leads to its braking. As the pads wear out, the friction layer wears off. The inside of the drum is also erased.
When is pad replacement necessary?
Before replacing the rear pads, an inspection must be carried out. A malfunctioning handbrake does not mean that the brake pads are urgently needed. They change in the following cases:
- If the thickness of the friction layer is less than the permissible value, that is, less than 1.5 mm.
- There is oil or other liquids on the lining.
- There are cracks, gouges or chips on the layer.
- Poor connection between the gasket and the base.
Only disassembly and detection of one of the above damages indicates the need to replace the pads.
Replacement of brake system elements
Replacing elements requires the availability of basic tools and careful implementation of repair actions. 1) It is necessary to place the Niva Chevrolet car on a flat surface and set second gear to the gearbox. Bars are placed under the wheels to secure the car in a stationary state. Set the handbrake to its lowest position. 2) Using a jack, lift the rear part and remove the wheel. Next, the drum is removed and a picture of the arrangement of the elements of the rear brake system is observed. Now you can remove the brake pads in two ways, let's look at both:
- First extraction path:
- One of the ends of the upper spring is pryed off with a screwdriver and removed.
- The spacer bar installed below the spring is removed.
- The support post, located in the middle, is held by hand on the back side of the shield and, using pliers, the outer post of the front block is rotated until the slots coincide with the protrusions.
- The tension spring with both cups is removed and the stand located on the reverse side is removed.
- The upper part is slightly retracted and the lower spring is removed.
- Next, retracting the rear part, the drive lever is pulled out and freed from the tension cable.
- Second extraction way:
- The support posts are removed from both edges.
- The rear block is pryed up with a screwdriver and removed, after first removing the spacer plate.
- The upper fastenings are removed from the working cylinder.
- The lower spring and both elements are removed along with the spacer bar and the spring.
- The tip of the cable is removed from the lever, and the brake pads assembled with the bar and spring are removed.
- Now holding one element, the spring and spacer are removed.
Next, replacement continues, but before installing new ones, it is necessary to check all parts: springs, spacers, struts. If there is damage or stretching, it is better to replace them. 3) Lubricant is applied to friction points, as well as to the threads of the spacer bar if old spacers are used.
Analogs
| Brand name | vendor code | Price, rub.) |
| LYNXauto | BD4602 | 860 |
| Ferodo | FDB195 | 1140 |
| Delphi | LP189 | 870 |
| HI-Q | SP1168 | 460 |
| TRW | GDB265M | 570 |
There is a large selection of similar parts, so choosing the ones you need won’t be difficult.
The main thing is to pay attention to the article number. This will prevent you from purchasing a low quality fake.
Also, fake parts do not have markings, or they are poorly printed on the products themselves.
Also interesting: What to check when buying a Niva
| Brand name | vendor code | Price, rub.) |
| Bosch | 1987475191 | 312 |
| Rosdot | 000006237 | 480 |
| Pilenga | BS-T001 | 560 |
| Fenox | BP50001C3 | 670 |
| "Start" | 361278J,MSK026 | 520 |
The minimum thickness of the brake pad linings should be 1.5 millimeters. To assess the condition of parts without removing them, you can use the inspection window. It is located in the brake shield.
Which pads to choose for Chevy Niva?
The choice of pads depends on your budget and preferences. At the moment, at least 6 types of front pads from various manufacturers are offered.
- Finwhale pads /2121-2123/ V221 set price from 500 rub.
- Pads Beginning 2121-3501090 set price from 300 rub.
- ADR pads ADR010611 price from 350 rub.
- Nippon pads ADB0192 set price from 450 RUR
- ABS pads BEST ABS010611 price from 300 rub.
- Lynx BD-4602 pads price from 600 rub.
All of the above brake pads are suitable for Niva 2121, as well as Chevy Niva. They have the same calipers.
The pads rattle in the Niva Chevrolet caliper
One of the common problems encountered by Chevrolet Niva car owners. Brakes make unpleasant sounds; they rattle, make noise, rattle, clank, and squeak. The noise is so loud that it's scary to even drive. Let's look specifically at one such case, why this happens, how to fix it, the owner made a video about this, where he describes this situation and how he dealt with it.
Video with a solution to the problem of noisy and rattling brakes on a Niva Chevrolet:
Here's how you can cut out rubber gaskets from an old camera to solve the problem of a rattling caliper:
A short video about this:
No matter how good the sound insulation is, the rumble from the calipers will be clearly noticeable. Many motorists face this problem. What is noteworthy is that the knocking occurs only on small bumps. On smooth asphalt and at high speed there are no extraneous sounds. If you hear a characteristic ringing sound in the front suspension, check the condition of the brake elements. Perhaps the cause is the rattling calipers. What to do in such a situation? See the answer to this question further in our article.
Types of brake mechanisms used in cars
The vast majority of cars are equipped with friction-type brake mechanisms that operate on the principle of friction forces. They are installed directly in the wheel and are structurally divided into:
- drums;
- disk.
There was a tradition of installing drum mechanisms on the rear wheels and disc mechanisms on the front. Today, depending on the model, the same types can be installed on all four wheels - either drums or discs.
Design and operation of the drum brake mechanism
The drum-type system device (drum mechanism) consists of two shoes, a brake cylinder and a tension spring located on a shield inside the brake drum. Friction linings are riveted or glued onto the pads.
The brake pads with their lower ends are hinged on the supports, and with their upper ends - under the influence of a tension spring - they rest against the pistons of the wheel cylinder. In the unbraked position, there is a gap between the shoes and the drum, allowing the wheel to rotate freely.
It should be noted that in the above design, the wear of the front and rear pads occurs unevenly. The fact is that the friction linings of the front pads in the direction of movement at the moment of braking when moving forward are always pressed against the drum with greater force than the rear ones. As a solution, it is recommended to change the pads after a certain period of time.
Disc type brake mechanism
The disc brake device consists of:
- a caliper mounted on a suspension, the body of which houses the outer and inner brake cylinders (there may be one) and two brake pads;
- disk, which is attached to the wheel hub.
Step-by-step instructions for replacing pads
To replace the pads you will need:
- “balloon”;
- small and large flat screwdriver;
- pliers;
- pipe wrench.
Install the jack and hang the wheel, having first removed the wheel mounting bolts. After removing the wheel, you need to place it under the car as insurance.
Remove the lower caliper pin by pulling the cotter pin using pliers.
Using a thin screwdriver, the finger is pulled out.
Then the pressure bar and two springs are removed.
Using a screwdriver, the caliper is pryed up and pulled up, freeing up space for replacing the pads.
The old pads are removed, after which the caliper cylinders need to be recessed inward. To do this, use a pipe wrench to carefully recess the cylinders without touching the cuffs.
Installing new pads is done in reverse order.
A few words about the problem of the front calipers
All Chevrolet Niva owners note that the front brakes rattle and rattle. This problem can be solved in several ways:
- installation of new caliper guides;
- installation of high-quality pads;
- treat the caliper mechanism and “guide” with copper grease;
- Apply three drops of sealant where the caliper cylinders touch the pad, which ultimately helps in the entire service life of the pads.
If the above methods did not help, and the brakes still ring and knock, then the last resort is to install calipers from GAZ Sobol.
Problems with Niva Chevrolet front calipers
Quite often, Chevrolet Niva owners complain about sounds that should not occur when the brake system is operating.
The situation can be resolved using several methods:
- Change the caliper guides. This can be done by unscrewing all the bolts of the caliper guide elements. If it doesn't come out of the blocks well, you can use physical force and a hammer.
- Treat the caliper mechanism with lubricant. For this process, it is necessary to use a lubricant with a high level of temperature resistance.
- Install quality pads.