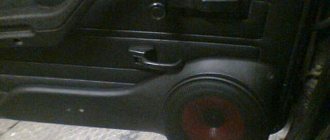
You can buy an acoustic shelf for the VAZ 2107 in a store or make it yourself. The second option does not require special qualifications and can be done by anyone who knows how to use a drill and jigsaw. With this approach, you can save a lot of money and also have a custom rear shelf with excellent acoustic performance.
An acoustic shelf can be made from various materials and in different ways. It all depends on technical capabilities and availability of funds. Let's look at one option that does not require expensive materials and has high sound quality.
Tools and materials
To make a shelf you will need the following tools:
- Screwdriver or drill.
- Ruler or tape measure.
- Jigsaw.
- Drill for metal.
- Brush.
- Pencil.
- Putty knife.
- Mounting stapler.
You will need the following materials:
- Carpet 2 linear meters.
- Polyurethane foam titanium or other.
- Epoxy adhesive.
- Sandpaper.
- Self-tapping screws.
- Construction stapler and furniture nails.
- Standard plastic shelf VAZ.
Types of speaker systems
Before choosing 10, 13 or 16 cm speakers for your car, let's figure out what types of speaker systems exist and how they differ from each other.
Today there are three main types of acoustic systems:
- broadband;
- coaxial;
- component.
This order was not chosen by chance - it is in accordance with it that acoustics increase in reproduction quality, installation complexity and, of course, cost. In the wideband version, one speaker reproduces the entire frequency range. In fact, this is only enough for listening to news on a radio station or turning on a low background while driving. Currently, most automobile manufacturers equip their vehicles with this type of acoustics during production.
ArtSound speakers for the car
If you value truly good sound, then to obtain it, such acoustics can be replaced with coaxial ones, which literally means coaxial. In this case, several columns of 13, 10, 16 cm or other sizes installed on the same axis can be used. The frequency range reproduced by the audio system is divided into low, medium and high. To ensure better sound quality, different devices are used for individual ranges.
In total, up to five such speakers (13, 10 or 20 cm) can be installed (but not less than two), but in most cases, a three-way system is used in domestic cars. That is, if the speaker size is 13 centimeters and it is the largest among the others, then it will be a low-frequency device. And in front of its diffuser, mid- and high-frequency speakers should be mounted. It is thanks to separation that the range of reproduced frequencies generally increases, and the sound quality improves.
It should be noted that the sound quality in general is facilitated by the correct separation of channels, as well as the absence of distortion. As for channel separation, a special crossover element is responsible for this, which is a filter that can contain from 1 to 4 stages. In simpler speaker systems, crossovers are installed in the car speakers themselves. If the system itself is of a higher quality, it will use an external crossover, which looks like a block, and in some cases it can be used to adjust the signals.
Column mounted on a stand and tweeter
As for the component options, in them the sound range is similarly divided by frequency, only in this case the speakers are scattered throughout the space, they are all installed separately. Of course, this significantly increases the complexity, as well as the cost of installation, but nevertheless, in the end, almost ideal and surround sound can be achieved. Component systems are widely used among connoisseurs of high-quality sound.
To ensure the loudest and, importantly, high-quality playback of low ranges, none of these types of systems are suitable. To ensure high-quality low-frequency sound, only subwoofers can be used. This type of device belongs to rear speakers; subwoofers are usually installed in the trunk.
Preparatory work
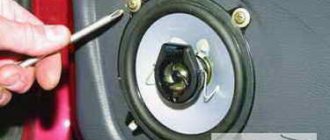
Before starting work, you need to dismantle the standard shelf of the VAZ 2107. This work will not take much time, all you need is a screwdriver. Once removed, the shelf will serve as a template for making an acoustic shelf. To do this, you need to lay it on a sheet of chipboard and use a pencil to mark the outline of the future shelf and the slots for the seat belts.
After the first stage, using templates, we mark the holes for the speakers. You can draw the templates yourself or make them in a computer program and print them out. It all depends on the master’s capabilities and skills.
DIY acoustic shelf in VAZ 2107
Hello everyone, I decided to share my acoustic shelf, or rather the process of its manufacture and installation). There were a lot of ideas for the shelf, but I decided to go with solid plywood. I did it slowly, everything by hand, I tried my best, but there are some mistakes. Let me start with the fact that we purchased Pioneer TS-A6923I pancakes:
They win back 100% of their money.
I completely disassembled the entire rear for further installation. I cut it out with a jigsaw, but I couldn’t cut out the ovals, the glass got in the way, but it saved time. I cut out rectangles, well, it’s ugly, but what can I do:
Result: 2 broken metal blades. After removing the standard shelf, I realized that it was damaged.
She was once beautiful. Armed with vibration isolation and a roller, I got to work, it was hot that day, so 5 minutes of vibration on the roof and it rolled like a rag, with a bang, thickness 2mm SGM
It took me an hour to roll it out, but I rolled it out well. I found plywood, the thickness was a little large, but I did not despair and moved on:
We needed plywood measuring 131x33 cm, with a margin, the thickness of the plywood was 19mm. I rather wanted to start doing it, so I rushed, brought the old shelf and let’s draw, first I gave an outline of the stock shelf:
After several hours of working with my hands, I made everything a lie, except for the holes for the speakers, since there was no light, I got the following result, or rather the shape of the stock shelf:
It turned out pretty good. But the shelf did not fit into place; it was too big, so adjustments began on the spot; where anything was in the way, I carefully filed it down, smoothed it with a file, and adjusted it again. Well, the fitting was successful, the shelf sits in its place:
Well, then we went to use the molds for the seat belts, cut them out and tried them on, everything was fine, but there was just one big minus, initially I wanted to make everything in one piece, including a casing for the seat belts and a shelf, but the shelf with the seat belts installed does not fit into place, the holes are too small, and I didn’t want to do more, so installing the shelf is a bit of a labor-intensive process, I decided that I would make casings separately, which would be placed on top of the installed shelf and attached to it.
Well, I drew the locations of the holes. I went home and drank holes:
The speakers sat down like family. Now it’s time to attach the shelf, secured it with bolts. 5 items. I made them invisible, they will be under leatherette, embedded in plywood:
Somehow they sit like this, quite firmly, to get it out you need to knock on it from the back side, you can’t reach it with your hand.
And here is the actual location of the bolts. PS are marked in red. After installing the bolts and trying it on with the speakers, I went home to cover the shelf. I knew in advance that I would buy leatherette, it cost me 225 rubles
I bought 50 centimeters, also with a reserve, its dimensions are 150x50 cm (according to the seller. An hour and a half of work, and now we get the result, it turned out quite well, I like it:
Final view of the shelf. Well, for clarity, the sizes of the bolts, there are 3 of these bolts, they are located closer to the seat
Unfortunately, I didn’t take a photo of the ones near the glass, but they are about 3 cm longer. Well, I assembled my shelf and put everything in place:
Now all that's left to do is make the covers for the seat belts and that's it. Actually speaking about the differences in sound, the sound is more pleasant, it’s bassy now (and not even weakly. That’s how, dear friends, I created an acoustic shelf for my seven!…
← Previous post
Next entry →
Leave a comment Cancel reply
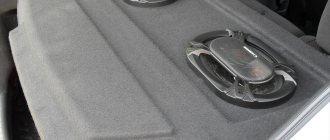
Construction of seat belt boxes and speaker podiums
Using a jigsaw we make the bases for the podiums. In order for the structure to be rigid, it must be reinforced with 40x20 mm wooden blocks; using self-tapping screws and bars we connect the ovals together (as shown in the figure below). We cut out several holes in the shelf for air circulation between the trunk and the passenger compartment.
We fill the voids between the bars of the podiums with polyurethane foam. After the foam has dried, we simply cut it along the edges and sand it with sandpaper to smooth out the unevenness. We strengthen the structure with cardboard, which is impregnated with epoxy glue.
When making boxes for seat belts, it should be taken into account that the belts enter from the side. The boxes are made of timber, which adds rigidity to the structure. After installing the boxes, the rear shelf of the VAZ 2107 is no different from the factory one. To give it an aesthetic appearance, you need to cover it with carpet, the entire shelf is ready, you can install it.
Note: you can make a bass reflex for an acoustic shelf. To do this, make a hole in the middle of the shelf, so as not to spoil the view, it can be covered with a decorative lattice.
Shelf installation
In principle, the process of installing a shelf and interior is not complicated. But we present it too, just in case. We do the following:
- We try to ensure the tightest possible fixation, avoiding a loose fit;
- We tighten the shelf with self-tapping screws;
- We close all the cracks with sealant;
- We install the speakers during the process of making the shelf, although in a particular case it is possible to put them in after installation;
- It is better to line the inner surface of the trunk with some sound-absorbing material. This will give the best results. Ordinary foam rubber is also suitable as a material, although today many special materials that provide sound and vibration-absorbing effects are sold at quite affordable prices.
Trunk soundproofing material
Note. Working with soundproofing materials is very simple - all you need to do is cut a piece of the desired shape and size, peel off the protective film of the trunk wall, apply the adhesive part of the material and press.
An acoustic shelf made on your own, its competent and durable installation, sound insulation of the trunk - all this together will give excellent results. During the work process, it is highly advisable to watch a thematic video review, high-quality photos - materials, diagrams and drawings.
What size is optimal?
If your car has front-facing speakers, then it is optimal to use a 16-centimeter speaker. This diameter will allow you to achieve good sound with low bass. As a rule, speakers with this diameter can be installed in a car without problems, but in some cases the installation space may be smaller. In practice, this problem can be solved on your own or by turning to specialists at the installation center for help. It is only necessary to slightly increase the size of the standard space for mounting the loudspeaker (the author of the video is URAL Sound Russia - Official Channel).
It is worth considering one main feature that many of our compatriots neglect, in particular, we are talking about the differences between models of the same line. We are talking about speaker models characterized by advanced technical features. It should be noted that the cost of different models may not vary much.
If your vehicle is equipped with three-component acoustics, then the best option would be to use 20 cm speakers. They are especially suitable for reproducing mid-frequency ranges due to their size. However, it is the dimensions that are the main problem that may cause difficulties in installing loudspeakers, especially in the front of the car. Not so often, but still such speakers are used for two-component acoustic systems; in this case, it must be taken into account that the quality of mid-frequency playback leaves much to be desired. As practice shows, 20-centimeter speakers are most optimally suited for systems that do not have a subwoofer.
If we talk about the size of the speakers 13 cm, then they are perfect for installation in a car with a front-facing system. The best way to use 13 cm speakers is as rear devices. If there is not enough space in the vehicle interior, then 13 cm speakers can be used to equip the front system, but this may lead to too limited bass (video author - LOUD SOUND).
In coaxial acoustics, speakers with dimensions of 15x23 cm can be installed on the rear shelf; these dimensions allow you to provide the deepest low frequencies. But it should be noted that devices of this type have certain disadvantages, in particular, the quality of the coaxial design itself will be low, especially since the driver will not have the opportunity to change the subwoofer. And although such a speaker can produce deep bass, it will not be full and clear, let alone balanced tonal sound. If you like a good visual effect, then, in principle, you can find oval-sized speakers on sale that will provide it. However, in this case, the problem of choice is acute, since there are not many options.
If you don’t want to use standard acoustics because of their low quality, but at the same time you don’t have the opportunity to remodel the place to install good speakers, there is a way out. For example, you can install oval speakers whose size is 13x18 cm. As for 10-cm speakers, we do not recommend that our users fall for advertising.
Manufacturers often advertise this product as a quality product that allows you to achieve better sound, but in fact this is far from the case. Devices of this type, no matter how they are advertised, are characterized by poor playback quality in general and, even more so, poor bass. So if you purchase such speakers, the acoustics in your car must be equipped with additional low-frequency support. For example, you can use so-called midbass devices, which are best mounted in the front part of the cabin.
Of course, in terms of cost, small-sized speakers will always cost less, unlike others. However, if you want to achieve good sound, then when purchasing, you should only look at the quality of the speakers, and not at their cost. Often, car owners, trying to save money, end up with low-quality acoustics that cannot reproduce high-quality sound at high volumes.