Why install speakers on podiums in the doors of a VAZ 2110
The simplest explanation for why a podium is needed on a VAZ 2110 is, at first glance, quite easy to understand; using them, you can move the speaker out of its usual seat.
But this is not the main reason out of several that still exist. In order for any car speaker to sound great, you definitely need to calculate everything correctly, starting first with the acoustic design and ending with a rigid base. When the internal acoustics are turned on, they begin to experience heavy loads. If in this case it is not drowned out, they begin to flow onto the trim panel and other elements made of thin material. And how correctly the sound distortion occurs. The podiums serve precisely to dampen vibrations.
Lada 2110 #HateHolic › Logbook › Making podiums. First experience (horn + casings)
I decided to put off the Priora salon for now until it warms up, or until I can properly heat the garage. Yes, and it was necessary to first try on something that was not a pity. My old skins were bought on Avito, and over time they became very worn out. I put up with this disgrace for a very long time, but finally the opportunity arose to fix it.
I started the process from the corners. In fact, I started it back in January - I set up the rings, drilled holes at the points of contact with the resin (as advised) and everything calmed down because there was no place to work with the resin.
As a result, only in August I got down to business, but broke down. The furniture stapler did not penetrate the plastic, so I had to go to my friends and use a pneumatic stapler. One corner pulled perfectly, but the second fell apart and had to be re-glued.
I put it in two layers of glass mat and coated it a little with resin on the inside.
Then I sanded it with a petal attachment on an angle grinder, and a little by hand. And I’ve finished the work for now, I’m waiting for a salary to putty it all.
Then I started working on the door cards, peeled off the foam in layers, cleaned it, adjusted the rings, then again, and again - everything was fine.
I'm tired of displaying them. I tightened the board so that all the speakers were placed in the same plane. I screwed it on with self-tapping screws and substituted plywood scraps to ensure rigidity. Then I drilled holes along the planned contour.
Next, I stretched the lycra and started nailing it with a stapler - it’s absolutely terrible, the casing simply broke in several places, I had to screw a piece of tin on the bend to give it shape, otherwise it wouldn’t have worked (in the end I removed it and it turned out as if it had happened).
Finally I started applying resin and glass mat. In the end, I made a mistake when, having applied only one layer of resin and letting it dry, I began to cut off the back of the skin; it apparently had not completely dried and sagged a little. Lumps appeared (I did the second skin differently - I applied a layer of glass mat on the front side, then cut off the back wall and put two layers on the inside. The same with the first.
Everything took a very long time to dry, it was cold in the garage, I had to turn the heater on them while I was in the garage. All this took me probably two weeks, while everything dried, new layers were applied. There was also not enough time to work. But in the end everything dried out, and I began to remove the whole thing with a petal nozzle and sandpaper.
It turned out well, but there are some problems. There's still a lot of puttying and sanding involved, but that's for another time. You also need to make a separate volume for the middle, the resin just ran out
The speakers are: -Ural Armada D200 from about 100Hz -Alphard Machete MM-60 from about 200Hz -Alphard HLS-20 from 6kHz (temporarily not connected) Having installed the 20's, I simply went crazy with the volume, very unexpectedly. Impressive lows appeared. Of course, this is all a dishman budget, but it’s enough for now. Result: About 3 liters of polyester resin were spent
300r/kg. Glass mat approximately 2 kg. Lycra small piece (about 1*1)
Source
Delivery by Russian Post (cash on delivery, no prepayment)
Advantages: the most widespread network in Russia, delivers to any corner of the country, including remote ones. Flaws:
- high cost of delivery of heavy or large parcels, as well as the weight of one parcel should not exceed 20 kg;
- long delivery times and queues in large cities for receipt.
To send your order by Russian Post:
- Place an order in our online store by phone or on the website (registration is not necessary);
- After we receive it, our manager will contact you by phone to clarify the cost, delivery time and your wishes. Next, we will pack your order carefully and then send it to you;
- You will receive the tracking number of the shipment via SMS from us and from the Russian Post; the message will indicate the full cost of the purchase, including delivery to your locality (that is, the cost of your order plus the cost of delivery by cash on delivery). You can control the status of the order coming to you using our tracking service, as well as independently, on the Russian Post website using the track number;
- To the Post Office, you will only have to pay the cost, including delivery.
Delivery time may vary depending on how far your locality is from Togliatti and usually ranges from 5 to 14 days.
The cost of delivery is calculated based on the volume, weight of the selected product and the distance to the recipient's settlement.
Required for sending:
- indicate full name recipient;
- Your mailing address;
- Your phone number (contact);
- Post office code.
Russian Post commission for cash on delivery service:
- purchase price up to 1,000 rubles. – 70 rubles + 5% of the amount;
- purchase price from 1,000 to 5,000 rubles. – 80 rubles + 4% of the amount;
- purchase price from 5,000 to 20,000 rubles. – 180 rubles + 2% of the amount;
- purchase price from 20,000 to 500,000 rubles. – 280 rubles + 1.5% of the amount.
Russian Post - Delivery of goods up to 20 kg throughout Russia. https://www.pochta.ru
Delivery time and cost Track the parcel Calculate delivery by mail
Modern podiums
Acoustic podiums yourself
Sound organization is a set of measures that includes not only sound insulation or installation of a subwoofer, but also installation in the front doors of the podiums. You don’t have to buy them, although you can find almost any option in stores today. You can make podiums with your own hands if you know the basic nuances of the operation presented in our instructions below. Modern acoustic podiums are not too different from those that came before. Although, this is at first glance, but if you take a closer look, you will see the following:
- Modern podiums are made of high-quality material, which significantly increases their service life. If earlier they were made of plastic, which soon became covered with cracks and delaminated, today podiums are made of more durable material;
Modern acoustic podium
- Acoustically, modern podiums have an excellent and comfortable matte surface that does not leave dirty marks. High-quality plastic or plywood, from which modern podiums are made, is quite difficult to accidentally damage;
- The current podiums are made in such a way that they provide the opportunity to conveniently lay hidden electrical wiring to the speakers;
- Modern podiums are distinguished by a slightly modified configuration, which allows the installation of not one, but several speakers that reproduce different frequencies.
Acoustic podiums for yourself
What should the podiums be like for the VAZ 2110?
As a result, it was found out by people over time that podiums are intended not only to improve the appearance, namely the midrange. After all, the sound quality of speakers of various sizes depends on it.
To achieve a more effective result and subsequently dampen unwanted vibrations, the podiums on the VAZ 2110 must be quite heavy despite their small dimensions.
In order to make the podium heavier, it is best to make it from a special material. But motorists most often opt for cheaper material such as plywood. It is very easy to process it at home with your own hands.
As you know, plywood itself is a fairly light material and, in order to increase its weight, the podium for the VAZ 2110 needs to be made as large as possible. But at the same time, you should definitely take into account all the features of the vehicle inside the cabin.
In the process of determining the right size, you need to focus on the quality of the outgoing sound of the outgoing music, but you should make sure that additional elements do not interfere with the operation of the main devices. For example, you can take a newly installed speaker; it should not interfere with the subsequent use of the door handle. Acoustic podiums on the VAZ 2110 must be attached to a metal base, but not to the door trim.
Why is this necessary:
- First of all, a weak mounting base does not provide complete vibration absorption.
- Secondly, it simply cannot withstand a heavy podium with a speaker.
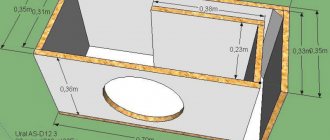
Dimensions and shape of the acoustic podium
The technology described below involves the manufacture of podiums for speakers located in the front or rear doors of the car. Most often, there is one speaker with a diameter of 13 centimeters in the door. However, regardless of its size, the podium manufacturing technology will be the same:
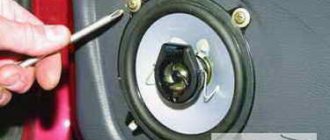
Photo: correct procedure for making a shelf in a car door
In order to give the plywood podium an attractive appearance, polyurethane foam is usually used. It is applied to the surface of the plywood. Then you need to do the following:
- when the foam has completely hardened, you need to work on the shape using a stationery knife or blade - you can give the workpiece absolutely any shape;
After initial processing, you will need to apply one or two layers of putty to the product. After it has dried, you will need to give the podium the smoothest and most embossed shape possible by treating it with fine-grained sandpaper;
What are the benefits of an acoustic shelf?
VAZ 2112 acoustic shelf
As you know, achieving good sound in a car interior, where there is very little free space, is quite difficult. But this can be done if you use some devices, one of which is a homemade or store-bought acoustic shelf. There are a lot of components inside a car that interfere with normal sound. It's not just the noise of the engine or the hum of a moving car. The weak stereo effect is mostly due to the rear speakers and the direction of their sound. In other words, a large number of barriers arise between the speaker and the listener, in which the sound disappears. Of course, the problem can be solved and this can be done in several ways:
Acoustic shelf VAZ 2112 with sides
- Point sound. This method involves installing the speakers (see How to choose speakers for your car radio yourself) so that they are aimed directly at the listener. In order not to deprive any of the passengers of sound, this method involves directing the speakers to the center of the cabin, thereby avoiding obstacles.
Note. In this case, the speakers are installed on the ceiling using a podium. But this method has disadvantages. In particular, there is no way to firmly fix the speaker, which will lead to rattling and other errors. In addition, this method of installing the speaker risks a complete lack of bass.
- Reflected sound. The speakers in this case are directed to the rear window. Thus, the stereo effect is enhanced, and the sound becomes much more voluminous. This method is much easier to implement than the first and the bass sound will not suffer from such a dislocation.
Note. The reflected sound method implies the presence of an acoustic shelf. Only the store shelf is made in such a way that the speakers face the ceiling, where some of the sound is dampened by soft and fleecy material. In addition, if the VAZ 2112 car has headrests on the seats, then these are additional obstacles. Therefore, it is recommended to make a shelf yourself, especially since it is not so difficult.
Final work
As noted above, the correct setting of the orientation of the speakers is considered a very important point, which will subsequently affect the creation of the podium frame. This includes focusing the beeper correctly, as well as listening to it. How correctly the speaker is adjusted, the music perception will be as comfortable as possible.
To accurately carry out the entire debugging process, you should start by setting the speaker, which is located near the driver, to the passenger’s left ear. Accordingly, the passenger speaker is tuned to the driver's right ear. Thus, a control point is reached in the cabin, where the sound waves intersect. This means that the music will evenly create a “load” on everyone sitting in the car.
If you plan to install component acoustics in the car, then the speakers are aimed at the rear view mirror, which is located in the cabin. As a guide, you can take an imaginary point located 10 cm in front of the passenger's head. This setting is especially important for fans of “heavy” music.
The design of the speakers implies the presence of a piston. Sound waves are generated by the movement of a diffuser, which compresses the air. When the waves exit the speaker, a vibration of a certain strength is formed. If the podium is not tightly fixed to the door, it will begin to vibrate.
Firstly, this will significantly affect the quality of the sound produced, and secondly, it can lead to deformation of the product itself. In addition, the metal on the door bends quite easily. The podium acts as a reliable speaker holder: the more rigidly it is fixed, the less vibration and deformation will be caused by loud listening to music.
Everyone chooses the shape of the podiums and the design approach to their production. But in any case, they must have appropriate rigidity. Therefore, when making a product with your own hands, you should use a durable frame. There is no need to rely on polyurethane foam, as it does not provide adequate rigidity.
To create truly high-quality music sound, you should remember that each car interior will “sound” differently. This depends on many features, for example, each surface has its own absorbing properties. Ideal sound is achieved by selecting the right audio equipment. Moreover, even an ordinary antenna requires proper configuration.
How to make and install podiums for 16 and 20 speakers on a VAZ 2110 with your own hands?
In order to carry out independent work on making a podium for any speakers, you need to prepare the following materials:
Any plywood or any other suitable material. This is necessary so that in the future it would be possible to cut out the ring parts.
Next, you will need sheet material that can absorb vibrations. It is needed for subsequent processing of the vehicle body in the place where it is planned to install new podiums on the VAZ 2110 in the future.
To make quite complex parts with your own hands, you also need to have fiberglass on hand.
Epoxy resin composition with hardener.
Nylon women's tights or any other similar synthetic material for making parts using technology, which in turn is called hosiery.
- Elastic glue
- Sandpaper
- Special acoustic fabric
- For subsequent work you will need the following tools:
- Complete set of keys
- Screwdrivers are different
- Stationery or construction knife
- Sharp scissors
- Electric drill
- Electric jigsaw
- Tassels
We do it ourselves
If you try, the homemade podium will not be much different from the factory one. But the price will be much less. Plus an additional reason for pride.
To complete the work you will need a set consisting of:
- plywood (take a thickness of about 6-8 mm);
- PVA;
- epoxy;
- cardboard;
- degreaser;
- nylon tights;
- polyurethane foam;
- paints;
- putties;
- leather or fabric (will be tight);
- scissors;
- pencil;
- hacksaw or jigsaw;
- sandpaper;
- spatula;
- stationery knife.
I will say right away that in this case we are considering the option of making a homemade speaker podium, which will later be installed with your own hands in the front or rear doors of the car. Often a speaker with a diameter of 13 cm is used here. But no one bothers to make a design for the rear shelf.
But size is not key. The entire preparation procedure looks like this:
- think over the shape of the podium;
- take measurements of the speaker and its special protective mesh;
- the diameter of the ring here will be exactly equal to the diameter of the corresponding landing socket or place on the future podium;
- the external diameter of the existing ring we need, in turn, corresponds to the diameter of the tread (protective) mesh;
- a sketch is drawn on cardboard;
- the template is cut out;
- applied to plywood;
- outlined and cut out;
- a perfectly even hole is cut for the podium.
Do everything as accurately as possible so that no problems arise later.
If you are done with this, proceed to the next step.
Manufacturing process
You have already made the preparation. But it’s too early to relax. There is still a lot of work ahead.
- A layer of polyurethane foam is applied to the surface of the workpiece;
- The foam hardens, and the required shape is given with a blade or sharp knife;
- Next, apply 1-2 layers of putty;
- When it dries, make the product smooth using sandpaper;
- The product is painted in a suitable color;
- It is better to apply the paint in 3 layers;
- An alternative to painting is upholstery with fabric or leather;
- The banner is secured with glue.
The installation process finishes it all off. The most optimal method of fastening is installation using self-tapping screws on the inside of the existing door trim. This will preserve the sound quality, ensure reliable fixation, and at the same time definitely will not spoil the appearance of the interior and the podium structure in particular.
Do not forget to additionally use soundproofing materials. They are used to make noise on doors. This is not necessary, but it is useful and effective.
I think you have figured out how to make podiums in the doors. They can also be installed in rear shelves and racks.
Thanks everyone for your attention! Don't forget to subscribe, leave comments, ask questions and invite your friends to join us!
New podiums on the Priora in the front doors: differences and features of the products
Before choosing a podium for Priora tweeters, the buyer needs to determine their appropriate size. This applies not only to the purchased speakers, but also to the free space left for a comfortable stay in the cabin. It is unacceptable to install an element that is too bulky, since it will not allow either the driver or the passenger to sit properly in the cabin.
In addition, the podiums should be conveniently attached to the side pads. The newly acquired elements must lie exactly on the surface of the door, without blocking the pocket. And special podiums for Priora, installed in the upper part of the sidewall near the pillar, will allow you to add new notes to the sound. And also achieve surround sound transmission.
The external design of the podiums also plays an important role. For example, in a car with a classic black and gray finish, you can buy podiums on a Priora in regular black or dark gray. But silver linings will look no less attractive, giving the interior a more modern look.
A car with a brown or beige finish should be complemented with podiums in a coffee or pleasant brown shade.
Small additions should not only be of high quality and convenient. The elements must look stylish in the car where they are installed. That is why only stylish podiums on Priora with tweeters can complement the interior and create really good sound from the media system. And during operation they will not cause any discomfort or noise.
Modern fashion for car audio
Today, most modern vehicles come with standard speakers. However, lovers of loud music in cars are often not satisfied with their sound, so they buy larger speakers. In this case, a different kind of problem arises - how to install large-sized equipment in the cabin so that, on the one hand, it does not disturb passengers, and on the other hand, to create truly clear sound?
One of the common ways to solve the problem is to make podiums for speakers. They can not only improve sound quality, but also take the performance of the speaker system to a whole new level.
Why do you need a podium for speakers, and how to make it yourself
Many motorists, when buying a car, first of all strive to improve and improve the sound of the audio system. A number of different solutions are used for this. One of them is to install a podium under the speakers. This is done in order to improve the sound and increase the quality of the acoustics.
Moreover, it is not at all necessary to contact a tuning studio. Many car enthusiasts manage to achieve the desired result by simply spending a few hours in their own garage.
( 1 rating, average 5 out of 5 )
Main stages of the procedure
The process of installing and fixing any podium in any part of the car is as follows:
To enjoy clear and powerful sound in your car, there is no need to overpay for expensive speakers and factory-made podium elements. Most car enthusiasts are able to assemble a podium for the speakers in the car on their own from available means.
If you find an error, please select a piece of text and press Ctrl+Enter.
Source