Published: 11/02/2020
- Part replacement
- Characteristics
- Instructions for replacing the front suspension wheel bearing on a VAZ 2114 on your own
- VAZ wheel bearing: do-it-yourself replacement
- Chassis design
- Replacing and adjusting the front wheel bearing Niva
- The process of replacing the front wheel bearing of a VAZ 2110 with your own hands
- When is replacement needed?
- Types of hair masks
- How to recognize problems with the hub?
- Replacing and adjusting the front wheel bearing Niva
- Necessary tool
- Bearing Failure Determination
- Purpose of the VAZ 2107 wheel bearing
- Replacing the wheel bearing
- Total
Part replacement
At the first stage, the car is placed on the inspection hole, gear 1 is engaged and stops or simple bricks are placed under the wheels.
In accordance with the instructions, which say how to replace the front wheel bearing of a VAZ 2110, work begins:
- After removing the cap from the wheel, using a spanner, unscrew the wheel nuts, which then need to be removed. To unscrew the bearing nut from the VAZ 2110 hub, use a 30mm wrench. First, using a chisel, you need to straighten the collar on the nut. To loosen the nut, the presence of an assistant is required to press the brake pedal.
- Using a screwdriver, the caliper is dismantled.
- Then the caliper is turned away from the steering knuckle. To prevent it from remaining hanging on the brake hose, it is necessary to tie it up in a timely manner.
- The brake discs are unscrewed from the hub.
Replacing a VAZ 2110 wheel bearing is carried out in 3 ways.
First replacement method
To replace the wheel bearing, follow these steps:
- The process of removing the hub element is carried out using a puller. Its legs are inserted into special grooves made in the hub, and the retaining ring is removed. It doesn't always work out right away. Sometimes a screwdriver is used to pry it off.
- As soon as the part is removed, it must be replaced with a new element. This is also done using a puller. Work with such a device is carried out much better. Less time is spent. However, with such a device, you need to have certain operating skills.
- All reverse actions are performed in the same order.
In this case, dismantling the steering knuckle is not required. During the work, the camber is not affected and after the procedure is completed it does not have to be adjusted.
The disadvantage of this option is the inconvenience of operation, since the removal and pressing of the new product is carried out directly on the car.
Second replacement method
Replacing a VAZ 2110 wheel bearing with your own hands without a puller consists of the following steps:
- In this case, after dismantling the steering knuckle, the hub is removed and taken to the workbench.
- Here the old bearing is replaced with a new product.
- Installation is carried out in reverse order.
In the process of unscrewing the steering knuckle, it is necessary to fix the marks. There are 2 of them:
- the first one on the rack shows the position of the adjusting bolt;
- the second indicates the previous position of the fist.
Tags will be required during assembly. Only after this the bolts of the knuckle and lower ball joint are knocked out. After removing the bearing from the hub and dismantling the retaining ring, it is pressed out using a vice.
This method is used when planning the repair of the entire chassis. After its completion, it is necessary to adjust the wheel alignment.
Third replacement method
It consists of the following steps:
- You have to remove the entire rack.
- For further work, to replace the wheel bearing, a special vice is prepared in advance.
- In this vise, it is necessary to replace the failed bearing.
The difficulty of the job lies not only in removing the rack. The steering tip is also pressed out and the nuts that secure the upper strut to the body frame are removed.
To change the wheel bearing on a wheel, there is no need to go to a service station. If the car is used frequently. If the traffic is on bad roads, such work is carried out frequently. In order to save money, it is better to carry out the replacement yourself, especially since the part has a low cost, and the instructions for carrying out the work are carefully developed.
Assembly
Clean and lubricate the inner surface of the steering knuckle. Use a puller to press the new bearing into the steering knuckle. In this case, the large puller washer rests on the steering knuckle from the inside so as not to damage its mud rings, and when pressing, the new bearing can be pressed through the old bearing, which will transmit force only through the outer ring. Install the retaining ring. Use a puller to press the hub into the bearing. Now the puller washers rest against the inner race of the bearing and the hub.
We carry out further assembly in the reverse order, tighten the bearing nut to the prescribed torque and be sure to lock it by jamming the collar.
In conclusion, I would like to note that replacing a hub bearing on a new car is not difficult, but if the suspension parts are many years old, then removing the hub and other elements will be very problematic. Replacing the wheel bearing is shown in the video:
By the way, do you know how to check the suspension yourself?
Replace the wheel bearing yourself...
1200 rub. for the photo report
We pay for photo reports on car repairs. Earnings from 10,000 rubles/month.
Write:
Many will agree that unscrewing the hub nut is an activity that can be punished in court; it is too inconvenient and difficult even for a physically strong person with all the necessary tools. However, since it is not always possible to choose the easiest one (option One, also known as the Main one!) - sending the car to a service station, where they will not only unscrew it but also carry out subsequent repairs. Then you will have to figure out the task yourself, using the easiest and most effective method possible.
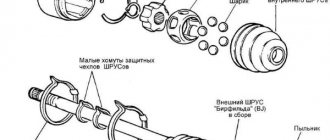
Instructions for replacing the front suspension wheel bearing on a VAZ 2114 on your own
Having opened access to the hub, you should remove the previously loosened “30” nut and washer from the CV joint shaft. You can get to one side of the bearing after removing the part with the developed flange:
- select two bolts with a length of at least 130 mm with threads similar to those of the wheel fasteners (M12 x 1.25);
- pass the selected bolts through two holes in the brake disc located opposite each other;
- Using sharp forward movements, hit the bolt heads several times with the brake disc (the process of pressing the hub out of the steering knuckle).
Access to the back side opens like this:
- unscrew the two bolts at “17” with a head, fastening the ball joint flange and the steering knuckle;
- move the steering knuckle towards you;
- remove the CV joint from the steering knuckle (you will need to use a pry bar: leaning on the stabilizer bushing body
- bend the two lower suspension arms to move the ball joint away from the swivel assembly).
Alternative method for removing the hub:
- disconnect the ball joint;
- remove the CV joint from the repair unit;
- knock out the hub by hitting the rear end of the part flange with a hammer through a soft metal drift (bronze, aluminum, brass...).
The actual replacement of the wheel bearing on a VAZ 2114 is carried out according to the following method:
- Use special pliers to remove the retaining ring located inside the steering knuckle on the front side;
- press out the support using a puller;
- clean and lubricate the inner surface of the unit on which the outer ring of the bearing is based;
- press in a new bearing (using an alternative method in the form of hitting the bearing ring with a hammer is highly not recommended);
- install the retaining ring;
- press the hub into the inner ring of the support;
- Carry out the preparatory operations in the reverse order (be sure to tighten the hub nut to a torque of 225-247 Nm and bend the collars to prevent unscrewing).
Second phase
We will make the lower and upper supports. We need a piece of sheet steel of maximum thickness. We cut a circle in it, you can also do it with a grinder. To simplify the work, you first need to cut a rectangle from the sheet, and then sand the sharp edges and the circle is ready. You only need two of these circles.
Finishing touches on the supports. Cut a hole for the bolt connection in the middle of the top support. The hole can easily be made using a drill and then drilled to the desired size using a lathe. Let's move on to the lower support. There you also need to drill a hole in the middle. The hole dimensions should be slightly larger than the axes from which you will remove the bearings. Then we cut out the part in the form of a triangle. At this point, the stage of work on the supports is completed.
VAZ wheel bearing: do-it-yourself replacement
The appearance of extraneous sounds in the area of the car wheel, as well as increased vibrations during straight-line movement, often indicates problems with the hub. If there is a partial or complete disappearance of these symptoms during a sharp turn, then there is a high probability that there are problems with the wheel bearing.
Next, we will look at how to replace the wheel bearing of a VAZ 2110. This information will also be useful if the Niva front hub turns out to be problematic, you need to change the wheel bearing of a VAZ 2107 or on other car models.
Read in this article
Remove the nut from the car: force method
- Lever made of pipe (length of at least one and a half meters).
- Powerful socket wrench (450 mm).
- Head of the appropriate size.
Place the head of the wrench on the hub nut, insert the wrench and place the pipe on the handle.
Gradually increasing the applied effort, we unscrew the part. How to unscrew a broken bolt
What to do, what to use and how to unscrew it if a pin or bolt is torn off. Video tips on how to independently unscrew a broken bolt/stud in an engine or manifold. A reliable way to unscrew if the head of a bolt has been torn off Read more
Replacing the rear wheel bearing of a VAZ 2111
To replace the rear wheel bearing on VAZ 2110, 2111, 2112 cars you will need: a “30” socket, “10” and “15” keys, a hammer, duckbills and a long pipe as a lever. See details clearly Read more
Chassis design
Front wheel bearing
Before you begin the replacement process itself, you need to see all the structural elements that need to be dismantled. Therefore, first you need to understand the structure of the front part of the suspension, or rather, look at the elements in section and determine the location of the bearing.
Front chassis design
Front suspension assembly: 1 – upper support of the telescopic strut; 2 – upper support cup; 3 – compression stroke buffer with protective casing; 4 – compression buffer support; 5 – suspension spring; 6 – lower spring support cup; 7 – steering rod ball joint; 8 – steering knuckle; 9 – telescopic stand; 10 – eccentric washer; 11 – adjusting bolt; 12 – rack bracket; 13 – steering knuckle; 14 – front brake protective cover; 15 – brake disc; 16 – retaining ring; 17 – wheel hub nut; 18 – splined shank of the wheel drive hinge housing; 19 – guide pin; 20 – wheel hub bearing; 21 – ball joint; 22 – suspension arm; 23 – adjusting washers; 24 – stabilizer strut; 25 – stabilizer bar; 26 – stabilizer bar cushion; 27 – stabilizer bar mounting bracket; 28 – body bracket for mounting the suspension arm; 29 – suspension arm extension; 30 – bracket for fastening the extension; 31 – protective cover of the ball pin; 32 – ball pin bearing; 33 – ball pin; 34 – ball pin body; 35 – suspension strut rod; 36 – outer body of the upper support; 37 – inner body of the upper support; 38 – upper support bearing; 39 – rubber element of the upper support; 40 – travel limiter of the upper support; 41 – protective cap of the upper support; B - zone for monitoring the suspension joint
Replacing and adjusting the front wheel bearing Niva
Symptoms and consequences The sound of a failed front wheel bearing 2121 is often practically indistinguishable from road noise, especially in winter when driving in studded tires on asphalt. However, as the unit wears out, it begins to intensify and accompanies the driver continuously. An additional benefit is the heating of the wheel away from the center without the characteristic smell of brake pads.
At the first suspicion of a specific malfunction, you need to start looking for it, and then change the part, otherwise, not only acoustic comfort is disturbed, but also there is a possibility of complete destruction of the bearing, the appearance of wear on the hub with its subsequent replacement, and in the most advanced situation - misalignment and wheel wedge, which will allow you to easily “make ears” using a short wheelbase and the unique suspension settings of the Niva 21213 and 21214.
When is replacement needed?
The wheel bearing located on the rear wheel of the VAZ-2110 fails quite rarely - the manufacturer indicates that its service life is 100,000 kilometers. Of course, we are talking about ideal conditions.
In real life, bearings fail more often. The main reason for premature wear is serious problems with the quality of roads. Our more than harsh and humid climate, as well as many other factors, also play a negative role.
In any case, the fact that the wheel bearing has flown is indicated by very characteristic sounds coming from the rear wheels of the car. Some drivers describe it as a howl, others as a rumble.
What is important is that the noise increases noticeably when turning
Confirming a breakdown is not difficult - there are several ways. The most accurate one is:
- lift one of the rear wheels with a jack;
- manually unwind it with all your might;
- listen.
There is another test - for backlash. To do this, the VAZ-2110 is also raised above the ground, and then they grasp the wheel with their hands and try to swing it. If it dangles, then the element in question is definitely damaged.
Experienced car enthusiasts advise immediately getting rid of two old wheel bearings for the rear wheels. But in reality this is not necessary.
Bolt pattern - dimensions
This wheel parameter for VAZ cars is marked with the following combination – 4×98.
As mentioned before, this is a standard value for all models of domestic manufacturers. It is deciphered quite simply. So:
- the first number (4) only indicates the number of fasteners provided to secure the disk;
- the second (98) means the gap between the holes (or rather their centers) in millimeters.
Many have noticed that the corresponding markings on foreign vehicles begin with the number 5. As you might guess - this should be understood this way - the disc is attached directly to the hub with exactly the same number of bolts.
They use tires of the following marking – 175/70 R13.
When planning to purchase third-party wheels for your car, it is important to know which ones are suitable for your model. In particular:
- It is best to choose those that have the following dimensions - 5.5 by 13.5 inches;
- 5.5 by 14 is also not bad;
- It will be possible to install 6 to 14.
In theory, it is possible to attach even larger ones, but usually this requires certain changes to the design of the vehicle itself.
In addition to the previously mentioned number of attachment points and the distance between them, designated as PCD, there are also other dimensions:
- the diameter of the central hole (DIA) of the nine is 58.1 millimeters;
- offset (ET) is indicated as +40.
Types of hair masks
Each hair type needs special care, which is why there are several types of hair masks that are aimed at preventing the problem. For example, dry strands need masks with a moisturizing effect, oily hair, on the contrary, needs drying products, and normal hair types need a balance between nourishing and drying properties. In addition, different types of masks contain certain components that distinguish one product from another.
Hair masks come in the following types:
- Moisturizing.
- Nutritious.
- Restorative.
- Strengthening.
- Carers.
There are also remedies for hair loss and dandruff. Further in the article we will talk about the professional hair mask “Alerana”, the action of which is aimed at intensive nutrition and activation of strand growth.
How to recognize problems with the hub?
The fact is that the hub is the most important element of any rotating mechanism, including a car wheel. It is the central part of the rotating parts with a hole to allow it to be attached to an axis or shaft. Thus, its main task is to provide rotational motion. To prevent free rotation on the axle, rolling bearings or special plugs are pressed into the hub hole. In addition, it is thanks to the bearings that the hub, as well as the wheel, can rotate.
It is quite easy to notice that the wheel bearing is urgently needed to be replaced; in this case, a characteristic knock occurs in the lower rear part of the body, most often it intensifies when driving on an uneven road or when hitting potholes and bumps. When driving on a relatively flat road surface, a hum may occur. In addition, the brake drum gets very hot.
Replacing and adjusting the front wheel bearing Niva
Symptoms and consequences The sound of a failed front wheel bearing 2121 is often practically indistinguishable from road noise, especially in winter when driving in studded tires on asphalt. However, as the unit wears out, it begins to intensify and accompanies the driver continuously. An additional benefit is the heating of the wheel away from the center without the characteristic smell of brake pads.
At the first suspicion of a specific malfunction, you need to start looking for it, and then change the part, otherwise, not only acoustic comfort is disturbed, but also there is a possibility of complete destruction of the bearing, the appearance of wear on the hub with its subsequent replacement, and in the most advanced situation - misalignment and wheel wedge, which will allow you to easily “make ears” using a short wheelbase and the unique suspension settings of the Niva 21213 and 21214.
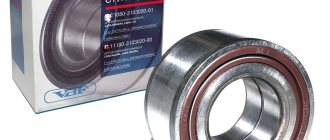
About the country of manufacture
Many people try to buy parts from European countries, such as Germany, France, etc. Some car enthusiasts look only at Japanese and American companies. If a person hears China, Korea, Malaysia, then he shrinks away as if from a “leper”. Guys, this is not entirely correct; serious manufacturers, such as SKF, FAG and others, have production facilities all over the planet, just like in China. The quality and technology at all factories are the same, for example, at the Chinese SKF, according to statistics, 1 out of 1,000,000 copies are defective, which will definitely be taken away, because the testing is very strict. So if this is a serious company, DO NOT BE AFRAID OF THE COUNTRY! Buy the brand!
Necessary tool
Before you start work, you need to prepare all the tools and assemble them in one place:
- Special puller for bearing removal.
- Collar.
- Head at "30".
- Keys or sockets for “17” and “19”.
- Mandrel for knocking out the hub.
- New wheel bearings.
The tool is assembled and ready to use
Preparatory work
Make sure that the workplace is well lit, and it is best if it is on a viewing hole or a lift. Because this is the only way to talk about high convenience when carrying out such work. It would also be a good idea to familiarize yourself with the detailed diagram of the location of the bearing on the front hub of the VAZ-2112.
Thanks to this illustration, the diagram becomes very clear.
Step-by-step work order
First of all, we place the car in a stationary state, put on the handbrake, and, if desired, install wheel chocks. And while the car is on the surface, we tear off all the bolts on the front wheels.
We unscrew the torn bolts and put them aside. We remove the wheel.
Next, we need to use a “30” wrench to unscrew the hub nut
Please note that during its dismantling, you will have to press the brake pedal, and for this we will need an assistant.
Then, using a screwdriver, press out the calipers. When this operation is completed, having the key at hand at “17”, unscrew the calipers from the steering knuckles.
- Carefully unscrew the brake disc from the hub.
- Then, making gentle blows, we release the hub.
- And then the CV joint from the bearing.
Replacing the wheel bearing
Then, when access to the hub bearing is completely open, there are several ways to replace it.
First way
In this case, it is necessary to have a special puller to remove the bearing.
- First you need to take care of removing the stopper.
- Using this device, you simply remove the old bearing and install a new one in its place.
- After this, we carry out the entire assembly process in the same order as removal.
- The advantages of this method include the fact that during this work there is no need to touch the wheel alignment bolt, therefore, you will not have to add additional work.
- The disadvantages of this method include inconvenience during the process. Because you have to contrive and take an extremely uncomfortable position.
Second way
To carry out this work, it is necessary to carefully dismantle the steering knuckle and completely remove the hub.
- Moving to the workbench, we replace the wheel bearing.
- To do this, dismantle the retaining ring and knock the bearing out of its seat, or press it out.
- Next, we perform the installation in reverse order, having previously cleaned the surface of the hub.
Advice! Before you begin removing the alignment bolts, mark their position with a marker or chalk. In this case, the marks should indicate the current position of the bolt on the rack and the previous location of the knuckles. Thanks to such marks, during assembly it will be much easier to navigate the position of these bolts. Although it will not be possible to return to the previous state, it will still be possible to minimize it.
Putting marks
- We put marks.
- We knock out all the bolts from the fist.
- Remove the mounting bolts on the lower ball joint.
- This will knock the bearing out of the hub.
- Remove the retaining rings.
- Press out the bearing.
- We mount a new bearing, having previously cleaned the space of the hub and generously coated its surface.
This repair method will be very effective when not only the wheel bearing is subject to repair, but also most of the VAZ-2112 chassis. Such elements include the replacement of steering tips, silent blocks of levers and ball joints.
Third way
To perform work using this method, it is necessary to remove the entire rack completely.
The stand has been dismantled.
- Next, using a vice, we replace the wheel bearing.
- Because this is how the replacement will happen quickly and efficiently.
After dismantling the bearings, we install everything in the reverse order, assemble the rack and mount it on the car.
Do we make the puller ourselves or buy it?
If you do not want to knock out the bearing, you can purchase a special puller in stores, since the entire process of working with such a device becomes easier and the time required for work is reduced. This also applies to bearing installation work.
Hand-made hub puller
Bearing Failure Determination
Some recommendations will help you make sure that you need to replace the wheel bearing on your VAZ 2107:
The easiest way to determine the need to replace the hub unit is to grab the front wheel and shake it in different planes
If you feel the presence of play, then it’s time for a more detailed diagnosis and most likely replacing the bearings. The front wheels of the car should be hung on a jack, while being sure to take precautions: pull the handbrake, install shoes and additional stands under the car. Grasp the top and bottom of the front wheel with your hands and then make movements. It is important to wobble the wheel, not the car as a whole.
Thus, you can accurately determine whether the product in question needs to be replaced. Another way to determine the need for replacement is to listen for humming, knocking, and grinding noises in the wheel as it rotates.
Having decided that you really need to replace the VAZ 2107 wheel bearing, you need to purchase new products and begin the replacement workflow.
Replacement features
The front hub of the VAZ 2107 car has a pair of roller bearings, one of which is called internal, and the second external. The manufacturer recommends replacing these products in pairs, on both front wheels of the car. We will find out further what the replacement of the parts in question is.
Initially, it is necessary to tear off the nuts securing the front wheel of the VAZ 2107 car. After this, install the jack and jack up the front part of the car. At the same time, do not forget to install shoes under the wheels, as well as a special safety stop to prevent the jack from falling.
- Removing the caliper. Changing the front wheel bearing is much more difficult than replacing the rear one, but it can be done even with no experience. First of all, the 2 bolts that secure the caliper are uncoiled, after which they are unscrewed. It is not necessary to disconnect the brake hose; it is enough to tie up the removed caliper so that it does not interfere with further work.
- Removing the outer product. The cap is removed using a screwdriver, behind which there is a hub nut. The nut must be unscrewed, for which you will need to use a chisel and a hammer. Behind the nut there is a lock washer that must be removed. Now you can pull out the outer bearing.
- Removing the hub. To remove the hub, you need to pull it towards you. It is removed along with the brake disc. To disconnect the disk itself after removal, unscrew the two “12” bolts. The brake disc is removed to make replacement easier, but it is not necessary to disconnect it.
- Removing the inner bearing. Using a screwdriver, you need to pry off the oil seal located on the inside and covering the inner bearing, then pick it out and pull out the split spacer ring. The ring may not stand, so we focus on the situation. After this, the inner bearing can be removed.
- Next, the old clips are removed using a special puller or an ordinary steel tube of suitable diameter. The next stage of replacement involves cleaning the inside of the hub from old grease, after which you can begin assembly.
List of companies
Replacing the release bearing on a VAZ 2110 with your own hands: video instructions
Well, now we come to the most interesting part. Now I want to introduce several serious manufacturers that you can choose from. I want to say right away that I will not take Chinese and Russian brands, we will take a walk through the famous ones.
1) SNR is a large French company, widely represented in Europe, less so in Russia, but quality is practically in first place.
2) SKF is the world's largest company, ranks with SNR, and is widely represented in Russia. Very high quality manufacturer.
3) FAG is a leading manufacturer in Germany, not as large as the first two, but the quality is at the same level. Recently acquired by INA
4) NSK is the second wheel bearing manufacturer in the world after SKF. The headquarters is in Japan.
5) NTN - Japanese domestic manufacturer, rarely represented in Russia.
6) Koyo - part of the TOYOTA company, the third largest in Japan.
Purpose of the VAZ 2107 wheel bearing
The VAZ 2107 wheel bearing is a part through which the wheel is attached to the steering knuckle, and the wheel itself rotates. In a car, this element is constantly affected by temperature changes, the environment, impacts from uneven road surfaces, jerks of the brakes and steering. If the bearing is in good condition, the wheel should rotate without any play, with noise and minimal friction allowed.
The part in question has a fairly large resource. However, there are many factors that sharply reduce its service life. These include:
- Poor quality of roads is one of the reasons for the rapid failure of wheel bearings. This is explained by the fact that the element is located in the center of the wheel and absorbs strong loads during an impact when hitting bumps. For some time, the bearing withstands such impacts, but gradually collapses.
- Exposure to an aggressive environment. In summer, moisture and road dust get inside the hub, and in winter, chemical reagents penetrate.
- Overheat. Wheel rotation is constantly associated with friction and increased temperature. With constant heating and cooling, which is especially typical in winter, the service life of bearings is reduced.
Where is the wheel bearing installed?
Based on the name, you can already understand that the part is located near the hub. On the VAZ 2107, the element is installed in its internal cavity and changes, as a rule, when it fails, as evidenced by characteristic signs.
Causes and symptoms of failure
The causes of failure can be very diverse, but basically they are all related to loads, for example:
- Operating a vehicle on bad roads or off-road;
- Transportation of heavy loads;
- Aggressive car handling with sharp acceleration and braking.
But there are often cases when breakdowns occur due to low-quality spare parts. For example, the previous owner of the car decided to save money before selling it and installed not the original, but a Chinese analog wheel bearing, and they contain the following defects:
- Insufficient amount of lubricant inside the bearing. Because of this, in the future it simply dries out and begins to wear off.
- Faulty rollers or bearing balls. Parts may not be made according to the stated characteristics, but from softer metals, which is why deformation occurs under normal load.
Replacing the wheel bearing
To work, you will need an indicator and a torque wrench.
To prepare for adjusting the wheel bearing, you must perform the following operations:
- Secure the indicator by resting its leg on the hub near the adjusting nut.
- Place spanners on the studs and secure them with nuts.
- Rotate the hub and move it axially. (Screwed spanners are used as handles).
- Measure the amount of axial movement (clearance) of the hub, guided by the indicator readings.
- If the stroke exceeds 0.15 mm, adjust the play.
The adjustment is carried out as follows:
- Straighten the collar of the nut.
- Unscrew it with a spanner.
- Install a new nut and tighten with a force of 2 kgf*m.
- Loosen the nut and tighten again with a torque of 0.7 kgf*m.
- Loosen the tension by turning the key 20-25 degrees counterclockwise.
- Check hub play.
- Make sure that the indicator readings correspond to the norm (0.02-0.08 mm).
- Lock the nut by pressing its edge into the groove of the outer CV joint.
You can adjust the hub play without using a torque wrench. To do this you need:
- Tighten the nut tightly.
- Rotate the wheel a few turns.
- Check the play.
- If necessary, loosen or tighten the nut slightly.
- Continue until the free play of the hub is within 0.02-0.08 mm.
- Lock the nut collar.
The design of the rear wheel mounting of the Chevrolet Niva is very different. However, they also use bearings that need periodic replacement. They are replaced either together with the axle shafts or separately. The second option is much cheaper, but requires good metalworking skills and a torch to heat the metal.
Also interesting: Brake pads for VAZ 21214: selection and replacement
To work you will need:
- Jack, wheel wrench, chisel, hammer.
- Standard set of screwdrivers and wrenches.
- Axle puller.
- Gas (gasoline) burner or muffle furnace.
- Repair kit including bearing, oil seal and retaining ring.
- A pipe with a diameter of 40-45 mm, the length of which exceeds the size of the axle shaft.
Replacement of bearings is carried out as follows:
- Place the machine on a level surface.
- Place wheel chocks or bricks under the front wheels.
- Jack up the car.
- Remove the wheel.
- Place a support under the rear axle.
- Unscrew the brake drum mount.
- Dismantle the part.
- Unscrew the nuts holding the bearing.
- Load the rear axle by lowering it onto the stand.
- Pull out the axle shaft using a puller.
- Hang the brake mechanism on a wire.
- Knock down the retaining ring using a chisel, hammer and grinder.
- Crack the bearing races using a chisel.
- Remove rust and dirt from the seating surface.
- Put the new bearing in place.
- Heat the locking ring to 200-250 degrees (dark red color) and hammer it into the seat with a pipe
- Replace the oil seal.
Assembly is performed in the reverse order of disassembly. The bearing does not need adjustment.
A visual process of replacing a Niva Chevrolet axle bearing
- Hang up and unscrew the wheel;
- Using a chisel, knock the cap off the hub;
• Using pliers, remove the cotter pin located on the lower axis of the clamping lever;
• Carefully remove the axis of the clamping lever using a metalworker's drift and then remove it using pliers;
• Using a flat-head screwdriver, having previously removed the clamping lever and springs, remove the brake caliper from its seat and place it behind the steering knuckle in such a way as not to interfere with the further process (hang).
Next, the ring with the separator as part of the inner ring is pulled out sequentially. The bearing components are removed from the inside in a similar manner.
Pay attention to the side of the outer bearing and remove the outer ring from there with a punch. The same manipulations are typical for the opposite outer ring
Disassembly is complete. Parts are defective and then, if necessary, replaced with new ones, components are cleaned of old lubricant, and filled with a new compound. It is recommended to use Castrol LMX universal lubricant for bearing joints and spline assemblies. Assembly - in the reverse order using suitable pipe sections for pressing bearings, oil seals, etc.
Using a puller
Clutch release bearing VAZ 2114 - do-it-yourself replacement
hubhubThe repair operation is often carried out using two types of pullers:
- cup, which is a bolt with large and small washers, a cup and a nut;
- two-legged.
Technique for handling the cup puller:
- when pressing out the wheel bearing, rotate the nut from the side of the cup: the cup rests against the end to which the flange was previously adjacent; the bolt head presses through the washer onto the inner ring of the bearing;
- when pressing a wheel bearing (the cup is not used): install a large washer on the bolt, insert the bolt into the steering knuckle (the washer rests against the rear end of the unit), install new and old bearings on the bolt, a washer that transmits force to the outer ring, and a nut (its rotate);
- when pressing the hub (the cup is not used): install a washer on the bolt that rests on the inner ring of the bearing, insert the bolt into the bearing from the rear side, install a washer that rests on the small end of the hub, mount and rotate the nut.
It happens that during the process of replacing a faulty VAZ 2114 wheel bearing, the inner ring remains on the hub. The procedure for removing it is often carried out using a two-legged puller:
- install the paws to the outer end of the rolling support ring (has the largest diameter);
- place the central screw in the end of the hub;
- By rotating the screw, remove the support ring.
Sometimes the puller is powerless in this procedure. An alternative is to use a thin chisel and hammer:
- pry off the dirt protection ring with a screwdriver;
- place a chisel between the hub flange and the end of the ring;
- Gently hit the chisel with a hammer to move and remove the ring;
- clean out the resulting nicks with a file;
- Install the dirt ring and seal.
For your information:
- the dismantled ring then participates in the procedure of pressing out the bearing using a cup puller;
- it is necessary to check the suitability of the hub for further use: the new bearing should be difficult to put on.
Total
Tools needed: a set of wrenches and sockets, circlip pliers, cup and two-jaw pullers, hammer, chisel, soft metal drift, screwdriver.
A summary map of the technology for replacing the VAZ 2114 front wheel bearing looks like this:
- loosen the collars and unscrew the nut on the CV joint shaft;
- remove the wheel;
- remove the brake disc and caliper assembly;
- unscrew the ball joint housing;
- press out or knock out the hub through a “soft” drift;
- remove the CV joint;
- remove the retaining ring;
- press out the bearing;
- press in a new support;
- install the hub;
- assemble the brake system;
- install the wheel;
- tighten the hub nut and bend its shoulders.
The easiest way to unscrew/tear off a hub nut
The easiest way can be considered the following, but it involves completely replacing the nut. Don't worry, any method does not guarantee the safety of this part. To easily unscrew or tear the hub nut out of place (an option for all brands - from VAZ to foreign cars with a groove on the shaft), you need to take:
Unscrewing the VAZ hub nut using a drill
- New nut.
- Drill or screwdriver.
- Drill up to 3 mm.
- Chisel.
- Hammer.
- You need to drill the nut along the groove to counteract it.
- Using a chisel and hammer, simply break the nut and remove it, then replace it.
- If throwing away the nut is not possible, then you will have to sweat - and in the literal sense of the word too.