Causes and symptoms of failure
The causes of failure can be very diverse, but basically they are all related to loads, for example:
- Operating a vehicle on bad roads or off-road;
- Transportation of heavy loads;
- Aggressive car handling with sharp acceleration and braking.
But there are often cases when breakdowns occur due to low-quality spare parts. For example, the previous owner of the car decided to save money before selling it and installed not the original, but a Chinese analog wheel bearing, and they contain the following defects:
- Insufficient amount of lubricant inside the bearing. Because of this, in the future it simply dries out and begins to wear off.
- Faulty rollers or bearing balls. Parts may not be made according to the stated characteristics, but from softer metals, which is why deformation occurs under normal load.
Design features of the hub nut
The hub nut is located in a unit whose operation occurs under conditions of high temperatures, mechanical and external influences. Therefore, alloy steel with anti-corrosion coating is used for manufacturing. The part, in addition to the standard nut elements, has grooves. After reaching the required torque, a locking pin is inserted into them or mechanically fixed with a chisel. The outside of the nut is surrounded by 6 standard edges. We gain access to the locknut after removing the protective cap.
Which wheel bearing to choose?
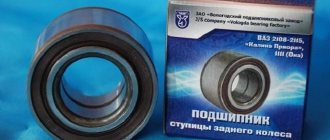
There are a large number of brands of AvtoVAZ spare parts on the market: Lada (original), Fag, Kraft, Lecar, etc. Among this variety, you can purchase a low-quality part and return to repair it in the near future. It is best to choose a bearing from the original brand, but be careful, often unscrupulous stores can sell you a product in a box similar to the original one.
The dimensions of the bearings on the rear axle and on the front, as a rule, do not differ on the VAZ 2114; they are 64 by 34 by 47 millimeters .
To simplify the search for the front wheel bearing on a VAZ 2114, you can insert these article numbers into the search:
- Original front: 21080-3101800-86
- Original rear: 21080-3104020-04
Stingy people pay twice, so it’s better to pay extra once than to waste time and money on repairs again.
Further sequence of actions
So, the hub nut was successfully unscrewed. What to do next?
- First of all, an external inspection is carried out to determine the integrity of the threaded elements. Using fine sandpaper, improvised materials, kerosene or solvent, the entire surface of the thread on the stud is thoroughly cleaned to bare metal. Order factory hub nuts in advance.
- The tightening is carried out under load control. We use a torque wrench.
- To prevent this part and contact from sticking again, we use a special deep penetration lubricant WD-40 or thick graphite lubricant.
- Don't forget to lock or install a cotter pin.
Security measures
To safely unscrew the hub nut, the following requirements must be met:
- Use proper tools and accessories;
- Firmly fix the body in its original position (handbrake, heel);
- Use special anti-slip gloves;
- If excessive force is used, do not place body parts under the car body if the wheel is jacked up;
- First we try to unscrew it using more gentle methods, trying to preserve the original locknut;
- The sequence of actions is defined in the operational map. It must be followed.
How to check a wheel bearing?
To check the condition of this spare part, it is not necessary to contact a diagnostic service. There are several ways to recognize the problem yourself:
- When driving on a straight road, at a speed of about 50-60 km/h, put the gear in neutral and turn the steering wheel left and right; if extraneous noise occurs and then goes away, then it’s time for a replacement.
- Jack up one wheel and start turning it. If there is extraneous noise, this also means that the bearing is failing. Perhaps rocking the wheel from side to side will indicate a problem.
- After the ride, touch the wheel disc at the hub. If the disk temperature is high, this means that there is also a malfunction.
Of course, it will not be possible to detect critical wear using these methods, but it will be possible to identify the malfunction. If a malfunction is detected in this unit, it is strictly not recommended to drive a car.
Possible problems for VAZ owners and not only
With long-term exposure to tools and repeated attempts to remove the nut, “force majeure” situations occur, which include:
- the edges are licked off;
- wear of the union head;
- does not withstand the ratchet mechanism;
- the thread on the shaft or locknut is knocked out;
- violation of adjustment, tightening torque;
- the bearing is damaged.
We buy a spare locknut and cotter pin in advance. It is also advisable to have a spare set of special keys before dismantling.
It is not recommended to unscrew
Don’t try to “discover America” again; the methods listed above will help break the locknut in 99% of cases. The following methods should not be attempted:
- Cut using argon, oxygen or electric welding;
- Strong blows with a hammer or sledgehammer on the end surface;
- Jumping on a lever;
- Impacts on the side, edges, base;
- Exposure of the part to open flame (for example, pour kerosene on it and set it on fire).
Required tool for replacement
Before replacing the front wheel bearing of a VAZ 2114, it is worth preparing a tool that will be useful during the work process.
- Balloon and jack. Needed to remove a wheel from a car.
- A set of open-end wrenches from 12 to 24 mm and a set of socket heads from 12 to 19 mm.
- Special puller for wheel bearing.
- Screwdriver and pliers to remove circlips.
It is better to do the work in or at a garage, since during the disassembly process you may need a hammer or, for example, a yew.
How to remove a hub nut from a thread - radical methods for VAZ owners
Sometimes power options are not enough, this is especially observed on cars of the VAZ family, where bearings are often adjusted. In this case, auto mechanics advise switching to radically aggressive dismantling methods:
- Break the fasteners with a chisel, hammer or nut splitter/nut splitter;
- A series of holes are drilled along the groove for locking;
- Heat the connection with a gas burner;
- Solve the issue by welding (welding a similar nut or a larger one).
Replacing a VAZ 2114 wheel bearing
Price for replacing the front wheel bearing of a VAZ 2114
The cost of the original wheel bearing (21083103020) is from 445 to 700 rubles. You can also choose equally reliable analogues:
- SKF (VKBA 1306) - 1400 rubles;
- Fenox (RTBB12066O7) - 450 RUR;
- Kraft (KT 100505) - 520 rub.
The SKF bearing is considered the highest quality, the service life of which is significantly longer than other options.
In Moscow, the price for replacing the front wheel bearing on a VAZ 2114 can range from 1200 to 2500 rubles. In rare cases, small service stations offer a replacement service from 500 rubles.
How to replace the front wheel bearing on a VAZ 2114 / 2115
The algorithm for replacing the front wheel bearing on Lada 2114 and 2115 is not complicated. Often you need a puller, it’s easier with it.
Initially, the car is placed on a jack and one wheel is removed. After this, the caliper and brake disc are dismantled. It is best to unscrew the steering knuckle with the strut - it takes less time than dismantling the steering knuckle itself.
Then the retaining rings are removed and the hub is pressed out. After the hub, the bearing is removed using a press, and a new one is installed in the same way. More detailed photo instructions are described below.
1. First of all, you need to place and strengthen the front axle of the car in a suspended state, this is the disadvantage of a lowered car, since you can’t get under the bottom with a jack, you have to drive onto the boards in order to raise the car higher and then jack it up.
Also, for better safety, we place houses or pyramids, whatever people call them, under the bottom.
3. Remove the wheel.
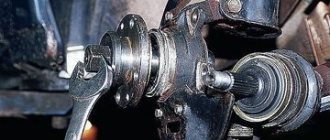
4. Then you need to knock out the locking clip on the hub nut, to do this, take a nail and knock it out, and then, taking a partner to help, unscrew this nut (the partner presses on the brake pedal). Let me tell you that the force applied is incredible to unscrew it.
This is the 30 nut in the center of the hub.
5. Next, dismantle the caliper.
6. Then remove the brake disc boot. Remove the brake disc.
8. Then carefully knock out the hub.
10. We remove the casing from the old bearing from the hub (it flies off when knocked out). Then we knock out the old hub bearing; to do this, you first need to remove the retaining rings on both sides.
And carefully knock out the old bearing (be careful not to damage the boot).
13. Then carefully hammer the new bearing back, install the retaining rings and the hub.
14. By the way, it’s better to change the ball joints for new ones, since they got into it.
We perform assembly in reverse order.
Where to turn?
For many beginners who are faced with the problem under consideration, the pressing question is which way to unscrew the hub nut - clockwise or counterclockwise? It should be noted right away that everything depends on the age of the car. On new cars, the hub usually unscrews counterclockwise. If we are talking about old VAZs and other cars, then on the right side you need to unscrew the nut clockwise, and on the left - counterclockwise.
Before you begin the repair, you need to take into account that the nut can only be removed if the vehicle is standing on wheels, and with pre-installed stops.
In some cases, you can try to unscrew the nut without installing the stop. But this option is only possible if we are talking about a ventilated brake disc, and the nut itself must be deep. In any case, the vehicle must be insured. You should also not forget about personal safety. It is not recommended to use unnecessary force, as many motorists receive minor injuries or damage to the vehicle body.
Practice shows that even a large lever is not always enough to unscrew. Therefore, to complete the work you will need to use special mixtures and other tools. We will also talk about them. Below is a video instruction on how to unscrew the hub nut.
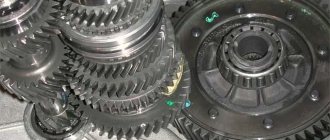
Device
The main purpose of the part is to ensure uniform rotation of the car wheels. Given the name of the part, it is easy to guess that wheel bearings are the connecting link between the hub and the axle to which the brake disc and wheel are attached.
The design of the part fully corresponds to the classic type of rolling bearings. These are two metal rings into which conical rollers are pressed, protected from the body by a durable rubber insulator.
Unlike foreign competitors, domestic bearings are created using outdated HUB technology. They are quite difficult to install, require very precise tightening torque and require plenty of lubrication.
The operation of the mechanism lasts for several years. It is recommended to change a spare part for a VAZ 2114 approximately once every 100 thousand kilometers. But negative operating factors can accelerate the wear process:
- Bad roads. The entire force of the shock load falls on this mechanism of the system. Over time, the metal gets tired and the bearing begins to fail.
- Aggressive reagents. In Russia, in order to save money in winter, aggressive chemicals are often used to remove ice from roads.
- Sudden temperature changes. In winter, owners of warm garages unknowingly shorten the service life of many metal parts, for which sudden temperature changes when leaving and entering the garage create a large load.
How to unscrew the hub nut - the main 5 ways
To solve the problem of how to unscrew the hub nut, it is necessary to determine the dismantling method. This can be done in one of two main ways:
- With the wheel removed.
- The car is on wheels.
If the nut does not unscrew, we make a choice taking into account the following possible methods:
| Name | Description | What tools are needed? | When to use |
| "Barbarian" option | Provides for dismantling and subsequent replacement. | Drill with metal drills (of different diameters), chisel, hammer (small sledgehammer). | It is used if there is no chance to unscrew it in the usual way. |
| "Hot" method | Heating the metal at the joint. | Burner. | Bearings and hubs must be replaced. |
| "Delicate" work | Carefully unscrew the stuck part, gradually increasing the force with the lever while simultaneously tapping on the body. | Tubular socket wrench, heavy-duty screwdriver, hammer, extension pipe, deep penetration lubricant. | If necessary, perform the work as carefully as possible |
| Maximum force | A powerful wrench and a long pipe can significantly increase the force, thereby increasing the chances of stripping the thread. | Heavy duty socket wrench, long pipe. Heads for licked nuts. Key with hydraulic or electric drive. | A strongly stuck nut. |
| Using chemicals | A soaked rag will gradually relieve the problem. | Kerosene and (or) white spirit, hammer, rags. | If you have time. |
You can quickly unscrew a stuck element if you provide a lever. It is installed on the ratchet wrench using a small pry bar. You can use a piece of pipe of suitable diameter with a length of at least 1 meter.
Wheel bearing diagnostics
Let's talk about how to check a wheel bearing.
An indirect sign that you need to pay attention to the bearing on the VAZ 2114 is the appearance of a characteristic hum or hum from one of the wheels while driving. Typically, the noise increases at high speeds, making it easier to hear on the highway.
The driver, being in the cabin, is not always able to correctly determine the source of the noise. For example, a hum from the left wheel may be perceived as coming from the right. Or vice versa. To accurately determine by ear where the damaged bearing is located, you need to watch how the sound changes when turning when the mechanism is subjected to a higher load. If the sound disappears when turning right, but appears when turning left, the right bearing has worn out.
Diagnostics is carried out in the following way.
- We raise the car so that the wheel being diagnosed is hanging out.
- We rock it with our hands, holding the top part.
- We turn the wheel by hand.
- Pay attention to the smooth deceleration of movement and to extraneous sounds.
- An emerging backlash may also indicate a problem.
How can you unscrew the hub nut? The simplest option
None of the unscrewing methods guarantees the safety of the hub nut. The simplest option involves a complete replacement of the part. To ensure that the nut is removed, you will need to prepare:
- chisel and hammer;
- drill and drill bit (thickness no more than 3 mm);
- new nut.
This option will be relevant if the hub nut cannot be unscrewed by other means. Moreover, it can be used on all vehicles, including expensive foreign cars and ending with domestic Lada cars. First you need to drill the part using a drill.
The part must be drilled along the groove. Then the part is broken using a chisel and hammer and replaced with a new one. If this option is unacceptable, then you will have to use another, more delicate method.
Replacement instructions
Replacing the rear wheel bearing on a VAZ 2114 is carried out as follows:
- Loosen the wheel bolts and wheel locknut before jacking up the vehicle.
- Raise the car using a jack. Tighten the hub nut completely and remove the wheel. Unscrew the mounting bolts on the drum.
- Remove the drum. If it is rusty, pre-treat the joint with WD-40. If after this the drum still does not budge, use long pins. Screw them into the holes and tighten them one by one until the part moves out of place. You can gently help with a hammer by tapping it on the back side.
- Unbend the stopper and unscrew the locknut. If it is tight, use a wrench extension.
- Using a universal puller, press the hub.
- The inner race remains on the shaft, and the outer part of the bearing remains in the housing. If you want to replace the pads at the same time, you need to remove the axle mounts.
- Now it's time to demonstrate the entire mechanism.
- As a rule, the rear part of the axle is attached to the brake shield. To dismantle you will have to use a hammer.
- Remove the wheel bearing race using a universal puller. If the brake system does not need to be changed, this operation can be performed directly on the vehicle's axle shaft.
- We place the hub on bricks or bars, as shown in the photo. Use a hammer to knock out the old rear wheel bearing.
- Be sure to remove dirt and wash the hub in gasoline. Clean the axle shaft in the same way. Use thick lubricant to treat the seating surface. Place the new bearing in the hub bore. Mounting chamfers will help avoid distortions.
- Press the bearing with your hand and press it in about 3 millimeters. Place the old bearing on top.
- Using the side of the hammer, carefully hammer the part inward. If the process is difficult, you can cool the bearing in the freezer and warm up the hub.
- Once the rear hub bearing is in place, you can install the circlip. For this purpose, round nose pliers are used. Don't forget to lubricate the axle first.
- Carefully attach the assembled mechanism to the trunnion. Be careful to avoid distortions. Then place a washer on the threads and screw on the hub locknut.
- Using a nut, press the hub onto the axle. Tightening torque: 220 N*M. Place the drum, secure it and screw the chassis.
As you can see, replacing a bearing is a rather complicated and time-consuming task. You need to have a special tool. Sometimes it’s easier to ask a car service for help.
Another way to unscrew the hub nut
To work, you will need to prepare a metal brush, a reliable screwdriver, universal WD-40, an iron tube and a wrench. The socket wrench must be strong. The work is performed in the following sequence:
- First, the threads are cleaned of traces of corrosion. To do this you will need a metal brush;
- The surface of the nut must be coated with a special product - WD-40. Other types of penetrating lubricants can be used;
- the part must be left for a quarter of an hour;
- Now the collar is put on and blows are struck with a hammer. The impact force must be gradually increased;
- Strikes must be struck without excessive effort. After deformation, the part should unscrew.
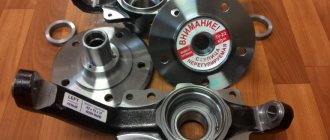
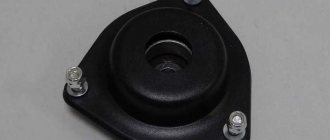
Removing the front wheel hub
Now you need to remove the hub. To do this you will need:
- Mark the position of the hub on the strut using a marker. Be sure to clean the surface thoroughly before doing this.
- Using keys “17” and “19”, unscrew the nuts from the bolts securing the hub to the shock absorber strut.
- Using a “17” wrench, you need to unscrew the lower bolts securing the ball joint to the hub. This is a simple option when you do not need to replace the ball. But if you need to change it, then you need to use a “19” key to unscrew the nut from the ball pin and remove it using a puller.
- Completely unscrew the hub nut.
- Carefully push the front wheel hub off the CV joint.
That's all, now you need to completely disassemble the element and remove the front wheel hub bearing of the VAZ-2108.
Size and characteristics.
A distinctive characteristic of these products is their increased load-carrying capacity, which affects the duration between replacements.
Table of sizes and characteristics.
| Bearing | Inner diameter (mm) | External diameter (mm) | Width (mm) | Weight (kg) | Load capacity (Kn) | |
| Dean. | Stat. | |||||
| 7804 | 19,05 | 45,25 | 15,494 | 0,13 | 27,5 | 27,5 |
| 7805 | 26 | 57,15 | 17,462 | 0,22 | 37,8 | 42,8 |
| 256907 | 34 | 64 | 37 | 0,44 | 31,5 | 27,9 |
| 256706 | 30 | 60 | 37 | 0,4 | 30,1 | 25,9 |
| 7700432405 | 37 | 72 | 37 | 0,62 | — | — |
| 8450030826 | 25 | 55 | 43 | 0,5 | — | — |
| 2007108 | 40 | 68 | 19 | 0,27 | 40 | 28,4 |
| 180508 | 40 | 80 | 23 | 0,45 | 30,7 | 19 |
What to choose?
Rear and front wheel bearings today are produced by both domestic and foreign manufacturers. The choice, as they say, is yours.
But we still want to give some recommendations on this matter.
- Chinese analogues. We strongly advise against choosing them to repair your VAZ 2114. They are of dubious quality, although they are the most affordable. Such bearings will not be enough for a long service life.
- Imported, mainly from Europe. The price is higher compared to analogues, but the quality is at the same level. When buying imported bearings, pay attention that they are not successful Chinese counterfeits. There are many of these now, unfortunately.
- Domestic. Pay attention to the parts made by Vologda or Samara craftsmen. The quality is quite high, and the price is affordable and adequate. What you need for the VAZ 2114.
Regardless of whether the bearing you are looking for is a rear or front hub, its size is identical and is 64 by 34 by 47 millimeters.
To work on replacing the element yourself, you will additionally need:
- Special puller for bearings;
- 30mm socket wrench;
- 19 and 17 mm wrenches.