Replacing gearbox seals for VAZ 2109, VAZ 2114 and VAZ 2110
Hello, reader of the blog RtiIvaz.ru. Today we will study how to replace gearbox seals on a VAZ 2109, VAZ 2114 and VAZ 2110. Replacing gearbox seals on a VAZ 2109, VAZ 2114 and VAZ 2110 and on other Lada models is done when oil leaks are detected. Typically, drips occur in the places where they are installed and a sign is a decrease in the oil level in the gearbox.
Sometimes oil leaks appear at the junction of the gearbox and engine. In this case, you need to touch the leak with your finger and by the smell you can determine where the oil is coming from. From the engine or gearbox. Transmission oil has its own specific smell, which differs from engine oil.
Before replacing the gearbox seals, you need to drain the oil from the gearbox. To do this, we need a container for the drained oil and two keys for 17 and 13. First of all, we need to check the gearbox breather, which is designed to ventilate the gearbox. And in the absence of one, excess pressure develops in the crankcase and this can cause oil to be squeezed out through the cuffs.
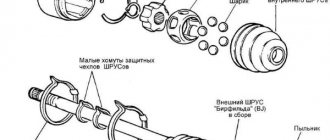
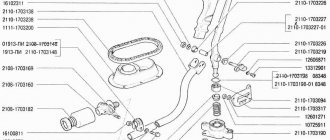
Transmission seals for VAZ 2109, 2110, 2112, 2114 cars are usually sold in a set of 4 pieces:
- Primary shaft oil seal.
- Drive seals, there are two of them, left and right, we will look at the differences later.
- Gear selector rod seal.
Expert advice
When replacing valve stem seals on a VAZ-2114 (8 valves), experts recommend paying attention to important nuances:
- Before installation, new seals should be fitted with guides on the bushings that are included with the valve stem seals;
- after installing new oil seals, be sure to remove the guide bushings;
- as soon as the oil seal is installed in its place, you need to put on the spring;
- the replacement procedure should begin with the second valve of the cylinder, then move on to the fourth, etc.;
- after replacing the oil seals, the crankshaft must be rotated 180 degrees;
- after installing the camshaft, the nuts are made from the middle to the edge;
- All actions when replacing oil seals must be carried out clearly and accurately.
REPLACING THE INPUT SHAFT SEAL
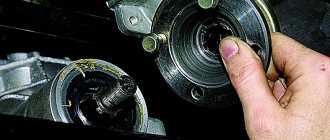
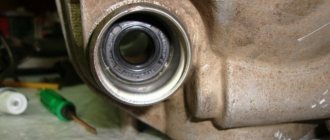
To replace the gearbox seals, especially the input shaft, the gearbox must be removed from the engine. Having removed the gearbox, carefully inspect the installation locations of the cuffs. And first of all, you need to dismantle the release bearing and remove its guide. Under it you will find the input shaft oil seal.
To remove the seals we need a flat-head screwdriver. By prying it from the inside, you can remove the cuff from its seat. The input shaft oil seal has dimensions 25x45x9. Catalog number 2110-2301043Р. It is better to install it with sealant. The outer race of the oil seal must first be degreased, and then a thin layer of sealant must be applied.
When installing, you must ensure that the inner race of the oil seal does not turn outward and the cuff spring does not jump out of its place. We install it in its place and carefully, using a pipe, lightly tapping, hammer the cuff into place. In this case, it is necessary to ensure that the plane of the input shaft oil seal lies exactly in relation to its seat.
Then we install the release bearing guide in place. It is secured with three bolts, which should be tightened evenly so that it fits into place without distortion.
Next, we immediately install the release bearing. When installing it, you must immediately put on the wire springs, which are placed on the legs of the release bearing and fix it in place.
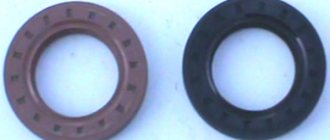
Now it's time for the drive seals. There are two of these seals, the left one is red and the right one is black. They also differ in the direction of rotation. This direction is shown by arrows on the seal housing. These arrows are located on the inside of the oil seals, on the right oil seal the arrow points to the left, and on the left oil seal the arrow points to the right. This can also be determined by the oil removal notches applied to the inside of the cuff.
They act to deflect oil away from the cuff. They are applied at opposite angles, in the direction of shaft rotation. Typically, the manufacturer labels it in three ways:
- Catalog numbers. The number of the right oil seal ends in an even number 2110-2301034Р, and the number of the left one ends in an odd number 2110-2301035Р.
- Arrows, left arrow on the right, right arrow on the left.
- Color. The left one is red. The right one is black.
REPLACING DRIVE SEALS
Video from YouTube channel: Engine repair and interesting!
The left and right drive seals are also removed using a screwdriver or a pry bar. There is no shaft on the right “black” oil seal (see video), so here you can insert a mounting bracket inside and remove it with a light blow. We also thoroughly clean the seat with a cloth.
Then, after degreasing the outer diameter, we apply sealant. After this, we install the cuff in place, and make sure that it sits evenly, without distortion, in its seat. Tapping with a flat object, we hammer it in until its outer plane is level with the body.
Then you need to insert a round block of suitable diameter into the hole; this is necessary to fix the satellites so that they do not move out of their places. You can also use a branch from a tree of a suitable diameter, sawing off a straight piece of the appropriate length, or a shaft from an old CV joint.
Next, place the gearbox vertically on the clutch housing.
We insert a flat mounting between the gearbox housing and the CV joint, or you can use a nail puller and, by hitting it, remove the CV joint from the gearbox. Next, using a powerful screwdriver or a flat mount, remove the “red” oil seal of the drive from the housing.
The new drive oil seal must also be checked for direction of rotation. The arrow on the inside should point to the right. Carefully install the new drive oil seal in its place, making sure that its plane is flush with the edge of the seat.
REPLACING THE GEAR SELECTION ROD SEAL
It's time to replace the gear selector rod oil seal, which is located under the boot. Catalog number 2108-1703042-01Р. Here you first need to remove the cross from the shaft. To do this, you need to move the rubber boot “glass” towards the gearbox housing, opening access to the crosspiece mounting bolt.
The bolt does not need to be completely unscrewed. Simply loosen it and the cross will be removed from the shaft. We remove the rubber boot and we will have access to the selector rod oil seal. We remove it, just like the others, by prying it off with a screwdriver.
The new oil seal, like the previous ones, covered with sealant, is driven into place using a pipe. Here you can use a spark plug wrench; it fits the diameter. We put the rubber boot in place, and then the cross, and that’s it!
The work on replacing the gearbox seals on a VAZ 2109 has been completed. With this, I finish the article and wish you, dear reader, success in operating the car!
Disassembly
Having removed the gearbox, you can proceed directly to the main thing - disassembly. This will allow you to change damaged elements as you work, identify existing faults and solve problems on your own.
- Clean and thoroughly wash all external surfaces of the gearbox.
- Place the box in a vertical position and remove the back cover.
- Remove the clutch cable bracket, then use a rubber hammer to knock the rear cover off the gearbox.
- Remove the old gasket. She will be replaced.
- Engage any of the two gears - 3 or 4.
- Unscrew the bolt that holds 5th gear, then turn it on.
- Simultaneously turning on the indicated speeds will allow you to fix the shaft and prevent it from turning.
- Unscrew the nut on the secondary shaft, and then on the primary one.
- Remove the 5th speed synchronizer along with the fork.
- Remove the fork from the coupling. Remove the synchronizer as carefully as possible. If you allow the clutch to move away from the hub, the spring-loaded balls that secure the synchronizer will simply fall apart.
- Remove the 5th speed synchronizer locking ring.
- Remove the 5th speed driven gear from the output shaft.
- Remove the thrust ring located on the needle bearing.
- Remove the needle bearing itself from the 5th speed gear.
- Remove the drive gear from the drive shaft and remove the bearing plate.
- Now the needle bearing bushings should be removed from the secondary shaft, and the thrust washer should also be removed.
Jewelry work
- Take out the ring that secures the input shaft bearing, and then a similar ring for the secondary shaft.
- Unscrew the locking plug and remove the ball and locking spring. Next you can get a couple more clamps.
- Remove the rear engine mount.
- Unscrew the reverse gear lock plug, tilt the box and thus remove the lock ball and spring.
- Remove the clutch housing and gearbox housing mounting bolts.
- Acting as carefully as possible, separate the two units. To do this, there are grooves in the crankcases into which the ends of a screwdriver are inserted. By shaking, you can disconnect the elements without any problems.
- Remove the gearbox housing.
- Unscrew the bolt securing the 1st and 2nd speed shift fork.
- Remove the fork and stem.
- Unscrew the bolt securing the 3rd and 4th speed forks.
- Separate the rod head from engagement with the lever, remove it along with the fork from your gearbox.
When disassembling the box into parts, be sure to pay attention to the condition of the elements. If you detect faults in time and replace gearbox components, you can get by with inexpensive but very effective DIY repairs. Disassembled gearbox
Disassembled gearbox
What to pay attention to
So, following the instructions, we disassemble the gearbox of your VAZ 2109
Along the way, we pay attention to the following points:
- Bearings. When they wear out, a noise from the box occurs. Plus, worn bearings negatively affect the condition of other gearbox elements;
- Synchronizers and sealing washers. If their condition leaves much to be desired, then the gears shifted poorly precisely because of them. Replace them;
- Clutch system, cotters, coupling hub clamps. All this must be replaced separately if there are signs of wear or defects;
- Blocking rings, synchronizers. If there are chips or nicks, don’t even think about alternative solutions, replace them immediately;
- Bearing tracks. Over time they wear out. If signs of wear are found, perform a complete replacement. In this state, they were only a short time away from breaking;
- Gap between gears and locking rings. Normally it is no less than 0.6 mm. In case of deviations, there is only one solution - replacing the rings;
- Retaining rings. If elasticity is lost, these elements must be changed, since they will no longer be able to perform their functions.
When assembling the gearbox, do not forget to lubricate the new gaskets with a layer of lithol. And when pressing the oil seals, do it with the working edge inward. The metal clip should be located on the outside.
https://youtube.com/watch?v=cgCFhYP17
During the process of reassembling the gearbox, all rubbing components should be treated with oil, and do not forget about the sealant for connecting the clutch housings and gearbox. Doing everything yourself is quite possible.
Replacing the gear selector rod oil seal for VAZ 2114 - 2109.
Hello. In this article I will tell you how to replace the gear selector rod oil seal on VAZ 2114 and later models such as the VAZ 2109. At the end of the article there is a video for a better understanding of the replacement process. When you find fresh drops of oil under the car, this is a reason to drive it into a pit or overpass for inspection. If a worn gear selector rod seal is to blame, you will see a fresh oil stain around the rod. If there are leaks, check the oil level.
Along with the oil seal, it is best to change the cardan housing, since oil from the box most likely got on it. Rubber quickly begins to crack after oil gets on it. Another argument in favor of replacing the yoke cardan boot together with the box rod seal is the possible damage to the boot during removal. Well, let's begin! First of all, bend the cardan boot and put a mark between the gearshift lever and the cardan. This is done so as not to adjust the position of the gear shift lever during assembly.
Now you can start turning the nuts! We take the key 13 and unscrew the bolt of the gearshift lever clamp and remove the lever from the cardan.
Pulling the boot towards the box, unscrew the bolt with a 10mm wrench and remove the cardan from the gear selector rod along with the boot.
Here we can see the culprit of this event - the gear selector rod oil seal.
You can get it in three ways:
- Using a thin hook.
- Using self-tapping screws.
- Along with the bushing.
The first method is quite simple. We insert the hook between the oil seal and the gear selector rod, turn the hook so that it catches on the oil seal and take it out. During this action, it is important not to scratch the gear selector rod! The second method is also not complicated. We take two self-tapping screws and screw them into the oil seal from different sides. We pull out the oil seal using the screws.
The third way to remove the gear selector rod seal from the gearbox is to knock it out along with the bushing. Take a screwdriver and hammer and knock out the bushing. Next, use the same screwdriver to remove the oil seal from the bushing.
We press in the oil seal.
If you removed the oil seal using the first two methods, i.e. without knocking out the bushing, then to press in a new one, you need to select a tube corresponding to the diameter of the oil seal (approximately 24mm outer diameter). In the case when the oil seal is removed with the bushing, simply press the oil seal by placing the 22 socket on it.
Next, coat the bushing with sealant and hammer it into place.
We assemble everything in reverse order. I hope this article was useful to you. Leave your questions and suggestions in the comments.
Source
Diagnosis of the problem
So:
- Signs indicating the need to replace the gearbox seal are, first of all, oil traces left on the asphalt after the car has been parked.
- Before changing the oil seal, you should first make sure that this is the problem.
- Because oil leakage is often caused by a poorly screwed oil filter.
- Failure to identify an oil leak problem in a timely manner can have serious consequences.
- If you do not detect an oil leak from the gearbox in a timely manner, it will leak out completely, and then instead of the oil seal, the price of which is 50-100 rubles, you will have to repair the gearbox (see Repairing the VAZ 2109 gearbox - we do it right), and the price will increase significantly.
- To prevent this, it is necessary to periodically check the oil level in the engine and gearbox.
- Insufficient oil level in the gearbox can be manifested by a characteristic crunching sound that occurs when changing gears.
Replacing the gearbox rod seal of a VAZ 2109
You will need:
- An awl like a crochet hook or something similar.
- Keys for 10 and 13.
- The awl is ordinary.
- Plastic cork from a mineral water bottle.
Replacement is carried out on an inspection pit or a lift. If there is nothing else, you can use a cheap alternative in the form of two spare tires laid flat. We take two stronger boards and drive onto this improvised elevation. Naturally, the work will have to be done lying down.
Replacing the oil seal in a VAZ 2109 gearbox is carried out in the following sequence:
- We get to the rod that changes gears; it is covered on top with a rubber boot.
- If it leaks oil, then it is very easy to find it by looking at the oil stain (see photo below).
Gear shift rod
- We bend the wide part of this boot to get to the cardan located underneath it, which is attached to the rod.
- To gain access to the oil seal, it is necessary to disconnect the cardan from the shift lever and from the rod.
- For this we use the key 13.
- We unscrew the nut completely, this will help loosen the connection of the lever with the cardan.
- We take the lever out of the cardan, thus engaging 1st or 3rd gear.
- We use a 10mm wrench to disconnect the cardan from the rod; to do this, we move the lever to the side.
- We dismantle the cardan.
Disconnect the cardan from the rod
- Next, we remove the rubber boot, now we see the reason for the repair - it is the gearbox rod oil seal.
- It is located in a special recess - this is the place where the rod enters the box.
- Removing this oil seal without using a special tool is impossible, so we take a special awl and get to work.
- You can use a self-tapping screw as an option, the principle is very simple - you need to screw the self-tapping screw into the oil seal and “uncork” it like a corkscrew.
- When you have removed the old one, you can start replacing it.
- It is first necessary to thoroughly clean the seat from sand, oil, and other contaminants.
- Now you can press the new oil seal into the seat.
Replacing the VAZ 2109 gearbox seal is easier using a plastic bottle cap:
- This is done this way: cut out the inside of the plug and install a new oil seal through it.
- You can do without a traffic jam, this is a matter for the owner.
- We assemble the lever in the reverse order of disassembly.
Note:
- When the oil seal was replaced or any work was done related to fastening the gearshift lever and cardan, the rocker located in the car interior shifted greatly, which makes it impossible, in some cases, to change gears.
- Here the whole problem is hidden in the 13 screw, which connects the cardan itself and the lever that switches the speeds.
- Not everyone knows that it (screw 13) is not only fastening, but also adjusting.
- Therefore, upon completion of the work, be sure to check what position your lever is in and adjust its position, if necessary.
- Only now can you safely collect your tools and wash your hands.
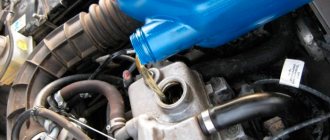
- After assembly, be sure to check the oil level; if the level is low, you need to top it up, after which we can check the operation.
- Drive a couple of laps and make sure that the oil is not leaking anywhere else.
- That's all, I hope our instructions were useful to you. As you yourself have seen, replacing this oil seal is not difficult, and there is no point in overpaying for service stations.
Replacing the oil seal on a VAZ 2114 gearbox
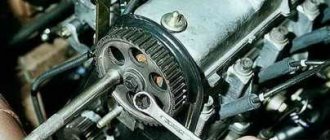
We will show you how to replace the gearbox gearbox seal of a shaft with grenades on VAZ 2115 VAZ 2114 VAZ 2113 with your own hands. During this repair, you will find the instructions on how to remove the shaft with grenades in the material “replacing the internal grenade of a VAZ 2115 2114 2113” useful. When the shaft is removed, use a screwdriver to pry up the oil seal and pull it out of its seat. Oil seals:
Different for the right and left sides. Black right, brown left. The arrows indicate the direction of shaft rotation:
Before installation, degrease the seals with a solvent, then coat them with sealant. Using the old oil seal, carefully hammer the new one into the hole.
Video of replacing the gearbox oil seal, shaft with grenades in a VAZ 2115 2114 2113
:
Backup video on how to replace the gearbox seal in a VAZ 2115 2114 2113:
You can replace the internal grenade seal of a VAZ yourself at home. To do this, you don’t need to be a specialist, you just need to have a head and hands.
How to repair a car
Replacing the drive seal of VAZ 2109, VAZ 2110, VAZ 2112, VAZ 2114, VAZ 2115
VAZ 2109, VAZ 2110, VAZ 2112, VAZ 2114, VAZ 2115 how to replace the drive seal of a VAZ 2109, VAZ 2110, VAZ 2112, VAZ 2114, VAZ 2115 yourself.
When should the oil seal be changed?
We are all fans of driving cars; we often forget about such an event as replacing the drive seal, or rather the internal grenade seal. Let's remember what signs indicate the need to replace the drive seal?
– oil leakage from the gearbox (formation of an oily film on the gearbox); If you notice an oil film, be aware that over time, more oil will ooze out, even to the point of forming oil droplets on the asphalt under the car.
Do not forget! Oil seals are left and right, and they should not be confused. The left and right drive seals are different in color. The left oil seal of a VAZ is usually brown and is installed on the driver’s side, while the right oil seal is black and is installed on the passenger’s side.
Tool for replacing the drive seal of a VAZ 2109, VAZ 2110, VAZ 2112, VAZ 2114, VAZ 2115:
- Wrench 17;
- 30mm socket wrench;
- Mount ;
- Screwdriver;
- Hammer ;
- Mandrel for pressing the oil seal;
- Container for draining oil.
- Pipe of suitable diameter.
How to buy a VAZ drive oil seal?
Before you run out to buy a drive seal, decide which drive seal you need (left or right). You can buy a drive oil seal at any VAZ auto store or at the car market.
What is the difference between the left and right drive oil seal?
The left-hand drive oil seal differs from the right-hand drive oil seal of the car in that it has oil drainage grooves in different directions.
The main differences between the left and right drive oil seal.
- Different directions of arrows on the inside of the seals;
- The numbering of the right oil seal has an even number at the end, and the left one has an uneven number.
- The color of the left oil seal is brown, and the color of the right one is black.
How to replace the drive seal of a VAZ 2109, VAZ 2110, VAZ 2112, VAZ 2114, VAZ 2115 car yourself?
- Drain the oil from the vehicle's gearbox.
- Loosen the wheel bolts and unscrew the VAZ front wheel bearing nut.
- Using a jack, raise the car and remove the ball joint from the steering knuckle by unscrewing the bolts.
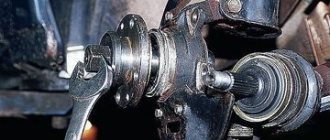
- Using a pry bar, push the lower arm down and pull one end of the drive out of the hub.
- Then we push the drive out of the gearbox (for this we drained the oil from the gearbox))) so that it doesn’t drip into the eyes.
- Using a screwdriver, remove the drive seal from the gearbox.
- Press in a new oil seal. The oil seal should fit freely.
Fortunately for us, the process of replacing the oil seal is carried out without removing the gearbox and you can replace the oil seal on VAZ 2109, VAZ 2110, VAZ 2112, VAZ 2114, VAZ 2115 with your own hands. The oil seal is replaced once every 3 years.
Where is the drive seal located?
Where the drive oil seal is located should be determined in advance. In a VAZ 2110 car, the drive oil seal is located in the clutch housing, and it is not easy to get to it.
A very simple way to replace the internal grenade seal
Grenade seals are divided into left and right, so when changing the seal, be sure to place the left seal on the left side, and the right seal on the right side. The left oil seal is brown (it is on the driver's side), the right oil seal is black (the passenger's side).
Photo. Internal grenade seals.
The first thing to do is to lift the front wheel on a jack; on the side on which you are going to change the oil seal, be sure to place a stump or bricks next to the jack for insurance. Remove the wheel and unscrew the hub from the ball.
Photo. The arrow shows which bolts need to be unscrewed to disconnect the hub from the ball, there are two of them with a wrench head, seventeen.
All that remains is to pull the grenade out of the box, here’s the most interesting thing, you can pull directly on the brake disc, trying to pull the grenade out of the box, if the grenade pops out well, or the drive may pop out from the internal or external grenade, then it’s an extra hassle to put the drive in place.
Photo. Removing the internal grenade using a pry bar and tube.
Backstage repair
The gearbox linkage is an element of a multi-lever assembly, which is designed to connect the gearbox lever and the rod that fits the power unit. In Niva Chevrolet cars, the rocker is located under the bottom of the vehicle, next to the cardan. This component is susceptible to contamination and the formation of moisture on it, which over time can deteriorate the quality of lubrication of rubbing parts. As a result, parts begin to wear out, which can subsequently lead to various problems.
Chevrolet Niva car - 2013 model
As stated above, the rocker is an integral part of the transmission system in Niva Chevrolet cars. Compared to other components of the transmission system, the rocker, which is also commonly called the gearbox control rod, is a relatively simple mechanism in its structure. However, for correct operation, the condition of the scenes should also be given special attention.
Pulling out the internal grenade from the gearbox. Video
Therefore, it is better not to try to tear the grenade out of the box by pulling the brake disc, but to insert a prybar under the grenade and a tube under the prybar, try to squeeze the grenade out of the box if it was squeezed out perfectly. It happens that a grenade cannot be squeezed out, then it is knocked down with hammer blows.
Photo. Removed grenade from the gearbox.
But before squeezing out the grenade, place a container to collect the oil; it can be made from an old canister by cutting a hole. If the oil in the box is normal, then it will definitely flow out of the box.
Lada 2114 2007 - breakdown
Cars for sale
Lada 2114 Samara, 2006
Lada 2114 Samara, 2012
Lada 2114 Samara, 2005
Lada 2114 Samara, 2010
Comments 47
What is the cardan for? If it’s not a secret)
Installation
It is better to purchase a new gear shift knob from Kalina, although some car enthusiasts prefer the “native” element from the VAZ-2114. Replacing the backstage with a new one happens like this:
- A platform is removed inside the car, blocking access to the gearbox and transmission. The platform is secured with 5 bolts that need to be unscrewed.
- Next, the clamp that presses the cardan and the rocker is loosened.
- The boot is removed from the gearbox hinge and the fastening is removed.
- The next installation step depends on which backdrop was chosen - standard, from VAZ-2114 or from Kalina. When installing a VAZ-2114 wing, the part may not fit into the seat, so you will have to solve the problem with the help of an angle grinder.
- The size of the cardan must be determined using the standard part. After adjustment, you need to check that there is no runout on the body. If everything is normal, you can tighten the clamp.
- Next comes the adjustment of the new part. You need to shift the gear to reverse gear by placing the lever in position R. It is best to install the lever closer to the driver's seat. After replacement, you can test the new link on the road.
Do-it-yourself short-throw scaffold
A similar device can be installed on any VAZ car (both classic and front-wheel drive) with your own hands; below are examples of how this is implemented.
Short-stroke link for classics
For production in this case you will need:
- a piece of pipe with a diameter of fifteen millimeters;
- nut from a classic ball nut;
- RPP from 2108;
- backstage repair kit 2108 (axle and two bushings);
- cardan from the steering mechanism 2104, 2105 or 2107.
The work is performed as follows:
- The ball from the bottom is cut off from the RPP;
- The lower part is sawed off so that a pipe can be inserted into it and scalded;
- The nut is welded to the pipe from below;
- The ball is placed in a convenient place;
- The cardan is attached to the gearshift lever.
Backstage adjustment
Step-by-step instructions on how to adjust the rocker on a VAZ 2114:
- Loosening the nut located on the clamp;
- Adjusting the position of the lever (at this stage you need to place it in the reverse position, and then tighten the nut on the clamp;
- Checking the gear engagement (here you need to carefully monitor the position - if the left side prevails when engaging reverse gear, then you need to smoothly move the cardan counterclockwise; if, on the contrary, the speed has “gone” to the right, then you need to turn it clockwise).
The correctness of the result of the adjustment process can be easily verified. To do this, you just need to install the lever in the middle. If everything was done correctly, the neutral gear will engage.
Advice! Watch the position of the lever itself. When installed correctly, the part will move freely. If it still interferes with the passenger or driver’s seat, then re-adjustment is required.
Sports
We noted that for the VAZ 2114 you can install a sports short-throw rocker . Outwardly they are quite similar, but the difference in work is felt immediately. On a sports unit, gears shift faster and smoother. It's all about the design of the backstage itself. Unfortunately, it is precisely because of this that the process of independent replacement becomes almost impossible.
Sudden changes in the weather? Is it uncomfortable to drive on winter tires? Find a quick replacement where they sell used tires.
Nobody argues that it is better to own a new car. Everything is good, it works well, all the functions included in this car by the manufacturer are present, nothing rings, does not knock, etc….
But after a few years of active use, problems begin, small at first, then more and more. But today, I would like to talk about such a thing as play in the gearbox of a VAZ car. This “disease” plagues cars of the entire front-wheel drive family. For a more convenient location of the gear shift lever you have to pay by adding new parts to the design of this unit, and accordingly more parts means more breakdowns :).
For VAZ models of the classic family, the gear shift lever is installed directly on the gearbox, or more precisely on the drive mechanism of the gearbox forks. This option eliminated any play in the backstage, since it was not there at all. In models with front-wheel drive, such a gearbox arrangement was impossible, so a rocker mechanism was used. It allows you to move the gear shift lever during design, which is a big plus in designing the comfort of a car.