Preparatory work
To adjust the headlights yourself, you need to carefully prepare the car and tools. This will help you avoid distractions while working and reduce adjustment time.
Finding a location is an important step. The site must meet the following requirements:
- to be level;
- be in a dark place without unnecessary glare from flashlights;
- the site must have a flat wall, gate, fence, garage door.
All of these factors affect the accuracy of the adjustments. High-precision adjustments can be achieved without special optical instruments only if all instructions are followed.
The car is prepared as follows:
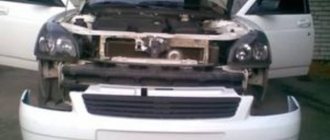
- Using a high-pressure washer, all dirt is washed off from the body and fender liners.
- The luggage compartment is cleared of all unnecessary items. If the spare wheel is missing, it must be replaced.
- The fuel tank is filled to the cut-off point.
- The tire pressure is checked and adjusted to the standard values of 2.0 or 2.1 bar.
- The optics are inspected for cracks, chips and defects on the surface of the glass and reflector.
You should also check the attachment of the headlights to the body. If free play is detected, the optics must be firmly tightened with standard bolts. A faulty part with cracks and other defects must be replaced, since broken glass refracts rays and blinds oncoming drivers.
To work you will need tools:
- rag;
- thick fabric or cardboard;
- cleaning composition for windows;
- felt-tip pen;
- roulette;
- construction level;
- a shoe or stick to support the wheel.
To independently adjust the light on a VAZ 2114, 2115, you do not need special tools. The built-in plastic thumbwheels on the back of the optics are easy to scroll with your fingers.
How to adjust headlights on a VAZ 2113-VAZ 2115
Note! In fact, the headlights are very easy to adjust on these cars, but if you take the classics, then in order to adjust the headlights there, you will need to take a screwdriver and turn the adjusting screws with it, but on cars of the Samara 2 family everything is simple, you only need put on gloves so as not to get dirty and also stock up on chalk, this is necessary to draw a diagram on the wall on which you will adjust the headlights, if you don’t understand something, if you have a question: “What kind of wall is needed and why draw a diagram on it ? then in this case, just read the instructions further and you will understand everything!
1) Before you start making adjustments, think about how you will do it (Correctly or by eye), if by eye you don’t need to draw any diagram, just twist the screws and that’s it (More on these screws a little later), if you want the beam correctly direct the headlights, then in this case, first find a flat surface on which you can place the car (Asphalt is best) and opposite this surface there should be a strictly vertical wall, as you see in the photo below, you will need to park the car from this wall at a distance of 5 meters (In addition to the wall, you can use sheets of plywood or anything else that comes to your mind), then with chalk, draw three vertical lines on the plywood or on the wall, one of these lines is as you can see from the photo should be in the very center (In the central part of the front of the car) and go all the way to the bottom (Line “O” is this), the second lines are the side ones (They should be drawn strictly from the center of the headlights) in the photo they also have the letters “A” " and "B" are indicated, the same thing is indicated by the horizontal line 1, which should also be drawn starting from the center of the headlights, and the last line is the horizontal number 2, which is indicated, it should be drawn just below the first line (at 650 mm).
Note! But there is one But! Before you start all this adjustment, so that it is more accurate, first check how much your tires are inflated, if necessary, inflate them to the desired level, in addition, wipe off all the dirt from the headlights so that they shine well, and also refuel the car (If not opportunity to completely fill it up, then at least fill half the tank) and put your friend or someone weighing approximately 75 kilograms behind the wheel, and finally, rock the car from the side so that the suspension springs are installed!
Oh yes, what else needs to be done, set the headlight hydro-corrector knob to the one-driver position (This is the number 0), below we have attached a photo in which the hydro-corrector knob is indicated by a red arrow (This was done for those who do not know what it is headlight range control), you will need to turn this knob to position 0, unfortunately it is not visible in the photo, because this number is on top and the upper part of the panel is covered, besides, in the photo everything is shown using the example of a VAZ 2110 car and not a VAZ 2114 , so this corrector knob you have is slightly different, but we will explain to you in a nutshell where it is located, namely, it is located on a car with a VAZ 2114 torpedo near the deflector on the left side (If you sit in the driver’s seat), there is another one near this corrector there is a handle, you will immediately find it after you sit in the driver’s seat of your car!
2) Now let’s move on to the adjustment itself, first close one headlight of your car (using a black rag, you can) and then proceed to adjusting the headlight that is not covered with a rag; to adjust it, open the hood of the car and on the back side of the block - headlights, find two manual screws, one of which is needed to adjust the light beam along the vertical plane (This is screw 1), and the other along the horizontal plane (This is screw 2), do not touch everything that is indicated by numbers 3, 4, 5 in the photo, so using these screws, adjust the headlights in the way shown in the photograph (meaning in the diagram) just above, namely, pay your attention especially to the points “E” that appeared by passing lines (“A”, “B”) and line "2". Additionally Both of these car models can be said to be completely identical
Additionally Both of these car models can be said to be completely identical.
Step-by-step instruction
Adjusting the headlights of a VAZ 2114 or 2115 with your own hands is a simple procedure. With proper preparation of the car, you can achieve optimal results that will not differ from adjustments on an optical machine.
Before setting the headlights, an auxiliary diagram is drawn. To do this you need:
- Install the VAZ 2114 at a distance of 5 meters from the wall. The measurement is made strictly from the headlight glass.
- The height of the lamp relative to the asphalt is measured with a tape measure.
- The value is marked on the wall with a horizontal line.
- A vertical stripe marks the center of the car.
- From the horizontal mark, an indentation is made downwards by 65 mm and a mark is made where the cut-off strip should be located.
- To identify the center of the beam, the transition points into daws are used.
- The centers of the jackdaws are marked on the wall with vertical lines, the distance between which should be 964 mm.
A schematic sketch is recommended by the manufacturer as the most accurate method for adjusting the optics.
Headlight adjustment:
- Turn off the car engine.
- Turn on low beam.
- Set the headlight hydraulic adjustment lever to position 0.
- Open the hood.
- Cover one headlight with cardboard or a thick rag. This improves the visibility of the beam boundary.
- Using the built-in screws, adjust the direction of light first on one headlight, then on the other.
- Rock the car and check that the settings are correct again.
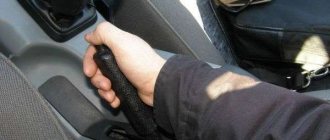
When performing work, the vehicle must be without passengers. You can put a load weighing 50-70 kilograms on the driver's seat, but this is not necessary. Installation on the handbrake often changes the position of the body relative to the road surface, so you should use a wheel support or a regular stick.
By adjusting each headlight separately, you can achieve the most accurate result of the beam position. Correctly configured VAZ optics will not blind oncoming traffic participants and provide high-quality illumination of the road surface.
Adjustment of headlight elements
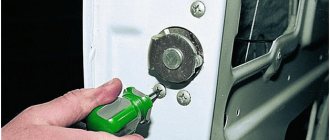
The headlights on the VAZ 2114 are adjusted using the built-in system for changing the angles of the reflector. The screws that regulate the position of the light beam are located on the back of the optics in the upper corners.
To raise the beam, you need to turn the regulator located closer to the direction indicator. To adjust the headlight in a vertical position, you need to use the lever, which is located below and located next to the radiator grille.
Adjustment process
How to properly adjust the headlights on a VAZ 2114? Moving on to this stage, it is worth having on hand the equipment that will be needed during the work process:
- Clean rag;
- Window cleaner;
- Cardboard or thick fabric.
After preparation, you can begin setting up the VAZ 2114 headlights:
- Turn off the car, as engine operation may create unnecessary vibrations.
- Turn on the low beam.
- Inside the car, move the corrector lever to position 0.
- Cover one element with cardboard or a rag prepared in advance.
- Use the built-in screws to adjust the direction of the light. Number 1 regulates in the vertical plane, and 2 in the horizontal plane.
- Rock the car to make sure the light is adjusted correctly.
- Using the same steps, adjust the light of the second element.
Try to completely rely on the instructions described in this article, and then you will be able to adjust the headlights correctly and as accurately as possible.
Interesting : DIY taillight tuning
Setting the fog lights
Adjusting the fog lights involves several steps:
- vehicle preparation;
- drawing up a diagram;
- adjustment.
The preparatory steps are no different from the actions performed before adjusting the main headlights. The fog lights should be clean, the tires should be inflated, and the trunk should be empty.
When setting up fog lights, you should use a special diagram that you create yourself. This requires:
- Place the car at a distance of 5-10 meters from the wall.
- Measure the height of the center of the headlight and mark it with a line on the diagram.
- Transfer the marks of the center of the car and the fog lamps to the wall.
- Draw a line 10-12 centimeters below the height mark of the fog lights.
To adjust the optics, you need to turn the screw until the beam reaches the level marked on the plan. If the headlight cannot be adjusted, you should clean the bolt head and inspect it for souring. You can use WD-40 aerosol to lubricate the parts. If the bolt rotates but the reflector remains in place, you will need to dismantle the fog lamp and check the integrity of the mechanism.
Adjusting the fogs
Adjusting the fog lights is almost no different from the main light elements, the only thing is that you need to make some adjustments to the diagram that we depict on the wall in front of the car:
- With the car installed 5 meters away, we measure the height from the asphalt to the PTF.
- We transfer the measurement to the wall in front of the car, drawing a horizontal stripe.
- From the strip from the last step we retreat downwards by 65 mm.
- Mark the center of the car with a vertical line.
- The distance between beam centers is 908 mm.
Ultimately we will get this picture:
You can adjust the fog lights yourself by covering each fog light one by one with cardboard or a rag, using the adjusting bolt to set them according to the diagram.
The screws that adjust the position of the light beam may be located under the plastic trim, so it will have to be pulled out of the bumper before you have access to the adjustments.
Types of lights on the VAZ 2114
It is very easy to adjust the headlights on a VAZ with your own hands. The design allows adjustments to be made without removing additional plastic elements and the battery.
The VAZ 2114 uses the following types of light sources:
- anti-fog;
- near;
- further.
Adjustment of low and high beam is carried out using two built-in screws located in the main optics housing.
To adjust the fog lights, you do not need to remove the bumper. The screwdriver is placed in a special hole in which the bolt is located.
Adjusting headlights VAZ 2114 VAZ 2115
In order for the driver to clearly see the traffic lane in front of him, cars are equipped with light sources:
- near – shines through 30 - 40 m. Prevents dazzling drivers of oncoming vehicles;
- distant - 130 - 150 meters. Includes only outside cities, villages, towns;
- anti-fog - equipped with yellow lamps, illuminates the path under the border of bad weather factors.
The luminous flux of the optics is directed towards the roadway and the side of the road. Adjusted lighting source devices make it possible to timely detect road signs, obstacles, and markings. Adjusting headlights 2114 is a necessary procedure.
Timely detection of road signs is made possible by adjusted lighting source devices
Must be performed after:
- purchasing a used car;
- replacing light sources;
- installation of other types of devices;
- repair of the landing site;
- lack of proper road lighting.
How to identify problems with optics
The need to adjust the light will be required in the following cases:
- lamps shine strongly up or down;
- the beam is shifted to one side;
- uneven brightness of headlights when inspecting the car;
- insufficient light intensity, a clear jackdaw is not visible;
- One of the headlights does not work.
The tuned optics of the VAZ 2114 or model 2115 cope perfectly with any weather conditions. To identify deficiencies, a visual inspection of the performance of the lamps should be carried out once a week, and adjustments should be made at least once a season.
Headlight hydrocorrector
During operation of the vehicle, depending on its load, the condition of the vehicle itself and the suspension, the direction of the light flux may change. To correct it, a hydraulic corrector is installed on the VAZ 2114 (the author of the video is Pavel V. M.).
Design and principle of operation
The device is a non-separable device that regulates the position of the light beam by changing the fluid pressure inside the nozzles. The unit cannot be disassembled, so if it breaks, it is replaced with a new device.
The design of the corrector consists of the following elements:
- master cylinder;
- working fluid;
- pipes containing liquid;
- cylinders
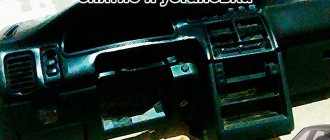
The headlights are adjusted using a hydraulic corrector by the driver using the corrector wheel located on the dashboard. By turning the wheel you can raise or lower the lamp.
Corrector wheel in the cabin
Features of DIY repairs
You can calibrate the corrector yourself using the instructions that come with it.
Before changing the device, you should find out the cause of the malfunction and try to restore the functionality of the hydraulic corrector. To do this, you must first inspect all the tubes and elastic bands; no defects are acceptable. If there is no leak, the cylinders are inspected and the stroke of the rod is checked. If the measures taken do not bring the device into working condition, then it is possible that the main unit is faulty and the hydraulic corrector needs to be changed.
Hydrocorrector of headlights VAZ 2114
Installation and modification
To install a new corrector, follow these steps:
- Having loosened the clamps, remove them from the pipes with the working fluid;
- in the cabin we dismantle the handle on the main cylinder;
- Having unscrewed the mounting bolts, remove the main cylinder;
- At the last stage, we remove all the working cylinders and take them out through the interior.
Refinement and repair of the headlight hydraulic corrector consists of checking the position of the adjusting bolt. It must be set so that the light can be adjusted with minimal effort.
Instructions for replacing the corrector
Many drivers want to tune their car. You can tune your car with angel eyes and eyelashes on the headlights. Tuning headlights is upgrading the corrector. To do this, replace the standard hydraulic headlight corrector with an electric corrector. Having removed the headlight on the VAZ, change the bulbs. After performing tuning on a VAZ 2114 car, replacing the headlight glass, you should adjust the optics.
Electric corrector installation kit
Replacing the VAZ 2114 headlight hydraulic corrector consists of the following steps:
- The car's power is turned off by disconnecting the negative terminal from the battery.
- Next, the main cylinder is unscrewed, and then the device is removed along with the lever.
- The O-ring is replaced.
- An electrical corrector is screwed into its standard place.
- Next, the negative wire is connected to the car body, and the positive wire is attached to terminal “20” on the cable block.
- The wiring is then routed to the headlight motors.
Thus, knowing how to remove the headlight to replace the optics, as well as how to adjust the light on a VAZ 2114 with your own hands, you can achieve ideal road illumination. A properly adjusted light will not blind drivers on oncoming traffic.
How to prepare for work
Before adjusting the VAZ 2114 headlights, you will need to perform a number of preparatory operations. First of all, prepare the car - to do this, follow the following algorithm:
- Inflate the tires and make sure that the air pressure in them is the same.
- Check the condition of the suspension.
- Fill the fuel tank to the maximum.
- Make sure that the load on all four wheels is distributed evenly.
After making sure that your machine is completely ready to go, find a uniform ten-meter area that rests on a clean, level wall. You will need a wall to mark and draw lines - so make sure you have chalk and masking tape.
Make sure the air pressure in the tires is the same
What to do if the headlights are not adjustable?
If you are faced with the problem that the headlight cannot be adjusted when you turn the adjusting bolt, it means that the hydraulic corrector, which is located in its housing, has failed. Turn the regulator from inside, and if the beam of light does not change its height, then the mechanism needs to be replaced.
The price of the mechanism is on average 500 rubles, and it is better to immediately replace it and adjust the headlights.
Understanding the question “how to adjust the headlights on a VAZ 2114,” we can conclude that optics are an important element, especially at night. It not only makes the car visible, but also allows the driver to assess the traffic situation around him. When the optics are not adjusted correctly, the driver can dazzle other road users, creating an emergency situation on the road. It is recommended that light fixtures be adjusted once a year during vehicle maintenance (of course, if this mechanism is not being replaced, then the adjustment should take place immediately). Proper adjustment at home will help ensure safe driving in the dark.
I ordered myself an ultra fashionable new product “Sal-Man 30W Led Fogs”.
They are delivered in the following box:
Packed very well, the fogs themselves look very high quality, the radiator is metal, there is a moisture separator, excellent height adjustment, sealed insulation on the wires (water will not get inside through the wires)
Before starting the installation, I took a photo of how my Bosch fogs with Osram lamps shine:
Now let's move on to the installation nuances: Before starting the installation, I completely screwed the adjustment up (which I did in vain, because the adjustment stroke is very large compared to the Bosch). When I screwed on the fog lamp, its tilt (adjustment) somehow got confused. I found out experimentally that the adjustment on the back side of the fog lamp rests on the fog lamp fastener. I didn’t think long and sawed off an unnecessary piece of plastic:
Perhaps someone who has fog lights installed in their bumper from the factory will have no problems, but I have a factory blank bumper with independent cutouts for fog lights.
When I turned on the fog lights, I expected a “WOW” effect, but I said, “Why the F*ck don’t they light up?” Here we remember a little that for LEDs it is important to connect plus to plus, minus to minus. Therefore, we take the fogs back and change the polarity on the plug:
And actually after that the “WOW” effect came:
The photos show a clear STG, in which these fog lights do not blind anyone.
For those who do not know how to adjust correctly: Find a flat surface and a flat wall at a distance of 5 meters. We measure the distance from the asphalt to the middle of the fog, now we mark this distance on the wall, and use the adjusting screw to lower / raise it to this level. Each fog lamp needs to be adjusted separately. With this adjustment, oncoming cars will not curse you.
Conclusion: after installing these fog lights, I now don’t understand how I drove before, the quality of light is comparable to expensive foreign cars, the only negative is their low location on the car. You can safely drive them up to 60 km/h.
Fog lights are undoubtedly not a superfluous element in a car’s external lighting system. And many owners of VAZ-2114, on which they are not installed, come to the conclusion that it is necessary to install such equipment. Such lighting elements are simply a lifesaver in conditions of poor visibility and poorly lit roadside conditions.
The video below shows general aspects of adjusting fog lights:
Do-it-yourself headlight repair for a VAZ 2110 – All about Lada VAZ cars
Bogdan 2110 2011, petrol engine 1.6 l., 81 l. p., front-wheel drive, manual transmission - do it yourself
Participate in the discussion can only registered users.
How to replace the headlight on a VAZ 2110-VAZ 2112?
Note! To avoid short circuits when working with electrical appliances, we recommend that you remove the negative terminal from the battery; for information on how to do this, read “Here in this article,” point 1!
Preparatory processes
Before setting up the VAZ 2114 headlights, you need to take the following steps:
- remove from the machine and disassemble;
- check integrity;
- wash the headlights outside and inside;
- dry before assembly.
Attention! After washing there should be no soap stains left. Headlight glasses must be clean.
It is necessary to carry out preparatory measures before adjusting the headlights of the VAZ 2114
- create the same operating pressure in all tires;
- check the serviceability of the suspension;
- fill the gas tank;
- remove excess weight.
Adjustment methods:
- service station professionals;
- use of specialized equipment;
- on one's own.