10.12.2019
| (Votes: 1, Rating: 5) |
Issues discussed in the material:
- What is on the Hyundai Solaris - a timing belt or chain
- After what actual mileage should diagnostics be carried out?
- What signs indicate a timing belt malfunction?
- How to correctly change the timing belt in a Huyndai Solaris
- What is the opinion of car owners about the timing belt in Solaris
How to properly replace the Hyundai Solaris timing chain? Even experienced car mechanics ask this question. Today we will consider the issue of repairing the Hyundai Solaris timing belt. On cars produced in Russia, a chain is installed instead of a belt. This significantly increases the mileage of the engine until the moment when you need to pay attention to the gas distribution mechanism, but accessing it and replacing it causes certain difficulties, which we will learn about below.
Timing device in Hyundai Solaris
The timing mechanism is an engine system responsible for accurately distributing the air-fuel mixture among the chambers, performing compression strokes and removing exhaust gases after combustion. Essentially, it synchronizes the operation of all translational and rotational movements in the engine. And so that the engine of your Solaris does not die for a long time, it is important to monitor the condition of the Hyundai timing mechanism. Since there is no visual access to it, you should simply adhere to the recommended service interval.
Many motorists believe that their Hyundai Solaris has a timing belt installed as a drive, which is incorrect. The Korean concern has practically stopped producing belt-driven cars. Although you can find motors with a belt mechanism, this is still a rarity, and to a greater extent, the owners of Hyundais call them out of habit.
Advantages of a timing chain:
- The Hyundai Solaris timing belt is absolutely isolated from the influence of external adverse conditions, such as moisture, dirt, etc., and the chain does not need to be replaced.
- On average, the mileage on a working chain is 5 times longer than the service life of the belt.
- The only thing that can break it in Solaris is an engine that jams while driving. During normal engine operation, its rupture is excluded, only some stretching is possible, so it usually does not require replacement.
- The chain is more protected from excessive motor overloads, unlike the belt.
- Solaris phase shifters in the chain version of the engine are more reliable and simpler in design.
Work order
When all the spare parts have been collected and the necessary tools have been prepared, you can begin the replacement process:
- Place the car on a lift or inspection pit.
- To avoid damage to electrical appliances, it is necessary to disconnect the positive terminal of the battery before starting work.
Unscrew the cylinder head cover, remove the gasket and remaining sealant. Before installation, it is recommended to replace the gasket and apply new sealant to the mating surfaces.
- Remove the engine protection, if present.
- Rotate the crankshaft pulley clockwise using the head and knob to set the TDC of the first cylinder.
- Drain the coolant; the procedure takes about 15 minutes.
- Drain the engine oil.
- Support the engine from below with a hydraulic jack.
- Unscrew the fastening of the right engine mount to the cylinder block.
- Jack up the engine to remove the right mount.
- Place a reliable stop under the internal combustion engine and secure the wheels to prevent the vehicle from rolling away.
Using a spanner, it is necessary to loosen the poly V-belt tensioner, secure it with a thin rod, and remove the belt from the auxiliary pulleys.
- Unscrew the power steering pump mount and move it to the side.
- Unscrew the tensioner mounting screw.
Important! The tensioner fastener has a left-hand thread; it must be unscrewed clockwise.
- Remove the poly V-belt tensioner.
- Unscrew all the fixing screws of the engine support bracket on the right side.
- After dismantling the bracket, you need to remove the bolt securing the idler roller of the poly V-belt and dismantle it.
- Remove the four bolts securing the coolant pump pulley.
- Unscrew the screws securing the coolant pump to the cylinder block.
- Remove the coolant circulation pump.
- Remove the coolant pump gasket and clean the surface of any traces of old sealant. Before applying a new one, the surface must be degreased.
- Unscrew the bolts securing the crankshaft pulley and remove it.
- Disconnect the generator wiring harness.
- Unscrew the fixing nut and remove the generator.
- Unscrew all the fixing screws of the timing cover and remove the cover.
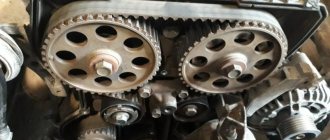
- Place marks on the chain that coincide with the marks on the crankshaft and camshaft gears.
- Unscrew the drive tensioner and remove other mechanisms.
- Remove the chain.
- Transfer the marks to the new spare part.
- Install a new chain, checking that all marks match.
- Remove traces of old sealant and apply new one.
- Install a new drive chain tensioner.
- Screw on the shoe.
- Pull out the hydraulic tensioner clamp.
- Check the tension and alignment of the marks on all gears.
- Screw on all parts of the gas distribution mechanism and damper.
- Close the timing drive cover.
- Tighten the bolts securing the cover.
- Assemble the remaining parts of the internal combustion engine, following the reverse procedure.
Read more: Mercasol anti-corrosion products - features and principle of operation
After assembling the engine, it is necessary to fill in engine oil, replace the filter and add antifreeze. Place the positive terminal on the battery and start the engine. If all work is carried out correctly, there will be no problems starting the internal combustion engine.
Tired of paying fines? There is an exit!
Forget about fines from cameras! An absolutely legal new product - Traffic Police Camera Jammer, hides your license plates from the cameras that are installed in all cities. More details at the link.
- Absolutely legal (Article 12.2);
- Hides from photo and video recording;
- Suitable for all cars;
- Works through the cigarette lighter connector;
- Does not cause interference to radios and cell phones.
When is it necessary to replace the timing chain in a Hyundai Solaris?
According to the operating instructions, replacing the Hyundai Solaris 1.6 timing chain is not provided. The designers expect that this element can last the entire service life of the motor, and replacement may only be required in the event of a major overhaul of the engine.
In reality, some experienced car owners or service station workers will tell you exactly how many km the Hyundai Solaris 1.6 timing chain needs to be replaced. It serves 250–300 thousand km on average. When overcoming such mileage values, the chain usually stretches beyond the permissible values and it is recommended to replace the gas distribution mechanism drive.
We recommend
“What is the difference between timing belts: their types and features”
More meticulous Solaris car owners have the opinion that their replacement is still needed after 90–120 thousand km of operation. Or at least it’s worth carrying out preventive timing control.
Reasons for early wear:
- Extreme operating conditions for Hyundai: towing heavy trailers and other vehicles, transporting heavy loads, driving on dusty or unpaved roads in muddy conditions, in winter. And, of course, long trips at high engine speeds and too dynamic acceleration lead to increased loads on the timing belt and chain stretching and will speed up the need to replace it.
- The timing mechanism is located inside the engine block and, being in constant contact with engine oil, is very sensitive to its quality. If you fill in good synthetic oil that has specialized detergent additives, this will help to significantly increase the service life of the Solaris timing belt.
- When the timing belt is functioning properly, mechanisms that regulate the force and degree of chain tension are involved in its operation, but sooner or later they will wear out and will require replacement. These are consumables and must be replaced periodically. When carrying out maintenance of the Hyundai Solaris, it is necessary to inspect and monitor the tensioner and damper for wear and serviceability. Failure to do this in a timely manner can result in chain links stretching and possibly jumping on the sprocket teeth.
It is worth noting that the owners of Hyundai Solaris were lucky that the manufacturer nevertheless refused to use a timing belt. Motors of similar volume and power with a belt in other cars need to be replaced already at 50–60 thousand. The chain is a fairly durable element, and does not indicate its routine replacement at all in its service books.
But it is still worth paying attention to the following prerequisites, which may indicate the need for a technical inspection of the timing belt condition and possible replacement of the chain (if necessary):
- The fuel consumption of your Solaris has increased.
- The craving is gone.
- When the car is running, a metallic knocking or clanging sound is heard from under the hood.
- The car has completely stopped and does not want to start, and the starter seems to spin more easily than usual.
- The Hyundai engine is unstable at idle or under load.
- Shots occur in the exhaust or intake manifold or exhaust pipe.
The above malfunctions may indirectly indicate that the valve timing is out of order, the chain tension has loosened or it has completely broken and needs to be replaced. If one or more of the described problems occurs, you should immediately contact the service.
How is wear determined?
Now let's talk directly about how to understand or how to find out that the timing chain assembly has worn out and needs to be replaced. Diagnosing and understanding the signs of wear and tear will save you from costly repairs.
Similar problems can happen on any machine, be it:
- Volkswagen Polo Sedan 1.6;
- Kia Sportage;
- Volkswagen Tiguan;
- Kia Rio;
- Skoda Yeti 1.2;
- Hyundai Solaris;
- Hyundai Elantra;
- Kia Spectra;
- Volkswagen Jetta, etc.
But if you look into the regulations for the maintenance and operation of some cars, you will, to your surprise, find that on many cars the plant does not provide for replacing the chain at all during the entire operating period.
That is, replacement is not carried out at a certain interval. But this is only possible under ideal operating conditions, which are almost impossible to achieve.
Experienced motorists advise changing the chain approximately every 100 thousand kilometers. This is a normal resource for a quality part.
But it’s best to start from the characteristic signs indicating wear. Namely:
- When starting the engine or idling, the engine runs rough and intermittent;
- There are strange sounds coming from the engine. Moreover, they are heard most clearly at idle with low oil pressure. The knock is characteristically metallic;
- During the diagnosis, a strong output of the chain tensioners is noted, as well as characteristic signs of wear on the sprocket teeth.
But that's not all you need to know.
"Hyundai Solaris" - replacing the timing chain: step-by-step instructions
One of the common timing problems at long mileage in Solaris is chain stretching, which leads to disruption of the engine operating phases. Often the problem is solved by replacing it with a new one.
This is quite labor-intensive, so initially you need to make sure that this is the problem. Computer diagnostics and an oscilloscope will help with this. The mechanic will take an oscillogram at different operating modes of the power unit and compare it with the reference one. On the graph, an experienced diagnostician will see deviations in the valve timing angles and the possible need to replace the drive. Using the oscillogram, you can quite accurately identify the cause of problems in the timing belt.
What tools and accessories may be needed if replacement is necessary:
- Container for draining oil.
- Collars and heads.
- Socket wrenches.
- Rags, rags.
- Mount.
- Hammer, screwdrivers.
- Pliers.
- Hydraulic jack.
Replacement work is carried out on a cooled motor. They can be combined with any interventions in the engine, for example, with adjusting or checking the thermal clearances of the valves (if the modification of the power unit provides for this).
- Before any work, it is advisable to disconnect the negative terminal from the battery. Then you should unscrew the protection (usually on three bolts) and drain the oil from the engine crankcase.
- Empty the cooling system of antifreeze by draining it into a clean container for further possible use.
- We remove the valve cover of the Hyundai Solaris, having previously unscrewed its fastenings with a wrench.
- We support the Hyundai Solaris engine with a jack, placing a board under the paw. Then you need to unscrew the engine mount bracket from the side where the timing belt is located.
- We remove the generator belt by loosening the tensioner.
- Unscrew the power steering pump mount and move it to the side.
- Now that we have access to the tensioner, unscrew it (clockwise, since the bolt thread is left-handed) and completely remove it from the cylinder block.
- Then you can use a socket wrench to unscrew the bolts (4 pcs.) of the right motor mount bracket and remove it.
- Unscrew the bolt securing the support roller. The pump pulley is secured with four bolts to prevent rotation. Let's take it off.
- The pump is bolted to the motor with 5 bolts. It can be removed by prying it off with a flat screwdriver.
- The fastening of the belt drive pulley is unscrewed with a socket wrench (if your Hyundai Solaris has a manual transmission, you can engage 5th gear and press the brake; if the car has an automatic transmission, you will need a special tool to secure the pulley from turning).
- You can tear the pulley off the crankshaft by using a pry bar to undermine it from different sides.
- We remove the generator. First, you need to disconnect the block with the wires by pressing the chip lock, and using a spanner wrench, unscrew the nuts securing the power wires from the contact pin of the Hyundai Solaris generator.
- We unscrew the bolts (top + bottom) securing the generator to the bracket legs, and the generator is free.
- The remaining bracket must be removed from the engine by unscrewing the 2 mounting bolts.
We recommend
“Replacing the timing belt on a Skoda Octavia” Read more
- The timing cover is secured to the cylinder head with 14 bolts, which can be unscrewed in any order. We remove the timing cover.
- Now it is important to set the TDC (top dead center) of the piston in the first cylinder, while you can navigate by the marks on the shafts.
- The chain tensioner is fixed with a pin. In this case, the shoe must be pressed out with a screwdriver. The tensioning device is attached to 2 bolts, remove it.
- Now you can freely remove the timing chain from the camshaft sprockets and crankshaft. We carefully remove it from the engine.
- We evaluate the condition of the chain and shaft sprockets for wear on their teeth and the need for replacement.
- Then you can clean the adjacent surfaces of the cover and block with a rag containing gasoline or some kind of solvent. We also wash the tensioner and clean its seat.
- It is advisable to replace the crankshaft oil seal along with the timing chain in parallel.
- We mount the new timing chain for the Hyundai Solaris on the sprockets without knocking off the marks (its modern versions have marks marked with paint).
- We put the tensioner in place, having previously coated the contact surface with sealant.
- Tighten the two fastening bolts back. After removing the locking pin, the chain will stretch back to normal.
- We control the position of the valve timing marks in accordance with the requirements for the Hyundai Solaris engine. The locating pin should be at TDC.
- Apply a small layer of sealant to the mating surfaces of the valve cover and cylinder head. All gaskets need to be replaced.
- We put everything back together.
- Tighten the bolts.
We perform further assembly in reverse order.
The list of works is intimidating only at first glance, but if you have experience and tools, it will not take much time and labor. If the above procedures are strictly followed, all operations will be completed in 3–5 hours, even in garage conditions. But the owners of the Hyundai Solaris should not relax and it is advisable to always carry the tensioner in the trunk, since its failure may leave you spending the night in the middle of the road, far from civilization.
Design features of the chain engine on Solaris
As practice has shown, the power unit copes well with the loads placed on it. With timely maintenance, no early breakdowns were identified ( according to the service book up to 180 thousand km ).
Engines of the Gamma type, which replaced the Alpha model range in 2010, are equipped with an aluminum block and do not have hydraulic compensators.
A characteristic disadvantage is increased oil consumption . The valves are adjusted after 100 thousand kilometers or when there is a sharp increase in noise under the valve cover.
From the technical characteristics, sufficient power stands out (for 1.6 l) - 123 l. With. and 6000 rpm, as well as the presence of 16 valves . The DOHC gas distribution system is quite reliable. There is no chance of the chain slipping under critical tension. The displacement of the cylinder axis relative to the crankshaft helped reduce the load on the piston skirts.
The convenient location of the intake and exhaust manifolds also deserves attention. When servicing a nearby injector, convenient access is ensured.
How to determine the country of manufacture of the engine
This engine is made in China. Basically, these were the models that were imported into the Russian Federation.
The company's factories are located not only in Korea, but also in different parts of the world. There is a strict technical quality control system everywhere. It doesn't matter whether it's China or the USA. To accurately determine the place of production, just look at the VIN code marking. The last letter in the row indicates the country of assembly:
- Korea (A – Asan; H – Hwasung; P – Poseung; S – Sohari; U – Ulsan).
- Turkey (T – Izmit).
- USA (K – Montgomery).
- China (B – Beijing; W – Shandong).
- India (M – Chennai).
- Slovakia (Z – Zilina).
Part selection and price for replacing the Hyundai Solaris timing chain
Timing chain - non-original, tensioner timing block "Hyundai"/"Kia" 243212B000. Price – 1400 rubles.
Originals - timing chain and tensioner from / "KIA" number 2441025001. Cost - 3000 rubles.
There are many analogues of these consumables at a better price and good quality.
Replacing the timing chain on a Hyundai Solaris 1.6 at the price of work on average can cost, depending on the cost of a standard service hour, from 5,000 to 15,000 rubles. Duration 3.5–4 hours.
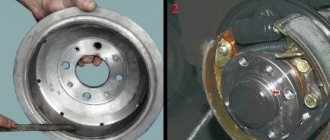
Timing chain tensioner:
Timing guide pulley:
Work order
When all the spare parts have been collected and the necessary tools have been prepared, you can begin the replacement process:
- Place the car on a lift or inspection pit.
- To avoid damage to electrical appliances, it is necessary to disconnect the positive terminal of the battery before starting work.
Unscrew the cylinder head cover, remove the gasket and remaining sealant. Before installation, it is recommended to replace the gasket and apply new sealant to the mating surfaces.
- Remove the engine protection, if present.
- Rotate the crankshaft pulley clockwise using the head and knob to set the TDC of the first cylinder.
- Drain the coolant; the procedure takes about 15 minutes.
- Drain the engine oil.
- Support the engine from below with a hydraulic jack.
- Unscrew the fastening of the right engine mount to the cylinder block.
- Jack up the engine to remove the right mount.
- Place a reliable stop under the internal combustion engine and secure the wheels to prevent the vehicle from rolling away.
Using a spanner, it is necessary to loosen the poly V-belt tensioner, secure it with a thin rod, and remove the belt from the auxiliary pulleys.
- Unscrew the power steering pump mount and move it to the side.
- Unscrew the tensioner mounting screw.
Important! The tensioner fastener has a left-hand thread; it must be unscrewed clockwise.
- Remove the poly V-belt tensioner.
- Unscrew all the fixing screws of the engine support bracket on the right side.
- After dismantling the bracket, you need to remove the bolt securing the idler roller of the poly V-belt and dismantle it.
- Remove the four bolts securing the coolant pump pulley.
- Unscrew the screws securing the coolant pump to the cylinder block.
- Remove the coolant circulation pump.
- Remove the coolant pump gasket and clean the surface of any traces of old sealant. Before applying a new one, the surface must be degreased.
- Unscrew the bolts securing the crankshaft pulley and remove it.
- Disconnect the generator wiring harness.
- Unscrew the fixing nut and remove the generator.
- Unscrew all the fixing screws of the timing cover and remove the cover.
- Place marks on the chain that coincide with the marks on the crankshaft and camshaft gears.
- Unscrew the drive tensioner and remove other mechanisms.
- Remove the chain.
- Transfer the marks to the new spare part.
- Install a new chain, checking that all marks match.
- Remove traces of old sealant and apply new one.
- Install a new drive chain tensioner.
- Screw on the shoe.
- Pull out the hydraulic tensioner clamp.
- Check the tension and alignment of the marks on all gears.
- Screw on all parts of the gas distribution mechanism and damper.
- Close the timing drive cover.
- Tighten the bolts securing the cover.
- Assemble the remaining parts of the internal combustion engine, following the reverse procedure.
After assembling the engine, it is necessary to fill in engine oil, replace the filter and add antifreeze. Place the positive terminal on the battery and start the engine. If all work is carried out correctly, there will be no problems starting the internal combustion engine.
What do car enthusiasts think about replacing the timing chain on a Huyndai Solaris?
1. Don't touch what works.
“The first commandment of the Red Army soldiers is not to interfere with the vehicle while it is moving, and this way the vehicle will not let you down for a long time. Until it rattles and knocks openly. If there are no extraneous sounds, then the rollers and chain are moving properly under the hood. You shouldn't go there. Enjoy the car, don't worry ahead of time. This is the case when you are very lucky that your Hyundai Solaris does not have a belt. There’s no need to worry about replacing it frequently.”
2. It’s easy to determine the malfunction
“How do you know when the timing chain is on its way?”
- The machine itself will inform you with a lighted “check” that the chain is too stretched and the tensioner cannot cope with the large backlash. Using a scanner, you can read the error code and make sure that this is the problem. And this is a signal from the tensioner sensor.
- The computer checks the correct timing of the ignition angles with a stretched chain (even with the Check not lit). In this case, their value deviates from the required one or may be close to critical figures.
- Usually, an experienced mechanic will be able to determine drive stretching by a specific sound coming from the motor (although this is not always the exact cause). If the “verdict” is correct, the corresponding noise will be heard in the engine. The diagnosis for Hyundai Solaris in this case is more obvious.
In general, one of three options can happen, or all points at once, but the angle will shift - this is 100%.”
How to check the condition of the circuit
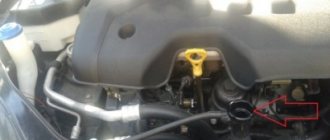
There is a folk method, very tempting and simple, but not working! The owners themselves periodically tell me about it. The point is to reach the chain with your fingers and touch it for sagging. The chain will almost always be slack between the intake and exhaust gears. Unfortunately, it cannot be verified that easily.
The popular way to check the condition of the circuit
The condition can be assessed by the position of the chain tensioner, counting the number of teeth by which it has come out of the housing.
7th tooth - you need to prepare, 8th tooth - it’s time to change
The problem is that getting to the tensioner is not as easy as on other cars. Many engines have a special viewing window; Solaris does not have such a window. Apparently the factory is confident in the chain. To get to the tensioner you will have to remove the valve cover.
You can see how to remove the cover yourself in our video.
Your browser does not support the format
After the valve cover is removed, many suggest checking the condition of the chain by checking its slack. But this method is not indicative.
Ignore the chain slack here.
Let's see how far the tensioner has extended.