Door locks hold the door in a closed position and prevent it from opening spontaneously while moving. The doors should be level, without distortions. The gaps between the door and the body must be the same around the entire perimeter. Otherwise, adjustment of the VAZ 2107 door locks or repair (replacement) of door hinges is necessary.
Important: it is useless to adjust the doors with faulty door hinges. Therefore, if they have play or are positioned incorrectly, the problem must be corrected. The VAZ 2107 doors should be adjusted after replacing or adjusting the hinges. Otherwise, the door will not close easily, even if it is fixed evenly with ideal gaps.
VAZ 2107 door problems
The loose state of the door structure is the main reason for the malfunction of the mechanism. Adjusting the door locks of the VAZ 2107 will correct a lot of problems, but before that, the cause and essence of the breakdown is clarified. Let's list the main problems that motorists face:
- incorrect position of the loops;
- formation of large gaps;
- malfunction of the door handle or lock;
- The backlash is set incorrectly.
After an accident, deformation of the body almost always occurs, even in a minor accident. If the door is moving, then adjusting the hinges will not help.
The procedure for installing doors in the desired position
On a VAZ 2107 car, each of the door hinges is fixed to the pillar with two screws; they must be loosened to move the part. Its position can be accurately adjusted only by releasing the fasteners and with constant monitoring from the outside. The operating procedure is as follows:
- We set the screwdriver to unscrew and with a sharp blow loosen the door fastening.
- Slightly tilt or lift the knot and tighten it in this position.
- We close the door and look from the side and check its position.
We perform the action several times until we obtain a result that suits the owner of the VAZ 2107 car.
When adjustment is needed
Certain symptoms will indicate that door adjustment 2107 is needed:
- The door may sag, sag, or move to the side.
- The appearance of serious gaps along the entire perimeter of the body part.
- Difficulty closing. This action does not occur with a dull sound, but with a loud feedback.
- If the lock does not close well, then the reason is not necessarily the mechanism of this device. Incorrect operation of the closing device is sometimes caused by incorrect door position.
- Displacement of the lock and latch.
- Raising or lowering the structure when closing.
- Poor locking in the closed position due to the latch inside the handle.
- Random door opening while driving.
To visually determine the need for adjustment, you can inspect the car; if there is a problem, it will stick out a little. In order not to rely only on your eye, you can take measurements; they should be the same on both sides.
Vehicle inspection and preparation for work
Incorrect position of the front door, as well as the rear door, can cause it to not be locked correctly. The adjustment begins with a thorough inspection of the car, which is performed in the following order:
Door adjustment involves correcting identified deficiencies by slightly shifting the part in the hinges and aligning the lock and its receiving plate. To perform this operation, you will need an impact and regular Phillips screwdriver, a hammer and a “10” open-end wrench.
Features of adjusting the gap, hinges and lock
You can configure the door in several ways:
- Loosening screws and hinge fasteners using hammer blows.
- Leveling the gap. While the hinges are loosened, the structure rises up and down to its optimal position. Then the fasteners are tightened.
- Adjusting the lock. The key loosens the lock, you can move it up or down. Checks whether the actions were performed correctly. If the door closes with a loud click, then you need to move the latch outward a little more. If the closure occurs well, but the element is loose, go inside.
When the closing mechanism jams and the door sags a little, the hinges or bolts are tightened. If displacement has occurred, a slight tap with a hammer on the body part where the bracket is located will solve the problem.
Reanimating door hinges
Good day everyone!)
For a long time I didn’t like the way the driver’s door closes, the reason for this was the slightly sagging hinges on the driver’s door... It’s not that there was much play, you could have put washers, but do it already). Digesting loops is a lot of hassle. Somehow while driving I came across an article on how to solve the problem without overcooking the loops! I lost the author of the article (I think many will be interested in this procedure)
I will try to describe the process myself, which is actually not complicated.
— We are buying a set of new door hinges.
— Now we need to knock out the pin from the hinge so that the outer part of the hinge can be installed instead of the old one on the door.
— Next, I primed the part we needed with a loop and painted it the color of the car.
- Now we need an impact screwdriver to remove the doors.
My bolts didn’t want to be unscrewed at all, especially the bottom one, I already wanted to drill it out, but everything worked out and the bolt was unscrewed in half with grief! I had the most trouble removing the doors.
— The doors have been removed, then you need to drill out this outer hinge itself
. The bottom hinge had the most play, the top one was almost alive) We take a drill and metal drills, drill small holes first, then increase the diameter of the drill. I drilled something like this: a 4-6-8 drill.
The meaning in the photo is clear, I think, we drill, then knock out the pin as in the last photo. The main thing is not to drill the door)) I adjusted the iron plate. Taking out the hinges
And we install new ones, and hammer in the pin from the new hinges.
Don't forget to lubricate it with something first! graphite for example.
That's all!
I had to take new bolts on the door, install the door, lubricate the bolts with nigrol, so that there would be no such problems with removal later!
We adjust and rejoice). Doors are like new!
There is not even a millimeter of play! They began to close without effort.
On the other doors, my hinges were fine, so for now everything worked out only on the driver’s side) Now I can install the silent Priora locks, which I already purchased.
If anyone has any questions, please ask!
Source
External handles and solving problems with them
If there is no external damage, then you will have to disassemble the element. To work you will need a number 20 screwdriver. Step by step instructions:
- The plug is removed. It is pryed off with the edge of a screwdriver.
- The screw is unscrewed. It is located at a depth of 6 cm. It is important to make no more than four turns clockwise.
- Carefully remove the handle, behind which the latch wire is pulled.
- The part is disconnected from the wiring. They are attached to each other by a plug.
After disassembly, the internal parts are cleaned and, if necessary, individual elements are replaced. Collection occurs in reverse order.
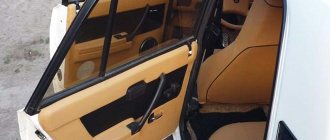
Door handles
Door handles (external and internal) of the VAZ 2107 are designed to unlock the door. Over time, these parts may fail, which means they need to be replaced.
External door handle
External door handles of the VAZ 2107 are left and right, which must be taken into account when purchasing and replacing. In addition, the part can be made of metal or plastic. A metal handle, although more expensive, is much more reliable, which is especially important in winter: you can apply pressure without fear of breaking it if it suddenly freezes.
Which ones can be supplied?
On the “seven”, in addition to the factory external door handles, you can install European handles. This procedure refers to car tuning, which allows you to change the appearance of the car, giving it an attractive and modern look. The essence of the process is to dismantle the standard handle and install a new part in its place, which fits without any modifications.
How to remove a door handle
To replace the external door handle, you will need to prepare the following set of tools:
The dismantling procedure consists of the following steps:
How to install a door handle
After removing the old handle, you can begin installing the new part:
Interior door handle
In most cases, the internal door unlocking handle on a VAZ 2107 has to be removed when dismantling the lock or when replacing the handle itself if it breaks, which happens extremely rarely.
How to remove the handle
To remove the inner handle you will need a flathead and Phillips screwdriver. Dismantling is carried out in this way:
How to install
After dismantling the old product, we begin installing the new part:
Video: replacing the inside door handle on a VAZ “classic”
How to install high-quality locks on the doors of a classic Lada
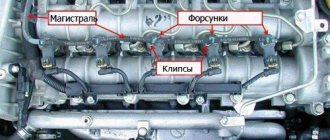
DaAZ carburetor 2107-1107010-20: design and adjustment
Many people know how “excellent” the locks work on classic model cars. That’s why installing silent locks on classics is so relevant nowadays. After all, no matter how you adjust these devices, you will never be able to achieve the same efficiency as with a “chisel”.
Installation materials
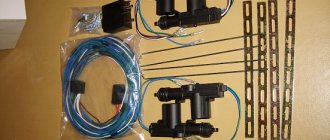
For example, we decided to install a silent lock on the front left door. To do this we need to buy:
- device mechanism;
- latch (popularly called a chocolate bar);
- two bolts from “Zubilov” locks (such bolts will connect all of the above parts into one);
- screws for the rack from a front-wheel drive VAZ;
- a cable with a diameter of 1.5 millimeters and several clamps.
Required materials and devices
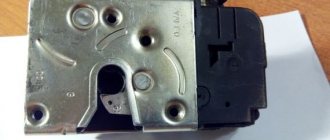
Installation of a silent lock
So, taking the mechanism in hand, we saw off the flag. After this, we take out the old lock and put it to the side. Next, using a drill and a 10mm drill bit, drill the left (bottom) hole in the door.
To mark the place for drilling a hole for the upper bushing, apply a lock on the inside. If such a situation arises, then we finish the door with a file. After this, the mechanism must be mounted in its place.
We assemble the device as a whole (by installing a chocolate bar on the mechanism). There are times when the door rests against the counter because a chocolate bar is in the way. And it happens that the lock itself does not work as it should.
To eliminate this malfunction, you need to process the lower (right) hole with a round file. After this everything should work properly.
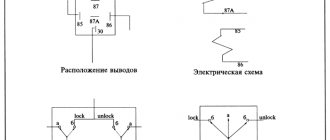
It is also worth checking the functionality of the device's locking. For these purposes, you must first take a closer look at the lock mechanism and understand its operation.
Therefore, we take a file and look at the outer part of the lock. On the side where it is pressed against the door you will find two bushings. They need to be removed almost completely. Leave a little length so that the device does not fall apart completely.
Lock installation
In order for the modification of silent locks to be successful, you need to do a little work on the angle of the lock. To do this, take the screws that connect the lock and grind off the caps with a file. So that they are on the same plane with the surface of the assembled device.
Well, that seems to be it. We assemble the lock and connect the rods and handles. We try our mechanism in action and here troubles may await us.
It may happen that the chocolate bar still rests on the counter. In this case, you need to take a hammer and a piece of board. At the same time, we begin to slowly push the lock inside the door.
The main thing in this process is accuracy and patience! And you will definitely succeed.
Next, install the screw on the stand. For this, the best option would be the following. Having snapped the chocolate bar (making two clicks), we place the chalk in the place where the screw with the stand should be located.
You can, of course, use a pencil. After installing such a marker, close the door, pressing it against the seal. After this, a mark should remain on the rack. We'll use it to drill the hole.
After screwing the screw into the rack, we fix it to the surface of the epoxy resin. That's all. Now installing silent locks is within your reach. After this we begin to adjust the lock.
Adjusting the lock
To do this, you should loosen the screws, move the lock slightly and see how this affects its operation. After this, we proceed to installing the device drives and connecting handles to it.
When an alarm activator was installed on the old lock, we connect it too. To do this, you need to remove the rubberized bushing from the old device. It should be mounted on a new lock and the rod from the activator itself should be inserted into it.
To connect the inner handle you will need a cable with clamps. To do this, drill a pin in the inside of the device and insert the cable into the resulting hole.
We use a cable to adjust
Then using clamps we make a loop. To connect the cable to the inner handle, it is best to make a clamp with a bolt (so that the handle can be replaced in the future).
So you have learned how to install advanced locks on cars. What locks are installed on your “iron horse”?
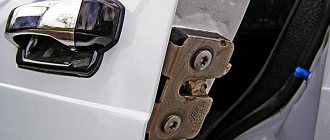
Replacing the entire hinge
If the door is sagging, then the likely cause is deformation or mechanical wear of the hinges. It is corrected by completely replacing them, along with the fingers. You don't have to buy them. You can make it yourself if you have a metal cutting machine. Such repairs will be cheap - you will only have to pay for the purchase of high-quality metal plates.
It is recommended to cut the loops strictly along the boundaries of their wedging. Fingers are placed last. And again, you need to lubricate them, hammer them, and lock them, as the manufacturer himself recommends. Replacement without taking into account their manufacture (if you do it yourself) will take at most several hours, including removing and reinstalling the doors. All that remains is to make the adjustment. And you should understand that in the next few days the noose may fall. This is shrinkage. The door may creak and may not always slam shut normally. If necessary, readjustment is performed.
Is the door sagging? Jack, and no washers...
Even on New Year's Eve, the service center tried to level the sagging door for me by traditionally placing washers under the bottom screws, but in the end I was not satisfied with the result. Firstly, the door was blocked: the top went deep into the interior, the bottom stuck out. Secondly, from inside the cabin from the driver’s seat, through the gap between the front of the door and the pillar, white fluffy New Year’s snow was visible! To lift the door, they had to put two washers with a total thickness of about 2 mm, maybe a little more, plus the blockage of the door and, as a result, a gap! Then, for the winter, I temporarily glued a seal to the edge of the door and firmly decided to redo this mess myself in the summer...
After looking through a bunch of Internet pages, I came to the conclusion that if there is no play in the hinges (my case), basically everyone uses this collective farm method with washers, and only a few times I came across notes that people jacked up the door... I didn’t see any real explanations anywhere, but still I decided to do this procedure... On a fine sunny day I prepared the tool, took a 3-ton jack from work and started repairing...
I took out the door opening limiter pin... be careful, our door now opens all the way with the edge on the wing, why scratch the paint again?! Of the five screws, only three were able to be unscrewed; two had to be drilled out... I used a tetrahedral file with a key to remove the drilled screws... The wire in the photo in one of the holes is in case of a rotten cracker frame... Otherwise, I’ve read a lot of horror stories about people’s crackers falling down, they say then you have to cut half the car to get it out...)) But everything turned out to be okay with the breadcrumbs...
I went through the seats with zinc...
The bottom of the door inspired a little sadness...
But on the other hand, for an 11-year-old door, the condition is still quite decent... But the protracted struggle with rust is in another topic, so I’ll continue... For ease of adjustment, I placed the front of the door through a wooden block onto a jack...
Attention! For those who are planning to repeat the procedure... When adjusting, one screw at the top and one at the bottom has to be periodically tightened and loosened so that it is possible to move the door on the crackers relative to the body... So, do not pull the screws too hard during these manipulations! They are disposable, the cap is wide, it fits tightly into the opening on the hinge... I twisted it a little harder to tighten it, and it came back with the splines breaking off! So I threw out one screw... After aligning the door, we move on to the most interesting part... For convenience, I removed the lock retainer body, only, pay attention, there is also a cracker there!)) Jack under the rear corner of the door through a block and carefully begin to pump...
My sag was about 4 - 5 mm, I did 3 approaches, let the door hang for 10 minutes in a jacked state... The last time the upper front corner of the door almost came into contact with the wing... It was very scary, I could hear the howling of metal...)))
In the end, I managed to get the door exactly in line with the back door... The latch is in place, we adjust the closure, and voila!
Source
Door hinge repair options
Failure or severely deformed hinges are repaired using the following methods:
Replacing door hinges, as well as fingers, is the most rational option in this case. It's inexpensive and relatively easy to do. If necessary, additional equipment can always be rented at a service center or automotive supply store. The cost of the hinges themselves for the VAZ 2110 and similar models is only about 300-500 rubles. You can also find old, used ones for sale. You will have to pay less for them. But new VAZ 2110 doors will cost several thousand rubles. And they are sold, as a rule, without glass and cladding. Their installation is an additional waste of money.
Replacing pins in hinges
So, if the repair only involves replacing the fingers, then the first thing you will need to do is remove the door to gain access to the hinges (3-4 fasteners are simply unscrewed, depending on the model). Next, the fingers are knocked out. If they do not come out due to corrosion or deformation, then you should first thoroughly fill everything with WD-40 to remove the rust and repeat the operation. If this fails, you will have to drill out the pins or replace the hinges completely.
When installing new pins, be sure to lubricate them with grease or oil, and after installation, adjust the door (lower or raise it a few millimeters through a tightening rod). The door should fit accurately into the catch when closing without additional physical effort. Otherwise, the wear and tear on both doors and hinges will be much higher. After 1-2 years of such operation, you will have to completely replace the door along with the hinges.
The main difficulty in repairing VAZ door hinges is to correctly knock out the pins (the same fingers). It’s most convenient to just rivet it and then straighten the loop if necessary. The most aesthetic method is to drill out each end of the finger, after which its edges are ground off or simply squeezed. The drill is immediately taken to the minimum size, then gradually increases literally by millimeter. This will take quite a lot of time, but the loop will not be damaged.
If the finger has other deformations, it may be necessary to make a through hole through the pins. This will not prevent the use of new fingers in the future. For this purpose, either an impact screwdriver or a powerful drill with a high-quality drill bit (carbon steel is ideal) will be useful.
What you will need to complete the work
To carry out work on changing handles, you need to stock up on a standard set of tools. The changeover procedure is not particularly difficult, but it will take a lot of time. After all, in order to carry out the replacement work, you will need to remove the door trim, and after that begin the dismantling process.
In addition to the standard set of tools, you will also need to purchase new mechanisms and cylinders to replace the front door locking device. Let’s take a closer look at what the procedure for removing and installing them on the “seven” is.
Changing the external handle on a VAZ 2107
Removing the external door handle on the “seven” is carried out by performing the following manipulations:
- First, you need to dismantle the door trim from the door on which you need to change the mechanism.
- Once access to the inside of the door is gained, you will need to disconnect all the rods and drives of the mechanism inside.
- Now you need to unscrew the two nuts with a 10mm wrench, which secure the device from the inside.
- After the nuts are unscrewed, you can dismantle the device. In a similar way, both the front and rear mechanisms for opening doors on the VAZ 2107 are removed.
- After the door handles on the outside are removed, new ones can be installed. Installation is carried out in the reverse order of removal, so there will be no problems.
When installing new products, we also recommend changing the rubber seal, which should be supplied with the new devices. This seal prevents water from penetrating inside the door.
Features of replacing the internal handle on the seven
Now let’s pay attention to the issue of replacing the interior handle on a VAZ 2107. We replace the inside door handle on the “seven” in cases where it jams and does not work to open, but more often than not it just breaks
The removal process looks like this:
- Initially, the upholstery is dismantled.
- To remove the product located inside, you need to use a Phillips screwdriver to unscrew the two mounting screws.
- After unscrewing the bolts, the product should be taken inside.
- A rod is attached to the product, which can be removed only after the handle is removed from the inside of the door.
- After removing the rod, you must put it on the new device in the same way. For this purpose there is a special fixing rubber insert.
- A new product with a fixed rod is inserted from the inside, after which it is fixed with the same two screws.
- Finally, you should install the casing in place and enjoy the work done.
Replacing the larva
There is another important element in the front door, which is called the lock cylinder. This is a device through which it is possible to lock the door from the outside with a key, which prevents it from being opened by third parties. The cylinder requires replacement only when it fails or gets stuck when opening, and it is not possible to lock the car.
On the VAZ 2106 and VAZ 2109 car models, the cylinders are built into the handles themselves, while on the “seven” this product is located below the door opening mechanism, so its replacement is carried out separately.
To dismantle and change the larva, you will need to perform the following manipulations:
- The upholstery and other elements from inside the car door are removed.
- It is necessary to disconnect the rod from the cylinder, through which the lock is blocked when the key is turned.
- Using pliers you need to remove the locking bracket.
- The mechanism itself is removed, together with the seal ring.
Installation of a new device is carried out in the reverse order of removal. All VAZ-2107 handles are changed in a similar way, and after the change process it is necessary to check their performance.
The serviceability of the devices in question on a VAZ 2107 car is very important. If the products are faulty, it is quite problematic to get into or out of the car (if the mechanism is jammed from the inside). Many owners know how unreliable the mechanisms in question are in domestic cars. At the first sign of a malfunction, it is necessary to immediately carry out diagnostics and, if necessary, lubricate or replace the part. Often it is not possible to repair (both internal and external) the device, so it is better to immediately buy new ones. As an option, you can install euro handles.
Source
What problems arise with doors
When might it be necessary to adjust the doors of a VAZ 2107? This happens in cases where the locking mechanism refuses to function. The inoperability of the locking mechanism is manifested by jamming of the doors, while they cannot be either closed or opened.
It is important to know! Reviews from owners of "Sevens" show that the most common disease of VAZs is door misalignment (sagging). When skewed, they close very poorly and are difficult to open, so it is urgent to take appropriate action to eliminate the malfunction.
There are also cases when faulty locks allow doors to open while the car is moving. Over time, any parts wear out, and with frequent and careless use, the locks can fail at any moment. To correct the situation, it is necessary to periodically diagnose the door locks on the “seven”. Diagnostics involves checking, lubricating and adjusting the locks of all devices on a VAZ 2107 car. We will find out in more detail how to adjust, as well as what details you should pay attention to.
Features of adjusting the gap and hinges
Adjustment does not require special knowledge, but it will require enough time to accurately set the locks, hinges and gaps. Initially, you should pay attention to the lock mechanisms, as well as diagnose the condition of the gaps between body panels, front fenders, as well as racks and frames. We also recommend that before starting work with the adjustment, it is good to clean and lubricate the lock mechanism and the mating part; sometimes this solves the problem of poor closing and further work becomes unnecessary. The gaps on the VAZ-2107 car sometimes reach 7 mm, which, by the way, is not a rare occurrence. If you cannot set a stable gap (no more than 3 mm), then there is nothing to do, you should proceed to the stage of adjusting the hinges.
In order to adjust the hinges on the VAZ-2107, you need to use a Phillips impact screwdriver. The hinges are adjusted either in pairs or only one, which depends on where the door is skewed. When adjusting them, you need to pay attention to the condition of the seals; if they no longer perform their functions, they need to be replaced. When adjusting the hinges, it is recommended to lubricate them and eliminate any play.
Features of lock adjustment
It is necessary to begin adjusting the door locks of the VAZ-2107 with troubleshooting. To do this, you should initially inspect the mechanism, and then lubricate the crossbars. There are two options for adjusting the locks on the “seven”. Let's consider both options:
- Option #1. Before adjusting the doors, you need to make sure that the parts of the product do not have critical wear. The front and rear locks have a similar design, so the adjustments are identical for them. It is necessary to begin work by unscrewing the three bolts that secure the mating part of the lock located on the rack. Once the bolts are loosened, you can proceed. To do this, the mating part should be visually positioned so as to obtain the optimal position. Afterwards, it should be slightly tightened and checked; if the door does not close, then it is necessary to slightly lower or raise the position of the counter part. If the closed door protrudes, we move the counter part inside the car; if it falls inside, we push it out. It is necessary to adjust little by little, until the most optimal moment.
- Option #2. How to adjust the door lock on a VAZ 2107? To do this, you need to slightly loosen the three bolts that secure the mating part. After loosening them, you need to close the door and lightly press on it. After this, the product must be opened and the bolts tightened. We repeat the closing again, and if necessary, the mating part is shifted again.
- If, after prolonged manipulation, it ends with the impossibility of adjusting the door lock, then you may have to replace the hinges. In most cases, problems arise with the hinges, which wear out and sag over time.
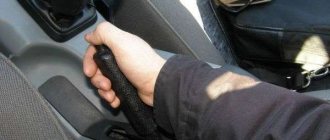
Practice, we change it ourselves
Logically, the first thing you need to do is remove the door from the car; this can be done using an impact screwdriver or a semi-automatic machine. After dismantling the door, it is necessary to place it on a previously prepared, flat surface covered with fabric. This will help you avoid scratches, since repairing a canopy involves the use of an angle grinder and welding, do not forget to cover the visible painted surface and be sure to! glass!
The patient is placed, protected, it’s time to start :) The first thing you need to do is try to pull/knock out the finger from the canopy, and if that doesn’t work, then cut through all 3 parts of the canopy with a thin grinder circle (1.6mm, I think), as in the photo.
We cut it with a grinder like this if we can’t knock out a finger
This thread will make it possible to loosen the fit of the finger in the loops, and even if there is significant wear in the loops, it will make it possible to compress the loop to the required size. After cutting through the canopy, you can try to knock out the finger using a tool. If you still fail to do this, then you need to take a thin chisel and slightly widen the groove by hitting the chisel into the groove. Now we should try to knock it out, we succeeded.
Next we need something that has practically nothing to do with the body - a valve from the engine. For what? And then, the diameter of the rod is ideal for the role of a canopy finger. Here we try it on:
Now you need to press the canopy onto the valve stem using a hammer. Here you need to do everything in moderation, you shouldn’t tighten the canopy too much, the rod should move with slight pinching, you need to leave a small gap for welding. Once you achieve the required pinch, you can cut the rod to the required length and weld the thread.
As for welding, here it is necessary to weld on a lower current; it is very important not to weld the canopy with the rod in a heap. That’s why I cooked on a low current, the semi-automatic was slightly “greasy”, but the main thing was not the beauty of the seam, but that it held the thread reliably. Excess metal can be sanded with a grinder.
Thanks for subscribing!
Also an important note about the finger. In the factory version, there are two grooves on both sides of the pin, which are designed to improve lubrication and self-removal of sand.
I don’t have the polished version, since in this case it doesn’t matter at all.
Please don't look at the quality of the seam, I was training
It's almost ready.
Don’t care about the seam, as in the previous version)))
Source
Replacing door hinges (VAZ Classic)
Since the car is from 1986, the driver's door hinges are tired, especially the bottom one, and the door sags accordingly. Not every straightener undertakes to replace hinges; they mostly offer door replacement, although now it’s not easy to find a good one
door, and in this door I have changed a lot. In general, replacement is not my option, I decided to change it myself and, as it turned out, there are no difficulties in this, everything is simple and quick. I ordered the hinges here > Avtoall First, I disassembled the new hinges, cut off the rod on one side with a grinder and knocked it out
The part that is intended to go inside the door is thrown away. Then I removed the door, capped it and drilled with drills in increasing order
After the old rod is drilled in the middle, the remains are knocked out in different directions.
Since I started covering my car with film, I covered the new hinges with film and put them in place. To prevent the rod from falling out, I welded it on top with a drop of welding. The top hinge was not very worn, but the bottom hinge, which is welded into the door, was also worn out, so I welded the rod on both sides and the play disappeared completely.
Next, I refined and put the door in place; I had to spend some time setting up the gaps, because... I installed it for the first time, but in the end everything was perfect, no sagging, the gaps were even, and I started installing silent front-wheel drive locks on an almost new door, but that’s another post.