December 11, 2014 Lada.Online 125 826 21
Many people ask what does audio training mean on Grant? Audio preparation is, as a rule, a series of works already completed by the manufacturer (laying cables, installing speakers, etc.), which allow the future owner to install music in the Lada Granta without much effort. Interestingly, depending on the configuration of the car, audio preparation may be different.
Trunk noise insulation
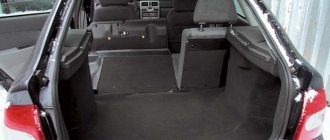
The most demanding music lovers also soundproof the trunk. The effect of this modification will only be felt by owners of compact hatchbacks. When the trunk lives a “separate life” (for example, in a sedan or coupe), then it should be soundproofed only when installing a subwoofer. In the case of the Renault Arkana, you can refuse to modify the cargo compartment - the trunk is quite well isolated from the passenger compartment. Count like in a sedan.
Read also: What is ovulatory syndrome?
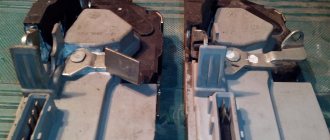
— You need to understand that a car is needed primarily to drive, and not to organize a disco. Therefore, the trunk should be touched only in extreme cases. Load the lid with additional kilograms - it will not stay open. This means that the gas stops need to be modified. “I would wisely weigh the need for modifications in a regular car,” says the specialist.
Is audio training necessary in a budget car?
In his dreams, an advanced music lover can drive a car with standard Harman-Kardon music, but in reality, alas, most often you have to choose a car that suits your pocket, and only then try to make it sound. When choosing a configuration, the question may arise: should you take the standard “music” or install it in a minimally equipped car according to your taste? (Although the configurations will not always differ only in “music”).
Lada Granta Standard
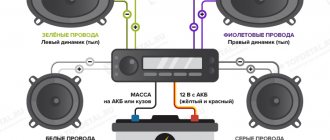
The audio preparation of the Lada Granta Standard is arranged as follows: the car has power wiring harnesses connected to the head unit. Such wires are present only in the radio; there are no visible outputs of wires for the speaker on the doors.
Therefore, on the basic configuration of the car, the wires do not reach the audio system speakers. Under the panel on the driver's seat side there are wire outlets for the radio.
In order to connect them into one system, you need to find the corresponding audio system wire outputs on the Lada doors. After finding all the necessary outputs, the wires located on the panel are connected to the wires that are built into the doors.
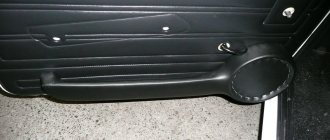
Front doors
Installing Lada Granta speakers is a labor-intensive undertaking that will require adherence to a clear algorithm of actions. At the initial stage, we carry out dismantling work: we pry up the plastic cover of the door handle, unscrew the two fastening screws, and remove the trim with a gentle movement towards ourselves. After these simple manipulations, access to the inside of the door opens, where the 13-centimeter speakers will be installed. The algorithm of actions is as follows:
- unpack the purchased speaker;
- connect the acoustic connectors (remember to maintain polarity);
- Using screws, we fix the product in the seats on the door card;
- We reassemble the door in the reverse order, and also put the grids (grills) in place.
The speakers are easily attached to the factory holes using bolts or screws, and the entire procedure takes no more than half an hour, even for an inexperienced driver. However, many owners of Lada Granta prefer to install speakers with a diameter of 16 cm or more on their own. During this procedure, all the disadvantages of the AvtoVAZ body design become apparent, since without selecting suitable spacers (podiums), problems will subsequently arise with putting the trim in place, closing the glove compartment or lowering the side window.
The installation of the described element of the acoustic system in the front doors of the Lada Granta involves the following steps:
- manufacturing or purchasing suitable spacers;
- using a metal file, cut out a hole for the speaker;
- install the attachment to the card using four shallow self-tapping screws;
- connect the speaker cables (remember to maintain polarity);
- We install the casing, standard mesh, check the absence of backlashes and sound quality.
At the next stage, the cardboard stencil is applied to the plywood and two blanks are cut out. It is optimal to use a sheet of no more than 5-7 mm, which will allow it to fit within the overall thickness of the podium. After the two blanks have been cut, use a hacksaw to protect the edges with sandpaper and glue them together with PVA glue.
The rear doors of the Lada Granta have enough speakers with a diameter of 13 cm. Even greater difficulties may arise with the installation of products with a diameter of 16 cm due to the design features of the car body. In addition, there is no need to make homemade spacers for the rear doors, since they are already manufactured at AvtoVAZ. Product name – “Rear left column trim” (article 21906202095) and “Rear right column trim” (article 21906202094). A huge number of online sites offer ordering products that will deliver the goods in a matter of days.
The algorithm of actions is quite simple:
- dismantle the casing using a screwdriver;
- fix the podium for the speaker to the door card (using screws);
- if necessary, replace the factory terminals with new ones (come with the speaker);
- We check the sound quality, the freedom of lowering the glass and install the trim.
A caveat: when attaching the factory spacer, three of the four holes coincide, but there is no hole provided for the fourth fastening. Here we have two options: drill a hole in the metal yourself to mount the podium, which is strongly not recommended, or leave the spacer held on by three bolts.
- Removing the door card.
- Removing standard noise and vibration insulation.
- Removing the stock speaker.
- Installation of speakers (13 cm) Granta liftback. When installing speakers at 16.0 cm, use a metal jigsaw to make a cut in the door contour.
- We connect the blocks with wires.
- We collect the card and replace it in a similar way to the second door.
The sequence of actions is presented very briefly; during installation, many “pitfalls” arise, which are discussed below.
INTRODUCTION
I want to say right away that I’m not at all sick of the auto-sound theme, it hurt me a little, but let me go relatively quickly. I became deeply involved in this topic around 2010. and already in 2013. I realized that I had achieved my goal in terms of building my system. Car audiophiles differ from home audiophiles in that the former, in order to get the system of their dreams, are constantly busy changing components: speakers, subwoofers, amplifiers, head units, interconnects and cables, without interruption installing and reinstalling them in different ways in the car, and doing this probably 5 times more often than home enthusiasts. This is some kind of absolutely endless process, for many it is a serious hobby, but I can say that it is very expensive, since requirements and appetites are growing rapidly, the cost of components and installation time are also constantly increasing, and the return and difference in the result are getting smaller and smaller . And the car is constantly disassembled and in bundles of wires. I stopped quite quickly in this process, went through all the paths of a beginner, stepped on every possible rake, and eventually found the necessary acceptable option, at which I decided that I had enough and didn’t need any more. So, during a short search, the following system was assembled:
- GU: JVC KW-R900BT (had to order from Amazon, since the GU was for the US and Japanese markets, specification)
- HF/MF front: So Audio SO55neo (link to manufacturer) (article)
- Bass front: Mid from the EOS Opera ES-165 II kit (link to manufacturer)
- Subwoofer: Helix P 12W SVC4, 26L capacity (link to speaker card) (link to manufacturer's documentation)
- Amplifier Front: EOS AE-475 LE Bi-amping (link to manufacturer)
- Amplifier Subwoofer: EOS AE-500.1 (link to manufacturer)
Next, let's look at the subwoofer and amplifier for it
I suggest taking JBL Stage 1200B and SWAT M-1.500
JBL Stage 1200B subwoofer , although not powerful, is of moderate quality, suitable for increasing low frequencies, efficiently and accurately, highlighting the lower frequencies! Of course, it won’t shake the windows and drive the wind, that’s not what it’s for! The bass is very fast and accurate. No chirping or buzzing, the sound is pleasant. The depth and power of the bass is certainly not enough. But for the price it's an excellent sub!
A compact and lightweight subwoofer that fits easily into any trunk. Carefully covered with carpet, there are protective grills.
SWAT M-1.500 amplifier is a very compact monoblock. It has good filters and tuning, has a subsonic (although it is not needed for the JBL Stage 1200B) and has a phase control (smooth) that will make it possible to coordinate the front speakers and the subwoofer! I installed such an amplifier in a BMW X5 in a niche where there was an CD changer for the Kicker subwoofer, it plays clearly, controls the speaker well!
“Nominal output power at 4 Ohms” is 300 W, and for the subwoofer “Nominal power at 4 Ohms” is 250 W, which is completely acceptable and will not let you burn out your speaker, no matter how much you want!
This monoblock is also suitable for a more powerful subwoofer, because... it is capable of pumping 500W into 2 Ohm
What if you install “music” in the car yourself?
Let’s say right away that you definitely won’t be able to assemble a High-End system for the same money that a car dealership will charge for standard “music.” But car acoustics are not only and not so much the “head” itself and the speakers, but sound insulation, which is practically absent in budget cars. So, high-quality sound will still require an injection of money, but now we will try to put together our response to the standard music of the same “Logan”, taken as an example.
Principles of modernizing car acoustics
By reducing the cost of a budget car, automakers are not interested in installing expensive audio systems. High-quality car audio is installed only in top trim levels of expensive foreign cars, for which exclusive radio products are ordered.
The usual process of upgrading a standard audio system begins with the car owner's dissatisfaction with one of the sound components. This may be the absence of a CD player in the radio, low playback power, or wheezing of the speakers. Having replaced one of the components, the novice tuner discovers the need to modernize the next one. Having improved the quality of the speakers, the car owner sees the imperfection of the head unit.
Read What is component acoustics, its features and installation
The next stages of tuning are the purchase of an amplifier and subwoofer. Their installation entails laying cables, re-equipping the trunk and interior.
The improvement process built on this principle can become endless. Experienced car audio tuning enthusiasts, when planning an upgrade, change all components of the audio system at the same time.
This principle makes it possible to balance the system in terms of technical characteristics and sound quality, but is associated with financial investments that cannot be extended over several years.
Audio preparation is the basis of car audio
It is worth understanding what audio preparation is in a car.
This may mean both work on installing audio equipment, and the presence of a special place for an audio system, speaker jacks, and wiring for further installation of acoustic equipment. Such a concept as standard audio preparation is an integral part of the car’s equipment. Its level affects the final cost of the new car and the owner’s further costs for acoustics. The manufacturer can install either simply a wiring harness with the necessary plugs and connectors, or additional elements: speakers, a radio antenna and the radio itself. Expensive versions even have high-frequency beepers and audio system control keys located on the steering wheel.
Selecting a speaker system
Having assessed the audio preparation of the car, you can begin selecting equipment.
Depending on personal preferences and financial capabilities, a minimum set is determined - in fact, a radio tape recorder (or, as it is called, a head unit) and a set of speakers. A true car audio connoisseur will select equipment with increased power, as well as taking into account the possibility of installing additional devices: subwoofer, amplifier. Typically such a complete audio system requires the purchase of an auxiliary battery. When choosing acoustics, beginners should consider the following main characteristics of the equipment.
For the head unit - available media formats (CD, MP3) and output sound power. It is worth focusing on the average value of 25 W for a standard four-channel device.
For speakers:
- dimensions of standard sockets and the possibility of changing them;
- power (take into account comparability with GI);
- frequency range during playback;
- sensitivity.
Audio system installation
After purchasing the equipment, the question of installation arises.
This event is not easy and requires special technical skills. In most cases, in order to avoid unnecessary headaches, car enthusiasts turn to certified service centers, where experienced specialists will perform the necessary work and provide a guarantee. Undoubtedly, there are people for whom everything related to the car is their hobby. For them, self-installation of sound equipment will be not so much saving money as it will be a pleasant pastime with a further reason for pride. In this case, what does audio preparation mean? In a nutshell, the higher the vehicle’s equipment level, the lower the additional costs for acoustics.
How to connect your phone to the radio via a USB cable
The most common way to connect a phone to a radio is using a USB connector. Not a single modern radio is produced without a standard USB output on the panel. This output allows you to use a regular computer flash card as a music storage medium. But you can easily connect your mobile phone to it via a computer connection cord
The arrows indicate the USB cable connecting the radio to the phone.
This cord has a standard USB plug at one end, and an output for connecting to a smartphone at the other. Simple radio tape recorders are not able to integrate with the phone, and in this case the latter acts only as a storage medium, that is, as a regular flash drive.
To play music, just connect the cord to the smartphone and to the output of the radio, and then in the phone settings in the “USB connection” item, select “Data transfer”, after which the radio will be able to read all music files. In this case, music files will be managed only from the radio. More modern radios integrate with your phone, allowing you to control music from both devices. In this case, it is possible to launch applications on a smartphone, for example, some special player, and in this case it will act as a regular amplifier.
How to connect your phone to the radio via USB
Connecting via a USB cable is quite convenient; it allows you to manage files directly from the radio; in addition, many smartphones are recharged with this connection, although not as quickly as from a conventional charger. And yet there is a double benefit - the music plays, and at least the phone doesn’t run out of charge. The disadvantage of this connection is the presence of the cord itself, which will have to be pulled to the location of the phone. Moreover, if the cord is short, you will have to disconnect the cord every time you make a call.
Which car is right for you
If after reading the article you still cannot compare Kalina and Granta liftback and have not decided which car is best for you, pay attention to the most basic nuances:
Car appearance
It is of no small importance, because every day it is you who drives the car, and not someone else. Price. Think carefully about what you're willing to pay for and what doesn't seem necessary.
Based on this, choose the appropriate package Technical specifications. Decide what is more important to you - power and speed, or comfort and maneuverability on difficult roads? And perhaps the size of the trunk and the space in the cabin? Do you want to show off your car’s dynamic design to your friends and fly through the city at night, or just comfortably get from point A to point B? Only by thoughtfully and truthfully answering these questions can you choose the car that will completely satisfy you in all respects and will become a real “friend on wheels” for you!
And for a more visual comparison, we present to your attention a brief table of the main 6 characteristics:
| Lada Kalina 2 (hatchback) | Lada Granta Liftback | |
| Body length | 3893 | 4260 |
| Trunk | 355 l. | 440 l |
| Transmission | Manual/automatic | Manual/automatic |
| Engine capacity | 1600 | 1600 |
| Speed indicators | 171 km/h | 176 km/h |
| Price | 375,000 rub. | RUB 344,000 |
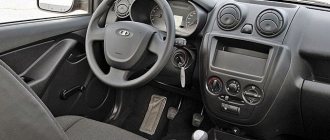
Lada Granta Norma
In the Lada Grant Norma, the audio preparation is configured in such a way that the door wires are connected to the head unit, which already powers the audio system itself. The car owner will only have to connect the radio and speakers.
The Lada Granta series has a flaw: the AvtoVAZ connectors for audio systems do not match the connectors of audio equipment manufacturers. Because of this, you have to additionally purchase the necessary wires and connect them directly, while paying attention to the corresponding symbols.
For example, the space for the speakers on the Norma doors is indicated by a corrugated pattern. It will be necessary to cut an opening to connect the speakers.
Do-it-yourself installation
Next, we will look in detail at how to correctly install the radio on the Lada Granta manually. If you are not a fan of the standard audio preparation of the Lada Grant, pay attention to this algorithm.
We recommend: Electric additional pump for the heater of VAZ and other cars: selection and installation
As stated earlier, the power wires are initially wired, and all that remains is to understand how to properly connect them to the radio.
After removing the cover that covers the radio, two connectors will be visible in front of you. One connector is intended for connecting speakers in the doors, the second is for power supply.
The black and pink wires indicate ground and plus, and at the same time they are the main ones for power supply. If the connection is incorrect, the audio system will at least not work; in the worst case scenario, you will short-circuit the “–” and “+” terminals, which will result in the fuse blowing.
When connecting directly, be sure to insulate all wires, not just those used, to avoid a short circuit.
After connecting the necessary wires, we secure the speaker with self-tapping screws or screws and close the mesh.
It is recommended to install 5-inch speakers (12.5 cm) on the front doors of Lada Granta cars, but if desired, you can insert 16 cm, as a result of which the sound quality will only increase. Choose speakers so that the glove compartment can open completely. This problem often exists when owners choose larger speakers.
Some craftsmen cut out the trim on the rear doors and install pancakes (6x9), which sound even better. With this option, a teardrop-shaped mesh is purchased in the standard factory place for speakers, and speakers measuring 13 cm are installed.
After doing all this grant-audio preparation, all that remains is to turn on the speaker and wait for the radio to turn on.
SETTING UP AND RECORDING A PROJECT:
Setting up and uploading the project program to the EEPROM of the board is carried out in the SigmaStudio software package. I gave detailed instructions for installing software, drivers and activating the CY7C68013A board as a USBi interface to make changes and adjustments in real time in a project in SigmaStudio in my previous review, and I will post that information again here below under the spoiler: Software and Drivers
SigmaStudio and software for the CY7C68013A board only runs on Windows. Take the SigmaStuidio package from the following link and install it: link A little about installing the driver for the board on CY7C68013A:
When connecting for the first time, the board was identified as an unknown device:
I took the drivers for the board from the CHIPDIP video page (link) Driver for the CY7C68013A board
I fed the driver to an “unknown device” and it began to be defined as “Cypress FX2LP No EEPROM Device”, exactly as needed. I didn’t touch any jumpers on the board, I left everything as is.
Next, from the software package for the Cypress board (the archive is located at the link: CySuiteUSB), you need to run the “CyConsole” utility
In the Cypress USB Console we see our device.
Now in this program we need to feed our device the script, which is located along the path C://Program Files/Analog Devices/SigmaStudio 4.2/USB drivers/x64/ADI_USBi.spt and by clicking the “Play script” button, run the script.
Our device will disappear from the system, and a new one will appear, called “Analog Devices USBi (programmed)”
VirtualBox users: after loading the script, my original USB device disappeared, and a new one did not appear, I was looking for why until I remembered that I needed to indicate in the menu that I needed to connect a new USB device to the guest OS.
Acoustic system
Tracks for setting up car audio
It is almost impossible for one speaker to reproduce the entire range of sounds recognizable by the human ear. For this purpose, high-quality car audio systems are equipped with separate components, each of which is assigned the task of reproducing its own frequency range. For cars there are two speaker systems:
Note: But this depends on the device being installed correctly.
Acoustic installation locations
Setting up car acoustics using discs
Installation of acoustics can be done in the following places:
Front speaker system
This system needs special attention. If the front speakers are installed correctly, no additional adjustments to the audio system components will be required, otherwise all improvement efforts will be simply pointless. It is due to these front acoustics that the sound of the audio system is formed. In order to improve the quality of front acoustics, two-component, sometimes three-component systems are used for each band with separate speakers and crossovers (separation filters).
How to set up car audio correctly
Note: In case of difficulty in installing component acoustics and when high demands are not placed on sound, install coaxial (combined) front speakers.
Rear acoustics
The purpose of rear acoustics in standard systems is to provide comfort for rear passengers. And therefore, the requirements are not so high and, most often, coaxial acoustics are used as rear ones. How to choose acoustics:
Acoustic sound
To choose the right acoustics, you should choose the musical accompaniment in the car:
Of course, these offers are conditional and it is proposed to listen to the selected acoustics right at the stand. The sound in the store will be almost the same as in the car.
Power and sensitivity
How to properly set up car audio
The designation of sensitive acoustics is in decibels. The higher the decibels, the more sensitive the speaker becomes. It has already been proven that speakers with a low cut-off frequency have worse sensitivity compared to less “bass” ones, and a small speaker turns out to be less sensitive than a large one. Sensitivity affects the power that will need to be supplied to the speaker to achieve the required volume. The higher the sensitivity, the less power is required. That is, this will determine how good the performance of the speakers depending on the head unit will be and whether an additional amplifier will be required. At the same time, do not forget that operating the speakers at maximum power means tormenting your ears with squealing and wheezing.
Note. The power indicated on the speaker is not the power that the amplifier should provide, but the power that will not harm them. Therefore, it is not recommended to use the speakers “to the fullest.”
What is a standard audio system?
Let's be realistic - we are unlikely to be offered anything good in the budget segment. Let's take, for example, the familiar Renault Logan 2 in the Privilege configuration: • The head unit (GU) is either a double-din radio, familiar from Dusters, or an LG touchscreen multimedia center, which has become famous for “glitches”, freezes and lack of sensor response to cold (and you will also have to pay extra for this). The ability to customize the sound in them is minimal, the quality is at the level of a regular budget device like Prology. • Front speakers – paper, 16 cm in size, with a proprietary connector and fastening with rivets. The rear ones are 13 cm, and that’s where the differences end. Both magnets are worthy of “tweeters”, but not wideband speakers; the diffuser is reminiscent of Soviet speakers from low-class radios. • Wiring - thin wires in rigid insulation, which, with decent power, will already cause serious drawdowns.
As a result, this entire system will only satisfy the sound of a person playing a radio in the background. In the Confort package, we will be offered a standard audio system as an additional package - 10,990 rubles for all the same primitive speakers and a 1-din radio, which used to be standard for the maximum configuration of the previous generation. At the same time, the car already has audio preparation - it’s enough just to install a head unit and speakers, even if you don’t bother with component acoustics and external amplifiers.
The same situation can be seen on other budget cars - a standard audio system, at best, will have a multimedia head unit (possibly with navigation), but the least attention will be paid to sound quality. The point here is that it is not difficult to teach the “head” to recognize different formats or receive calls via Bluetooth, but to make it sound requires a high-quality decoder, a complex audio processing code (equalizer and sound effects), and a high-class final amplifier. And this is a completely different cost of design and production, which is critical in the budget segment.