Everyone needs a radio in their car. The older generation can listen to the news or chanson, middle-aged people can enjoy jazz, rock and classics, and young people can have fun and loudly “sway” to electronic music or rap.
In this article, we will not touch upon complex Hi-Fi and Hi-End systems that require serious investment - the purchase of an expensive head unit, cables, amplifiers, capacitors and sound processors. As well as calculating subwoofer enclosures, complex podiums, and adjusting the frequency response.
Therefore, we will consider 3 types of simple car audio systems with minimal financial investment.
Improving the sound of the standard car radio and acoustics
Factory audio in a car, if it is not premium, leaves much to be desired both in functionality and sound quality. How to improve multimedia in this case?
Replacing the head unit (receiver) will give more or less decent sound, plus the ability to play audio tracks from a USB flash drive, SD card and external AUX input. Fans of mobile gadgets should pay attention to modifications that support smartphones via USB and Bluetooth.
Such models may have both a hands free system and mobile phone charging. Moreover, the phone book is displayed on the car radio display, which is very convenient. If we increase the budget, we will get a full-fledged multimedia center on Android with navigation, cameras, and the Internet.
But decide in advance whether a disk drive is needed. If you do not use CDs and DVDs, then there is no need to overpay for these functions. Plus the extra weight is an additional load on the frame. And the volume - in cramped conditions behind the dashboard, it is sometimes difficult to place a large case along with a bundle of wires and linear output connectors.
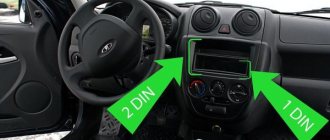
The connection is the simplest - with a standard ISO connector (in extreme cases, you will have to swap the red and yellow wires). Single-din and double-din adapter frames are sold for almost any car.
At full volume the speakers often wheeze. Including due to the fact that the amplifier chip is overloaded. Therefore, when replacing a radio, we give preference to products with an output path using field-effect transistors (MOSFET).
To build car audio without an external amplifier, it is important to choose
a speaker system with high sensitivity (from 93 dB).
By replacing OEM “speakers” with aftermarket ones, we will get better and louder sound. If the standard radio does not play mp3, and you don’t want to invest money, a simple FM transmitter (modulator) will do. With its help, even cassette radio will play modern formats over the radio channel. But distortion at high volumes will not go away, and the range of reproduced frequencies will be limited - you will have to forget about deep bass and “ringing highs”.
Subwoofer
literally translated - low-frequency dynamic head. On the Internet you can find the spelling “sub, superwoofer, superbuffer, buffer, sambufer.” There are four types of acoustic design (enclosure type) - free air (frameless infinity screen, applicable on cars with a sedan body), closed box, bass reflex, bandpass - in the latter case, the diffuser is not visible from the outside and cannot be damaged.
Even the most inexpensive subwoofer will improve bass performance many times over. If desired, the case can be made on your own from plywood, MDF or chipboard. But for this you need to have minimal carpentry skills and you will have to learn what the quality factor, resonant frequency, Thiel-Small parameters are.
We understand the basic settings of the radio
Not all drivers consider it necessary to understand the technical settings of radio tape recorders. Considering that they work fine on their own after factory settings or the previous owner. It is not always so. Even if minimal sound is provided. Either a powerful or otherwise individual sound that suits you, you will have to do it yourself.
You can balance the sound of the speakers using the radio. This only applies to modern models. After connecting, the device will “see” all the speakers that you have connected and will offer to configure their interaction. This cannot be done without practical testing.
Be prepared to play comparison music even after very minor changes.
The main task is to make sure that all speakers play in unison. Of course, they have different roles and sounds. But you don’t need to have an ear for music to detect desynchronization.
Step-by-step verification instructions:
- Sit in the driver's seat, this is the place where the sound should be optimal. Since you are there most of the time.
- We set the bass to 0 Db - it is in the low frequencies that the causes of discomfort from sound usually lie.
- Let's switch to balance mode; you will find it on any modern radio. And using any melody we adjust the sound in real time.
- You can stop tuning when you are completely satisfied with the sound.
Sometimes the opinion about the sound changes - after tuning, you can drive for several days. And then want to make additional changes. For a more objective look at the state of the audio system, you can try different types of music. For example, very different from each other in the number of bass or high sounds.
Working with frequencies
Music consists of several types of frequencies. The higher the frequency, the louder the sound. Thanks to the capabilities of modern radio tape recorders, the driver can independently select music at those frequencies that suit him best. Emphasis on high and mid frequencies is the simplest and cheapest. A way to make the music sound as loud as possible.
The thing is that low frequencies themselves are not loud, this does not mean that they are not needed. But a large number of them makes the composition generally quieter, even if you have excellent acoustics. Manual tuning of car audio through frequencies has long existed. Using the radio - frequency cutoff mode.
This mode allows you to “prohibit” the device from reproducing frequencies below a certain minimum that you set. We recommend setting the lower threshold to 125 Hz (or frequency 78). In this way, the resources of the speaker system are redistributed. And the overall sound volume increases significantly.
Car radio + 4 speakers - classic design
This is the most budget-friendly and common way of voicing a car. Music of this configuration can play quite loudly and is much higher quality than the factory device. As a rule, coaxial acoustics are purchased for such a circuit. For the front doors - 5-6.5” (13-17 cm), for the rear shelf - “ovals” (“pancakes”) 6x9 inches. You shouldn’t get carried away with the number of coaxial strips, two are enough - 99% of people will not hear a piezoelectric supertweeter at 22 kilohertz. In general, the softer the suspension and the larger the diameter of the diffuser, the lower the sound the speaker can reproduce at low power. If ready-made podiums are sold for your car, use this solution. This is especially true if the standard seats have a diameter of 10 cm (4”) - in this case, switching to 16 cm speakers will give a noticeable effect in terms of midbass.
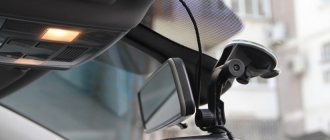
- To raise the sound stage higher (if it is appropriate to talk about it in the context of this configuration), it is advisable to install component acoustics (“spaced”) in front. We place a separate HF unit (tweeters, tweeters) on the front windshield pillars, in the corners of the dashboard, or in the area where the side mirrors are mounted.
- For denser bass, it is necessary to replace the rear shelf in the hatchback with a plywood one. In a sedan, you need to cut out the metal of the body panel and strengthen the structure (make wooden spacers between the base and the cladding). Owners of station wagons will have to make more efforts by placing “speakers” in the rear doors or side niches of the trunk.
- If possible, replace the wires included with the speakers with thicker and better ones (with a cross-section of 0.75 mm²), and connect the radio power via a fuse directly to the battery through 2.5 sq. mm. in a corrugation (we take the control wire from the standard connection socket or ignition switch).
In this configuration, you can also use a 4-channel amplifier.
If the car does not have audio preparation, let’s not forget about the antenna.
Vibration isolation - what is it and how to install it?
All lovers of loud music have a problem in their car - vibration. Loud music, especially with a lot of bass, makes the car literally shake from the inside. The driver is faced with the choice of turning down the volume or continuing to pick up objects that have fallen due to shaking.
Noise-vibration insulation as a procedure is an additional lining of your car from the inside - such
“Rattling” sound and other unpleasant effects appear on top of the original sound. Because vibration from sound transfers to the materials of the machine - metal, plastic, etc., without encountering any obstacle. This can be corrected by purchasing a soundproofing layer for the car, which will not only improve the quality of the music sounding in the car. But it won’t allow extraneous noise from the street to interrupt it.
Car audio 2.1 - 2 speakers and a subwoofer
This is already a fairly serious configuration with an external amplifier, allowing you to get decent quality. Based on budget and installation complexity, we divide this type into three connection options:
- Simple.
We connect the front “speakers” to the head unit, and take the signal to the active subwoofer (it already has an amplifier built in) from the linear subwoofer output of the radio or from the rear channels. - Fast.
Component “front” - from the “head”, “sub” - through a single-channel D-class monoblock or a two-channel auto amplifier connected by a “bridge”. - Correct. A system with a four-channel amplifier, where the head unit is used only as a source of low-current signal. We connect the front channels each to its own connector, and connect the rear channels using a bridge circuit. You can use a “three-channel” - such models are also available.
For such an audio system you will need to buy a set of wires. The larger the section, the better (8 gauge is enough). If you plan to leave the rear speakers for volume, connect them to the corresponding outputs of the receiver.
Whatever method you choose, to ensure the result does not disappoint, you should start with minimal noise and vibration insulation of the door cards. Instead of expensive “Dynamate” or “vibroplast”, you can use self-adhesive vibroinsulation from the construction market and polyurethane foam mats.
There is no limit to perfection - if you become seriously interested in car audio, you will subsequently end up with an expensive audio system with channel amplification for SQ or a full trunk of subwoofers for SPL. But even the options proposed in the article can seriously improve the sound inside your car today.
Ilya Ilmarin, 2020
Level one. Noise insulation
Yes, yes, this is the very first point for any upgrade of a standard audio system. If you want to listen to music, first of all get rid of unnecessary sounds. By the way, we are talking not so much about outside noise as about body noise. Look at the home speaker. Durable body, devoid of overtones. Sound emits only what should emit sound, and what should not be held monolithically. Now take a look at where and how any car speaker is installed and what the housing is for it. Most often it is mounted on some kind of metal panel, and in the worst case, even on plastic upholstery. And the body of such a “column” is a door or some kind of body niche. Tough, and that's all. By the way, in the literal sense of the word.
The easiest way to improve the acoustic operating conditions of speakers and get rid of unnecessary resonances and other metallic sounds is to use vibration-damping materials. They are usually made from bitumen or rubber, often with some additives. Their main feature is high internal viscosity. Basically, these are just sheet materials that are cut right on site and carefully rolled onto the metal. But sometimes such materials come in the form of mastics.
Treatment with vibration-damping materials eliminates metallic sounds and improves the operating conditions of installed speakers
Vibration-damping materials are heavier and more rigid, more effective, but they are also harder to work with, so not all craftsmen like them. Thinner and lighter ones are easier to work with, but their effect is not so high. The optimum is usually somewhere in the middle.
Various kinds of lightweight foam and fibrous materials can be considered only optionally; they work somewhat differently and do not have much effect on the absorption of metal vibrations.
External acoustic screen
Pros:
- Since a significant part of the screen is located outside the door card, there are many more ideas for implementing different design solutions than in the previous version;
- Inside the screen, some of the sound waves are absorbed, and the desired sound is reflected, making the sound cleaner and the bass deeper;
- The column can be directed in any direction. Car audio enthusiasts often configure their speakers so that most of the sound waves are directed toward the top of the cabin.
Minuses:
- Since the speaker will be attached to the outside of the screen, the case must be as durable as possible;
- It will take time to create the design, as well as money to purchase additional material;
- If you don’t have the skills to install speakers, you can not only ruin the sound, but also break the speaker itself (in addition to the fact that it itself vibrates when the sound is loud, the vibrations intensify while driving, which is why the membrane can quickly tear);
- A certain angle of inclination is required.
Sound emission angle
If the speaker is placed too high, it will affect the clarity of the music. High frequencies will be transmitted worse. Experience shows that tilt angles greater than 60 degrees distort the transmission of the audio signal. For this reason, when creating an external screen, this value should be accurately calculated.
When making the outer structure, you first need to securely fasten the inner screen. Then the outer box is either initially made with the desired slope to the vertical, or screwed obliquely with self-tapping screws. The voids are filled with putty. The entire structure is processed with fiberglass and covered with appropriate fabric.
Which ones are better to put
The choice of speakers for a car radio should take into account the needs of the car owner. There are several options. The appropriate location of the device will depend on the size and type (for example, it is better to place speakers in the door or on the back shelf).
- Home speakers. Such devices must be connected to the dashboard via a digital input.
- Portable speaker. It is most often connected via Bluetooth.
- Powerful acoustic speakers for cars. For demanding audiophiles, these are the best speakers that provide spacious, clear sound.
How to strengthen
During installation, it is necessary to carefully strengthen the speakers, since the sound quality and duration of operation of the device directly depends on this.
Wiring issue
When installing wiring, there are several important rules to consider.
- If there are no specialized holes in the doors for pulling wires through, you will have to drill them yourself.
- The wire should not pass through metal and plastic without protection. For safety reasons, it is recommended to use spacer rings. They are fixed on the inside and prevent contact of the wiring with the casing.
- The cable to the head unit should be laid under the interior trim. The best option is to secure the cable from the speakers to the main wiring using electrical tape.
Wire marking
Most speaker systems are equipped with a set of cables that have colored insulation. Thus, FR (front right speaker) is marked in gray, FL (front left speaker) is marked in white. The wires for the rear speakers are similarly different. For the right rear (RR) use purple insulation, for the left (RL) - green. The cable on “-” has the same insulation color as on “+”, but is supplemented with a black stripe.
If the wires for connecting the speakers have all the insulation in the same color, the cable must be marked. This will allow you to connect the speakers to the radio in your car quickly and correctly.
Coaxial or component
Choosing the right speakers is not that easy. There are currently two types of car speakers in use: coaxial and component. Coaxial speakers include several speakers at once, the so-called strips. There are two-, three- and even four-way speakers. Component speakers are designed to reproduce only a certain segment of frequencies: low, high or medium.
Let’s make a reservation right away that the price tag between coaxial and component speakers varies very, very much; component speakers belong to HI-FI and HI-END equipment and are expensive, and also require a professional amplifier (possibly more than one) and competent installation. Moreover, the location of such speakers in the car is of no small importance for the overall sound quality.
History of car audio
The beginning of the entire history of car sound (we will call it car sound), one might say, was laid in the 30s of the 20th century. With the development of radio technology, the first radio receiver for a car appeared. And already in the late 60s, the first car tape recorder was invented in America. From that moment it all began! The era of car audio has begun.
Now we will not delve into the intricacies of radio technology of those times and analyze historical moments in detail. Although there were a lot of interesting things there (maybe we’ll return to this issue later).
To make the car “play”
If you don’t take into account premium brands like Lexus, BMW, Range Rover, Mercedes, then the standard music from the factory is nonsense, good only for listening to the radio or lullabies for children.
Standard acoustics in public sector and middle-class cars have a narrow frequency range, a large sound stage, and are generally made according to the principle of “this is it and that’s okay.” Nobody bothers with creating a stage, surround sound, vibration and noise insulation of doors, or selection of components. As a rule, with a normal head unit, the music already at two-thirds of the volume begins to distort and wheeze. Some tools are completely lost, resulting in a mess.