Published: 10/20/2020
- Self check
- Tips for use
- Electrical connection
- How to make a tow bar yourself
- Types of towbars
- Installation
- Installation
- Types of towbars for VAZ 2110/2112, advantages of use and differences in installation
- Go to Main page
- Step-by-step description of the work
- How to install a towbar on a VAZ 2112 yourself
- Selection and installation instructions for a towbar on a VAZ 2110
Tips for use
What facts should you know about towbars and VAZ cars:
- the model of the car in question, called 2110, is not designed to move heavy loads (houses, carriages with two axles), including other passenger cars;
- if you accidentally bought a towbar with an unsuitable socket (thirteen-pin instead of seven-pin), you can use an adapter;
- for the “ten”, a trailer is suitable, the load capacity of which does not exceed half a ton, therefore the towbar should be selected taking into account this safety margin of the vehicle;
- the holes in the purchased towbar may coincide with the technological holes in the car structure, then you will not have to drill them to secure the towbar beam to the VAZ;
- do not forget to cover the surfaces of the new metal device with a special car paint to match the car immediately after assembly.
It is not necessary to buy a more spacious car if your VAZ 2110 is not enough to accommodate all your things when traveling. Simply attach a lightweight trailer to your car using a towbar, which fully transmits all light signals to the trailer's headlights.
Installation work
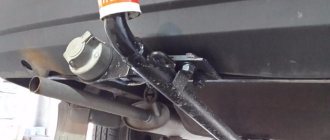
You can install it on a VAZ without removing the bumper. But then you will need to drill holes in the floor to get the wires out. But this can be completely avoided by simply removing the bumper from the car.
After this you can start drilling holes:
- Make two holes for the brackets with your own hands, treat them with anticorrosive;
- Install the towbar, securing it with bolts and nuts;
- Drill four more holes: two in the lower part of the side member and two more in the trunk;
- Attach the device to them using special nuts.
Electrical connection
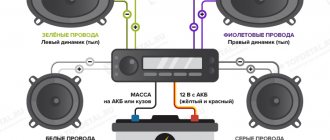
After installing the towbar on the VAZ 2110 and attaching it to the body parts using the above method, you need to connect the towbar socket to duplicate important road signals behind the towbar during traffic and stopping the composite vehicle (car + trailer). In order to connect the wires correctly and safely, the car owner should always follow the diagram that comes with the factory-made tow bar. The towbar electrical socket on a VAZ suggests that it has seven places for connecting contacts.
After the wires from the car lights are threaded through the technological hole, which became accessible after removing the bumper, you can start connecting the corresponding wires. Connection diagram with decoding of the meaning of the signals and indicating the color of the wire:
- L — left turn signal, wire color — yellow.
- 54-G — rear fog light 12 V (this option may not be available), color — white.
- “31” – ground (earth, grounding, “—”, minus), wire color – black.
- R - right turn signal, wire color - green-yellow.
- 58 R - rear lights for illuminating the license plate, as well as the right side light, brown wire.
- “54” - stops (brake lights), red wire.
- 58 L - left side marker light, blue wire.
Requirements for the minimum thickness of each core, in square millimeters - from 1.5 mm 2, for the ground wire - from 2.5 mm 2.
Towing hitch connection
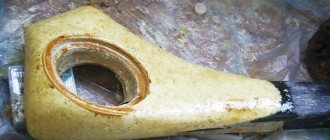
If you removed the bumper during installation yourself, you should have noticed three rubber plugs in the body. You will need to replace the middle one so that you can pass wires through it later. They are laid under the threshold and lead to the left headlight.
The wires are connected by color, that is, they are inserted into the harness with the rear lights. And then the socket is installed, which is mounted on the bracket.
Please remember that wiring connections may differ in each individual case. Therefore, you should read the instructions for your car.
Installing a tow bar on a VAZ
How to make a tow bar yourself
If not a single factory towbar fits your VAZ, try making it yourself. To do this you need to prepare:
- square steel pipe (about 1 m in length);
- several sheets of steel of the same thickness (width - 7 cm, length - 20 and 30 cm) or shorter pieces of pipe;
- bolts (M 10 - 2 pcs., M 12 - 6 pcs.), four-centimeter screws with nuts;
- socket;
- file and sandpaper;
- a metal hook, preferably with the same ball (the latter is used as a cap, retainer or towbar plug);
- wires (cores), insulating tape;
- primer and paint.
If you need to make a tow bar for your VAZ yourself so that the product looks beautiful, you should stock up on ready-made drawings or draw at least a simple diagram on paper or in a computer program. The simplest version of a homemade towbar is a horizontal bar, to which a pipe with a hook is firmly attached in the middle. For greater strength, it is also advisable to make sidewalls that are installed strictly perpendicular to the main beam.
How to make a towbar yourself (the example is given for clarity, you can choose the towbar sizes that you like, the main thing is to maintain the proportions and check the preliminary calculations “in kind” several times, that is, by measuring the rear of the car):
- Remove all items and upholstery from the trunk, turn off the power to the car and remove the rear bumper.
- Using metalworking tools and a welding machine, make a shape out of a square pipe that slightly resembles a flattened letter “P” by welding to the main piece of the towbar pipe (length - 110 cm) on the sides two of the same pieces, but shorter (the length of each of the 2 - x side parts - 26 cm).
- Strengthen the weak points formed on the welds of the metal structure by welding or screwing the corners (the width and length of each of the two sides of the strengthening corners is about 12 cm, but the final number depends on the thickness of the piece of pipe you selected).
- Drill holes for mounting to the car frame (two on each side).
When performing metal work (cutting, drilling), do not forget to take safety measures appropriate to the tools used, and immediately process (clean) the edges of metal products with sharp “burrs”.
Take the hook and drill a hole in the middle of the structure that matches the base of the hook in shape and size. Weld or screw this part to the towbar being manufactured.
VAZ 2110 installation of a towbar, independent installation of a towbar
Despite the versatility of towbars for the Lada family, models for the VAZ 2112 have some differences. The towbar platform can be monolithic or bolted together. The length of the trailer hitch for the VAZ 2110 and 2112 is different, so during installation a problem may arise with a mismatch between the holes for fasteners and the position of the clutch hook.
It should also be taken into account that the VAZ 2112 muffler mount covers one of the four holes for attaching the tow bar. If you want to install a tow bar for the “ten” on a hatchback, you will have to somehow adjust it using improvised tools and an angle grinder. Conclusion - the design of the trailer hitch for the VAZ-2110 differs from the same product for the VAZ-2112 in that the VAZ-2112 has a shorter rear overhang, which is why the muffler is located closer to the rear bumper, i.e. the VAZ-2110 has a towbar mount devices on the left side are longer. The connection of the electrical component of the VAZ 2110 and VAZ 2112 towbars is identical.
The first thing I would like to note in this section is “Read the instructions!”, it is always attached to certified trailer hitches, it is clear and written in understandable language. As an example, instructions from a tow hitch for a VAZ 2110.
Usually the instructions say about installing the tow bar without removing the bumper, but then you will have to drill an additional hole in the floor to bring out the electrical wiring. To avoid this, it is better to remove the bumper from the car. It is advisable to carry out installation work in a garage with an inspection hole and an assistant, or trust professionals at a service station, as recommended in the instructions.
Take the choice of a towbar for your car seriously and responsibly
To install a tow bar in holes you made yourself, you will need the following tools:
Installation should be carried out as follows:
Read more: Jaguar car alarm review Jaguar instruction manual
A durable, high-quality towbar is a guarantee of safety on the road
Video summary on self-installation of a towbar on a VAZ 2110. How to install a towbar on a VAZ-2114 with your own hands:. Thanks for watching, don't like it. Do not forget.
Types of towbars
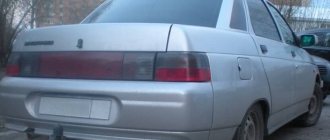
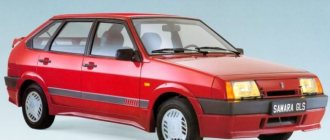
The VAZ 2110 is an ordinary medium-sized Russian-made car that can fully satisfy the needs of the average driver. It is quite powerful, economical and capacious, so that it can be comfortably transported from point A to point B. But we are interested in how the towbar will look on it, right?
In this regard, the car is simply impeccable: a powerful subframe and a fairly low plastic bumper allow you to freely install towed equipment on the car. At the same time, the hardness of the body and the appearance of the car will not be compromised. But more on that later, first we’ll figure out what kind of tow bar we’ll install on our VAZ 2110 car. There are several options for towed equipment in the world, their geographical distribution is such that a model found in one side of the world is not found at all in the other. So, in America, a model of towed equipment that looks like a square is widely found. Theirs can have different sizes, and the maximum carrying capacity of a car with a trailer directly depends on this.
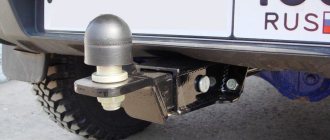
Our tow bar has a slightly different look and its main part is the trailer ball, which acts as a connecting link between the trailer drawbar and the car. In this form, in most cases you can see towed equipment on cars.
Installation of towbar VAZ 2110 / 2112
How to install a tow bar on a VAZ
2110/
2112
: https://okuzove.ru/modifikacii/farkop-na-vaz-2110-2112-svoimi-rukami.html
.
The VAZ 2110 is also equipped with a tow bar of this type. Due to its ideal spherical shape, it became so widespread. After all, earlier, even on Soviet cars, the tow bar looked like a tow hook, and the trailer drawbar simply clung to it. Here everything is different: the trailer drawbar is put on the ball, and due to its perfect smoothness it slides over it. When the car moves, the trailer can move in the horizontal and vertical plane, without the car even feeling it. So, when turning, the trailer moves smoothly and continues the trajectory of the car.
Tow bar for VAZ 2110
Recommendations for choosing a tow bar
Based on the experience of experienced motorists, the following can be noted:
- When choosing between a monolithic and collapsible trailer hitch, it is better to give preference to a solid one, so that you do not have to constantly monitor the fastening elements of the component parts. But when the welds wear out, the entire tow bar will have to be thrown out;
- It is better to choose towbars for the VAZ 2110/2112 with a removable ball to avoid injuries when approaching the trunk and excess dirt in the garage and clothes;
- if you have chosen a towbar whose ball cannot be removed, purchase a special protective cap for it at any auto store and protect your clothes from stains of dirt and grease;
- do not overload the car (VAZ-2110/2112 can tow a trailer with a total weight of up to 800 kg - with brakes or up to 400 kg - without brakes);
- Remember that a car trailer is a highly dangerous vehicle, so you should not skimp on a trailer for the VAZ 2110 and 2112.
Give preference exclusively to certified models that have passed all necessary tests
By spending about two hours of your time installing the purchased towbar, you will not only turn your car into a universal assistant, suitable for traveling from/to the dacha, large-scale outings for a picnic or fishing, transporting large loads, but also receive additional rear protection. bumpers when parking. The final step in transforming the car will be purchasing a trailer and preparing documents for it.
The most interesting and popular articles on our channel in Yandex.Zen
Similar articles:
Mailboxes in an apartment building, whose are they anyway? Listed in clause 15 of the Rules for the maintenance of common property...
Return of goods that do not correspond to the description In accordance with Part 5 of Art. 18 of the Law of the Russian Federation “On the protection...
How does the filtration system work? Sellers will tell you that special cartridges purify water from scale and flow…
Results of the procedure Cadastral engineer can only be an individual. His qualifications are confirmed by the appropriate certificate.…
If you are one of those drivers who have repeatedly thought about increasing the cargo-carrying capabilities of your vehicle, purchasing a trailer would be a great decision for you. But before you think about purchasing it, you must first install a towbar on the VAZ 2110/2112. You can do this yourself by carefully understanding all the intricacies of choosing and directly installing a traction device.
Installation
Installing a towbar yourself should not be too difficult for you. Although it is better to immediately enlist the help of an assistant, and also have a viewing hole at your disposal.
Prepare a set of tools necessary for the job, which includes:
- A drill on which you can adjust the speed;
- Kern;
- Knife;
- Screwdrivers;
- Drills with a diameter of 12.5, 13 and a countersink of 20 millimeters;
- Keys;
- Hammer;
- Insulation tape;
- Lubricant with anti-corrosion properties.
The installation procedure is as follows.
- Attach the towbar to its future location. Make two holes through the holes in the towbar mounting bracket.
- Using a countersink, all burrs from drilling are removed. Treat the surface with anti-corrosion lubricant so that the surfaces are pressed tightly against each other.
- The towbar amplifier must be secured with two bolts through the plate.
- We go to the next pair of holes in the bracket, through which the spar is drilled from below.
- A hole is drilled from the trunk towards it through the amplifier plate.
- This way the holes made will coincide and the bolts can be installed in them. Be sure to use washers.
- Now we tighten all four bolts that hold our tow bar in place. Remember to control the force, since over-tightening the fasteners will damage the metal of the spar. To improve the effect, take a short sleeve that is passed through the bolt in the spar. This will allow the metal of the body to press tightly against the ends of this bushing, thereby increasing the reliability of the fixation.
- In the area where you removed the bumper, there are three plugs. We pull out the middle one, and the freed hole is useful for starting the wiring to connect the trailer to the power supply.
- Additionally, make a hole in the inner panel so that the hole comes out to the left of the lock. Through these holes, wiring is carried out from the connector to the rear left light. Be sure to seal the wires.
- The connector must be fixed on the platform provided by the tow bar. Before connecting, do not forget to disconnect the negative cable from the battery.
- The connection is made according to the diagram, in accordance with the color of the wiring. The wires must be cut into the desired wiring, insulated and carefully laid in place.
If you correctly install and connect the towbar, you can increase the load-lifting capabilities of your VAZ 2110, use the car to transport your own belongings, or engage in transportation services. This is a completely worthy option for part-time work. Plus, you can always go out into nature with everything you need.
Remember to properly place cargo in the trailer. This should be done evenly, maintaining balance. Do not throw everything to one side so that sudden loads do not act on the towbar while driving. This may cause it to break.
Installation
Installing a towbar yourself should not be too difficult for you. Although it is better to immediately enlist the help of an assistant, and also have a viewing hole at your disposal.
Prepare a set of tools necessary for the job, which includes:
- A drill on which you can adjust the speed;
- Kern;
- Knife;
- Screwdrivers;
- Drills with a diameter of 12.5, 13 and a countersink of 20 millimeters;
- Keys;
- Hammer;
- Insulation tape;
- Lubricant with anti-corrosion properties.
Before starting installation, remove the rear bumper and trim from the sill. This will make it more convenient to carry out work, marking, and installation. Plus, you don’t have to make additional holes in the bottom for wiring.
The installation procedure is as follows.
- Attach the towbar to its future location. Make two holes through the holes in the towbar mounting bracket.
- Using a countersink, all burrs from drilling are removed. Treat the surface with anti-corrosion lubricant so that the surfaces are pressed tightly against each other.
- The towbar amplifier must be secured with two bolts through the plate.
- We go to the next pair of holes in the bracket, through which the spar is drilled from below.
- A hole is drilled from the trunk towards it through the amplifier plate.
- This way the holes made will coincide and the bolts can be installed in them. Be sure to use washers.
- Now we tighten all four bolts that hold our tow bar in place. Remember to control the force, since over-tightening the fasteners will damage the metal of the spar. To improve the effect, take a short sleeve that is passed through the bolt in the spar. This will allow the metal of the body to press tightly against the ends of this bushing, thereby increasing the reliability of the fixation.
- In the area where you removed the bumper, there are three plugs. We pull out the middle one, and the freed hole is useful for starting the wiring to connect the trailer to the power supply.
- Additionally, make a hole in the inner panel so that the hole comes out to the left of the lock. Through these holes, wiring is carried out from the connector to the rear left light. Be sure to seal the wires.
- The connector must be fixed on the platform provided by the tow bar. Before connecting, do not forget to disconnect the negative cable from the battery.
- The connection is made according to the diagram, in accordance with the color of the wiring. The wires must be cut into the desired wiring, insulated and carefully laid in place.
If you correctly install and connect the towbar, you can increase the load-lifting capabilities of your VAZ 2110, use the car to transport your own belongings, or engage in transportation services. This is a completely worthy option for part-time work. Plus, you can always go out into nature with everything you need.
Remember to properly place cargo in the trailer. This should be done evenly, maintaining balance. Do not throw everything to one side so that sudden loads do not act on the towbar while driving. This may cause it to break.
The towbar on the VAZ 2110 is indispensable for those car owners who do not have enough trunk space to transport the necessary things. For this reason, a trailer hitch is installed to attach a trailer or carriage, a device for transporting other cars, to your vehicle.
Installation of trailer equipment
On the VAZ 2110, trailer equipment is installed relatively simply. We only need:
So, as we can see from the list, we can understand that the installation process can be divided into mechanical and electrical stages. This is due to the fact that it is important to correctly install the towed equipment and prepare the trailer, taking into account the Road Traffic Regulations.
The trailer must be equipped with a light alarm that will indicate the further direction of the vehicle's movement. Without this, you cannot operate the car.
We will assume that you have a ready-made tow bar. For the VAZ 2110 it is quite possible to find a ready-made model that will be specially designed for it. We will need to attach the towbar to the subframe of the car and mark the places where we will then drill holes for fasteners. Next, we better remove the rear bumper. This is important, because the drill may come off, or we ourselves may accidentally lean on it and push through it. The bumper will cost a lot now, so we'll remove it as a precaution. After drilling the holes, we screw the trailer frame to the car. We're done with the mechanical part, let's move on to the electrical part. Here we will need to screw a special socket to the towbar and connect all the signal wires from the stops, turn signals and reverse signal to its connectors. Next, we need to route the wiring along the trailer and connect it to a socket, which, when connected to the socket, will provide duplication of signals from the rear of the car. The main thing here is that it is important not to confuse the connector and the corresponding plug plug so that everything is connected correctly.
Types of towbars for VAZ 2110/2112, advantages of use and differences in installation
Among the variety of towbar devices, that is, towing devices that can be installed on a VAZ model 2110, 2111 or 2112, several main groups can be distinguished: towbars, which can be installed in existing special holes on the car, manufactured by the factory - by the manufacturer, or done independently.
In this case, the first group includes those holes that are provided specifically for installing a traction device or those that were technologically conceived for other purposes, but were adapted for towbar installation by skillful car enthusiasts. Depending on the method of installation/removal of the traction device, the towbar for VAZ 2110, 2111, 2112 is a stationary (not removable) or removable device, monolithic or dismountable (parts are replaceable). Also, the differences between towbars concern their sizes.
Preparatory work
Take the necessary tools and materials:
- adjustable electric drill with drills;
- a set of keys;
- knife;
- punch for marking;
- hammer;
- a rag;
- anti-corrosion lubricant;
- insulating tape;
- reinforcement plates;
- bolts and nuts;
- self-tapping screws;
- washers.
Remove the rear bumper and trim. As practice shows, if you do not remove the bumper, in this case you will have to additionally drill the bottom to wire the trailer-device socket. It is also necessary to de-energize the vehicle by removing the terminal from the battery.
Installation technology
Instructions “How to install a tow bar on a VAZ 2110”:
- Attach the towbar to the lower rear of the car where it is intended to be attached.
- After the towbar for the VAZ 2110-2112 is firmly pressed to the body and centered, drill holes at the level of the finished holes in the upper brackets (you need to make all four upper holes - 12.5 and 13 mm on each side). After treating the notches at the drilling site, do not forget to coat the edges with an anti-corrosion agent.
- Insert the spacer bushings and, with a couple of movements, lightly screw the towbar onto the VAZ 2110/2111/2112.
- In the same way, you need to attach the towbar to the lower brackets to the side member. To do this, press the other two holes located on the tow bar in the middle of the mount to the desired location and drill through the spar from below. In this case, you first need to hold the drill from above, and after that you will also need to go from below, towards the inside of the trunk. Insert the bolts, but tighten them gradually, without applying excessive force, using bushings to avoid deformation of the side member being tightened during this process.
Types of towbars and advantages of their use
Depending on the installation method, towbars can be divided into types:
- towing device, which is installed in the holes provided by the manufacturer;
- Towing hitch installed in technological holes;
- Tow hitch mounted in holes made independently.
Naturally, the easiest way is to install the device according to the instructions in the holes provided for this. To install a towbar in technological holes or those made by yourself, you will have to use tools and do the work more accurately and painstakingly.
If we consider towbars by production method, we can distinguish:
- factory;
- handicraft (homemade) production.
Factory trailer hitches that have passed certification and have a full set of necessary fasteners and wires have a clear advantage in quality, although they cost a little more. But a handicraft or home-made product, due to the lack of a certificate, will not allow your car to pass inspection and will bring a fine from the traffic police, since it is “... a change made to the design”, noted in section 4, chapter 5 of the Technical Regulations of the Customs Union 018 /2011 “On the safety of wheeled vehicles.”
Step-by-step description of the work
✓ First you need to remove the bumper. ✓ Next – cut off the eyes. ✓ Here you need to take a drill and make holes.
✓ We take a welding machine and weld the fasteners. ✓ Now you need to weld the second tube in the center to make a right angle connection. ✓ You need to take a grinding wheel and coarse sandpaper and clean the seam and edges of the tubes. ✓ The manufactured structure is coated with a primer. ✓ Now the structure is covered with paint.
To strengthen the spar, we install a small angle with nuts. This will create a tow bar with a removable structure. You can use headlights to power the towbar, and use a connector to power the socket. Ready! Now you have a full-fledged homemade tow bar.
When making a homemade towbar, you need to try it on all the time, controlling where it is placed on the car.
What to choose?
To connect a trailer, you first need to acquire the towbar itself. Today, VAZ 2110 owners are offered two options:
It is noteworthy that both options are worthy of each other, they have positive and negative sides. Let's look at them.
Homemade tow bar
To manufacture it, you will need the appropriate drawings, according to which the unit is assembled. Often their level of reliability is in no way inferior to their factory counterparts, and sometimes even surpasses them. Homemade does not mean you will assemble it yourself. Although some are capable of this. There are many workshops where you can order the production of a tow bar. The price depends entirely on your requirements and the manufacturer's conditions.
Drawing
This is due to the use of higher quality materials by craftsmen than those provided at the factory. But at the same time, the overall weight of the structure increases.
But the makeshift towbar has a weak point - the seams. They are not subject to control similar to the factory control. Therefore, in appearance the design may be reliable, but in reality the seam barely holds the towbar elements together.
Article on the topic: Repairing the fuel pump on a VAZ 2109 (carburetor)
Don’t forget that homemade towbars are often sold without anything, so all kinds of fastenings have to be purchased separately.
Factory tow bar
Factory products are more expensive than homemade ones. Actually, this is the only serious drawback of such towbars. Of course, if you don’t take into account potential marriage, which, unfortunately, you sometimes have to deal with.
Towbar
However, the price is actually not that high. A good towbar from the factory will cost about 1.5 thousand rubles. But you get a reliable design, matching elements, and a complete set of fasteners.
To summarize, we can say that it is better to choose towbars with a removable tow ball. Similar systems are provided on European cars from leading companies.
If the trailer part can be removed, this will allow you not to get dirty while in the garage and not have to deal with eternal grease on your pants. When required, the element is put in place, a trailer is attached to it and off you go.
But if you were unable to purchase such a unit, and the structure turned out to be solid, take into account protective caps and linings. They are affordable and can be found at any auto parts store.
Selection and installation instructions for a towbar on a VAZ 2110
The towbar on the VAZ 2110 is indispensable for those car owners who do not have enough trunk space to transport the necessary things. For this reason, a trailer hitch is installed to attach a trailer or carriage, a device for transporting other cars, to your vehicle.
In this case, the first group includes those holes that are provided specifically for installing a traction device or those that were technologically conceived for other purposes, but were adapted for towbar installation by skillful car enthusiasts. Depending on the method of installation/removal of the traction device, the towbar for VAZ 2110, 2111, 2112 is a stationary (not removable) or removable device, monolithic or dismountable (parts are replaceable). Also, the differences between towbars concern their sizes.
Preparatory work
Take the necessary tools and materials:
- adjustable electric drill with drills,
- a set of keys,
- knife,
- punch for marking,
- hammer,
- rag,
- anti-corrosion lubricant,
- insulating tape,
- reinforcement plates,
- bolts and nuts,
- screws,
- washers.
Remove the rear bumper and trim. As practice shows, if you do not remove the bumper, in this case you will have to additionally drill the bottom to wire the trailer-device socket. It is also necessary to de-energize the vehicle by removing the terminal from the battery.
Installation technology
Instructions “How to install a tow bar on a VAZ 2110”:
- Attach the towbar to the lower rear of the car where it is intended to be attached.
- After the towbar for the VAZ 2110-2112 is firmly pressed to the body and centered, drill holes at the level of the finished holes in the upper brackets (you need to make all four upper holes - 12.5 and 13 mm on each side). After treating the notches at the drilling site, do not forget to coat the edges with an anti-corrosion agent.
- Insert the spacer bushings and, with a couple of movements, lightly screw the towbar onto the VAZ 2110/2111/2112.
- In the same way, you need to attach the towbar to the lower brackets to the side member. To do this, press the other two holes located on the tow bar in the middle of the mount to the desired location and drill through the spar from below. In this case, you first need to hold the drill from above, and after that you will also need to go from below, towards the inside of the trunk. Insert the bolts, but tighten them gradually, without applying excessive force, using bushings to avoid deformation of the side member being tightened during this process.
How to install a towbar on a VAZ 2112 yourself
A towbar is a specialized traction device. The device is designed to optimally secure the trailer to the vehicle and distribute the load as evenly as possible. Car enthusiasts know that a tow bar can expand the vehicle’s capabilities and provide the maximum level of safety when transporting significant loads. Experienced professionals say that a properly installed towbar not only gives the car an attractive aesthetic appearance, but also adds many functions to it.
Why do you need a tow bar?
Beginner car enthusiasts believe that a tow bar can only perform a protective function. Of course, this opinion is wrong, since the product not only protects from rear impact, but also helps to move fairly bulky loads without any fear. At the moment when it is necessary to install a towbar on a VAZ-2112 car and many others, you must first know that today experienced professionals represent four main areas of this unit:
- removable, which are secured with specialized locks;
- conditionally non-removable, fixed with bolts;
- welded;
- end
Naturally, depending on the different types of vehicle, different types of towbars are selected. This is due to the fact that when choosing such a configuration, it is necessary to take into account not only the weight of the vehicle and future cargo. The make of the car, its weight, the type of trailer and other features also matter.
Since modern vehicle owners repeatedly try to independently install a tow bar on a VAZ 2112 car, competent service center professionals have created instructions that will help carry out this action without any errors.
Step-by-step instruction
Before you begin installing a tow bar on your car, you need to purchase it. The peculiarity is that professionals recommend buying only completely suitable spare parts. A high-quality tow bar directly from the manufacturer is equipped with the following parts:
- towing device;
- specialized metal plates;
- bushings:
- appropriate wires and sockets.
Naturally, such a package is accompanied by specialized instructions, which state that you can install specialized components without first dismantling the bumper. However, in this case, the owner of a VAZ car must be prepared for the fact that there will be a need to drill additional holes in the floor. Professionals do not recommend carrying out such activities and adding extra holes to the lower part of the car.
Algorithm of actions
- We dismantle the bumper;
- Remove the door sill trim;
- Using a specialized tool, we drill several holes that should pass through the holes of the bracket. In this way we create binary fastenings for the towbar. It is worth noting that the diameter of the hole should not exceed 13 mm.
- We process the holes with a specialized tool;
- We secure the device using a reinforcing metal plate;
- Tighten the bolts and place a washer;
- In the lower part of the spar we make two symmetrical holes for the lower fastening;
- In order to avoid differences or mismatches between holes, it is recommended to use a specialized reinforcing pad;
- Tighten the fastening nuts.
After carrying out such actions, the installation of the towbar on a VAZ car is considered complete. All that remains is to connect it correctly.
Features of connecting the coupling device
At the time of dismantling the bumper, each vehicle owner can see that in the body there are three specialized plugs made of high-quality rubber. To connect the part, you need to pull out the middle plug. We insert the sealing sleeve into the existing connector and pass the wires through it. Do not forget that you must first make specialized holes in the inner panel.
The wires are laid directly to the left lamp along the thresholds of the car. Connection is carried out by color; insertion is provided in a specialized harness for rear lights.
Professionals recommend fixing the socket to a bracket. This will help keep the wires intact and eliminate unnecessary noise when moving.
All activities associated with installing this part on a VAZ 2112 car take no more than a few hours. However, if the car owner is unable to carry out such actions on his own, then it is imperative to contact experienced professionals at the service center.
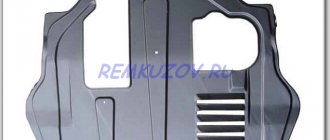
Installing a fender on a VAZ 2110-2112
Did you like the article? Share with friends: