The data that the sensor sends to the system determines whether the correct amount of fuel or a lean mixture will be supplied to the engine cylinders. Which, ultimately, will lead to a loss of traction of the power unit, and then to the fact that the engine will completely stall. Let's consider the device in the context of the VAZ 2114 model, which is considered one of the most popular in our country at the moment. What is the VAZ 2114 mass air flow sensor, how to check the sensor and how is repair carried out?
Purpose of the mass air flow sensor
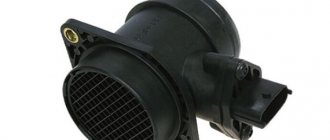
The mass air flow sensor is a complex electronic device that regulates the fuel injection system into the engine cylinders. It is responsible for how much air is contained in the engine. It is known that in order for the power unit to come into action, it is necessary that air and fuel be supplied in half. Then an atmosphere is created inside the equipment that is ideal for striking a spark and setting all mechanisms in motion.
The difference is significant. The system, receiving this information, trustingly follows it. The proportions of air and fuel are disrupted, and a slightly smaller amount of fuel is injected, which is called a “lean mixture.” Symptoms of this problem are a sharp decrease in engine power, controllability and dynamics. The consequence of this “disease” is the engine’s refusal to start. And then the driver has to puzzle over what actually happened.
Therefore, from time to time you should check the working condition of the sensor, so as not to waste much more time on engine diagnostics. There are several ways to check the sensor, but the most popular is diagnostics using a multimeter - a simple device that every car owner would do well to keep in his toolbox.
Checking the air flow meter
One way to check the air flow sensor
There are several ways to detect a malfunction of this sensor. The easiest way is to disconnect the power supply from the sensor while the engine is running. After the chip is turned off, the control unit goes into emergency mode, in which fuel dosage is carried out according to the readings of the throttle position sensor. In this case, the idle speed will begin to increase to over 1500 revolutions, although not always; some injection systems do not increase the speed.
With the flow meter turned off, you need to drive the car. If the performance of the power plant has improved, most likely there are problems with the mass air flow sensor.
Video: Demonstration of a faulty mass air flow sensor on Kalina, Priora, Grant, VAZ 2110-2112, 2114-2115
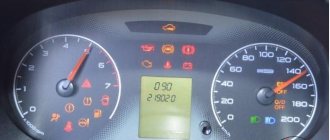
Some sensors can be checked using a voltmeter or multimeter with high precision settings. The measuring device is connected with a “positive” probe to the MAF signal wire (usually the far right wire), and with a “negative” probe - to the ground wire of the sensor. Then you need to turn on the ignition, but do not start the power plant. A working sensor should have a voltage between 0.9 and 1.4 V. The readings above indicate a sensor malfunction.
Very often the failure is caused by contamination of the working elements of the sensor. Therefore, a visual inspection can also indicate a malfunction.
If the working elements of the sensor are noticeably heavily soiled, this is most likely the cause of problems with the operation of the power plant. But restoration work can be done with sensors based on a pitot tube. They can be removed from dirt by washing with a carburetor cleaning spray.
Symptoms and troubleshooting
Since the mass air flow sensor is electronic equipment, and a very complicated one at that, most car owners do not dare diagnose it themselves and take it to a car service center the old fashioned way. But quite often, having just connected the diagnostic device to the sensor, the auto repairman declares that the device is completely faulty, it cannot be repaired, and its place is only in a landfill. Rest assured, if you bring in a completely new sensor, the technician will tell you the same thing.
But any disinterested expert will say that the mass air flow sensor is an almost indestructible device. It may malfunction, sometimes seriously, but this is a completely fixable problem, something that will take no more than an hour. But how to check the mass air flow sensor for performance? Very simple. If, after installing a new sensor on your car, you notice that it works perfectly, then that is where the problem lies. If the situation has not improved at all, then there is no point in wasting your energy, time and money on the empty hassle of replacing a completely “healthy” sensor.
Just above we mentioned such a device as a multimeter. You can understand whether the sensor is working or not by finding out the voltage of the device. If everything is normal, then the multimeter produces 1-1.2 W. If there are any problems, then the scale goes down, the critical mark starts at 0.99 W. If, on the contrary, the voltage is higher than normal, for example 1.037, then this indicates one thing: the sensor is very clogged, and therefore makes errors in the readings. If you clean it, it will work again at the same rate.
First of all, this is a sharp increase in fuel consumption. Here you should not blame the car for its large “appetites”: it is not to blame, and the manufacturer is not to blame, here you just need to “treat” your “iron horse”. Of course, this can happen not only in the case of a sensor failure, but from this fact alone you can come to the right idea: most likely the problem lies in the tiny device.
Also, when the engine loses power, a hot engine will stop starting. The car, previously dynamic and controllable, turns into some kind of monster on wheels, which is constantly lost in control and “freezes”. And finally, if you see a simple Check Engine sign on the instrument panel, then there can be no doubt: this sensor is asking you for an ambulance.
Troubleshooting methods
If the diagnostics show that the mass air flow sensor is not working, then many car owners decide to immediately install a new sensor. In some cases, cleaning the regulator makes it possible to revive it.
How to clean the VAZ air flow sensor:
- First, using a Phillips-head screwdriver, you need to loosen the clamp securing the air intake pipe. Remove the corrugation and make sure that there are no traces of engine fluid or condensation inside. Also perform a visual inspection of the regulator surface.
- As practice shows, the cause of the problem is often the sensitive element, which usually breaks due to the accumulation of dirt inside the device. To prevent dust from accumulating, it is necessary to change the air filter from time to time.
- The controller itself is mounted on the corrugation using two bolts; they can be unscrewed using an open-end wrench. If you need to remove and replace the regulator, you can do so at this stage.
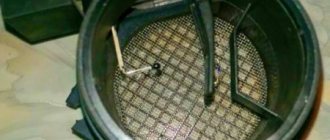
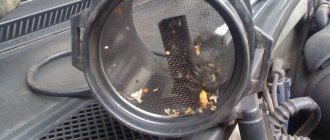
- From the front you can see the entrance on which the sealing rubber is mounted. Its purpose is to protect the system from the suction of dirty air flow coming from outside and not passing through the filter. If there is no sealing rubber, then most likely it could get caught through the filter element. Ultimately, the device's inlet mesh may become dirty. To restore functionality, you can try to clean it; for this, improvised means are used. For example, in practice, the mesh can be effectively cleaned with a toothbrush or toothpick. Alternatively, you can use WD-40 or a special cleaner for cleaning.
- After cleaning is completed, a rubber seal must be installed in place. When all work is completed, the regulator is put in place, all components are assembled in the reverse order.
Sensor repair
Any electronic device has a huge disadvantage: sensitivity to the slightest power surges, pollution, aggressive environmental influences and many other factors. If even a tiny particle of dirt or dust gets into the air flow entering the engine, it will certainly settle on the sensor, which, being so vulnerable, attracts such troubles to itself like a magnet.
Continuing to work in this state, he is forced to increase the load, as dust ballast interferes with him. Consequently, it starts to fail. Also, if low-quality oil or bad gasoline is poured into the engine, all this first of all has a very negative impact on the electronic device. That is why it is so important to pay attention to air, oil and other filters and not to skimp on the quality of fuels and lubricants poured into the engine.
Having made sure that the VAZ mass air flow sensor is faulty, we move on to the next stage - repair. Repair consists of a good cleaning. But how is the mass air flow sensor cleaned and is it possible to do this work with your own hands? To begin with, you should remember, like a multiplication table, that in no case should you use the following for flushing:
For cleaning, use carburetor cleaning fluid. The most popular in this matter is WD 40, which has good technical properties and is safe for electronic devices. You need to wash the sensor carefully so as not to damage the thinnest plates and wiring.
After making sure that there is no more dust or debris in the device, you can, after thoroughly drying it, install it in place. As a rule, after such a simple procedure, the device should work like a good Swiss watch. We have discussed the most frequently asked questions regarding the mass air flow sensor. Now you know why it breaks, what needs to be done to protect it, and what to do if it suddenly malfunctions. We wish you good luck on the roads and good mood!
Why it is not recommended to clean the mass air flow sensor on a Priora and how to do it correctly
The mass air flow sensor cannot be repaired, so if it malfunctions, it must be replaced. However, there is an exception to this: if the DTVV fails, then the thermistor can be replaced by selecting the appropriate type depending on the resistance
If the sensor begins to show incorrect values, which happens if the silicon crystal is dirty, then it can be cleaned, but it is important to understand that such manipulations are only temporary, and soon the possibility of recurrence of problems with the mass air flow sensor cannot be ruled out
Why is it not recommended to clean the film mass air flow sensor used on Priora? Let's look into this issue in depth.
If you decide to clean the mass air flow sensor on a Priora, where a film type of product is used, then it is important to know the following:
- Such substances are strictly contraindicated for use for flushing. Like ketones and esters. This is due to the fact that they dissolve the compound layer that covers not only the board, but also the platinum branches connecting the crystal to the processor on the board. If the compound is dissolved, then thin branches (their thickness is less than 0.01 mm) will be damaged by passing air.
- When silicon comes into contact with ketones and esters, the wafer cools, which can ultimately be damaged.
- When exposed to the substances described above, the coating on the polymer film, which is located on the crystal itself, is also washed off. If the coating is washed off, the film is simply deformed.
- It is strictly contraindicated to blow or clean the product with a compressor (that is, you cannot apply a stream of compressed air to the crystal area), as this will lead to deformation of the branches.
If you are convinced that your air flow sensor on the Priora needs to be cleaned, then it is recommended to perform the procedure correctly. To do this, it is best to use the following substances:
- WD-40;
- "Liquid key";
- isopropyl alcohol;
- special liquid for cleaning the air flow sensor.
It is best to use a special cleaning liquid, but it is naturally more expensive than other cleaners. That is why, when choosing among budget cleaners, you need to give preference to isopropyl alcohol, since, unlike WD-40 and Liquid Key, it does not form an oil film on the surface, which will also need to be washed off. Preparations that are intended for cleaning carburetors and contain acetones, ketones and ethers are strictly contraindicated for use in cleaning the air flow sensor on a Priora.
This is interesting! Washing should be done using a syringe and a needle, from which you need to pour a thin stream onto the surface of the sensitive element.
How to check the mass air flow sensor on a VAZ 2114 car with your own hands?
The mass air flow sensor is used to estimate and balance the air flow entering the engine. Signals from the device are sent to the motor control unit. Based on data from the mass air flow sensor and other sensors, the required mixture composition is formed. To prevent the device from breaking down on the road, it is necessary to diagnose it. There are several ways to check the mass air flow sensor on a VAZ 2114.
This is interesting: Adjusting the Gazelle rear axle gearbox
Checking with a multimeter
Of the entire list of sensors in a car, the DMRV is the most expensive. Its cost in auto parts stores reaches 3000-4000 rubles. There is also a possibility of purchasing a counterfeit or inappropriate spare part model. Before the replacement procedure, you should make sure that the element gives the correct readings on the multimeter. A step-by-step check of the sensor using a multimeter looks like this:
- To begin, set the multimeter to DC measurement mode (readings up to 20 V);
- Use a red probe to connect to contact number 5, and connect a black probe to the third contact;
- Without starting the engine, turn the ignition key to the last position.
For a convenient interpretation of the readings from the multimeter, we will provide a complete table of voltage showing the wear of the part.
This element is quite sensitive to dirt, oil and other debris. To prevent its early failure, you should change the air filter more often and monitor the wear of the engine piston group. When there is a lot of wear, oil begins to seep into the intake system, which makes it impossible to take accurate readings of the incoming air.
You can change the mass air flow sensor yourself in a matter of minutes, so there is no need to rush and purchase a new part. Often the problem with floating speed and periodic engine shutdown at idle lies in other malfunctions. Make sure the wiring is intact, the readings are correct, and only then proceed to replacing the element. Below we present the air volume indicators that correspond to the normal operation of the 2114 engine.
How to decipher multimeter information?
- The multimeter shows from 0.006 to 1.01 V - this means that the sensor is still new. In a few weeks, the data will increase by a couple of hundred units.
- If the multimeter data is in the region of 1.01, 1.02 V, they indicate that the sensor is in use mode, this is its operating state.
- The sensor shows 1.03 - 1.04 V, - such readings will indicate that the working reserve is half used.
- Sensor readings 1.04V -1.05V - such readings indicate that the sensor should be replaced with a new one.
- Sensor readings above 1.05 V sent to the ECU are incorrect. Most likely, it does the work incorrectly, or does not do the work at all.
DMRV pinout
- a pink-black cable is responsible for sending data from the mass air flow sensor device to the relay. Designated as contact No2;
- for grounding, green cable. Designated as contact No3;
- white, responsible for powering the mass air flow sensor device. Defined as pin No4;
- The yellow cable is defined as contact No5 and is responsible for transmitting an impulse from the ECU (electronic control unit).
MAF pinout for VAZ 2114
But it is worth considering that the colors may differ from those described above. Sensor manufacturers may replace the described colors with others. Be careful!
Based on the readings of the device, you can easily determine what exactly the problem is. And don’t waste time identifying the breakdown. Also, based on the readings of the multimeter, you can carry out the necessary work, such as cleaning, checking contacts, or replacing a new device yourself. But it’s also worth considering that the tester can overestimate its readings. This is a risk of replacing a completely working sensor with a new one when it does not need it. The sensor parameters depend on the purity of the masses in the circuit.
Necessary equipment
To work, you will need a car multimeter. A wide variety of models are on sale, their prices vary from 350 to 15 thousand rubles. The costs are quite justified, since you can independently test the on-board electrical network as needed without a trip to the service station. For example, the cost of diagnosing a mass air flow sensor as of August 25, 2019 in car services is on average 500 rubles.
Voltage readings of a working and faulty sensor
- 1.01-1.02 - readings of the new sensor, everything is normal.
- 1.02-1.03 - there is wear, but the parameters are within normal limits.
- 1.03-1.04—the parameters are working, but there is already wear.
- 1.04-1.05—critical parameters, get ready for replacement, if you have the money, then we’ll change it. Fuel consumption may be reduced.
- 1.05 and higher - the mass air flow sensor is not working.
Measurement using paper clips - there may be an error on the device. According to the readings, it is clear that the sensor “ordered to live long”
Preparatory activities
Checking the mass air flow sensor of the VAZ 2114 and other models begins with studying the pinout of the contact group.
For a typical mass air flow sensor it is as follows:
- pin No. 2 is black and pink, it transmits data to the main relay;
- green contact No. 3 – ground;
- white or gray contact No. 4 – node power supply;
- yellow contact No. 5 – ensures the passage of signals from the ECU.
To perform diagnostic measures, the mass air flow sensor does not need to be removed.
If there is oil deposits or condensation on it, the air filter on your car needs to be changed more often. There may be other types of contamination on the device - dirt and dust. In this case, you need to check the oil level in the crankcase, clean the bumper, and replace the O-ring.
Sequence of procedure
First, we prepare the measuring device; the multimeter must be switched to the mode for measuring direct electric current up to 2 Volts.
Further operations are performed in stages:
- The black end of the measuring device is connected to the third contact, the red end to the fifth. You can connect them with a pin.
- The vehicle does not start, but the ignition turns.
- Information appears on the multimeter. Its decoding is given in the table below.
on the multimeter (V)
Mass air flow sensor status
new sensor (after several weeks of operation, parameters increase)
DMVR device on VAZ 2114
The overall design of the sensor consists of two filaments made of a platinum-based alloy. The threads are heated by electric current, with one being the working thread and the other being the control thread. The working element is located in the air flow supplied to the engine, which cools the part. As the temperature of the filament changes, resistance increases or decreases. The data is compared with the parameters of the control element, and based on this, the amount of air passed is automatically calculated.
On later VAZ 2114 models, thermistors began to be used, which have increased durability and measurement accuracy. This is exactly the sensor that is used on the VAZ 2114.
Where is the mass air flow sensor located?
The mass air flow sensor on the VAZ 2114 is located in the air duct located behind the air purification filter. A wiring harness is connected to the sensor, ending with a plug.
Installation location of the air flow sensor on the VAZ 2114 engine
Sensor design features
The VAZ 2114 can use mass air flow sensors of domestic and imported origin. The design of the devices is the same and corresponds to the diagram below.
Design of the air flow sensor VAZ 2114
The DMRV includes:
- 1 — block for connecting the wiring harness;
- 2 — sensor operation controller;
- 3 - measuring element;
- 4 — outer body;
- 5 — metal protective mesh;
- 6 — guide deflector;
- 7 — fastening the sensor body to the body;
- 8 — direction of air flow.
Necessary tools and spare parts
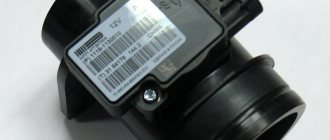
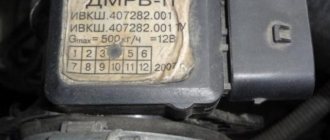
Before starting work, you should clarify which part number is stamped on the body of the old mass air flow sensor. Different sensor options were installed on different 2114 engines. Two types of article numbers are common - 037 or 116 . Getting to the room without dismantling the case is problematic.
After determining the part number, you can begin preparing the tools and spare parts that will be useful for replacement:
- A flat or Phillips screwdriver for removing the air filter housing;
- New metal clamps (in case of breakage or wear of the old fastening);
- Spanners for unscrewing fastening nuts;
- A working mass air flow sensor to check changes (as soon as you are sure that there is a problem with it, purchase a new one).
What is the optimal air flow for VAZ 2114 cars?
The amount of air required to form the mixture depends on the speed:
- at idle speed (850-950 rpm) - 9.5-10.5 kg of air per hour;
- at medium speed (2000 rpm) - 19-21 kg of air per hour.
Reducing the air supply leads to a leaner mixture, and increasing it leads to a richer mixture. Small deviations in measurement accuracy have little effect on the operation of the engine, but with errors of 2-3 kg, the engine begins to operate unstably. Some control units compensate for measurement inaccuracies based on data from other sensors. For example, the January 5.1 block additionally adjusts the mixture composition based on the signal from the lambda probe.
What is the difference between sensors 037 and 116?
How can the regulators of these models differ from each other and is it possible to install 116 instead of 037? There are differences between these controllers, and the point is not in the MAF pinout. After all, if these models were the same, what would be the point of giving them different names?
So, how do the controllers differ from each other and is it possible to install model 116 instead of 037:
- The first difference that can be guessed based on the technical characteristics is that the 037 model can produce data with an error during operation. Of course, an error of 2.5% is not critical, but it does exist.
- Device 037 is intended for installation in VAZ 2111, 2112, 2123, 21214 cars, which are equipped with controllers M 1.5.4, January 5.1-5.1.3, etc.
- As for model 116, its use is relevant on Ladas 21114, 21124, 21214. Installation of this device is allowed on Kalina and Priora. Installation of the device is allowed on cars equipped with M 7.9.7 and January 7.2 controllers.
If you encounter a problem with the device not working, then when replacing it you need to install the same model that has already been installed. But it is worth considering that 037 is not a common option like 116, so it is more difficult to find. The latter, in turn, is more common, and its cost is lower.
Replacement is allowed, but experts do not recommend this. This is because these devices differ in their calibration, so in case of replacement, you will have to change the parameters of the control unit. And you can only get into the “brains” of a car if you understand what needs to be done and have minimal experience.
Loading …
The main causes of failure of the mass air flow sensor
The most common causes of sensor failure are:
- dust ingress;
- oil contamination;
- short circuit of the wiring due to damage to the insulation or plug;
- mechanical damage to active elements.
What factors disable the mass air flow sensor?
Factors causing failure of the air flow sensor:
- Dust may be caused by improper installation of the sensor on the filter, which causes the sealing ring to become distorted. With this defect, a thin coating of contamination will be present on the sensor input grid. Another cause of dust is a clogged air filter, so regular maintenance will prolong the life of the air flow sensor.
- Oil is thrown onto the sensor if the level in the crankcase is high or if the oil separator in the ventilation system is clogged. An additional negative factor is engine wear, which causes lubricant to actively enter the crankcase ventilation.
- Contact with sharp objects on the insulation, oiling. Such impacts are the result of careless repairs.
- Damage to the sensor is possible during vehicle maintenance (impacts to the body) or during improper cleaning of the active part.
How to check the mass air flow sensor yourself?
To independently check the sensor, there are several methods based on disconnection, as well as inspection and testing with a multimeter. There are no other diagnostic methods at home. A thorough inspection of the mass air flow sensor is carried out on a special stand, which makes it possible to record sensor problems under various operating modes. Another common testing method is to install an identical device removed from another vehicle.
Disabling the mass air flow sensor
Visual inspection
External inspection requires removal of the air duct from the sensor. During the inspection, the dustiness of the inside of the housing and the corrugated air supply hose is assessed. There should be no traces of oil or dust on the surface.
Checking the device with a multimeter
The purpose of diagnostics is to measure the voltage supplied by the sensor.
Bosch products are checked in a similar way:
To measure you will need:
- test device:
- a set of measuring probes;
- WD-40 liquid.
The measurement is made between the yellow and green wires. Voltage values can be displayed on the screen of some on-board computers (menu voltage from sensors, U Mass air flow sensor).
Checking the mass air flow sensor using a multimeter is demonstrated in the video from “IZO))) LENTA”.
Determining the pinout of the mass air flow sensor
The location of the wires in the block starting from those closest to the windshield:
- yellow - positive input signal (in diagram 7);
- gray-white insulator - positive power signal (in diagram 12);
- green — sensor grounding (in diagram 30);
- pink-black insulator - sending a signal to the main relay.
Pinout of DMRV contacts
Other colors of wiring insulation are possible, but the pinout sequence remains unchanged.
Instructions for testing
- Insert the probes into the connector to the places where the wires are installed. To facilitate the procedure, the probes are lubricated with WD-40 liquid. The positive signal comes from the yellow wire, the negative signal from the green wire. It is not recommended to pierce the insulation and use additional cables, as this reduces the accuracy of the measurement.
- Switch the multimeter to DC voltage measurement mode with a limit value of 2.0 volts.
- Turn on the ignition, do not start the engine.
- Measure the voltage and compare it with the required value.
Comparison of test results with established standards
In accordance with the table, the sensor state is determined based on the measurement results.
Features, diagnostics and replacement of elements of injection systems on VAZ cars
Below we will look at the main controllers!
Hall
There are several options for how you can check the Hall sensor of a VAZ:
- Use a known working device for diagnostics and install it instead of the standard one. If after replacement the problems in engine operation cease, this indicates a malfunction of the regulator.
- Using a tester, diagnose the controller voltage at its terminals. During normal operation of the device, the voltage should be from 0.4 to 11 volts.
The replacement procedure is performed as follows (the process is described using the example of model 2107):
- First, the switchgear is dismantled and its cover is unscrewed.
- Then the slider is dismantled; to do this, you need to pull it up a little.
- Remove the cover and unscrew the bolt that secures the plug.
- You will also need to unscrew the bolts that secure the controller plate. After this, the screws that secure the vacuum corrector are unscrewed.
- Next, the retaining ring is dismantled and the rod is removed along with the corrector itself.
- To disconnect the wires, you will need to move the clamps apart.
- The support plate is pulled out, after which several bolts are unscrewed and the manufacturer dismantles the controller. A new controller is being installed, assembly is carried out in the reverse order (the author of the video is Andrey Gryaznov).
Speeds
The following symptoms may indicate a failure of this regulator:
- at idle, the speed of the power unit floats, if the driver does not press on the gas, this can lead to an arbitrary shutdown of the engine;
- the speedometer needle readings float, the device may not work as a whole;
- fuel consumption has increased;
- the power of the power unit has decreased.
The controller itself is located on the gearbox. To replace it, you only need to jack up the wheel, disconnect the power wires and remove the regulator.
Fuel level
The VAZ or FLS fuel level sensor is used to indicate the remaining volume of gasoline in the fuel tank. Moreover, the fuel level sensor itself is installed in the same housing with the fuel pump. If it malfunctions, the readings on the dashboard may be inaccurate.
The replacement is done like this (using the example of model 2110):
- The battery is disconnected and the rear seat of the car is removed. Using a Phillips screwdriver, unscrew the bolts that secure the fuel pump hatch and remove the cover.
- After this, all wires leading to it are disconnected from the connector. It is also necessary to disconnect all the pipes that are supplied to the fuel pump.
- Then the nuts securing the clamping ring are unscrewed. If the nuts are rusty, treat them with WD-40 before unscrewing.
- Having done this, unscrew the bolts that directly secure the fuel level sensor itself. The guides are pulled out from the pump casing, and the fasteners need to be bent with a screwdriver.
- At the final stage, the cover is dismantled, after which you will be able to gain access to the FLS. The controller is replaced, the pump and other elements are assembled in the reverse order of removal.
Idle move
If the idle speed sensor on a VAZ fails, this is fraught with the following problems:
- floating speed, in particular, when additional voltage consumers are turned on - optics, heater, audio system, etc.;
- the engine will start to stall;
- when the central gear is activated, the engine may stall;
- in some cases, failure of the IAC can lead to body vibrations;
- the appearance of a Check indicator on the dashboard, but it does not light up in all cases.
Restoring the air flow sensor
They ask for a considerable price for a mass air flow sensor, and according to the laws of the market, this should be justified. It's simple, though! To a large extent, this is the price to pay for our ignorance - we have no idea how the mass air flow sensor works... and why it stops working. And also - for the opinion imposed on us by market traders: the mass air flow sensor is depressed - buy a new one!
The role of the mass air flow sensor is difficult to overestimate. In order for the controller to accurately control the operation of the injectors and ignition, it must, as far as possible, accurately know the actual air flow of the engine. If the mass air flow sensor starts to lie, the engine loses power, fuel consumption and exhaust toxicity increase, and acceleration dynamics worsen.
One of the common reasons for the malfunction of the mass air flow sensor on the “tens” lies in the features of the engine crankcase ventilation system. It has two circuits - a large one, which operates when the throttle is open, and a small one - for idle mode when the throttle is closed. In the latter case, crankcase gases are sucked into the throttle body through a channel with a hole diameter of 1.5 mm. Some of them pass along the idle line, through its regulator, at the same time coming into contact with the delicate film resistor of the mass flow sensor. In addition, the latter is located in the zone of action of reverse gas oscillations in the intake tract. Resin deposits change the characteristics of the resistor - and the sensor becomes false. By this time, the idle speed controller begins to act up in its own way - it sticks, jams, especially when starting the engine.
This is interesting: Do-it-yourself engine cooling radiator repair
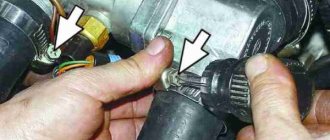
Usually the mass air flow sensor is checked with a diagnostic device (for example, DST-6), but we will make do with a digital multimeter with a scale of up to 2 V. We insert a pin between the rubber seal and the yellow wire until it makes contact (photo 1). Now turn on the ignition and measure the voltage at this contact. Ideally, the result should be 0.99 V. Taking into account measurement errors, no more than 1.03 V. If it is higher, some people immediately replace the sensor with a new one. We won't rush. Having unscrewed the tricky screws securing the sensor's measuring element with pliers, we will instead select simple ones (4.9 x 20) for a Phillips screwdriver. This will make servicing the machine easier in the future. Let's work with the removed element. Let's prepare a washing device - an aerosol carburetor cleaner, the tube of which, heated in the flame of a match, will be bent at an angle of 90°. Then we cut it so that the stream is knocked out to the side, and the tube itself remains straight (photo 2). By introducing it to a depth of 10 mm into the upper channel of the measuring element of the mass flow sensor, we will flush the resistor. A few seconds later - again. As a rule, no more is required. Please note that the resistor does not allow any force - forget about cotton swabs, brushes, compressed air.
After allowing traces of the cleaner to dry, we insert the sensor into the housing and repeat the voltage measurements. Hasn't changed? Apparently, the MAF resource has really been exhausted. Usually, the “top ten” needs to travel 80–90 thousand, or even more, to do this. If the voltage drops to normal, we will drive. Of course, after washing the sensor in this way, some engine characteristics may change. It will be necessary to re-check the exhaust toxicity, in some cases (if the system allows) to adjust it - and so on. Well, is it possible to ease the operating conditions of the mass air flow sensor and extend its service life? We'll talk about this another time.
Detailed repair instructions
In practice, with the help of cleaning, the functionality of most sensors can be restored. At the same time, the car owner saves money. If, when checking the mass air flow sensor, it turns out that the voltage readings do not correspond to the norm, then you need to dismantle the device and wash it.
An aerosol carburetor cleaner that does not contain acetone, pure medical alcohol, a penetrating lubricant such as WD-40, and distilled water are suitable for this purpose.
It should be remembered that you cannot use a toothbrush or cotton swabs for cleaning, since mechanical contact with the sensitive elements of the sensor can cause serious harm. Alcohol must be diluted with water in a ratio of 5 to 1. In addition to the listed means, in some cases you may need a 10-20 cc syringe with a needle.
Removal and cleaning of the mass air flow sensor must be carried out in the following order:
- First, disconnect the block with the power wires. To do this, you need to press the release button, which is located at the bottom of the device. Unscrew the screws securing the unit to the air filter housing.
- Unscrew the connecting elements of the protective casing, screws, and remove the sensor itself.
- The most sensitive parts of the device are the temperature sensor wire and contacts. They need to be washed with extreme caution.
When using aerosol cans (carburetor cleaner, WD-40), it is necessary to control the jet pressure. It is unacceptable to use too much pressure, so you need to hold the canister tube at a distance of 5-10 centimeters. You can also rinse these elements with a syringe. For this, an aqueous solution of alcohol is used.
Thus, if the air flow sensor partially loses its functionality, you should not rush to purchase a new device. It is advisable to spend 15-20 minutes dismantling and cleaning the old device. This will restore its functions and help save money.
Source
Engine operating principle
Before you begin repairing the mass air flow sensor, it is important to understand the operating principle of the device as a whole. The controller mixes fuel with air. The optimal proportion is obtained only when the device provides correct data on engine air consumption.
If this does not happen, the air-fuel mixture becomes unbalanced and engine operation is disrupted. This, in turn, leads to a deterioration in the dynamics of the car as a whole and significantly increases fuel consumption.
What's the result?
As you can see, if there are signs of problems and the first symptoms of the DMVR VAZ 2114 or another car appear, you should check the device as soon as possible for possible breakdown. In this case, you can quickly diagnose the air flow sensor with a multimeter in a regular garage.
We also recommend reading the article about what a car engine knock sensor is. From this article you will learn about the purpose, design, as well as signs of malfunction or malfunction of the engine knock sensor. Based on the readings obtained from the device, it is possible to determine the malfunction (if a breakdown is confirmed) or to exclude the mass air flow sensor from the list of possible problem elements. One way or another, it is important to understand that this sensor is actively involved in mixture formation and affects the operation of the engine as a whole.
For this reason, it is necessary to perform regular checks of the ECM, scan for errors, and also pay attention to any failures and symptoms of malfunctions of the sensors of the electronic engine control system (TSP, DPKV, etc.).
Evgeniy (auto expert) “Turn the Engine” is dedicated to one of the greatest blessings of civilization - the piston internal combustion engine. Everything about the operation, service and preventative maintenance of gasoline and diesel internal combustion engines. Useful information on engine and attachment repairs, methods and techniques for carrying out diagnostic procedures. Tuning, engine tuning and competent selection of technical fluids.
Why does the breakdown occur?
The most common problem that causes the MAF sensor to fail is related to the crankcase ventilation system. The system consists of two circuits: 1. ensures operation with the throttle open (which has greater performance); 2. Ensures operation when the throttle is closed. In the case when the profile is closed, crankcase gases move partially along the idle line, since they enter not only into a special line. The measuring resistor of the sensor has a film coating, with which the crankcase gases come into contact along the idle line. During operation, the resistor is also affected by the gaseous environment in the intake tract. All this leads to an increase in error readings. This can be felt when the engine starts, when the idle air control sticks slightly.
System depressurization
If depressurization occurs in the intake tract system, then instability in engine operation occurs. Air leaks occur in the following parts of the car:
- In sealed areas of the nozzle;
- On exhaust systems for gasoline vapors;
- On the walls of the throttle frame;
- On idle jets;
- On the vacuum brake booster pipes;
- On the cleaning pipes.
Due to improper air removal, improper mixing of fuel masses occurs. Emergency symptoms are detected during the operation of the intake tract. The air leaving the system does not pass through the filtration system. It contains many harmful particles of dirt, metal, and plastic, which enter the engine and threaten to lead to poor performance of the latter.
Measuring voltage in the sensor
When repairing the mass air flow sensor in a VAZ 2110 with your own hands, you need to check the device using a special diagnostic device. If this is not possible, use a regular voltmeter. The scale should allow you to measure voltage with an accuracy of 0.01 volts. Measurements are taken between the sensor input and ground. The input is indicated by a yellow wire, and ground is usually indicated by a green wire. The optimal value is a voltage in the range from 0.99 to 1.01 V. If the mark shows a value higher, it’s time to repair the mass air flow sensor. To clean the sensor, you must first remove the unit mount. The factory fasteners look rather tricky; it makes sense to replace them with standard ones and a regular screwdriver.
The solvent will be carburetor cleaner. This is also convenient because the tube of the aerosol can fits perfectly into the resistor channel. We clean the resistor in several passes. Important: do not use matches, toothpicks, sharp sticks, or elegant rollers. Even a jet of compressed air can cause harm. After assembly, check the voltage again. If it is in the desired range, then the repair was successful.
Signs of malfunction of the DMVR
Mass air flow sensor design
Signs of a malfunctioning mass air flow sensor can be direct or indirect. Let's consider all possible options:
- Check Engine light on the dashboard. In most cases, the CHECK indicator lights up due to the failure of one of the sensors, so you need to connect to the ECU to accurately determine the fault.
- A drop in power is only an indirect sign, since there may be another reason for this malfunction.
- Increased fuel consumption. Of course, everything can be attributed to the fuel pump, but the fuel pressure sensor must also be checked. About standard fuel consumption indicators here.
- Reduced acceleration dynamics. An incorrect amount of air mixture that enters the combustion chambers produces a poor ignition mixture, which in turn does not allow the car to accelerate normally and leads to jerking when the gas pedal is sharply pressed.
- Poor starting or inability to start. A rich or lean fuel mixture cannot detonate normally, which will lead to just such problems. It is also possible that fuel will not burn through and there will be popping noises in the muffler.
- Floating idle speed. Different amounts of air entering the fuel mixture will have an effect when the speed will either decrease or increase.
To accurately determine the malfunction of the DMVR sensor, it is necessary to diagnose it.
Main symptoms
So. If you have problems with your mass air flow sensor, the signs of a malfunction can be very different. Among them are failures during acceleration, lack of traction, and decreased power. There is a persistent feeling that the car simply “does not go.” If there is no proper response when you press the gas, then this is one of the signs. High fuel consumption is also a signal for diagnosing this sensor. When your car stalls when shifting from gear to gear, it makes sense to check the MAF sensor. The VAZ 2110 has the same symptoms of malfunction as other cars.
If you have difficulty starting a cold engine, if the engine operation is unstable, if the speed spontaneously increases or, conversely, decreases, if detonation occurs under load - these are all signals for checking and diagnosing the sensor.
Diagnostics using a multimeter
Diagnostics can be performed using a multimeter; for this we recommend that you read the operating instructions for the tester. The device must be configured in the DC voltage measurement mode; it is usually marked with the symbols DCV or V.
To ensure that connecting the device does not cause difficulties, you need to know exactly the pinout of the device:
- black-red or pink contact is a connection to the control module;
- green is ground (grounding, ground), connected to the body or battery;
- gray-white contact - output voltage;
- yellow - used to supply current to the input.
Diagnostics with a multimeter is performed as follows:
- To begin with, the tester should be turned on and the voltage value set on it to 20 volts, and then the probes from the device are connected to the corresponding contacts on the plug.
- To make the connection more convenient, you can use pins; you will need two of them. Each of them is installed in a hole with green and yellow contacts. Then you will need to connect the probes of the device to these pins.
On a working device, the voltage level will be around 1.01-1.04. If the readings are between 1.02 and 1.05 volts, this indicates that the device will need to be changed in the near future. If the readings obtained are higher, then the flow meter must be replaced because it is faulty.
It should be noted that during operation, the voltage parameter will only increase, since the resistor components of the device wear out, and the resistance value, accordingly, decreases. You can also accurately determine the voltage using the on-board computer, if it has the appropriate function. To search, go to the flowmeter voltage section and find the U value.
Step-by-step instructions for DIY diagnostics
- Turn on the ignition, but do not start the engine.
- Switch the tester or multimeter to voltage measurement mode. Set the scale limit to 2 volts.
- Connect the probe with the red wire from the voltmeter to the sensor terminal (the yellow wire goes to it).
To make it easier to measure the output voltage, use a pin. Be careful not to damage the insulation - Connect the black probe to the “Ground” contact (black-green wire).
- We record the value of the voltmeter.
The serviceability of the sensor is judged by the voltage value. To help the driver, below is a small table:
| Range of values | Air flow sensor condition |
| 1,01 — 1,02 | good |
| 1,02 — 1,03 | satisfactory |
| 1,03 — 1,04 | resource is running out |
| 1,04 — 1,05 | "near-death" state |
| 1.05 and above | it's time to change |
Visual inspection
Here we need to carefully examine the surface of the corrugation and consumables. To check the condition, we need to loosen the air intake clamp at the outlet of the mass air flow sensor, and then pull it off. If you see traces of grease or condensation on the surface, then most likely they have damaged the unit. Sometimes the sensor can be “reanimated” by removing all the dirt. It ends up in the consumables due to rare changes of the air filter. If liquid appears on the sensitive element, this is a 90% failure. Lubricating oil enters due to a clogged oil separator or due to an increased level in the crankcase.
Drops of oil on the sensor are a sure sign that it has failed.
If the above-described elements are detected, the diagnosis can be completed. If the surface is clean, move on. Remove the consumable from the air filter. It is held in place only by 2 screws, which are unscrewed with the 10th key. Looking at the photo, we see that there is an o-ring on the front of the mass flow sensor. It is installed for sealing - unfiltered air cannot leak through the inlet.
If this ring (in the photo it is green, but your color may be different) has slipped or remains in the filter housing, then a layer of dust can be found on the consumable mesh. Such a defect is enough to cause the sensitive element to fail. You need to assemble the unit according to the following scheme: check the reliability of the sealing skirt, put on the rubber ring, place the sensor in the air filter housing.