Let's say right away that the stoves on the UAZ are the best for heating from all other cars. The standard UAZ 469 stove can keep the cabin warm in winter only while driving. Due to the peculiarities of the body, when stopping, the cabin instantly becomes cold.
- KITB.3221-8110010;
- Heater NAMI-4 or NAMI-7,
- heater from Zhiguli.
Automechanics recommends installing an autonomous heater NAMI-4 in this model, which will run on gas fuel. In this case, it is taken into account that, regardless of the choice made, the heater power should be 2-4 kW. The advantage of such a system is the autonomous maintenance of temperature in the cabin. Cons: complicated installation.
Before you start tuning your UAZ Hunter, please note that the tap also needs to be replaced. This is due to its inconvenient location and tendency to leak. The correct solution in this case would be to install a new unit in this system. The tap should be installed next to the radiator.
The corner valve must be closed in the passenger compartment, otherwise it may become clogged with dirt. In this situation, one connector is output to the box, and the other is connected to a similar part of the radiator. An important point in this matter is the correct selection of parts. It is recommended to install an adjustable mixer.
The BMW 5 Series solenoid valve may be preferable. It must be installed in the gap between the exhaust manifold and the radiator intake manifold. This part cannot be removed. To upgrade it you will need to drill 4 rivets in the cover. In this case, you will get a collapsible design that is easy to clean. Screws are used for installation.
Article navigation
Which stove to choose
This is one of the main problems when performing this type of tuning. The fact is that in the UAZ there is quite a lot of space for various manipulations, so, for example, if the radiator you like from a foreign car does not fit on the UAZ due to a mismatch in dimensions or methods of connecting the pipes, then the problem may not be solved at all. In other cars there are much fewer such possibilities due to the large compactness of the arrangement of components and parts in the engine compartment, as well as under the dashboard.
No Additional heater UAZ 469
Since the domestic auto industry is mainly focused on the products of the Volzhsky Automobile Plant, it is not surprising that many are trying to adapt the heater from VAZ. But there are some nuances. The stove from the classics is clearly not suitable here, the stove from Niva Chevrolet, while demonstrating good performance characteristics, is unacceptable due to the difference in the angles of the outlet nipples - it is almost impossible to put hoses on them. Therefore, the most realistic way to install a radiator on a UAZ with a VAZ is to use the Kalina radiator, although in this case a significant number of alterations will be required.
The stove from the Volga will not fit on the UAZ either, but many car servicemen install a rotor from the Volga instead of the original one, along with an additional engine and assure that there will be a real “Tashkent” in the cabin. Whether this is true or not, this option for upgrading the UAZ 469 stove can be called half-hearted, and not everyone will be happy with it.
The same can be said about installing a KAMAZ heater on a UAZ - too many alterations, but many modernizations of the original heater, replacing the original plug from the front heater with a KAMAZ one. In this case, you get pretty good exhaust with minimal effort, and at least complaints about windshield fogging are a thing of the past.
One of the most exotic options is installing a ZAZ heater on a UAZ. There are able-bodied people for whom an autonomous heater is an ideal option for many reasons (night fishing enthusiasts especially like it). Of course, a lot of improvements are required here, and there are many more shortcomings - from banal gas consumption to too noisy operation. However, the main problem is the unreliability of the design, especially when installed independently. And there are very few technically competent drivers capable of performing such tuning.
Most people are looking for a heater that can replace a standard heater with minimal modifications. In this regard, NAMI 4 has virtually no competitors.
Causes of malfunctions
First, you need to figure out why the stove on the UAZ Hunter may not heat well. Much depends on how exactly the symptoms of the problem manifest themselves. For some, the stove seems to work, but it blows frankly weakly and produces insufficiently hot air, which is objectively not enough to heat passengers. In other situations, the stove simply blows cold, and no adjustments or manipulations from the interior help change the temperature. But it also happens that the heater stops functioning altogether. The heater does not turn on, the fan does not rotate, and warm air does not penetrate inside the cabin. Various heating elements in the UAZ Hunter can be sources of such troubles. You need to look for the cause among the following components:
- thermostat;
- additional resistor;
- electric fan;
- radiator;
- stove faucet, etc.
Before disassembling a part of the car, trying to find and replace this or that element, it is recommended to start with a banal check of the fuses, as well as the integrity of the wiring and the functionality of the heater regulator itself. The thing is that the fuse can burn out due to a short circuit or a sudden short-term overload, which is not associated with a serious breakdown. And since the fuse does not allow the stove to receive power, it will not be able to work. Also, broken wiring and broken contacts cannot be ruled out. If possible, it is recommended to check the condition of wires and contacts accessible without major dismantling work. If necessary, clean them, replace part of the wiring and try starting again.
Another rather banal, but very common reason is the lack of coolant in the heating system. You can check this through the expansion tank. If the level is low, add the missing amount and check if the Hunter's heater now works well. It is considered normal when the level is 3-4 centimeters higher than the Min mark on the expansion tank. If the coolant is being used up quickly, there is probably a leak somewhere. It is necessary to check the condition of the pipes and the tightness of the expansion tank itself. Leaks can also form in more inaccessible places, where dismantling is no longer possible.
In addition to malfunctions, the stove may not work well due to its design features. All UAZ Hunter owners admit that initially the car was equipped with a frankly weak heater with its own factory shortcomings. The most effective solution to the problem is to replace the stove with a more efficient analogue. But you can also get by with some modifications, which you can learn about from this material.
Installation of the NAMI-4 stove on a UAZ
There are several ways to improve the microclimate in the UAZ cabin: some decide to adjust the air intake damper, others simply install plastic nostrils on the original air intake. But most take the path of a radical solution to the problem: installing a more efficient and economical heater.
Such a device is the NAMI-4 heater, which, when installed on a UAZ, requires minimal modification compared to all other devices. True, this pleasure is not cheap - from 10 thousand rubles, but if you are used to driving in comfortable conditions, then such costs will not scare you.
The kit includes:
- The heater itself, along with the already installed tap and wires for controlling the modes in the river;
- corrugated pipe;
- plastic edging installed at the bottom of the bulkhead;
- consumables (metal plates, screws);
- heater installation instructions.
Before starting work, it is advisable to check the battery and its tightness, whether the fan motor is working, how well the heat exchanger dampers open/close.
Also make sure that the impeller blades are not stuck to the housing - if so, sharpen the tips of the blades with a file to avoid annoying whistling.
Algorithm for assembling the NAMI-4 heater on a UAZ:
- The first step when removing the heater in every car is to drain the coolant. On a UAZ, for this you need to remove the radiator cap by unscrewing three screws 10;
- Since it is not always possible to install a tank of sufficient capacity under the radiator, it is recommended to connect a hose of sufficient diameter to the tap - this way we minimize the loss of antifreeze. The spatial arrangement of the faucet cannot be called convenient - the rod with which it opens protrudes strongly and can pinch our drain hose, so you should make sure that there are no problems here;
- Unscrew the radiator filler cap, the surge tank cap and open the drain valve. Wait for the coolant to drain;
- Loosen the terminals on the connectors connected to the heater radiator, remove them (if they are stuck, this will take some time);
- To prevent spillage of small amounts of coolant remaining in the hoses, install an appropriately sized container;
- Remove the expansion tank with the tube (it will also contain some coolant);
- it's time to replace your old, rusty calipers with new ones;
- Disconnect the negative battery terminal;
- Repeat the same operation for the heater wiring harness and disconnect the heater ground wire that is bolted to the heater body;
- Loosen the nuts securing the heater body to the bracket (not necessarily all the way);
- Move the bracket to the side and carefully remove the heat exchanger;
- Install the NAMI-4 harness in the standard location, secure it with two side screws, making sure that the heat exchanger fits tightly without gaps. After making sure that nothing gets under the heater (such as an antenna wire), tighten the two nuts on the sides;
- Now you can put on the tips and tighten the clamps securely;
- close the coolant drain valve and at the same time open the heater valve;
- Pour antifreeze into the system (if it is heavily contaminated, it is not recommended to use it, otherwise the new heater will quickly become covered with the first layer of scale);
- Make sure there are no coolant leaks;
- in the reverse order of assembling the dashboard;
- checking the new heater during operation.
As a rule, glass fogging disappears after the device warms up. Due to a slightly modified design of the heater (taking into account the shortcomings of the standard heater), when the fan is turned off, the air flow decreases (due to the presence of a plastic casing in which moisture accumulates), but this disadvantage is more than compensated for already at the first speed of the fan, which works much more quieter than my own.
Now not only the front passenger, but also the driver will feel equally comfortable, and you can more accurately control the flow of warm air in winter and cool air in summer.
We hope that the above information will be enough to make the right decision on which heater to install in the UAZ 3303 instead of the unattractive original one.
Step-by-step replacement of the VAZ-2114 stove
For those for whom this method is not suitable, you can completely remove the stove and adjust it. This is done in stages.
Before you remove the heater (1), do not forget to disconnect the ground wire, otherwise the battery will play a trick on you. At the same time, drain the coolant from the system.
Now remove the instrument panel, as well as the floor tunnel lining. Now carefully disconnect the air duct (under No. 19) to heat the interior.
Start a new round of work:
Carry out the same manipulations with the electrical wires from the resistor (No. 18), the electric motor (No. 2) of the fan, the inlet (No. 12) and outlet (No. 13) faucet hoses.
- Sequentially unscrew the 2 nuts securing the faucet directly to the front panel.
- Remove the seal from the faucet pipes.
- It's time to unscrew the 4 nuts securing the stove to the body.
- You can easily remove the heater of your vase with control assembly.
- Once you finish the adjustment process, carry out the installation in strict reverse order.
Heater radiator UAZ-469 copper 3-row SHAAZ
Radiator UAZ 469
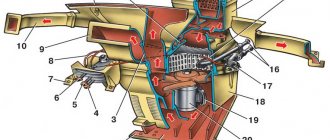
Typically, a car radiator consists of components such as upper and lower tanks, a core, and fasteners. The UAZ 469 radiator is designed in such a way that the liquid entering it directly from the engine water jacket is cooled to the required temperature. Radiator tanks, as well as the core soldered to them, are usually made of brass to ensure good thermal conductivity.
The core of the radiator consists of thin transverse plates, through which flat vertical tubes pass, soldered to these plates. The liquid passing through the radiator core is divided into several streams. This arrangement of the core allows the liquid to be cooled more intensively, since the area of contact of the liquid with the walls of the tube increases significantly.
The cooling tanks are connected to the cooling jacket using outlet pipes. The lower tank is equipped with a special tap for draining water from the cooler. There is also a tap at the bottom of the device to drain water from the water jacket. This is what the radiator on a UAZ 469 looks like. The price of the device depends on the material and model of the car.
The cooling system is filled through the tank neck, located in the upper part and closed with a lid. The liquid cooling system of the engine is characterized by double thermal control: thermostat and shutters.
A radiator curtain is a type of tape, one end of which is attached to a winding mechanism, which, in turn, is installed in a drum. The other end is attached to the bottom of the car's radiator.
Some internal combustion engines are equipped with dampers consisting of plates instead of louvers. The plates are hinged on the lower beam, connected by a system of levers and rods to the blinds control handle, which is located in the cabin. The doors themselves can be positioned horizontally or vertically.
SHAAZ
Shadrinsky Automobile Plant (SHAZ) is a machine-building enterprise of the Ural Mining and Metallurgical Company. The main activity of SHAAZ OJSC is the production of automotive equipment: water and oil radiators for car engines, heater radiators, heating and ventilation equipment, hydraulic and lever jacks, gasoline pumps for car engines, charge air coolers. The assortment consists of more than 150 items. Radiators occupy the largest share in the sales structure. Products manufactured by the company are supplied to the main automobile markets (GAZ, ZIL, UAZ, LiAZ, KAVZ, etc.) and to the secondary market. The plant has a full engineering base: transport, hydraulic mechanisms, departments of the chief technologist and chief designer with a small-scale workshop and an experimental base, a department of standardization and certification, a department of the chief mechanic, a department of production control and labor protection, a quality service with a testing base and an input laboratory control, department of chief metrologist, central factory laboratory, machine tool department, tool production department, construction and reconstruction department. In 1999, ShAZ became part of the Ural Mining and Metallurgical Combine. A trade loan provided by the investor allowed us to increase working capital and stabilize the company’s operations. In 2002, SHAAZ joined the National Association of Radiator Manufacturers NARSA. In February 2003, the Shadrinsky Automotive Unit Plant began Russia's first mass production of automotive heat exchangers using the Kuprobraze technology, which is based on the use of lead-free copper-based solders for soldering. This ensures a much longer service life of the structure and environmental safety of the process. With the start of production, JSC "SHAZ" begins production of new products that meet Euro-2 and Euro-3 standards - charge air coolers (CAC). The production is equipped with unique equipment. Capital investments in technical modernization in 2000-2003 amounted to $4.5 million. Currently, SHAAZ produces water radiators and charge air coolers using new technology for almost all models of cars and buses in Russia and the CIS; several samples of heat exchangers have been manufactured for foreign companies.
BAKER
is the official dealer of Fuel Systems LLC (formerly Leningrad Carburetor Plant). We offer for sale a wide range of Pekar brand products, which have become famous among customers due to their quality and reliability. The main part of the company's product range consists of units and components under the Pekar brand, which has won recognition among both car and motorcycle manufacturers and consumers for its quality and reliability. Currently, a significant part of vehicle fleets in Russia and the CIS countries are equipped with Pekar brand auto parts. PEKAR products are manufactured in Russia, meeting the needs of the automotive and spare parts market. PEKAR's portfolio includes several hundred products for domestic cars (VAZ, IZH, AZLK, GAZ, UAZ, ZIL, PAZ, LIAZ, URAL, KAMAZ, MAZ, etc.), including components and spare parts for key vehicle systems - injection fuel, power, cooling, heating, lubrication, electrical system, ignition and chassis. Today, almost every Russian car owner knows that the PEKAR brand is the ideal combination of quality and price!
The VAZ 2114 heater motor does not work
It happened: The owner got into his car, started his girlfriend, turned on the stove fan and heard... silence. He was not an experienced driver, but he immediately figured out how to get into that same fuse box. I was not confused and changed one of them. But time passed, and the motor still did not work.
Urgent questions: Is the electric motor covered, has the contact come loose?
- If the driver is just a beginner, then go straight to a car service center.
- For an experienced owner, the following steps: crawl under the panel and inspect the contacts on both the fan and the switch.
- Unplug the connector and check the voltage to the motor with a probe. If it is, then remove the motor.
- It is possible that the “minus” has fallen off from the electric motor itself. In his place! Five minutes later, your car is already warm.
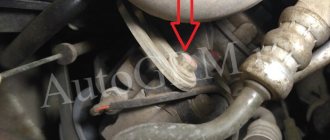
How does the UAZ heater valve work?
The first and so far practically the only domestic SUV, although not the pinnacle of engineering feats, is distinguished by a number of original solutions that are extremely rare in other cars. For the owner of such a car, exclusivity is far from a dominant factor. It is important for him that all devices, including the heater, work reliably and have a long service life.
Thus, stock heater problems occur here regardless of what year the car was produced: in the 1960s or now. UAZ owners are well aware that in severe frosts, the original heater will not provide passengers, especially the rear ones, with comfortable conditions in the cabin. Therefore, upgrading the heating system is a standard step, which is resorted to more often the more often the car is used in the north.
However, in addition to replacing the radiator and engine, it is necessary to take care of the heater valve, which shuts off the supply of hot coolant to the heater radiator or resumes its circulation. In general, this tap is used twice a season: before the cold weather arrives, it is opened, and in the spring, on the contrary, it is turned off. In real conditions, of course, this procedure is performed much more often, but still, breaks can be very long and have an extremely negative impact on the condition of the crane itself.
On older models, the filling valve has to be opened/closed manually, and its original location is not very convenient - you have to get out of the car so that the hot antifreeze coming out of the block gets into the heater radiator. In the old days, this was not a problem, and designers believed that this would not happen often. In modern UAZs, the temperature in the cabin is controlled by a lever located on the center console within reach of the driver's right hand. In fact, this lever is connected to the same old-fashioned faucet using zip ties, so the principle of operation of the heating system remains the same. If the tap is open, hot antifreeze flows through the radiator tubes, heating its cells, which in turn give off heat to the colder air pumped by the fan (the laws of physics, you can’t argue with them). Quite an effective, but primitive scheme. When the faucet is turned off, the radiator remains cold, and the air forced by the fan (when it is turned on) enters the cabin, providing the desired coolness.
Let's take the UAZ Patriot as an example, as the most advanced representative of domestic SUVs. By default, the switch is made of metal, but the shutter is made of plastic, so the total service life of the device is several thousand hours. The steel movable base is connected to a cable, the other end of which is connected to an adjustment lever located in the cabin. This lever is used to tighten/release the cable that closes/opens the faucet. Since the temperature of the coolant in the output area of the power unit reaches 80 degrees, plastic is often made heat-resistant - such valves are used in the UAZ 3163, equipped with a diesel engine from Iveco.
Heating tap IVECO for UAZ
How to replace the VAZ-2114 heater relay with your own hands
The ignition regulator, located in the VAZ-2114 directly under the instrument panel, cannot be repaired, it can only be replaced. The work of dismantling the old part and installing a new one does not require special knowledge, so follow the step-by-step instructions offered by the specialists, and soon the installation will be successfully completed:
- Disconnect the battery from the network by removing the terminal connected to the minus.
- Using a slotted screwdriver, unscrew the 4 screws located on the steering column housing. After this, removing the component will not be difficult.
- A Phillips screwdriver will allow you to unscrew another self-tapping screw holding the lower part of the case.
- If there are no fasteners, remove the protective housing from the steering block.
- At the bottom there is a block where the harness is located along with the wiring, and the VAZ-2114 heater relay is connected to them.
- Disconnect the adjuster from the block, carefully pull it out and install a new part.
- Assemble the structure together, returning the fasteners to their original place. Check how the heater now works and whether heated air enters the car interior.
Additional stove UAZ 469
02/24/2019RUB: Air system Author: Site Administration
UAZ Patriot is practically the only SUV with a purely Russian pedigree. And although it also contains imported components, the concept itself and all design features are the result of the work of domestic specialists. It is for this reason that the car has many both supporters and critics. A significant number of critics draw attention to the shortcomings in the operation of a conventional heater.
It would seem that our designers should make sure that the cabin is warm in all weather conditions. After all, in a significant part of our country, winters are not at all European.
But. A large cabin is nice, but if the heating isn't powerful enough to keep the entire SUV at a comfortable temperature, it's a glaring omission.
Unfortunately, for UAZ cars (and not only the Patriot series - Hunter suffers from the same disease as earlier modifications), the situation is when the driver and front passenger are in comfort, but the rear row passengers must freeze, especially if the temperature outside is lower 5 degrees below zero is typical.
Ways to solve the problem
For the reasons described above, fighting the cold falls on the shoulders of car owners. Currently, there are several ways to insulate an UAZ. Some of these can be called drastic ways, others are minor upgrades, so no one is prohibited from using a combination of them, as long as everyone stays warm. So, these are the methods:
- UAZ in most modifications is equipped with a thermostat that operates at a temperature of 70°C. Perhaps in this way the designers wanted to protect the drive from overheating, but in most foreign cars the operating temperature of the engine is considered to be 80 degrees. Therefore, the simplest and most obvious way to increase the upper limit of the radiator operating temperature is to install a suitable thermostat instead of the usual one. For example, GAS. This is exactly what many people do. As a last resort, you can install a ball valve on the furnace heater branch, but this measure is not capable of providing a significant increase in heat;
- Instead of the original heater fan, which has a relatively low efficiency, you can install a more auxiliary motor. In particular, with minimal modifications, the VAZ-2108 electric fan is suitable for this role, however, again, an increase in air flow speed will primarily affect those in front of the car. At the rear, this effect will not be so significant, especially considering the fact that the UAZ does not have heated seats;
- Another way to improve the microclimate in a car is related to the insufficient performance of the ventilation system. As a result, excess moisture present in the exhaled air accumulates in the cabin, which, having reached a critical concentration, will immediately affect the fogging of the windows in the SUV. This problem is especially acute in the autumn and spring off-seasons. Also in winter, snow entering the heater along with outside air increases the level of humidity inside the car. This problem can be solved by including a cabin filter in the ventilation system in the area between the heater and the end vents;
- Many owners of UAZ vehicles, especially older modifications, complain about the presence of cracks in important structural elements of the car (windows, doors, panels). The lack of sufficient sealing is solved by insulating the car. For example, the use of polyethylene foam;
- Finally, the most effective method of improving the microclimate in the interior of a domestic SUV, due to the insufficient thermal efficiency of the standard heater, is installing an additional UAZ 469 stove. It should be noted that the choice of possible options for upgrading the heating system is extremely wide. But even from the point of view of the complexity of implementation, this solution requires the car owner to have extensive experience in self-repair skills and the determination to make quite significant changes to the design of the car.
Auxiliary heater UAZ
Soundproofing UAZ
Regarding the complete elimination of noise on this car, I would like to note the following. On old, well-worn UAZ cars, soundproofing is difficult, problematic, ineffective, and, simply put, useless.
If the car is relatively new, then you won’t have to fight with rattling pieces of iron and whistling through the cracks. It will be enough to eliminate the noise made by the exhaust pipe and the engine.
main sources
Let's highlight the main sources of noise on the UAZ:
Exhaust system (muffler and other exhaust tract elements). The source of noise is rather the most important. It is with this that we must fight first.
- The second source of noise is the engine, which is also incorrectly and poorly adjusted. It is recommended to first start setting up and adjusting, and only then start soundproofing the engine compartment;
- The rigid suspension of the UAZ engine/gearbox system is also considered as a cause of noise. Most likely, if you install soft, but rather thick rubber, the problem can be solved;
- The heater fan in the cabin is also considered a source of noise.
Modernization of UAZ 469
Noise elimination work
So, you can reduce the noise level of the UAZ in several ways or by combining all the systems described below:
- Carry out thorough sound and vibration insulation of the hood (see Soundproofing the hood without problems) and other areas of the car, which reduces the noise level by as much as 20 percent;
- Upgrade the heater motor by installing a fan from the Gazelle;
- Wrap the muffler with a sheet of fire-resistant material (asbestos), and place a sheet of galvanized iron on top.
UAZ Patriot and sound insulation
- Treatment of the interior with a high-quality vibration isolator. Will help cope with low-frequency noise that occurs on UAZ cars at speeds of 80-90 km/h;
- Install a double seal on the door;
- Cover the floor with foam rubber crumbs mixed with bitumen mastic. Such a porous mass will create both sound insulation and excellent anticorrosive properties;
- Use a foam mat. Sold in a sports store. The price is ridiculous - 150 rubles, but the effect is excellent. It will be necessary to remove the covers in the floor of the UAZ that cover the box-dispensing mechanism, wash it in the bathroom with powder, dry it and wrap it in pieces of foam (cut from a rug) treated with glue. Then put in place;
- It is recommended to place a large piece of the same mat between the heater and the engine compartment panel, but without glue. It is necessary to insert the material into the gap (6-10 mm);
- Use a noise-absorbing cover. Place it on the area of the lever, covered with leatherette with a foam layer. This event will help eliminate noise from the transfer case and engine.
Tuning and modernization of doors on UAZ
Now, in fact, about the sound insulation process itself specifically:
It is advisable to cover the floor with polyurethane foam mats (purchase at a store for fishermen, hunters and tourists). The dimensions of the rugs, as a rule, are 80x200 cm. They will retain heat excellently, and most importantly, they will practically not allow noise to pass through. It is advisable to place the rugs on polyurethane foam (only Penoflex, but not Macroflex). We carefully place the foam in the crack areas at the joints of the mats.
The same material can be used to process the hood, gearbox tunnel, and engine compartment partition; The hood needs to be given special attention. Here it is advisable to put the material in the form of foil foam (details above about materials)
In the places where the gills are located, it is necessary to make slits in the material or tuck it in so that there is ventilation in the summer and can be closed in the winter.
UAZ can be soundproofed in another way:
- Remove and strip off all the factory stuff;
- Purchase the necessary materials for heat and sound insulation (the thermal conductivity of the material should be the same as that of 20-centimeter brickwork);
- Lay the material (8 mm) on the metal floor surface.
- According to factory sizes, you can order insulation made of felt and leatherette in black. Place these materials on the floor and secure them with self-tapping screws on the vertical side surfaces of the doors;
- The area under the hood also needs to be well insulated. It is recommended to glue a strip of rubber between the hood and the fender, and a felt “muzzle” on the radiator.
In a word, you can modernize and eliminate noise with your own hands on the UAZ in various ways. The main thing is to take your time and do everything right. Videos and photos will be a great help in your work, and step-by-step instructions on specific sound insulation of individual parts of the car (can be found in other articles on our portal) will only be beneficial.
vote
Article rating
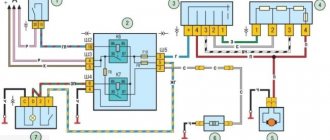
Additional resistor
Finding an additional resistor on the UAZ Hunter, which can also cause the stove to work poorly, is not difficult. It is installed on the steering wheel side in the engine compartment directly on the heater housing. If you have any difficulties, then find the heater motor wires and follow them. A pink and brown wire goes to the resistor. Getting to it is not very easy, but it is possible. You will need a flathead screwdriver and an 8mm wrench for this work.
- First, disconnect the negative terminal from the battery. It is not necessary to completely remove the battery;
- Remove the 2 nuts that hold the resistor terminals in place. Now throw them aside as well;
- Now unscrew 2 more screws. The resistor itself is attached directly to them and held on the body of the car’s furnace equipment;
- The resistor can be removed. The old device cannot be repaired. Mandatory replacement required.
In the case of a problematic resistor, due to which the stove on the Hunter does not work, it will not be difficult to solve everything on your own. The main thing here is to find and get to the resistor. Removing it is quite simple, and installation is carried out simply in the reverse order of dismantling work. Even a novice motorist can handle it without much difficulty.
More comfort
469 UAZ already from the factory had a spring front suspension and disc brakes on the front axle, but this was not enough for comfortable driving on rough roads, so the rear suspension was also made with springs. The conversion kit, specially designed for UAZ , consists of standard spare parts from the Ulyanovsk Automobile Plant: Panhard rod and trailing arms. It was only necessary to weld the brackets for their fastening and the platforms for the rear springs. At the same time, they put back disc brakes. By the way, both the springs and shock absorbers are Ironman, with their help it was possible to raise the body by seven centimeters and at the same time avoid “body lift”. I also had to work on the front axle: the original plastic pin inserts are not reliable, if you “trot” on broken roads, they usually break after a few thousand kilometers. The solution to this problem was invented a long time ago: installing bearings in pivot units. The “hubs” were replaced with manual ones from AVM.
Site about off-road vehicles, SUVs, off-road vehicles
The best improvement to the standard UAZ Hunter heater is its replacement with a more advanced and efficient heater produced by NAMI. It has more advantages than disadvantages, the main one of which is the high price. If you want to save money, then you can increase the efficiency of the standard heater with the help of some simple modifications, which will be discussed below.
Refinement and improvement of the UAZ Hunter heater design.
You should start by sealing the heater housing. To do this, it must be removed from the car and all corners and joints of the body parts must be sealed from the inside using automotive sealant. And then, preferably, also from the inside, cover the walls of the box with thin, 2-3 mm, sheets of automotive noise and vibration insulation. All this together will eliminate air leaks, slightly increase heat transfer and somewhat reduce the overall noise of the heater during operation of the electric motor.
The next step is to try using any available method, for example by gluing a window seal around the perimeter, to seal the lower rectangular outlet hatch of the heater housing. This is necessary in order to eliminate air leaks when the hatch cover is closed, thereby increasing the strength of the air flow that will flow through the corrugated hoses to the windshield or through the lower side air distributors.
Well, in conclusion, you need to remove or simply bend to the left the rectangular protrusion located from the inside of the heater housing and partially covering the left outlet pipe supplying air to the windshield. The general purpose and functionality of this protrusion in the design is not entirely clear, but the fact that without it the force of air supply into the left corrugated hose increases, and therefore the force of blowing the windshield on the driver’s side increases, is a fact.
Rain water leaking from the UAZ Hunter heater housing into the passenger compartment.
Despite the plastic box installed under the air intake hatch, some of the rainwater, when the hatch cover is closed, can still get into the UAZ Hunter’s interior when parked. Initially, as a result of inspection and control during the rain, it seemed that water droplets were entering the cabin somehow through the drain hose of the box.
It was then assumed that the plastic box itself was damaged. In fact, it was precisely determined that water enters the cabin through the joint of the upper internal iron heater box, which exits to the outside of the body. There it forms a small side on which the lower seal of the hatch is installed.
Rainwater flows under this seal, then goes into the gap between the protruding side of the box and the body itself. And from there it immediately gets inside the heater housing and then flows through leaks under the feet of the driver or front passenger. That is, it does not initially fall into the plastic box, but bypasses it.
Therefore, the lower rubber seal of the hatch must be removed, treated well with body sealant around the joining seam that has become visible, and then put the seal in place. No more water will flow into the cabin through the heater.
Installing a door seal on the air intake hatch cover of a UAZ Hunter.
In any case, whether a plastic box is installed on the car above the heater radiator or not, the natural entry of water and dust into the heater, and then into the passenger compartment when the air intake flap is closed, must be prevented. A plastic cover installed on top of the hatch will best cope with this task. You just need to find out in advance whether it is suitable for the UAZ Hunter with a lower windshield wiper arm or not.
If you don’t want to drill additional holes in the car body to install such an overlay, then there is a simpler and cheaper method. It consists of replacing the standard rubber seal on the air intake flap cover with a seal that is installed from the factory on the inner door opening of the UAZ Hunter, its catalog number is 3153-6107018 or 3153-6107019. But in fact, this is an ordinary door seal from VAZ 2101, 2102, 2103, 2104, 2105, 2106, 2107, which goes under the numbers 2101-6107018, 2101-6207024, 2101-6207025.
There are no particular difficulties when installing such a seal. The only thing you need to pay attention to is that during installation the cover is raised as high as possible, as far as its adjustment holes allow. Now, when closed, the air intake hatch cover is maximally sealed around the entire perimeter and water ingress into the interior is practically excluded, even during very heavy rain.
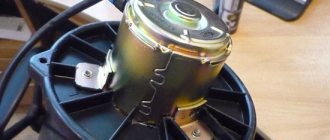
Selecting and replacing the electric heater motor of the UAZ Hunter.
As standard, the UAZ Hunter heater is equipped with an ME236 electric motor with a power of 25 Watts. Its capabilities are frankly not enough to properly draw air through the radiator. The low performance of the ME236 also greatly affects the quality of windshield blowing.
Finding a more powerful electric motor to replace the ME236 is not difficult. For example, these could be electric motors 19.3730, 191.3730, 192.3730 and 194.3730 with a power of 40 Watts, or 197.3730 with a power of 60 Watts, or 51.3730 and 511.3730 with a power of 90 Watts. The main thing is that the diameter of the output shaft of the electric motor is 8 mm, so that a standard impeller can be installed without modifications, and also that it has suitable studs or threaded holes on its body for mounting it in the heater.
Airing the cooling system
Since the main coolant is antifreeze, a significant part of the malfunctions that cause the UAZ stove to blow cold air are associated with problems with coolant circulation along the main line. Among the many reasons of this kind, the appearance of air jams in the most problematic areas of the cooling system should be highlighted. Indeed, in the presence of a closed autonomous liquid-type system, any malfunctions in its operation, especially those associated with partial depressurization, often lead to the accumulation of air at the highest points of the line. A typical example is the appearance of air locks in household heating systems, which millions of Russians encounter every year.
On a UAZ SUV, this is one of the most common causes of deterioration in the performance of the stove
In most cases, this problem occurs due to antifreeze leaks, which is why it is so important to regularly monitor the level of coolant in the expansion tank. Ideally, this should be done simultaneously with checking the oil level, since the correct measurements are carried out on an unheated power unit
If it turns out that the level has dropped below the MIN mark, you should add coolant - otherwise the engine will overheat and the stove radiator will not receive enough heat. As a rule, a leak of antifreeze is accompanied by air entering the line. Normally, excess air should escape through the expansion tank, but in practice, depending on the location of the leak, some of the air may accumulate in high-lying elements, which leads to a noticeable deterioration in fluid circulation.
Fixing the problem is quite easy:
- after adding antifreeze, start the engine with the expansion tank cap screwed on;
- it is desirable that the front part of the car is raised - in this case, the RB will obviously be the highest part of the cooling system;
- We increase the engine speed several times by sharply pressing the accelerator pedal (up to 2500-3000 revolutions);
- excess air will escape, which will lead to a slight decrease in coolant level;
- add antifreeze and tighten the cap of the expansion tank.
If the antifreeze level decreases frequently or constantly, you should look for the leak and fix the problem. If the fluid drains relatively quickly, it will show up as a wet spot under the car. If it is slow, you should carefully inspect the engine compartment for wet and heavily soiled parts. These may be pipes with through defects, their connections, radiators, pumps and thermostats may leak. In all cases, the leak is eliminated by replacing damaged parts and components.
UAZ air suspension price: A-ride kit for both axles 48,000 rubles.
- Increased load capacity without loss of controllability.
- Select the stiffness and height of the springs immediately before the trip.
- Driving comfort on any surface.
What is the price of this pleasure?
If you compare air suspension with a spring version, the cost of the former will be higher. But if you evaluate the absolute benefits of using pneumatics on the UAZ Patriot, 469, Hunter, “loaf”, then the advantages of air springs are obvious. Especially if among the kit options, preference is given to A-ride.
The cost of work depends on the configuration of the car, the degree of preparation and the desired result and can range from 15,000 rubles. up to 25,000 rub.
In addition to installing the air suspension kit, to connect it, you will need to install a pneumatic system, which consists of a compressor, a receiver and components. As well as suspension control, which can be selected specifically for your tasks and wishes.
The cost of installing an air suspension kit on a UAZ on both axles, including a pneumatic system, control, air springs and a set of brackets, together with our work, will be from 95,000 rubles. And at the same time, your car will have a full-fledged pneumatic system, which you can use not only to control the suspension.
A-ride suspensions are always of excellent quality and an excellent choice for any car modifications. The specialists of the LTruckService auto center are invited to select a system for a specific SUV and get full advice on installation and maintenance. Favorable prices, guarantee of work and spare parts, professional and individual approach - for all clients.
Modernization of the heating system for rear seats and driver's feet in VAZ cars
Laying corrugated heating ducts
As for the module for distributing air flow to the driver’s feet, front seat passenger and rear part of the cabin, this also has its own factory flaws. They are also associated with insufficient sealing of cracks. You can fight with modelin or silicone, as in the case of a torpedo, if you do not want to disturb the factory aesthetics of the parts.
It would be much simpler and more reliable to cut off the ill-fated Christmas tree that distributes air flows and use three separate 40 mm corrugated pipes for heating ducts. What do you gain in this case:
- you get reliable sealing of the channels;
- three corrugated hoses take up much less space, which greatly simplifies access to the VAZ 2110 electrical wiring system, located there (there are really a lot of wires and access to them is extremely difficult).
Corrugation gasket for heater
We also remove the partitions of the old air distribution system. We seal the hoses using polyurethane foam. It should also be taken into account that the textured internal coating of a corrugated hose can cause whistling and howling of air, so we do not make the pipelines very large.
Sequencing
Drain the coolant by opening the plastic tap next to the generator (at the bottom of the radiator). Remove any remaining liquid using a piece of hose and a funnel. After removing the air ducts, check the condition of the holes with the heater outlets on the panel. If they are not aligned and the misalignment is more than 50%, carefully trim the interior heater. After marking all the connectors with strips of colored tape (colored felt-tip pens), remove the instrument panel. Remove the steering wheel, steering column trim, steering column switches
Carefully dismantle the heater by unscrewing the nuts and removing the wire from ground. Having previously marked, disconnect the heater connectors. With the cable release and radiator hoses removed, remove the heater by removing the 2 fan screws.
Be sure to pay attention to the condition of the rubber washers and thrust bearing
- After unscrewing the 3 bolts, carefully remove the heater core.
Remove the radiator carefully. Residual coolant may leak out.
- Prepare turbulators (plastic spirals to increase heat transfer from the radiator). Spirals should be included at the factory, but are often not.
. You can cut turbulators (swirlers) yourself. Prepare aluminum (copper) plates with a cross section of 6 mm by 1.5 mm. Clamp one edge of the plate with a drill, the opposite edge in a vice and twist it with a spiral.
Check the bottom wall of the heater for deformations, displacements, holes, integrity problems and other defects. Integrity can be determined through the hole for installing the radiator. Carefully disassemble the heater, moving the body halves apart from each other. Use a suitable screwdriver to open the latches and remove the screw under the central nozzle. Sequentially remove the levers that control the flaps. Inspect the inside surface of the heater. Glue the foam rubber if it has peeled off and stick on the bitoplast strips. Bitoplast must be glued so that the body remains as tight as possible when the dampers are moved to the extreme position. Carefully adjust the center flap. Treat all fastening points of the dampers with grease. Before connecting parts of the heater housing, treat the connector surfaces with sealant. Reassemble the rebuilt heater in reverse order. If there is deformation at the bottom ribbed wall and a gap has formed during assembly of the housing, fill it with sealant. There should be no gaps between the radiator and the stove. Strips of regular foam won't do much good. It is better to glue bitoplast strips at the points of contact between the radiator and the heater. Balance the fan impeller, wrapping wire around the fan blades if necessary. Route the wires back through the housing rubber plug. Adjust the damper stroke. All levers should be easily locked in extreme positions
Particular attention should be paid to the levers of the central and main dampers. The adjustment is mainly carried out by selecting the positions of the braid
After adjusting the dampers, work on the heater valve. Structurally, the choice of partial opening/closing of the tap is provided. Determine the position in which the tap will not close completely. Before installation, treat radiator hoses and tubes with sealant. Replace all clamps with new ones. After complete assembly, filling with antifreeze and warming up the engine, tighten the clamps again. Then, before installing the panel, glue foam and bitoplast to the inlet holes of the air ducts, making sufficiently wide holes in them. In some cases, heater maintenance may not be enough to solve all problems. The question arises, how to insulate a VAZ 2114 for the winter so that the car warms up quickly and the temperature in the cabin is as comfortable as possible? If it blows from the doors or heat escapes through technological openings, the problem can be solved by replacing the seals and thermal insulation of the car.
Operation: Interior heater
The heating system is almost standard. Once I swapped the hoses, now they are returned as they were: supply to the heater to the lower pipe, return from the heater through the upper pipe. An additional electric pump was installed in the heater branch (to drive the liquid out in severe frosts, otherwise it won’t last for a very long time).
Today the ambient temperature is about -10 degrees behind the thermometer outside the window of the house. With the car parked and warmed up for about half an hour:
1. With the heater fan running and the auxiliary pump turned off, the coolant temperature is 74-75 degrees. (thermostat 80 degrees). The air temperature at the heater outlet is about 45 degrees.
2. When the heater fan is running and the additional pump is turned on, the coolant temperature drops to 67-68 degrees. The air temperature at the heater outlet drops to 40 degrees. Approximately, I did not wait long for the measurements. The thermometer mark has stopped moving actively.
3. In the outside air, I waited until the thermometer reached -5 degrees. Then it sank very slowly. Mathematics and physics.
Those. Roughly the heater warms the air by about 50 degrees. All this is rough in several stages (without waiting for the measurements to finish, plus the mixing of the exhaust air with cold air from the passenger compartment at the outlet of the heater).