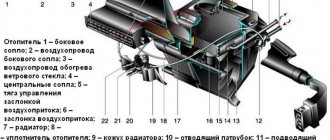
In order to provide a comfortable atmosphere in the cabin of any car, including the Niva Chevrolet, an air heating and cooling system is provided. The manufacturer took care of this and equipped the car with a stove motor, specifically an electric motor, an impeller and a shaft mounted on it.
Video about replacing the heater motor on a Niva Chevrolet:
But sometimes it happens that this miniature structure breaks down, ceases to fulfill its intended purpose and needs to be replaced. In this article we will look in detail at how to replace the heater motor on a Niva Chevrolet, as well as how to service it if necessary.
If only fourth speed works
In cases where the motor refuses to work at the first, second and third speeds, but turns perfectly at the fourth, the same resistor with three isolated windings is to blame. If you can’t buy it, you can try to restore it yourself. True, only in the case when the thermal fuse has blown, naturally, no one will rewind the windings, the game is not worth the candle.
Fan resistor
You can remove and check the resistor without dismantling the engine. This is done like this:
- Use a Phillips screwdriver with a short blade to unscrew the rightmost screws securing the glove compartment.
- We gain partial access to the motor, but this is enough to get to the resistor.
- Remove the terminal block and move the wiring harness to the side.
- Using a Phillips screwdriver, unscrew the screw securing the additional resistor.
- We remove the resistor from the housing.
- We check the integrity of the thermal fuse with a multimeter. If it is faulty, you can try to replace it.
- Installation of a new or restored resistor is carried out in the reverse order.
Built-in fuse
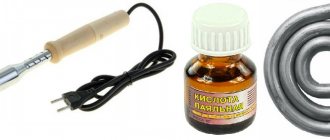
To replace the built-in thermal fuse, any type KSD-160 or RY01-165 is suitable. They work up to a temperature of 150-165 degrees. To solder a new resistor, be sure to use low-melting solder so as not to overheat the part, and during soldering, hold it with thick pliers for better heat dissipation. Good luck to everyone and a comfortable temperature in the cabin!
Symptoms of a problem
The simplest situation is when the electric motor does not spin at all. In this case, there may be several reasons:
- Failure of fuse No. 18 with a nominal value of 25 A. It protects only the heater motor circuit.
- Break, short circuit, damage to the motor winding.
- Lack of contacts on the motor power supply block, damage to the wiring.
- Damage, freezing or wear of the electric motor brushes.
- There is no voltage at the output contacts of the speed switch, the switch is broken.
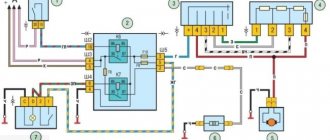
Connection diagram for the electric motor of the heater fan and the rear window heating element: 1 – ignition switch; 2 – mounting block; 3 – heater motor switch; 4 – additional resistor; 5 – heater electric motor; 6 – rear window heating element; 7 – switch for heated rear window with control lamp; A – to power supplies; K6 – additional relay; K7 – relay for turning on the heated rear window.
Stove fan repair
It is more difficult when the engine turns, but does not develop sufficient speed. This is dangerous because when the rotation of the electric motor shaft is difficult, it consumes much more current, so the fuse may burn out and the winding may fail. Diagnosing a fault in this case requires some experience and the breakdown may not be immediately detected, but a blown fuse will make it clear that there are problems with the motor.
In addition, insufficient motor speed can be caused by an interturn short circuit in the armature winding or wear or clogging of bushings or bearings. It is also possible that the cabin filter is clogged. In the case of bearings or bushings, the engine will make noise during operation, and the noise will increase over time. This can be treated either by replacing the motor, or by lubricating or replacing bushings or bearings.
The cause of increased noise from the stove may be clogged bearings and bushings that need to be lubricated.
The bushings or bearings are lubricated only with a regular spindle and machine oil. Engine oil or grease is not used in this case. A new engine costs about 600 rubles, depending on the manufacturer.
Heater fan motor. Possible malfunctions, their causes and methods of elimination
The electric motor does not work
1. Wires are damaged or wire connections are oxidized.
2. Fuse F 18 in the mounting block has blown.
3. The heater switch is damaged - voltage is not supplied to the switch output terminals.
4. Sticking or wear of the motor brushes, a break in the armature winding or contamination of the commutator.
5. Short to ground of the armature winding - when the electric motor is turned on, the fuse burns out.
1. Check and restore connections. Replace damaged wires.
2. Replace the fuse.
3. Check the switch, replace it with a new one if necessary.
4. Check motor, repair or replace.
5. Replace the electric motor.
The electric motor only operates at one speed
1. Wires are damaged or wire connections are oxidized.
2. The heater switch is damaged.
3. An additional resistor has burned out.
1. Replace damaged wires, strip wire ends.
2. Replace the switch.
3. Replace the resistor.
Motor armature rotates slowly
1. Contamination or oxidation of the commutator, wear of the brushes.
How does the Niva Chevrolet heater fan work?
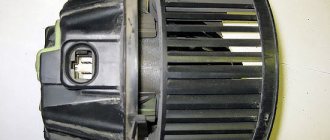
Like any automobile electric motor, the heater fan on the Chevrolet Niva is a DC commutator motor with the ability to stepwise adjust the speed. A motor with catalog number 2123-8118020 with a removable impeller on bushings is installed on the conveyor; however, there is an alternative to it on floating bearings from the Luzar company with catalog number lFh-01211, and there is a similar bearing motor from the Boutler company.
Stove fan.
The stock engine can peak at 3,000 rpm, while the equivalents rev to a maximum of 2,750 rpm. The maximum current consumption for the Luzarov motor is 25 A, for the native one - about 18 A.
Heater motor luzar lfh-01211 12V/14A.
Additional resistor
The operation of the electric motor in four modes is ensured by an additional resistor, which often causes various malfunctions. Its catalog number is 2111.8101012 or 2123-8118022-01.
Additional resistor 2123-8118022-01.
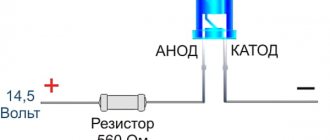
At the first speed, the engine should consume no more than 5.1A, at the second and third 9 and 14 A, respectively. At the maximum, fourth rotation speed, the voltage is supplied bypassing the resistor. Actually, all possible culprits for the malfunction of the air supply to the cabin are indicated; it’s time to name the symptoms of the malfunction.
Symptoms of a malfunctioning stove fan
The main signs of a stove fan failure are as follows:
- the electric motor does not work;
- the rotation speed of the electric motor decreases;
- The fan starts to creak.
Depending on the symptoms that appear, the procedure for eliminating the problem is determined.
The electric motor does not work
If the electric motor stops working, the noise in the cabin disappears when the heater is turned on.
Often the reason for this is the failure of fuse F18 with a rating of 25A in the corresponding block, through which voltage is supplied to the stove motor.
We remove the fan with our own hands on a Niva Chevrolet
When the cause of the fan malfunction is established, it will need to be removed from the car. Before starting work, you need to disconnect the negative on the battery (the ignition in the car must be turned off).
Disconnect the negative terminal.
To make the work more convenient, you must first remove the dashboard from the interior. Next you will need to disconnect the inlet pipes on the stove. Then you should check with your hand that the impeller can be easily rotated.
We remove the glove compartment, unscrewing everything that will interfere with us.
Then you need to disconnect the connector on the motor. If the motor does not work in only one position, you should simply replace the board.
Disconnect the fan power supply and rubber hoses.
Removal process:
- Press out the locking lugs using a screwdriver.
- Rotate the heater housing.
- In this way, bring the motor to the middle of the dashboard and pull it out completely.
Next, you need to inspect the air ducts for damage. They may contain foreign elements. Clean the air ducts. Then you should check the operation of the motor itself. To do this, you can connect it directly to the battery.
Replacing the stove fan
The connection board must be screwed to the new unit. Then insert the motor into place and turn it to the left.
We install the fan with the motor, turning it as shown in the figure.
Connect the wires and pipes to the stove to the bar. Check the operation of the engine with the ignition on. At this point the work can be considered completed.
We screw the fan, connect the wires, a rubber hose and check the functionality.
Fan replacement
So, if there is an urgent need to replace the stove motor, we recommend that you hurry with the repairs without waiting for frost. Believe me, driving in a vehicle in which the heating system does not function is quite uncomfortable. In addition, in severe frosts such trips are still extremely unsafe, since the lack of heat does not allow the ice concentrated on the windows to thaw. Icy windows limit the driver's visibility of the roadway and, accordingly, provoke emergency situations.
So, pick up a new fan and check the quality of rotation of the blades. If you have not purchased it yet, we recommend that you give preference to a model with bearings, of course, if the auto store offers you an expanded range of heaters suitable for your Chevrolet Niva.
Replacement algorithm
Now that you have already prepared for the immediate replacement, we recommend that you familiarize yourself with the algorithm of actions. By the way, on some forums you can find advice from car owners, which indicates the need to completely remove the entire panel. On other forums you will easily find an alternative opinion, which we also adhere to. You can dismantle the old stove fan on the Niva, and then successfully install a new motor in the same way, without resorting to complete dismantling of the panel. It is quite possible to get by by removing the glove compartment and air duct. Don't neglect one more piece of our advice. Purchase a new cabin filter in advance. You will not incur serious financial expenses, but at the same time you will make the operation of the heater easier, and also eliminate the urgent need to replace a dirty filter in the near future.
Unscrew all the bolts holding the glove compartment, remove it, then remove the cabin filter. After this, you will find a fan that you need to dismantle and then replace. You will find a latch on the impeller; we advise you to press it, and then unscrew the three screws that directly secure the electric motor. We recommend that you be patient and persevere, as these actions will not be easy for you. It is very inconvenient to get to the places where these screws are located. If you have screwdrivers with a small handle, then it will be more profitable for you to use them directly.
As soon as you manage to unscrew the screws, the fan will immediately begin to slide. You need to hold it, but at the same time shake it slightly in different directions, which will allow you to pull it off the shaft. As soon as it is in your hands, consider that you have already done half of the work.
We now set you up for the preparatory work ahead of installing your new fan. Examine the motor carefully. During such a visual inspection, you will easily find holes on the surface of the impeller. Pull a wire with a thin cross-section through them, then secure it in the shaft where the motor should be placed. Make sure that the impeller “becomes” correctly. In particular, the groove located on its surface must fit into the pin on the motor shaft. In addition, the impeller must be located perpendicular to the axis of your car.
It's time to install a new fan. We recommend lubricating it and only then installing it. By the way, this procedure is quite complicated due to the fact that although all the actions are understandable, it is inconvenient to perform them. Twist and turn your new fan, do whatever you want, as you please, only the electric motor must be in the right place. Once you are sure that you have actually positioned the fan correctly, you can proceed to secure it by tightening a few screws securely. Now don't forget that you have a wire connected. Of course, the moment has already come when you no longer need it. Get to it through the engine compartment, bite it off and remove it. The last final step is to connect the pipes. Now that you have so diligently completed everything that we recommended to you, you can check the result of your work. Start the engine, warm it up, and then observe how well your heater and fan work.
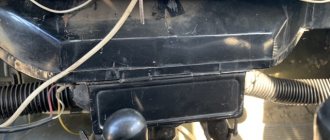
Step-by-step procedure for dismantling the stove motor
The stove motor is not so easy to get to!
Before we begin dismantling the stove, we prepare all the necessary tools and make sure that the key is not inserted into the ignition switch. To make it easier to dismantle the stove motor, the manufacturer recommends dismantling the entire dashboard, along with the instrument panel, wiring and other fasteners, followed by their dismantling and removal from the interior
However, we consider this method to be too long and not rational, because it is much simpler and easier to dismantle the motor simply by looking from below
To make it easier to dismantle the stove motor, the manufacturer recommends dismantling the entire dashboard, along with the instrument panel, wiring and other fasteners, followed by their dismantling and removal from the interior. However, we consider this method to be too long and not rational, because it is much simpler and easier to dismantle the motor simply by looking from below.
- So, to do this, we dismantle the glove compartment, otherwise there is no way to get the engine out of the seat.
When dismantling, we must be careful.
Remove the air duct on the right side and the power plug on the motor body itself. Next, using a Phillips screwdriver, unscrew the three screws connecting the motor to the impeller.
Then, using long flat screwdrivers, insert them in the center and separate them from each other
(When carrying out this work, pay special attention to the position of the pulley stopper and the impeller, because it can simply fly out - approx.).
Or, if you do not want to disconnect the motor from the impeller, you can unscrew the four screws in the air intake and remove the entire assembly.
Next, we remove the entire structure and begin to inspect it.
Inspection of the stove motor and replacement
We inspect the motor and impeller for damage.
Depending on the presence of certain malfunctions, the stove motor may need:
- Cleaning and blowing the impeller from dirt and dust.
- Lubricate all moving parts to avoid heat and unnecessary friction.
- Replacement of power wires or rubber pipe.
In order to diagnose the condition of the motor, you just need to bring its terminals (red and black wires directly to the battery - approx.). And if the motor is working, it will turn on at maximum power.
How the heater and cooling fan works in Niva Chevrolet
The movement of air through the heater radiator is carried out by a DC motor. The impeller is installed directly on the rotor shaft, which minimizes power losses. The fan electric motor is securely mounted in a sealed casing, which is located under the windshield of the car, so to repair it, you will need to remove some interior elements.
The operation of the electric heater motor is controlled from inside the car using a special switch.
Additional resistor
To ensure a comfortable temperature inside the car, it is not always necessary to operate the fan motor at full power. To reduce the speed, additional resistance is installed in series in the electrical circuit. This simple but effective method can significantly reduce the intensity of the air flow.
For more precise adjustment, the resistor has 3 resistance values, and given the possibility of direct connection, the rotation of the motor rotor can be set in 4 different speed modes.
The standard product provides the following indicators of the current that is directed to the electric motor after passing through the internal spiral of the limiter:
- 5.1 A – first speed.
- 9.0 A – second.
- 14.0 A – third.
DIY troubleshooting
If the Chevy Niva cooling fan does not turn on, then if you have at least a little experience, you can try to fix the problem yourself. The main advantage of repairs without the involvement of third-party specialists is saving money and time. Also, during the work, other elements and devices that are located at the location of the stove can be checked.
The disadvantages of self-repair may include making serious mistakes, which will lead to failure of not only the products being repaired, but also related parts. In some cases, replacing parts may result in a short circuit and fire in the vehicle.
If, despite all the possible disadvantages, you decide to repair the Chevrolet Niva yourself, then the recommendations below will help minimize the risks and possible damage from unprofessional intervention in the electrical system of the car.
Step-by-step instruction
If the stove fan does not turn on, then first you should check the fuse that is responsible for the safety of the wiring circuit of this electricity consumer. The Chevrolet Niva relay and fuse mounting block is located under the steering column. To get to it, you will need to unscrew the screws and remove the cover by pulling it towards you.
The location of the fuses inside the block may vary significantly depending on the car model, but in both old and restyled models, the protective device located in cell F18 is responsible for the heater heater. Such a product must operate at a current strength of more than 25 Amperes. You can check the functionality of the fuse with a tester or multimeter.
If the fuse is in good condition, the heater fan malfunction may be caused by a failed electric motor. To make sure that this part has actually burned out, you will need to dismantle it.
This work is performed in the following sequence:
- Remove the glove compartment. To perform this operation, you will need to unscrew several screws, remove the cover stops and the side casing.
- Unscrew the screws securing the electric motor.
- Disconnect the wires.
- Open the hood and remove the windshield wipers and the panel underneath them.
- Remove the cabin filter.
- Unscrew the four nuts holding the air duct box in place.
- Remove the engine from the engine compartment side.
You can check the electric motor using a multimeter, or by directly connecting it to a 12 V power source. If the motor is faulty, it must be replaced with a new original product or its complete analogue. Otherwise, it is recommended to lubricate the bearing and reassemble the interior heating system in the reverse order of removal.
If the heater fan motor constantly runs at maximum speed, then the additional resistor is most likely faulty. As a rule, this part cannot be repaired and you will need to use a new product in order to select the operating mode of the stove. To replace this part, you will also need to dismantle the glove compartment as described above.
Once this part is removed, the work of replacing the resistor is performed in the following sequence:
- Remove the wire terminal block.
- Unscrew the screw securing the resistor.
- Remove additional resistance.
- Install and connect a new product.
- Connect the wires.
- Install the glove compartment.
Sometimes the cause of a fan malfunction is a broken motor operating mode switch. The work to resolve this issue is similar to the steps above. If no broken wires are detected, this part is removed and then checked with a multimeter. Even if there is no closed circuit in one of the modes, it is recommended to replace the part.
The duration of operation of the electric motor or other components will depend on the quality of the spare parts used, so it is advisable to use only trusted retail outlets or order parts directly from the manufacturer.
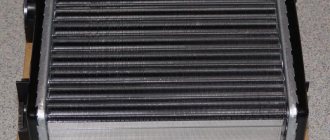
DIY heater replacement
So, the radiator of your stove is leaking, to make sure of this and not to do “monkey work”, touch the radiator pipes on the front passenger side, if they are dry, then let’s look under the driver’s mat for a puddle. If the puddle is made of antifreeze, it will be greasy and sweet. This means that if all the signs coincide, the radiator is most likely leaking.
We go to the store and buy a radiator. I bought a regular aluminum one for 500 rubles and some clamps just in case. You will also need 10 liters of antifreeze. Also stock up on boxes for self-tapping screws, because there will be a lot of them!
Drain the antifreeze. To get as far as possible, blow into the expansion tank.
I’ll say right away that you need to remove the torpedo if you don’t want to end up at a gas station, although judging by the assumptions, you’ll have to remove the torpedo even then.
First of all, let's remove the glove box, it comes off easily, there shouldn't be any problems.
Unscrew the center console along with the radio. Nothing complicated here either.
Next, unscrew the decorative panel of the center console, which is located on the side. We loosen the lining of the checkpoint tunnel. To do this, just unscrew one (sort of) outer self-tapping screw. The driver's side is closest to the pedals, and the passenger's side has the same groans.
Next, we begin to disassemble the decorative trim of the instrument panel, while simultaneously removing the instrument panel and the steering column cover with switches, and take out the air duct, which is located behind the instrument panel. Here you will have to stick to the cables. Why can't you remove the entire torpedo? - you ask. This bolt won't do it for you.
This is a bolt. And how did the designers manage to make it rotate from the evaporator side? So we have this thing. Torpedo frame with steering column.
Unscrew the steering column universal joint. And we begin to unscrew the frame of the instrument panel, having first cleared all the cables from it. We carefully remove everything from the car and voila. You're almost at the radiator.
Next, unscrew the radiator housing from the evaporator and the gearbox tunnel. Here you will find the screw that is located between the evaporator liner and the radiator liner. This is truly an ambush! Unscrews with a tambourine and mats. When assembling, there is no need to tighten it, because twisting is even more difficult and holding it holds practically nothing. We take out the central air duct and the air duct that leads the air to the driver’s feet. That seems to be it. Unscrew the 2 screws on the radiator. We take it out and put on a new one. And we begin the assembly in reverse order.
If during assembly you still have a couple of extra screws left, then you have assembled everything correctly!
Thank you for your attention! If you suddenly have questions or forgot to add something, contact me, I will be happy to answer you. First of all, don't be afraid of the amount of work and take care of yourself!
Problem
The question, as always, turned out to be extremely simple - the quality of the original delivery. It turned out that the Chevrolet Niva heater motor was supplied to the conveyor assembly assembled from the Kaluga plant. The official name of PJSC Kaluga Automotive Electrical Equipment Plant is KZAE. This plant, as you know, is almost entirely configured to work with the Volkswagen plant, which is located there, and supplies products to AvtoVAZ only for the assembly line. And even these supplies are not enough and we have to install stove motors from other manufacturers. There is a very big difference, both in the resource of spare parts and in the ease of installation. Of course, the main supplier of the Russian spare parts market is China or Luzar (which is not very important). The motors initially hum very loudly, but most importantly the impeller is pressed onto the motor shaft. While on the Kaluga product it is located on a lock washer, which greatly facilitates the installation and dismantling of the spare part. There is another Tolyatti product, if I’m not mistaken, of a similar design. But with a minimal difference in price, it is better to supply a conveyor original, especially since, as I said earlier, the plant serves Volkswagen.
Important nuances
There are several important points that must be taken into account when changing the heater fan on a Chevrolet Niva. Here they are:
The cabin filter cover should be removed very carefully, since the latches that hold it in place are easily broken. This point is especially relevant if you have to change the fan in the cold;
when lowering an unscrewed electric motor, you should remember that there is a small guide bushing on its shaft, which is very easy to lose: it falls, rolls down the glove compartment directly into the engine compartment and it will be very difficult to find it there;
It is not always possible to find a “native” fan for a Chevrolet Niva on sale (its catalog number is 21238118020)
For this reason, many car owners install LUZAR brand fans (and its number is lFh01211). These devices cannot be called a good alternative, and here's why. “Native” fans for the Chevrolet Niva can rotate at a speed of 3000 rpm, while the analogue from LUZAR reaches a maximum speed of 2800 rpm. The “native” fan consumes a current of only 18 A, and the LUZAR consumes 25 A. At the same time, fuse F18, mentioned above, is designed for 25 A, that is, the risk of its burnout when using the LUZAR fan increases many times over. In such a situation, the best option would be to install a “native” fan on the Chevrolet Niva.
Replacing a broken fan on a Chevrolet Niva is not that difficult. Even a novice car enthusiast who has held a Phillips-head screwdriver at least once in his hands can cope with this task. The main thing is not to damage the latches on the cabin filter cover and not to lose the fan guide bushing.
Replacing the heater fan on a Chevrolet Niva
Before you start work, you need to stock up on everything you need. Here's what we need:
- hex keys, set;
- Phillips screwdriver;
- new heater fan.
Replacement sequence
- The hood of the Chevrolet Niva opens. Near the windshield there is a niche with a cabin filter installed in it, which is covered with a plastic cover with latches. They are opened manually, the cover is removed, and then the cabin filter is removed. Access to the furnace fan impeller is provided.
- There is a mounting bracket on the impeller. Use a Phillips screwdriver to loosen the bolt that holds it, the bracket is moved to the side and removed.
- The car interior opens. Using the same Phillips screwdriver, unscrew the screws holding the glove compartment panel. The glove compartment is removed. Now you have access to the electric heater motor.
- The electric motor is held on by three self-tapping bolts. They are unscrewed using a 10mm hex.
- After unscrewing the last screw, the electric motor is carefully lowered (no problems should arise, since the mounting bracket has already been removed from the impeller).
- When the electric motor is removed, the fan impeller is completely freed and can be removed through the cabin filter niche.
- The old impeller is replaced with a new one, then all components are assembled in the reverse order.
Chevrolet Niva › Logbook › Winter is coming... Changing the heater fan without removing the dashboard
So, in the previous entry you may have already appreciated how the Shniva’s stove whistles. Let's add to this the fact that repairing something in winter is not the most pleasant pleasure, which is why we replaced the heater motor in advance.
The book says that you need to remove the entire panel and only then replace it, but on the forums they write that you can get by, which is what I did. (in principle, this is no longer a new operation for me