Purpose
The main task of the oxygen sensor (lambda probe) is to determine the oxygen in the exhaust gases of the car. This parameter allows you to determine the quality of the fuel mixture that burns in the combustion chamber. If the parameters exceed the permissible ones, then the mixture is rich (lots of fuel, little air), but if the parameters are less than normal, then the mixture is lean (little fuel, lots of air). Based on this data, the sensor determines the state of the fuel mixture and sends signals to the engine control unit to adjust this mixture and prepare it in the required proportions.
Finally, about fuel selection and prevention
In the vast majority of situations when the lambda probe has become unusable, it is substandard fuel. We recommend that you pay significant attention to the choice of refueling location. Do not be inclined to purchase gasoline from an unverified supplier, because in such fuel the risk of the presence of harmful impurities increases many times over. At the factory, the engine and fuel system are configured for a specific type of gasoline, which is then indicated by the manufacturer in the car's characteristics.
Also, a fairly effective measure to extend the life of the sensor is timely maintenance of the fuel circuit. A properly functioning fuel supply system will provide the LADA Kalina engine with cleaner exhaust, where the lambda probe can “feel more comfortable.” At the same time, its resource increases significantly. Otherwise, the sensor will need to be replaced.
Location
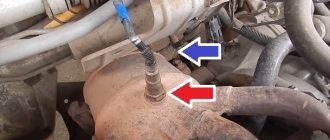
On Kalina, as on all Lada models (with a catalyst), two oxygen sensors are installed, which read readings before and after the converter. The oxygen sensors on the Lada Kalina are located on the engine exhaust manifold, one before the converter, and the second after.
The sensors are installed through a threaded connection and through a special heat-resistant sealing gasket (ring). Quite often, when replacing a sensor, a problem arises when unscrewing it; due to high temperatures, the sensor simply sticks to the exhaust manifold body. Before dismantling this part, it is best to heat it up or lubricate it with VD-40.
Where is?
Oxygen sensor 4x4
Oxygen sensor (control lambda) for Priora, Kalina
The oxygen concentration control sensor is installed on the body of the exhaust pipe of the catalytic collector (pants). In the photographs, number 1. However, if the car meets Euro-3 standards in terms of environmental friendliness, then, in addition to the driver, it also has a diagnostic oxygen sensor. It, in turn, stands after the catalyst and is practically invisible from the engine compartment.
Symptoms of a problem
When the oxygen sensor fails, the following malfunctions are observed with the car:
- The dynamics of the car disappear;
- Engine power is lost;
- Fuel consumption per 100 km increases;
- It is difficult to start the engine.
Oxygen sensor error
Basically, when a sensor fails, the check engine light on the dashboard comes on. If you connect a vehicle diagnostic device to the diagnostic connector, then if the DC is faulty, error P0130 or P0134 . These errors indicate malfunctions in the operation of the sensors.
Collector failure
It often happens that problems with sensors are caused by a clogged catalyst; after such a problem, many people change it to a Stinger 4-2-1 manifold. But after such a procedure, it is necessary to flash the engine control unit with the appropriate firmware, or install an oxygen sensor blende.
Replacing the lambda probe
Since this oxygen sensor cannot be repaired, if it malfunctions, the only remedy is to replace the sensor. The cost of the element is not high, about 1.5 thousand rubles. During the replacement process, you will need to use a multimeter and a special type of wrench. It is also necessary to provide access under the bottom. A pit or lift will help here.
- We begin the process by disconnecting the probe connector from the ECU network.
- Now, using the device switched to voltmeter mode, we measure the voltage value at the terminals. The value of this parameter should be 0.45 Volts, which corresponds to the nominal value. If the voltage level is underestimated or deviates from the specified value by 0.02 Volts in any direction, this indicates the possible presence of a malfunction.
- Having identified the cause of the problem, we proceed directly to the replacement. Remove the probe cable holder from the hole located in the protective screen.
- Taking a key of size “22”, we unscrew the probe from the mounting socket in the manifold. To dismantle the element, you will need to acquire a designated key of a special configuration. Experienced owners of LADA Kalina can demonstrate their skill in removing a component using a regular key (the same size - “22”).
- We install the new sensor in the reverse order of steps.
Oxygen sensor decoy
There are several types of oxygen sensor decoys, each of which performs its tasks perfectly. Many people use these decoys; when changing the exhaust manifold, rather than flashing the ECU, a decoy is installed.
Decoys can be mechanical or electrical. Let's look at each of these deceptions in more detail.
Mechanical snag
This part is installed after replacing the manifold without a converter. An oxygen sensor is screwed into it, and then this entire structure is inserted into the manifold. The mechanical blende simulates the operation of the converter, thereby the ECU thinks that the catalyst is operating in normal mode.
The cost of mechanical blende starts from 300 rubles.
Electronic snag
This decoy is installed in the sensor connector and simulates the operation of the sensor itself by sending signals to the engine control unit, which thinks that the sensor is working and does not light up the “check engine” lamp on the dashboard.
The cost of electronic decoy starts from 1800 rubles.
How to understand that the sensor is faulty
Kalina develops DC breakdowns very often. This is due to careless operation of the car, as well as partly to its design.
A DC malfunction can be directly indicated by incorrect engine operation, periodic loss/recovery of speed, or increased fuel consumption. But such signs may also apply to other sensors, so it is necessary to perform computer diagnostics of the VAZ. Computer diagnostics can show several errors that are directly related to the operation of the sensor.
Error P0032 : To fix it, you need to unhook the wiring harness block and turn on the ignition. Now we find the harness block and unhook it from the controller. After this, we check contacts X1/C4 and see if there is a short circuit with the vehicle’s on-board network. If there is no short circuit, then the problem is in the controller. If a short circuit is present, then in this case it is necessary to check the connection between the block and the on-board network. If there is a short circuit, then the problem is in the harness; if there is no short circuit, then the sensor itself is broken.
Error P0030 : Disconnect the sensor block and turn on the ignition. It is necessary to check the presence of 12V voltage at contact B. If it is not there, then the problem should be looked for in the heater circuit. If voltage is present, then we measure the voltage at pin D. We look at the indicators, if the indicator is less than 1 V, then the problem is in the DC.
Also, error P0134 indicates that there is no power to the DC, P0140 indicates a possible open circuit, and P0136 indicates a short circuit to ground on the sensor.
It is almost impossible to independently understand that it is the DC that is faulty, only if you use special diagnostic devices. Of course, the ideal option would be to quickly replace the sensor with a functional one, but we still have to find the one we need. There is a simpler option; you can check the circuits that are directly connected to the DC. If the circuits are working properly, then in this case the problem lies in the sensor itself and you can safely replace it.
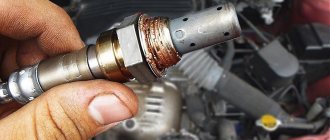
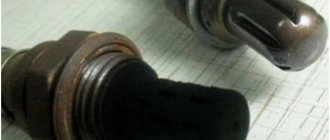
You can also unscrew the DC and look at the visual condition. If there is a shiny coating on it, then this is a direct indicator of the presence of lead in the fuel. This indicates the use of a low-quality fuel mixture. In this case, it is worth replacing the sensor and thinking about changing the gas station.
DIY lambda sensor repair steps
To dismantle the lambda probe, you will need to first warm up its surface to a maximum of 60 degrees. Then carefully remove it and additionally take out the protective cap. After this, you can begin cleaning with orthophosphoric acid, which helps to easily deal with any (even the most persistent) flammable deposits.
Warming up the surface of the lambda probe
At the end of cleaning the sensor, it is necessary to soak the spare part. To do this, you can use products for flushing the engine cooling system or just clean water. At the end of the work, be sure to dry the sensor and install it in its proper place.
Tip: upon completion of work, before installation, do not forget to pre-lubricate the threads with a special sealant to ensure complete tightness of the product.
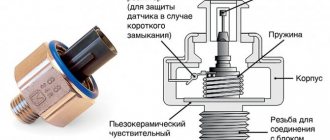
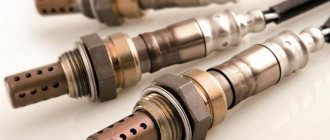
Device
The lambda probe consists of the following elements:
- Ceramic insulator.
- Rings and cuffs (serve for high-quality sealing).
- Tip with drilled hole.
- Protective shield (also has a hole for exhaust gases).
- Spirals (it is placed in a separate tank).
- Conductive contact.
- Postings.
All this is enclosed in a metal heat-resistant case. The Kalina oxygen sensor is attached to the exhaust manifold using a threaded connection.
Note that the technical characteristics of the lambda probe do not allow measurements to be taken at temperatures below 250 degrees Celsius. In order for the Kalina oxygen sensor to show the correct values, its ceramic tip must warm up to operating temperatures. These are considered values of 300-400 degrees Celsius. But how does the element work when starting a car “cold”? In this case, the control unit uses average lambda values that come from other sensors (crankshaft speed and coolant temperature). A little more fuel is burned in the cylinders than required by the standards. But as soon as the temperature in the exhaust manifold reaches three hundred degrees, the fuel to oxygen ratio will return to normal and will be 1:14.7.
How to replace the speedometer cable on a VAZ 2101-VAZ 2107?
Note! Before buying this sensor in a car store, take exactly the same one that you had (you need to look at the markings for this on the old sensor, but for this, of course, you will have to remove the sensor), if you neglect this, the engine will most likely not work as expected should, we also categorically do not recommend that you take oxygen sensors without heating, (Even if your car was equipped with one), such sensors may not always give correct readings until they warm up, due to which the engine will again not work correctly, so before When purchasing a new sensor, be sure to take all these nuances into account!
1. The sensor is removed very easily, first remove the negative terminal from the battery (How to do this, read “in this article”, point 1) and then disconnect the deck and wire connectors, as soon as this is done, unscrew the sensor itself by the thread that is on applied to it and thereby remove it from the hole in the exhaust manifold and that’s it, you can install a new one.
Additional video: Watch the video that talks about the oxygen sensor, which is located below:
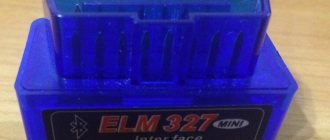
Method number 3
This method consists of computer diagnostics using an ELM adapter. For Lada Kalina, the optimal choice would be ELM-327. After connection, the computer reads all errors from the block. Below we list several codes indicating a malfunction of the Kalina oxygen sensor:
- PO134. No power to the sensor.
- PO136. The sensor shorts to ground.
- PO140. Talk about a broken circuit.
If you have a Kalina with a lambda probe heater, error PO135 may also appear. In this case, the element is also considered faulty.
Operating principle
The control oxygen sensor is not dismountable, along with the wiring harness and contact block. As the name suggests, it changes the level of the reference signal depending on the amount of oxygen in the exhaust gases. The sensor signal is processed by the ECM. What is desirable to know about the principle of operation?
During engine operation, after the UDC has warmed up, the controller responds to changes in the signal range by depleting or enriching the fuel-air mixture. The controller's response to UDC readings is varied. This is a command, in the current process, to change the quality of the mixture and enter the last set of data into memory in order to call these modes in the process of subsequent work.
If the working part of the UDC has not heated up to 300 degrees Celsius, the sensor is not active - the signal level is zero. In a cold state, the resistance of the UDC sensitive element is several megohms. As the temperature rises, the resistance decreases and the signal level enters a certain range. There is a special heating element inside the UDC. Power is supplied to it, controlled by the ECM, using a relay in the circuit. Thus, on the block we have a controller circuit, a relay and contacts of the sensor itself.
The design features of the sensor are that its sensitive element is chemically active and can be “poisoned” by lead and silicon compounds (their vapors).
Possible causes of failure
- Leaded gasoline (the presence of lead compounds in the fuel) leads to failure of the UDC “for 4 tanks”.
- The use of silicone-based sealants (silicon compounds) during engine assembly can lead to the same results. Of course, if the assembly using sealants excludes contact with the power supply, exhaust, and ventilation systems, then the silicone will not harm (for example, when installing a pump housing).
- Contact of lubricants and water on the pad contacts, ceramic insulator.
- Mechanical damage to the housing, wiring harness, block, contacts.
Causes of oxygen sensor failure
- Poor quality fuel. The impurities it contains clog the sensor electrodes.
- Worn oil scraper rings.
- Antifreeze or solvents get on the ceramic tip of the controller.
- If the oxygen sensor housing overheats, this may occur due to incorrect operation of the ignition system.
- Incorrect connection of this part.
- Multiple attempts to start the engine with short intervals between them. In this case, unburned fuel accumulates inside the exhaust manifold, which may result in a fire.
Comments
Guests cannot leave comments on the site, please log in.
Products for LADA at the best price
A selection of accessories for LADA from AliExpress
Content
Some car enthusiasts who are wondering how to check the oxygen sensor of a VAZ 2114 think that doing it themselves is extremely difficult, but this is not so. It is enough to follow the instructions (which can be found below in the text). This will be quite enough to solve the problem.
The VAZ 2114 has a lot of complex electrical devices, each of which requires maintenance or periodic maintenance. The VAZ electronic control unit allows you to obtain data on the current state of any vehicle systems.
An oxygen sensor (also called a lambda probe) is one of the key elements of a car. If it fails, the performance of the machine will be impaired. In order to prevent this, you should study the principle of operation of the device, as well as the technology for checking an oxygen sensor that has failed.
Oxygen sensor VAZ 2114