You have to start replacing the lambda probe when checking it shows that it is not working and therefore requires replacement.
It is worth noting that it is advisable to purchase a similar lambda probe for replacement, so as not to resort to resoldering the connectors or a model with the same number of connectors.
For example, oxygen sensors from the company BOSCH, which produces lambda probes for both foreign cars, in particular Ford cars, and domestic cars, VAZ, Moskvich, etc., are very popular. And most of them are interchangeable.
Lambda probe (oxygen sensor in a car) - what is it
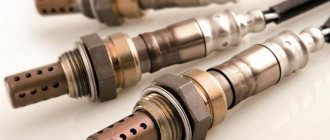
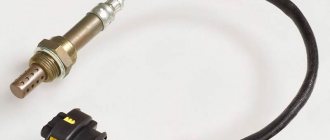
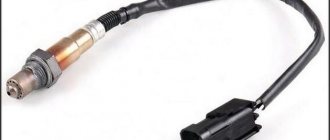
A lambda probe (oxygen sensor) is a small device that is part of the exhaust system of a vehicle. Its main function is to monitor the level of oxygen in exhaust gases that are formed as a result of fuel combustion in an internal combustion engine. The device looks like a small tube with wires. It connects to two machine systems:
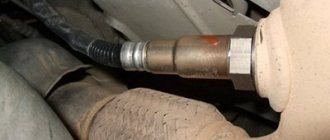
- On one side - to the exhaust pipe of the catalyst in front of the manifold. There is a threaded hole in the pipe into which the sensor is screwed.
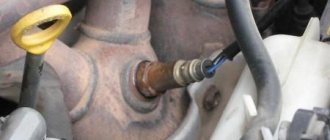
- On the other hand, to the electrical connector, which connects to the electronic control unit (ECU) of the motor. The probe looks like a fork with four teeth, and the connector looks like a plane with four holes.
An oxygen sensor in a car is installed on any vehicle. These are cars, trucks, buses, special equipment. Most lambda probes are designed for 60-80 thousand kilometers. If the device fails, it must be repaired or replaced. In the absence of a working device, most modern cars go into emergency mode.
Why do-it-yourself replacement is superior to car services?
Why is it better to replace the lambda probe yourself than at a car service? Because you won't have to:
- The most important thing for most people is that it’s free than in a car service, and you can also replace the lambda probe sensor at home without leaving anywhere.
- It is very easy. In 90% of cases, replacing the upper lambda probe does not require a lift, special equipment or a garage. Replacing the oxygen sensor (upper) is easier and faster than replacing spark plugs. Having experience in changing spark plugs, you can easily replace the oxygen sensor.
- In this way, you protect yourself from car services where they give you the “original” one and you pay for it (in fact, it can be either a used or an analog version). You buy the one you need yourself.
- You protect yourself from the mistakes of masters:
- When installing the lambda probe, the car service worker forgot to lubricate the threaded connection or accidentally touched the tip with lubricant, thereby reducing its effectiveness.
- Used too much force when installing the lambda probe, which will lead to problems the next time it is replaced.
- The lambda probe cable is poorly or not secured at all, and later your insulation will either melt or break.
For yourself, you will avoid all the mistakes of the masters described above and will do it much better and more economically. But this does not apply to those services in which the specialists have been trained and have professional equipment. Prices in such car services are much more expensive.
Why do you need a lambda probe?
To answer this question, it is necessary to understand the physics of fuel combustion in an engine. For efficient combustion of fuel in an engine, the presence of two components is required - fuel and oxygen. The fuel enters the core using injectors connected to the fuel tank. The oxygen level is controlled by a mass air flow sensor device.
Physical experiments show that the optimal level of fuel combustion is achieved when there are 14.7 parts of air and 1 part of fuel in the core. This relation is called the lambda relation, and is denoted by the Greek letter λ. If in the core oxygen in relation to the fuel is in a proportion of exactly 14.7 to 1 , then the λ indicator is equal to unity.
Fuel combustion scenarios depending on whether the optimal fuel/oxygen ratio is achieved:
- λ is less than 1. There is a lack of oxygen in the core. Some of the fuel does not burn (there is not enough oxygen), which leads to an increase in fuel consumption.
- λ is equal to 1. This is the optimal scenario. The fuel burns completely in the core, and the engine runs stably, without jerking.
- λ is greater than 1. In the core, fuel burns quickly, since there is a shortage of it (while, on the contrary, there is a lot of oxygen). The engine begins to run jerkily, which will impair the functioning of the machine.
The lambda probe does not regulate the amount of oxygen and fuel in the core. It evaluates the oxygen concentration in the exhaust gases and provides this information to the engine ECU. If there is a lot or little oxygen, the electronic unit reduces or increases the fuel supply, which leads to the reduction of the fuel/oxygen ratio to the standard value λ.
Mechanics of lambda probe operation:
- When an internal combustion engine operates, fuel (gasoline, diesel) is injected through the injectors into the engine active zone. During combustion, gases are formed that enter the exhaust manifold, which is shaped like a pipe. Some of the gases enter the active zone of the lambda probe.
- The device determines the amount of oxygen in the exhaust gases and compares it with standard values. If the optimal amount of oxygen is contained (14.7 to 1) , then nothing happens and the device does not send a signal to the engine control unit. The gases enter the filtration chamber (usually a catalyst).
- If the lambda probe detects a deviation from the standard values (up or down), it will send an electrical signal to the engine ECU. Then the unit sends a signal to the injectors, which leads to a decrease or increase in the amount of fuel injected. Now the fuel burns and hits the active zone of the lambda probe and the cycle repeats again.
- Many modern cars have not one, but two lambda probes. The second device is installed immediately after the catalyst. The second lambda probe performs a different function - it allows you to determine the quality of gas purification in the catalyst in order to change its operating mode if necessary. It can also signal to the driver that something is wrong with the device.
Note! The same device is used as the second lambda probe. It has a similar structure, works on the same principles, connects to the car in the same way, and so on. It differs in functions and location.
The first signs of a sensor malfunction
Experts advise regularly diagnosing the sensor, every 30,000 km, and replacing it after 100,000 km. Manufacturers typically use this range to limit the life of the probe.
This fuel cell does not last forever. Since it works in an aggressive environment, it can fail at any time, even before the end of the warranty period. The driver notices a malfunction based on the symptoms of the behavior of the vehicle unit. For example, in cases where the vehicle is equipped with a fuel probe and the CO level is extremely high, this means that the control device is not working.
The content of harmful substances in exhaust gases can only be determined using gas analyzers. But this is an expensive device, and it is not profitable to purchase it for personal needs. Therefore, a breakdown is indirectly determined by the current gasoline consumption and frequency of refueling. In addition, a warning light on the panel indicates that there is a malfunction in the engine. If it is impossible to analyze the exhaust gases with a special device, this is done visually. Light smoke from the muffler is a sign that the mixture is airy, and black smoke indicates excessive consumption of gasoline and a malfunction of the fuel system.
Types of lambda probes
- Zirconium. The body is made on a metal base (usually steel). Contains a ceramic block onto which a zirconium dioxide compound is sprayed. Thin platinum plates are installed on top, capable of generating electric current (they act as electrodes). The device operates at a temperature of 300-350 degrees. Heating of gases is not provided due to the fusibility of zirconium and individual elements of the lambda probe.
- Titanium. The design is similar to the previous model, but the coating is made of titanium. This metal belongs to the category of refractory, therefore a heating element is additionally installed on the titanium lambda probe. The heater increases the temperature of the gas in the core. This allows you to obtain more accurate values for the gas mixture and increases the shelf life of the probe.
- Broadband. The zirconium and titanium lambda probes that we discussed above are usually made in the form of narrowband devices. But there are also broadband devices (based on zirconium and titanium). They contain two additional cells that play a number of auxiliary but extremely important functions. They seriously improve the quality of measurements, increase the shelf life of the device, and so on.
If you have a choice, preference should be given to broadband devices based on titanium. They are expensive, but provide the highest quality measurements and have a long shelf life.
How does a car oxygen sensor work?
To understand the operating mode of the lambda probe, you need to know its design. Essential elements:
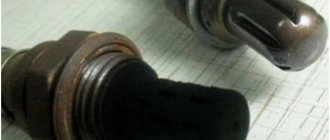
- Frame. It has a hollow cylindrical shape, inside which the functional elements of the lambda probe are contained. Usually made on a steel basis.
- Seal with thread. It is attached to one of the edges of the lambda probe. The thread is used to attach the spare part to a pipe that contains corresponding recesses.
- Ceramic tip with protective shield. Located next to the seal. It has a ceramic base that contains sensitive elements based on zirconium/titanium oxide and a thin layer of platinum. Needed to collect exhaust gases. Can generate electric current (acts as an electrode).
- External screen. It is attached to the middle of the body and contains a coating based on zirconium or titanium dioxide. Can generate electric current (acts as an electrode).
- Output wires. They are attached to the other side of the body. Transmits an electrical signal, if present, to the engine ECU. The total number of wires can be from 2 to 4.
- A heating element. Attached to the body of the lambda probe, it is capable of heating the body. This improves the quality of gas analysis and extends the shelf life of the lambda probe.
- The sensor also contains other auxiliary elements. These are electrical wires for transmitting the impulse inside the probe, a current collector, a cuff and others.
The mechanics of the lambda probe are simple. The outer screen is in contact with atmospheric air, while the inner screen is in contact with exhaust gases. At a sensor temperature of 300-350 degrees, a potential difference occurs between the internal and external screens due to the unequal oxygen content in the air/gases. The higher the difference, the stronger the voltage. The resulting electric current is supplied to the wires, which are transmitted through the wires to the engine ECU.
Oxygen sensor location
The first lambda probe is installed in the exhaust manifold. In this case, the probes are connected directly in front of the place where the catalyst is located (to ensure its uninterrupted and long-term operation). In the engines of some car brands, a second lambda probe is installed at production. The presence of a second lambda probe makes it possible to significantly increase the efficiency of measuring air concentration, obtaining more accurate indicators. Thanks to this, the catalyst will work much longer and better, and the amount of harmful substances released into the atmosphere will noticeably decrease.
According to their design, oxygen sensors are divided into the following types:
- Wideband lambda probe (WLS). Used as an input sensor.
- Two-point lambda probe (DLZ). Installed both in front and behind the catalyst. Measures the air content in the vehicle exhaust and atmosphere.
Lambda probe is faulty: causes and repairs
The lambda probe fails for various reasons. These are high loads on the exhaust system of the car, damage to electrical wiring, the use of low-quality gasoline, and others. Below we will consider the main scenarios of malfunctions, and also find out how these problems with the lambda probe are resolved.
Carbon formation
One of the popular reasons for the failure of a lambda probe is the formation of a layer of carbon in the area of the active zone of the spare part. If the engine is started too quickly, small portions of gasoline enter the exhaust system of the car and settle there on the surface of the lambda probe. Carbon deposits also form for other reasons - the use of low-quality fuel, improper starting of the engine.
Failure is determined based on the following criteria:
- The engine runs in slight jerks.
- The ignition often fails.
- The “Check Engine” light flashes periodically.
Related article: Check Engine light (engine error): causes and best solutions to the problem
To fix this problem, it is recommended to remove the old one and install a new lambda probe. You can also try cleaning the tip yourself. This is done like this:
- Dismantle the device, carefully remove the protective cap.
- Pour 80-100 ml of orthophosphoric acid into a container.
- Place the cap in the container so that its edge remains outside (for example, tie it to something).
- After 20-30 minutes, remove the sensor, rinse with water and dry it.
- Reinstall the tip, apply protective paste and weld the structure (for example, using argon welding).
Device overheating
The lambda probe may temporarily fail due to overheating of the exhaust system. The key word here is “temporarily” - under increased load, the “Check Engine” button begins to flash. Whereas during normal driving such a problem is not observed. This is due to the fact that zirconium-based sensors are installed on cars, and such lambda probes cannot operate at high temperatures. This leads to failure of the device.
Overheating is determined by the following signs:
- The problem only occurs under high loads (driving at high speed, climbing uphill).
- Fuel costs are rising significantly.
- The performance of the acceleration and braking system deteriorates.
To fix this problem, it is recommended to dismantle the zirconium and install a titanium lambda probe. Sometimes this does not help - for example, if the car system as a whole cannot cope with high loads (and not just the lambda probe). In this case, simply reduce the load level to correct the problem (for example, drive more slowly).
Damage to electrical wiring
Another popular reason for lambda probe failure is damage to the wiring. Each device is equipped with electrical wires (from 2 to 4) that transmit a signal to the motor control unit. If the wiring is damaged, the signal becomes unstable, which leads to unbalanced motor operation. Damage to wires is often mechanical in nature (for example, the driver was involved in an accident).
Damage to electrical wiring is determined by the following signs:
- The engine runs intermittently and there may be ignition problems.
- Noticeable increase in fuel consumption.
- The “Check Engine” light comes on periodically, but then goes out.
If the wires are damaged, it is recommended to install a new lambda probe. You can replace a damaged section of the circuit if you have wires from an old probe lying around. To repair, the old oxygen sensor is removed from the system, then the old damaged element is cut off (with or without a connecting plug). In its place, undamaged electrical wiring from the old lambda probe is installed.
Heater failure
Another reason for the failure of the lambda probe is a breakdown of the heating element. A heater failure does not always damage the probe. This defect usually does not make itself felt at low loads, but at medium and high loads it manifests itself. The main signs of heater failure:
- Under increased loads, the engine begins to stall.
- Fuel consumption increases when climbing a mountain or while driving fast.
- The spare part was purchased a long time ago (approximate mileage - 30-50 thousand kilometers).
The heating element is firmly attached inside the lambda probe, so it is difficult to disassemble the spare part and remove the damaged heater. If you have such a problem, buy a new probe and replace it with the old one. If you do not plan to drive under high loads, then you do not need to replace it. That is, you can drive a damaged lambda probe until it completely fails.
Important Tips
When using this cleaning method at home, always consider the following important nuances.
- Phosphoric acid and various aggressive analogues of this product are dangerous chemicals. When working with them, you should adhere to personal safety rules. Liquids should never get into your eyes, mucous membranes or inside your body.
- For moderate clogs, cleaning the lambda probe with acid may actually take 15-30 minutes. But if a stable and dense layer of soot has formed, then it is better to leave the oxygen sensor in an aggressive environment for a longer time. There is no need to worry, because even a day in a container with phosphoric acid will not damage the core. But the pollution should certainly disappear.
- To make sure the controller is working after cleaning it, you will have to wait a while. The vehicle may not immediately return to its previous operating mode before problems with the oxygen sensor occur. But if, after 10-20 kilometers traveled, fuel consumption does not drop to normal, the car jerks and thick smoke pours out of the exhaust pipe, then it is better to change the sensor. If all symptoms go away soon, you have successfully cleaned the lambda probe correctly.
- If the check engine light on your car comes on again after installing the cleaned controller, then you should not expect the device to restore functionality. This message on the instrument panel clearly indicates that cleaning did not produce any results. You will have to completely replace the oxygen sensor with a new one.
- Some oxygen sensors use double-layer protective caps. If you don’t have a machine, you won’t be able to make a window with a simple file. But this does not mean that it is impossible to clean it. You just have to lower the sensor along with the cap. Cleaning may take a little longer, but often achieves the desired result.
Based on these recommendations and cleaning features, you will be able to do everything correctly. There is no point in giving up trying to resuscitate the lambda probe. This item is really not very cheap, so there is a good opportunity to save on repairing your car.
Lambda probe service life
The service life of a device depends on many parameters. This is the quality of spare parts, the purity of the fuel used, the nature of the driver’s control of the car, and the level of load. Most zirconium devices are designed for 60-80 thousand kilometers . Narrowband titanium and broadband titanium operate up to 100 and 120 thousand kilometers . The service life can be found in the instructions for the device, and can also be checked with the seller upon purchase.
In the case of normal non-commercial use of the machine (that is, not for transporting goods or delivering passengers), the device operates for 1-3 years . Therefore, it is recommended to keep a couple of spare devices on hand so that, if necessary, you can always quickly replace a damaged device. Also follow these tips and tricks to extend the life of your sensor:
- Fill the engine only with high-quality, clean gasoline (not lower than class A-92). Refuel at trusted gas stations, do not trust private hot sellers and online stores.
- If you tried to start the engine, but it did not start, then the second attempt should be repeated after 25-30 seconds (but not earlier ). Otherwise, unused gasoline will enter the sensor, which will lead to its damage.
- Do not use sealants to fix the lambda probe. When the engine warms up, vulcanization of sealants may occur, which will lead to irreparable consequences not only for the sensor, but also for the entire car.
- Periodically inspect the place where the device is attached to the pipe where the exhaust gases flow. The optimal frequency of checking is every 15-20 thousand kilometers.
Where can I buy
Spare parts and other products for the car are easily available for purchase at auto stores in your city. But there is another option that has recently received significant improvements. You no longer need to wait a long time for a parcel from China: the AliExpress online store now offers the opportunity to ship from transshipment warehouses located in various countries. For example, when ordering, you can specify the “Delivery from the Russian Federation” option.
Follow the links and choose:
| SPEEDWOW 4-Wrie Universal Lambda Oxygen Probe for Toyota Chevrolet | Oxygen Sensor O2 Lambda for VW Jetta GOLF Beetle Skoda 1999-2005 | Waterproof car mirror film, anti-fog |
| Custom made sun visors | Air freshener with numbers for phone number | Protective film for car door sill |
Replacing the lambda probe
There is nothing difficult about the replacement. Before carrying out work, put the car on a lift, and also buy a new device. An approximate algorithm for replacing a part is discussed below.
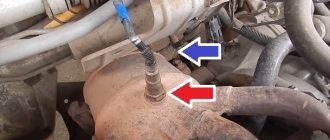
- The sensor is mounted in front of the catalyst in the exhaust manifold of the car under the hood. If two devices are installed in the system, then the first is mounted in front of the catalyst, and the second is mounted after it. Modern manifolds are protected with a metal plate - before replacing it must be removed to gain access to the lambda probe (one or two). Use screwdrivers to remove the protective plate.
- Now warm up the car engine to a temperature of 80-90 degrees. This will make it easier to unscrew the old sensor (it sits tightly on the car). When heated, the metal expands slightly, which makes it easier to unscrew the part. There is no need to warm up the engine for a long time. The best option is to start the engine and wait until the temperature is 80-90 degrees, warm up the engine for a few minutes and turn off the ignition.
- Use a wrench to disconnect the negative terminal on the car battery. The nuts on the electrical components are not tightly tightened, so there should be no problems with their disconnection. As you loosen the nut, move the terminal to the side to completely disconnect the electrical components of the car.
- Find the lambda element on the exhaust system and carefully disconnect the electrical connector. The old oxygen sensor fits snugly, but not tightly, in the connector, so you can easily disconnect the device with a few hand movements. The connector should be moved to the side so that they are located at a distance of at least 20-30 centimeters from each other.
- Now the most difficult stage of work is being carried out - the actual dismantling of the device. To carry out the work, it is recommended to purchase a nozzle with an extension, which makes the work easier. Attach the nozzle to the lambda probe, rotate the nozzle counterclockwise to loosen the fastening. Take a wrench and loosen the nut on the exhaust pipe, and then carefully pull out the oxygen sensor.
- You can get rid of your old device – you won’t need it anymore. It does not contain any useful spare parts or components. Pick up a new lambda probe and treat its threads with any good lubricant (for example, it could be copper paste). The use of lubricant simplifies the installation of the device and also seriously reduces the risk of damage to the threads on the exhaust pipe.
- Now take the new sensor in your hands and secure it until it stops in the hole on the pipe. For installation, you do not need to use a nozzle with an extension - installation by hand will be sufficient. Use a wrench to tighten the nut to secure the part into the hole. But don't overdo it! If you overdo it, it will be difficult to remove the lambda element in the future, which will create many unnecessary problems.
- Connect the new part to the electrical connector leading to the engine. Take the “fork” end of the lambda probe in your hand, treat it with electronics cleaning spray and insert it into the motor electrical connector. It is recommended to fix the resulting structure with clamps. You can also put them on a special “shelf” made in the form of hanging hook-supports (all modern cars have them).
- At the final stage, reinstall the metal plate and connect the negative terminal to the battery. Reset the settings or update the memory on the electronic unit that controls the engine. You can reset the settings on the control panel or using a program on your smartphone, if your ECU supports such a function. To activate the sensor, remove the car from the overpass and drive it for several tens of kilometers. After this, the device will begin to function as usual.
It is recommended to carry out work wearing thick, clean gloves. Many parts of the exhaust system will be hot (gloves will help you avoid getting burned). Gloves will also help protect against electric current discharges at the stage of dismantling the terminal.
Solution of a problem
How to safely unscrew the lambda probe will depend on the reason why problems arose with dismantling this part. If the sensor is stuck, then very often this problem is solved using a gas burner. The main condition for successful removal of a part in this way is strong heating of the collector next to the sensor. Due to thermal expansion, the seat will expand slightly, after which we remove the main part using a wrench.
To remove a sensor with licked edges, you may need a welding machine. To remove a part, you will need to sacrifice a wrench or a socket head, which, after being placed on the edges of the part, is carefully grabbed in several places. Then you should use a large lever to rotate the DC in the mounting hole. In most cases, such an operation is performed on completely dismantled elements of the exhaust system.
Which brand is the best lambda probe and how to choose it
You can find hundreds of different lambda probes on sale. The total number of manufacturers in Russia is 20-30 companies. The best manufacturing companies are the following organizations:
- Bosch. Makes expensive, but high-quality and reliable lambda probes. They are suitable for all categories of vehicles. Supplied with protective cap and lubricant. The main disadvantages are the high price and many fakes.
- Profit. A Czech brand that sells lambda probes in the mid-price range. Available in various configurations and sold in any store. Therefore, the driver will be able to choose a spare part to suit his needs. The main disadvantage is mediocre wire protection.
- Denso. A Japanese brand that produces broadband and zirconium lambda probes. The brand's products are distinguished by good quality, a wide variety of probes in thread design, and a fairly reasonable price. The main disadvantage is that it is sold mainly online.
- NGK. Another Japanese brand that produces high-quality, reliable lambda probes. The parts are inexpensive, which is another advantage of the brand. NGK has one major drawback - the electrical connector is unsuitable for European and Russian cars. The buyer will have to cut and solder with a different connector.
Installation Features
Despite all of the above, the following features should be taken into account when changing the oxygen sensor:
- When reusing the sensor, you need to treat the threads with a special paste, doing this so that the protective tube remains intact.
- It is necessary to carefully and seriously consider the tightening torque specified by the manufacturer.
- Replace the lambda probe carefully and slowly to avoid damage to the sensor.
Now you can independently calculate the failure of the oxygen sensor, and also replace it. You learned what a lambda probe is and why it is needed. Make the replacement, strictly observing all the conditions, and everything will be successful. Good luck!
Lambda probe decoy
Oxygen sensors are sensitive devices that are usually designed for 60-80 thousand kilometers. If the sensor fails, the engine check . The car itself can be put into emergency mode. To restore the car's operation, you should install either an original probe or a decoy device. It sends a false signal to the electronic system, which avoids putting the car into emergency mode. There are two categories of deceptions:
- Mechanical. It is made in the form of a small steel or bronze cap, inside of which a filter catalyst is installed. The mechanical blende is installed directly on the faulty probe. When gases enter, the blende filters the air to the required levels. Then a signal with the required oxygen levels is sent to the engine control unit. Installation of the “mechanics” is simple - the lambda probe is removed and a blende is installed in its place. At the end, a non-working oxygen probe is connected to it.
- Electronic. It is made in the form of a small controller chip, which is installed on a circuit that goes from the lambda probe to the electronic engine control unit. Electronic snag corrects the signal, setting the required standard indicators. This allows you to fool the engine. The installation method for electronic decoy depends on the device model. Usually it is made in the form of a microcircuit block with wires of different colors feeding the elements. These wires are connected to the necessary elements of the circuit.
Use “cheats” only in extreme cases, as this is fraught with the following consequences:
- Deterioration in driving characteristics of the car. The deception does not determine the oxygen concentration, but only imitates this process, deceiving the engine control unit. Therefore, an oxygen/fuel imbalance may occur in the engine, which leads to various consequences. The most common problems are increased fuel consumption, deterioration in vehicle performance, and others.
- Refusal of warranty service. Almost all modern cars are covered by a factory warranty, which is 2-4 years depending on the brand of vehicle. To carry out repairs, the driver must take the car to a service center. If, during an inspection, a mechanic discovers a snag, this may be a reason for denial of warranty service. In this case, the law will side with the service center.
- Possible problems with the law. The technical regulations of the Customs Union directly prohibit making unapproved changes to the design of the exhaust system. In case of violation, the driver can theoretically be held accountable under Article 12.5 of the Code of Administrative Offenses of the Russian Federation. In practice, drivers rarely have problems with the law, since it is almost impossible to install deception without special equipment. And the punishment under Article 12.5 is mild - a 500 ruble fine.
Conclusions and results:
- A lambda probe is a small device that is attached to the catalyst pipe in front of the manifold. Its main function is to determine the oxygen concentration in the exhaust gas mixture in the pipe.
- Causes of lambda probe malfunction:
use of low-quality gasoline, high loads, incorrect engine start-up, and others. - If the lambda probe fails, you need to buy a new one and install it: disconnect the battery, carefully unscrew the old probe, apply lubricant to the new one, screw it to the pipe, reset the engine ECU to reset the settings.
- Tools for replacing the lambda probe: analyzer, auxiliary tools. This is a suitable wrench, a special socket with a flexible extension (sold in many car dealerships), a suitable lubricant (say, copper paste).
Tips and tricks
Tips from more experienced car owners can save a considerable amount of time for novice auto mechanics, for example:
- If the new car is used for a short time after purchase, then to remove this part, it is enough to pre-treat the seat with penetrating lubricant.
- If the lambda probe is in a hard-to-reach place, then it should be unscrewed after installing the car above an inspection hole, on an overpass or on a lift.
- Some oxygen sensors cannot be removed without using a special key.
If the lambda probe cannot be removed, then the methods presented in this article will solve the problem. If no method is suitable, then you can always remove the manifold, cut off the sensor with a grinder, drill a hole, cut a large thread. Then install a new lambda probe into the mounting hole restored in this way.