How to clean the lambda probe yourself
Equipping cars with catalysts is the result of the implementation of environmental standards. The main goal is to reduce the harmful impact of car engines on the environment. To do this, it is necessary to reduce the content of toxins contained in exhaust gases. Undoubtedly, catalysts are necessary, but their proper operation requires special conditions and control of the composition of air and fuel. Otherwise they won't last long. Therefore, equipping cars with an oxygen sensor or lambda probe becomes a real assistant for monitoring the composition of exhaust gases.
Broadband
Read
There is such a device as a wideband oxygen sensor. Signs of a malfunction (UAZ Patriot has the same as any other car) of the sensor are that the engine operating mode changes. The difference between a conventional and such a device is quite large. The fact is that they have completely different operating principles and sensitive parts. And wideband lambda probes are more informative, and this is relevant for cases where the engine operates in non-standard modes. Therefore, the richer the information, the more accurate settings the electronic control unit will make.
Device, principle of operation
The lambda probe is designed to measure the oxygen level in the exhaust gases, maintaining the optimal composition of fuel and air that enters the engine. The norm for this ratio is 14.6–14.8 parts air and 1 part fuel.
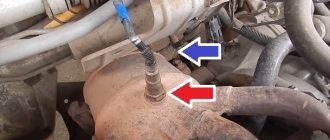
Located in front of the catalyst in the exhaust manifold. Some car models are equipped with two devices. If there are two devices, then the second one is installed at the outlet of the catalyst. Thus, more accurate indicators of the air-fuel mixture are achieved, and the operation of the catalyst becomes more efficient.
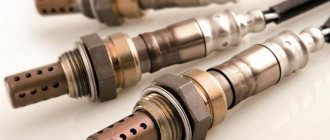
Several types of sensor are available. Some of the most common are zirconium, titanium and broadband. It consists of several main elements:
The principle of operation is that when the desired temperature of the electrolyte is reached, oxygen, instead of exhaust gases, passes through it. In this case, a potential difference is formed between those sensitive to oxygen ions. There is an inverse relationship between the voltage that occurs on the electrodes and the oxygen concentration in the exhaust gases. The higher the oxygen content, the lower the voltage.
Titanium devices require a higher temperature to heat up, about 700 ºС. Their sensitive element consists of titanium dioxide. They measure the output voltage and operate without atmospheric air.
The wideband oxygen sensor is considered more advanced. It has a finishing element. The device itself measures the amount of oxygen, records the voltage, compares the readings with the norm and, if a discrepancy is detected, sends an electric current. It provokes the release of oxygen from the exhaust gases. The process continues until the voltage reaches 450 mV. Most often used at the entrance.
Method No. 2 – accelerated.
To implement it, you will need the same phosphoric acid and a gas burner or stove. If the choice falls on the latter, it is better to use the smallest burner (it will be more convenient): remove the lid from it, turn it over and place it, slightly moving it to the side, so that it protects (covers) the gas pipe from possible acid entering there.
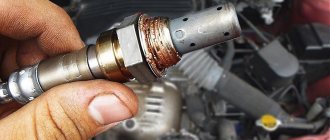
Then everything is simple: light a fire, dip the oxygen sensor core in acid and heat it thoroughly over this fire. When the acid begins to boil and splash, green-blue salt will begin to appear on the surface of the sensor.
Wait until the aggressive liquid has completely boiled away, rinse the part with clean water, dip it in phosphoric acid again and put it on fire... - repeat these steps until the lambda probe sparkles clean (in our case it took about 15 minutes). Before installation, the threads of the oxygen sensor should be lubricated with graphite grease (so that it does not burn).
Only after this can the part be returned to its place.
How to check
This type of sensor is considered one of the most frequently worn out. It is constantly influenced by exhaust gases; an important factor is the quality of the fuel with which you have to work, as well as the health of the engine. Malfunctions and malfunctions will be indicated by the corresponding light on the instrument panel. In this case, diagnostics using a scanner will help identify problems with this particular sensor. Also, problems that have arisen will be indicated by a loss of power, “jerky” operation of the engine in idle mode, and minimal response to the gas pedal. The toxicity of exhaust gases will increase, which can only be determined by measuring with a special device. There will be an increase in fuel consumption.
The main reasons for failure include: wear (each sensor has its own mileage), dirt, moisture, mechanical stress that leads to chips and cracks, as well as a broken heating element circuit. Poor quality fuel, frequent engine overheating, oil ingress, detergent ingress, and the addition of additives to the fuel will contribute to faster wear.
Results
The part plays an extremely important role in the operation of the engine. It allows you to increase its productivity thanks to the correct dosing of air. It is not surprising that her unstable work has a bad effect on the overall dynamics. Despite this, cleaning is a last resort method that is used only when serious failures are detected.
First of all, I want to warn dear readers, if you are expecting to see in this post “miraculous” manipulations for washing medical products in various acids or any liquids, then I intend to disappoint you, you can only amuse yourself with this placebo. This post will talk about repairs.
Actually, I decided to combine two entries from my BZ regarding lambda probes.
So the preface: I had my first and second adventures with the first lambda. In general, I then changed the first lambda to Boshevskaya 0 258 006 537 and the problems disappeared. But time does not stand still, and just now, while sorting out the trash in the garage, I came across a box, and in it there were already 3 lambdas. 1st - dear. She is completely “ales” 2nd - supposedly the original. I checked it with a multimeter - there is no voltage on the signal wire. (mine is gray) we can assume that there is a break somewhere inside. 3rd - from disassembly. We check with a multimeter - the heating is interrupted.
It was decided: the 1st one will be cut, and then we’ll see, maybe out of the 2 remaining ones with different problems I’ll make one, but a working one.
Now you can solder everything, recheck it and install it. Soldering with a jewelry torch using copper-phosphorus solder. Unfortunately, there is no photo of the finished product. We put it on the car. And we check everything with the engine running using a multimeter. We are glad to have a spare LP for a rainy day
This is actually the most responsible and painstaking work. And here the lambda repair is also shown, only less responsible, but also requiring attention
All the best PEACE and GOOD
Replacement or repair
A faulty device leads to rapid wear of other key engine parts and affects the quality of driving as a whole. If a device is found to be inoperative, it must be replaced with a new one. If pollution becomes the cause of the problem, then there is a chance of bringing it back to life. Before cleaning, you need to know whether you can clean the lambda probe yourself or whether it is better to trust the professionals. Due to the specific operating system, soot often accumulates on the device, and combustion products fill the inside. This allows you to work, but intermittently. This kind of work can be done at home.
Before cleaning, you must remove the sensor. These actions will be performed differently on different car models, but in general the mechanism of action is the same. To begin with, you should provide a work area that will be most convenient for disconnecting and removing the sensor. This could be an overpass or a pit. Then you need to disconnect the terminals of the wires that go to the lambda probe itself. Next, using a key of the required size, the device itself is dismantled. Work should only be carried out after the engine has completely cooled.
There are several cleaning options:
If the cap was removed by sawing on a lathe, then it can be returned to its place using argon welding. Instead of phosphoric acid, you can use any rust removing liquid, such as WD. Before installing a cleaned device, you should pay attention to the O-ring. It is also necessary to lubricate the finished sensor with graphite grease. This way it will be protected from burning. When you know how to clean a lambda probe and what effective methods there are, the work will not seem difficult; you can do it yourself.
Checking the oxygen sensor
Typically, diagnostics of a lambda probe is carried out using a voltmeter and an ohmmeter or a multimeter, which replaces both of these testers at once. To check the filament coil of the regulator, you need to disconnect pins 3 and 4 of the connector from the block (usually these are brown and white wires) and connect the ends of the tester to their clamps. If the resistance of the spiral is at least 5 ohms, then this is a good sign.
Also, checking the lambda probe with a multimeter allows you to find out the sensitivity of the tip of the oxygen sensor. To find out the thermoelectric parameters of the element, you need to turn on and warm up the engine to 70-80 degrees. After that:
- Raise the engine speed to 3000 and hold this value for 3 minutes to allow the sensor to warm up.
- Connect the negative probe of the tester (signal wire) to the ground of the car, and the second one to the output of the lambda probe.
- Check the tester readings, the data should vary from 0.2 to 1 V and update up to 10 times per second.
- Press the accelerator pedal sharply and release it; if the multimeter shows a value of 1 V, and then sharply drops to zero, then the lambda probe is ok. If the data on the tester does not jump when you press and release the pedal, and the readings are about 0.4 - 0.5 V, this indicates the need to replace the sensor.
If there is no voltage at all, then most likely the cause of the malfunction lies in the wiring, so use a multimeter to test all the wires that go from the ignition switch to the relay.
Healthy! To more accurately clarify the sensitivity characteristics of the lambda probe, you will need professional equipment - an oscilloscope.
If your car is equipped with a “smart” on-board system, then pay attention to the “Check Engine” signal, which may display the following errors:
- 0130 - indicates that the sensor is producing an incorrect signal.
- 0131 – very weak sensor signal.
- 0133 – lambda responds slowly.
- 0134 – no response at all.
- 0135 – malfunction of the lambda heater.
- 0136 – the grounding of the second sensor is short-circuited.
- 0137 – the second sensor produces a very low signal.
- 0138 – the signal of the second lambda is too high.
- 0140 – probe breakage.
- 1102 - it is impossible to read the indicators, since the resistance of the element is too low or completely absent.
However, before you check the lambda probe oxygen sensor (a video of this process is presented below) using a special tester, pay attention to its appearance. If substances have stuck to it that prevent it from working properly, then it may be possible to limit yourself to repairing this element.
Proper cleaning of the lambda probe with your own hands at home
Any motorist will agree that there are no eternal parts in a car. Each element has its own expiration date and service life. Some can work for many years, others have to be replaced almost several times a year. One of the car components that needs periodic replacement is the lambda probe. This engine part is of great importance in the operation of the power plant. It is also called an oxygen sensor or oxygen sensor. The essence remains the same, regardless of the name. The probe fails quite often, and replacing it is far from cheap for the car owner. Therefore, many are looking for ways to extend the life of the lambda probe by cleaning the resulting contaminants. And we managed to find them. Moreover, some of these methods can be implemented at home. To properly clean the lambda probe with your own hands, you need to understand the functions and importance of this element, read the cleaning instructions and strictly follow all recommendations.
Methods for cleaning the lambda probe yourself.
Emergency firmware
The fact is that when the electronic control unit sees a breakdown of the lambda probe, it starts working not according to the default firmware, but according to the emergency one. In this case, mixture formation occurs based on data obtained from other sensors. Only the oxygen sensor is not involved in this process. The driver will notice signs of malfunction of this device immediately. Unfortunately, the mixture is too lean, since the percentage of gasoline is higher than necessary. This ensures that the engine does not stop. But if you increase the air supply, there is a high probability that the engine will stall. However, as a warning, most cars have a Check Engine light on the dashboard that indicates engine problems. Literal translation of this inscription Check the engine. But even without it, you can determine the failure of the lambda probe
. The fact is that fuel consumption increases significantly compared to normal mode.
Oxygen sensor functions
The first step is to understand what a lambda probe is, why it is needed and why so much attention is paid to this element. A lambda probe or simply an oxygen sensor is a controller that evaluates or measures the volume of oxygen remaining in the unburned air-fuel mixture, presented in the form of exhaust gas. The sensor compares this indicator with the nominal values, after which it sends information to the electronic control unit of the fuel system. This unit, in order to optimize the composition of fuel and oxygen, regulates the air supply inside the combustion chamber. This is done by increasing or decreasing the amount of air. This reduces the amount of harmful substances in the exhaust gas, increases the stability of the power plant, improves the dynamics of the vehicle and more.
In a situation where the sensor is heavily contaminated, it cannot work correctly. Because of this, the electronic unit receives inaccurate information, which disrupts the operation of the oxygen and fuel supply system to the combustion chamber. The result of this situation is increased fuel consumption, unstable engine operation and severe environmental pollution. The driver harms himself and the environment because the car exceeds acceptable environmental standards. To avoid such a situation, you need to change or restore the oxygen sensor in time.
The first signs of a sensor malfunction
Experts advise regularly diagnosing the sensor, every 30,000 km, and replacing it after 100,000 km. Manufacturers typically use this range to limit the life of the probe.
If motorists do not heed these recommendations, after passing the “anniversary” sign of 100 thousand km, they will receive a “Check Engine” alarm.
This fuel cell does not last forever. Since it works in an aggressive environment, it can fail at any time, even before the end of the warranty period. The driver notices a malfunction based on the symptoms of the behavior of the vehicle unit. For example, in cases where the vehicle is equipped with a fuel probe and the CO level is extremely high, this means that the control device is not working.
The content of harmful substances in exhaust gases can only be determined using gas analyzers. But this is an expensive device, and it is not profitable to purchase it for personal needs. Therefore, a breakdown is indirectly determined by the current gasoline consumption and frequency of refueling. In addition, a warning light on the panel indicates that there is a malfunction in the engine. If it is impossible to analyze the exhaust gases with a special device, this is done visually. Light smoke from the muffler is a sign that the mixture is airy, and black smoke indicates excessive consumption of gasoline and a malfunction of the fuel system.
Cleaning methods at home
Since the oxygen sensor can sometimes be restored, car owners have a logical question. They are interested in how to properly clean the lambda probe without going to a car service center. There are indeed methods that can be used at home. But you need to be extremely careful, since the work involves the use of potentially dangerous substances. Please note that the oxygen sensor is quite fragile by design. Therefore, causing any damage during cleaning directly indicates that work needs to be stopped and a new controller purchased. This one is no longer suitable for further use. The need to replace the lambda probe arises when the vehicle begins to consume a large amount of fuel, exceeding normal values, without objective reasons. Warning lights also appear on the dashboard, which recommend diagnostics. Quite often, such symptoms indicate problems with the oxygen sensor. And there are two cleaning methods:
It is recommended to immediately abandon the idea of performing mechanical cleaning. This is explained by the fragility of the element, which is very easy to damage when working with your own hands. If any damage is caused, further operation of such a controller is not permitted. It is also dangerous to use any power tools with abrasive attachments. They act with too much force, which causes the sensor to instantly break. Sitting and picking at the sensor with different toothpicks or needles is also long and exhausting. As a result, experienced motorists agree that the chemical method is the most optimal, easy to perform at home and effective.
When choosing a chemical cleaning method, it is important to choose the right product. Here you can use liquids from different manufacturers who offer their own solvents for solid carbon films. And many are interested in whether it is possible to clean the lambda probe at home with carburetor cleaner. This product can really help, as can an injector cleaner. But still, orthophosphoric acid has gained great popularity. It is able to cope with more serious pollution. Phosphoric acid is characterized by the ability to quickly dissolve metal oxides and organic alkaline films without damaging the oxygen sensor itself. This cleaning gives a good result, so it is often done with your own hands at home if the controller has not failed, but has simply become dirty.
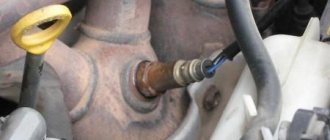
Phosphoric acid can be used in the usual and improved ways. To carry out cleaning work, you first have to find the oxygen sensor itself. It is located in the engine compartment in front of the catalyst installed on the car. But keep in mind that on modern cars, manufacturers install two lambda probes at once. The first one stands in front of the catalyst, and the second one is located behind it. Therefore, sometimes it is easier to find devices by moving from the engine compartment under the car. If there is a hole in your garage or you have the opportunity to lift the car on a lift, finding oxygen sensors will not be difficult. The controllers are dismantled using a key of the required size. Once removed, you can begin cleaning. You will use the usual method or the accelerated one, everyone chooses for themselves.
Conventional acid cleaning
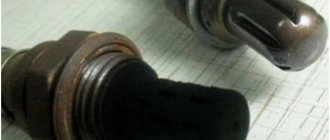
It cannot be said that self-cleaning the lambda probe with phosphoric acid is extremely simple. And this is not about the acid itself or the procedure. The difficulty lies in the fact that the ceramic-platinum base, on which carbon deposits and soot accumulate, is hidden under a protective metal cap. If it is not removed, the treatment will be useless. To remove the cap, you need to be extremely careful and delicate. If you pick up a hacksaw, you will probably damage the entire device, so further cleaning will not be necessary. You will have to change the oxygen sensor. A lathe is suitable here, which can be used to cut off the cap near the thread. In the absence of a machine, files are used. It will not be possible to completely remove the cap with a file. But you can make a small window, the dimensions of which will be about 5 millimeters. The optimal method that does not require additional tools. When you manage to get to the working rod, you can begin cleaning the lambda probe. Below are step-by-step instructions for cleaning the oxygen sensor.
This type of cleaning takes a lot of time, but often gives good results. Therefore, motorists are ready to endure, just not to spend money on buying a new oxygen sensor. Although it is possible to speed up the procedure.
Accelerated method
Those who want to clean the oxygen sensor with their own hands, but who do not have the patience for the usual method, are interested in how they can help so that the lambda probe quickly returns to its original appearance. To increase the cleaning properties of orthophosphoric acid, you will need to additionally take another device. After using it and completing all procedures, do not forget to rinse the surface of the cleaned core. To speed up the procedure, you will need a gas stove or burner. If you use a regular home stove, then it will be more convenient to work on the smallest burner. Here everything is done like this:
It is necessary to achieve a metallic shine on the working surface of the oxygen sensor. Typically this procedure takes about 15-20 minutes. Before putting the device back in place, be sure to treat the threads on the oxygen sensor with graphite lubricant. Now feel free to return the lambda probe to its socket. If you have two devices, a similar procedure should be performed with the second controller.
Stories from our readers
“Fucking basin. "
Hi all! My name is Mikhail, now I’ll tell you a story about how I managed to exchange my two-wheeler for a 2010 Camry. It all started with the fact that I began to be wildly irritated by the breakdowns of the two-wheeler, it seemed like nothing serious was broken, but damn it, there were so many little things that really started to irritate me. This is where the idea arose that it was time to change the car to a foreign car. The choice fell on the melting Camry of the tenth years.
Yes, I had matured morally, but financially I just couldn’t handle it. I’ll say right away that I am against loans and taking a car, especially not a new one, on credit is unreasonable. My salary is 24k a month, so collecting 600-700 thousand is almost impossible for me. I started looking for different ways to make money on the Internet. You can’t imagine how many scams there are, what I haven’t tried: sports betting, network marketing, and even the volcano casino, where I successfully lost about 10 thousand ((The only direction in which it seemed to me that I could make money was currency trading on the stock exchange, they call it Forex. But when I started delving into it, I realized that it was very difficult for me. I continued to dig further and came across binary options. The essence is the same as in Forex, but it’s much easier to understand. I started reading forums, studying trading strategies. I tried it on a demo account, then opened a real account. To be honest, I didn’t manage to start earning money right away, until I understood all the mechanics of options, I lost about 3,000 rubles, but as it turned out, it was a precious experience. Now I earn 5-7 thousand rubles a day. I managed to get the car buy after half a year, but in my opinion this is a good result, and it’s not about the car, my life has changed, I naturally quit my job, I have more free time for myself and my family. You’ll laugh, but I work directly on the phone)) If If you want to change your life like me, then here’s what I advise you to do right now: 1. Register on the site 2. Practice on a Demo account (it’s free). 3. As soon as you get something on the Demo account, top up your REAL ACCOUNT and go to REAL MONEY! I also advise you to download the application to your phone, it’s much more convenient to work from your phone. Download here.
During the first 5-7 minutes after starting the engine, the ECU adjusts the mixture composition based on the readings of other sensors and averaged parameters. After this time, when the oxygen sensor has warmed up to operating temperature, then the ECU connects its parameters to the general calculation formula.
An oxygen sensor error may be caused by a faulty heating circuit. As a result, the sensor will not have time to warm up in the allotted time, which means that incorrect signals from the oxygen sensor . The fuel mixture will not be suitable, which will negatively affect engine performance (high fuel consumption, idle speed fluctuates, the car does not drive). As soon as the oxygen sensor warms up to operating temperature, all symptoms disappear.
Important Tips
When using this cleaning method at home, always consider the following important nuances.
Based on these recommendations and cleaning features, you will be able to do everything correctly. There is no point in giving up trying to resuscitate the lambda probe. This item is really not very cheap, so there is a good opportunity to save on repairing your car.
Clean the old one or buy a new one
There is a lot of talk and debate around this topic. Whether to clean the lambda probe or not, each car owner must decide for himself. But here it is important to take into account basic statistics. They indicate that not in all cases, after the procedure for cleaning the oxygen sensor, it is possible to fully restore its correct functionality. Sometimes controllers work for a short time after restoration or continue to produce not entirely correct results, which is why the electronic unit is not able to correctly form the air-fuel mixture for the combustion chamber. You should not rely on cleaning as a panacea for probe malfunction. You can always try to revive the sensor. But it is also recommended to keep a new, working oxygen sensor in stock. If cleaning does not give the expected result, then it will be easier to insert a new device in place of the old sensor. Motorists also claim that cleaning the controller after more than 100 thousand kilometers is generally a pointless exercise. It has served its purpose, so just throw away the sensor and buy a new device. It will be easier for everyone.
The role of the sensor in engine operation
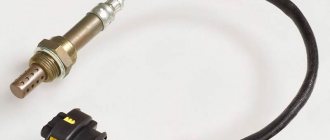
The element is a metal rod with a threaded or flanged tip for mounting inside the exhaust tract. A platinum-coated ceramic working part protrudes from the end of the lambda probe, protected from the outside by a steel cap with holes for the passage of exhaust gases. Wires (from 2 to 6 pieces) come out from the other end, transmitting a signal to the electronic control unit (controller).
To understand the question of how to clean the lambda probe and whether it needs to be done, it is advisable to understand how it works:
- The sensor's task is to determine the amount of oxygen remaining in the gases after fuel combustion. To do this, the device is placed in the section of the exhaust pipe between the catalyst tank and the exhaust manifold. In new cars, 2 elements are installed - before the neutralizer and after it.
- When the probe detects a large amount of oxygen, the controller “sees” this by a change in voltage and determines that the mixture supplied to the cylinders is lean, after which it adjusts the air-to-fuel ratio.
- If there is little oxygen, then the mixture is too rich and the control unit reduces the supply of gasoline.
If the sensor fails, wires break or contacts oxidize, the controller switches the fuel supply to the average mode . That is, the car can move further, but fuel consumption increases, and the car’s behavior changes for the worse (acceleration dynamics are lost). In general, this is a fairly reliable device, serving 100-150 thousand km on imported cars and 50-100 thousand km on domestic ones.
How to clean a lambda probe
The oxygen sensor (also known as a lambda probe) must determine the concentration of free oxygen in the exhaust gases of the internal combustion engine. This happens thanks to the O2 analyzer that is built into it. When the sensor is clogged with non-combustible carbon deposits, the data it produces will be incorrect.
If problems with the lambda are identified at an early stage, restoring the oxygen sensor will help correct them. Cleaning the lambda probe with your own hands allows you to return it to normal operation and extend its service life. But this is not relevant in all cases, and the effectiveness depends on the product used and the method of use. If you want to find out whether cleaning the lambda probe helps with various malfunctions, how to clean it from carbon deposits and how, read the article to the end.
The estimated life of the lambda probe is about 100-150 thousand km, but due to aggressive fuel additives, low-quality gasoline, oil burnout and other problems, it is often reduced to 40-80 thousand. Because of this, the ECU cannot dose gasoline correctly, the mixture becomes lean or rich, the engine begins to run unevenly and loses traction, and a “Check engine” error appears on the panel.
Reasons leading to lambda malfunction
The following reasons can lead to breakdowns of the oxygen sensor:
- One of the main reasons, especially relevant in our country, is the low quality of gasoline and the high lead content in it. Alas, it is impossible to check the quality of gasoline at a gas station;
- contact with brake or coolant fluid on the oxygen sensor housing;
- an attempt to clean the probe without knowledge of the matter, or with means not intended for this.
In general, the oxygen sensor is a disposable part and should not be subjected to attempts to clean, rinse, or other manipulations, the purpose of which is to restore functionality. But, nevertheless, cleaning it is a very common procedure.
Common problems with the oxygen sensor
The malfunction of the lambda probe, according to the manufacturers, cannot be eliminated, and if it fails, it must be replaced with a new one or a false one installed. However, in practice, if you notice a functioning problem in time, you can slightly extend its life. And not only thanks to cleaning, but also by changing the quality of the fuel. If we are talking about contamination, then you can clean the lambda probe so that it begins to give correct readings.
It is better to revive the lambda only after preliminary diagnostics and testing, because it is possible that this will turn out to be just a waste of time.
Focusing on the cause, based on preliminary data when checking the oxygen sensor, it will be possible to roughly say whether there is any point in cleaning.
| Signs of a malfunction of the LZ | Why is this happening | How does the car behave? |
| Case depressurization | Natural wear and overheating of the sensor | Problems with XX, a rich mixture enters the engine, fuel consumption increases, strong smell from the exhaust |
| Sensor overheating | Happens when the ignition is incorrect: with a broken coil or wires, incorrectly selected or dirty spark plugs | Problems with idle, combustion products burn out in the exhaust tract, possible engine tripping, loss of traction, shots into the muffler, popping noises in the intake |
| Housing clogged | Occurs due to refueling with low-quality gasoline or accumulation of deposits due to high mileage of the car | Unstable engine operation, loss of traction, increased fuel consumption, strong smell from the exhaust pipe |
| Wiring damage | The wiring rots, breaks in the cold, shorts to ground, etc. | Unstable engine operation at idle, slight loss of engine response and traction, increased gasoline consumption |
| Destruction of the ceramic part of the LZ | After a blow to the sensor, for example, after an accident, contact with an obstacle with exhaust parts, or careless repair of the exhaust tract | Unstable operation at idle, tripping, increased consumption, loss of traction |
As you can see, all types of oxygen sensor problems present with the same symptoms. This is due to the fact that if the lambda transmits incorrect data about the composition of the mixture to the ECU, the “brains” begin to dose fuel incorrectly and adjust the ignition timing. If there is no signal from the sensor at all, the ECU switches the engine to emergency operating mode with “average” parameters.
If the diagnostics did not reveal any mechanical problems with the sensor (broken parts, deformations, cracks), but only elementary contamination of its heating part or the most sensitive element, you can try to restore it. But before you clean the oxygen sensor from carbon deposits, you need to make sure that its wiring is in good condition (perhaps it will be enough to eliminate the break, clean the contacts or replace the chip), as well as the normal operation of the ignition system.
Preparing for testing
Modern cars usually have 2 sensors installed - before and after the catalyst. The signals from them must be different, then the control unit regulates the injection duration in accordance with the accepted parameters.
But if one of the sensors fails or the car owner has removed the catalyst option, the signals from two sensors are perceived by the unit as an emergency mode. In this case, the controller will select average data to adjust the injection, which will increase fuel consumption and reduce engine power, and the Check Engine sign will appear on the panel. To combat this phenomenon, carry out a simple diagnosis of the sensor. It is necessary to work on a cooled engine, otherwise you may get burns.
- Open the hood and find the exhaust manifold.
- Locate the probe on the catalytic converter.
- Perform an external examination. Soot and deposits are signs of improper operation of the fuel system, indicating that there is too much lead in the gas.
- Replace the oxygen sensor and diagnose the car again.
- Disconnect the sensor connector and connect a voltmeter to 2 volts.
- Run the engine at up to 2500 rpm, then reduce it to idle.
- Measure the voltage. The change should be small, in the range of 0.8/0.9 volts. If there are no transformations or the voltage is zero, this indicates a sensor malfunction.
Is it possible to clean the lambda?
Restoring the operation of an oxygen sensor in a garage is possible if it is contaminated with deposits from fuel combustion products. It is useless to clean a physically broken sensor; it must be replaced. If you find just a dirty lambda probe, cleaning it from carbon deposits will bring it back to life. Is it possible to clean the lambda probe? There is no need to worry. Since this sensor is designed to operate in an aggressive environment of hot gases, it is not afraid of heating, washing and some caustic chemicals. Only in order to choose the product that can make cleaning safer, you will need to determine the type of sensor.
Before cleaning the lambda sensor from carbon deposits, determine its type. There are two main types:
Left zirconium, right titanium
You can visually distinguish a zirconium lambda probe (oxygen sensor) from a titanium one by two characteristics:
Lambda is cleaned of contaminants using active chemicals such as acids and organic solvents. Zirconium sensors, being less sensitive, can be cleaned with aggressive concentrated acids and solvents, while titanium sensors require more gentle handling. Carbon deposits on the second type of lambda can only be removed with a more dilute acid or organic solvent.
How can I clean the lambda probe?
When choosing how to clean the lambda probe from carbon deposits, you must immediately discard potentially aggressive substances that destroy the sensor. Depending on the type of sensor, these include:
It is necessary to use substances that are chemically active and aggressive towards carbon deposits, but neutral towards the sensor itself. There are 3 options for cleaning carbon deposits on an oxygen sensor:
Phosphoric acid for cleaning the lambda probe
But cleaning the lambda probe with acetic acid or trying to remove deposits with a solution of citric acid will be completely useless . Read below for information on how to clean the lambda probe sensor with different chemicals.
Mechanical cleaning of the converter
It is important to clean the oxygen sensor in a timely manner so that the functionality of the car is not impaired.
If the driver neglects to clean the probe, it contributes to performance problems and reduced performance due to inefficient combustion.
Required materials and tools:
- Goggles and work gloves.
- Car lift.
- Wrench.
- WD-40 and gasoline.
- Container.
- Soft fragile brush.
- Paper towel.
The lambda probe is cleaned in compliance with safety regulations. The car owner should first put on gloves, safety glasses and a face mask as he will be working with gasoline during the restoration process. Sequence of operations:
- Park the car in a clean, well-ventilated and lit place.
- Use a jack to raise the car and keep it in position.
- Apply the handbrake to prevent the vehicle from moving when raised.
- Install jack stands.
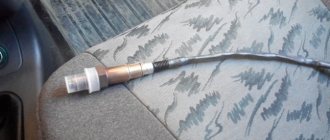
- Find the oxygen sensors that should be located near the converter. There may be a different number of them, depending on the make and model and edition. You can refer to the user manual to find out the exact location. Typically, one is located in front of the catalytic converter and the other is located in the exhaust manifold.
- Spray lubricant onto the sensors to make it easier to unscrew the boiled nuts.
- Wait 10 minutes and then unscrew them from the mains using a wrench.
- Carefully collect excess gasoline in a special container with a tight-fitting lid.
- Sensors should not be left on the ground or in any other dirty place.
- It is necessary to place the removed sensors in a container and slowly pour gasoline into it. Its quantity should be sufficient to completely cover the devices. After this, you need to give the gasoline a chance to break down the dirt deposits, and then rinse the container. If the dirt cannot be cleared immediately, the container should be left in a cool and dry place overnight.
- In the morning, you need to check the contents of the container and make sure that most of the dirt has been cleared. But if there is anything left, you can take a soft-bristled brush, dip it in gasoline and gently rinse the probe.
- Allow the sensors to dry completely for some time, or dry them quickly by placing a paper towel over them.
- Place them back in the correct position by tightening all the bolts.
- Now the restored sensor will begin to work effectively, which will lead to an increase in vehicle performance.
Do-it-yourself lambda probe cleaning
So that cleaning the lambda probe at home does not take you much time, you can look in the table at the expected result and the time spent when using a particular product. This will help you decide what and how to clean the oxygen sensor with your own hands.
| Means | Result | Time to clean up |
| Carbcleaner (cleaner for carburetors and chokes), organic solvents (kerosene, acetone, etc.) | Suitable for prevention, does not cope well with carbon deposits | Dense carbon deposits are almost impossible to clean, but a quick rinse allows you to wash away small deposits at an early stage |
| Dimexide | Average efficiency | Removes light deposits in 10-30 minutes, weak against dense deposits |
| Organic acids | They don’t wash away very heavy stains, but they take a relatively long time and are ineffective against dense deposits. | |
| Orthophosphoric acid | Removes deposits well | Relatively long, from 10-30 minutes - up to a day |
| Sulfuric acid | From 30 minutes to several hours | |
| Hydrochloric acid |
How to determine the effectiveness of lambda probe cleaning?
Result of cleaning the lambda probe
Cleaning the lambda probe is not a panacea for all its problems. Chemically active substances can only remove deposits and carbon deposits, the crust of which prevents the sensor from detecting oxygen in the exhaust gases.
Whether cleaning the lambda probe helps depends directly on how persistent the contamination was, and on the absence of other problems with the fuel system and ignition system.
If the DC is leaky, cannot compare readings with “reference” air, the ceramic part is broken, or cracked from overheating, nothing will change after cleaning. There will be no result even if the carbon deposits are removed only from the iron protection, since the sensor itself is inside.