March 03, 2015 Lada.Online 95 573 3
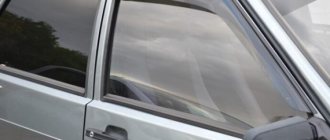
Some owners, after purchasing a LADA car, notice malfunctions in the operation of the doors. For example, the back door doesn't open well. You can cope with the problem yourself by adjusting the locks and door geometry. The defect can also be corrected under warranty from an authorized dealer.
Malfunctions that owners of LADA cars (and other car brands) encounter when the door locks are not adjusted:
- the door does not open or close;
- the door closes/opens poorly (tight);
- large gaps between the door and the body (water gets into the cabin, rattling and whistling appear at speed).
Door adjustment on all LADA cars (XRAY, Vesta, Largus, Granta, Priora, Kalina Niva 4x4) is performed in the same way. There are no fundamental differences.
Car doors do not open well
The most common manufacturer defect is that the rear and front doors on Kalina are difficult to open. The flaw occurs in used cars and those that have just come off the assembly line. The reason is incorrect or insufficient adjustment of the door handle or the door itself. In used cars, the doors become loose over time. Uneven gaps form at the joints with the housing components.
The problem can be solved with the help of a service center or fixed by yourself. The second option is more acceptable for experienced drivers, experienced auto mechanics and those who like to experiment with their car.
First of all, it is important to find out the reason why the back door on a Viburnum does not open well. An external inspection of the defect is carried out and a comparison with the original position of the part is carried out. Based on the results of the check, you can adjust the elements yourself.
In a similar way, malfunctions of the front and rear doors are eliminated, including the trunk door, if the car has a hatchback or station wagon body, but in this case there are nuances.
201-1 Repair Kalina
Front door lock with locking drive and outside handle
Remove the front door trim (see “Removing the front door trim”).
Using a Phillips screwdriver, unscrew the screw securing the base of the inner handle. . and remove it from the mounting pin. We bend the edge of the protective material behind the inner door panel.
Using a screwdriver, we disconnect the rod from the cylinder mechanism of the outer handle lock.
Similarly, disconnect the rod from the outer handle.
Using a 8mm socket, unscrew the bolt securing the outer handle.
Using the “8” socket, unscrew the handle securing nut.
. and remove the outer handle.
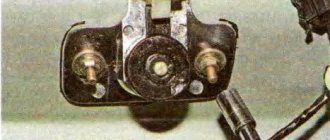
Using a Phillips screwdriver, unscrew the three screws securing the door lock. Move the red block lock up.
. and disconnect the block from the locking drive.
Use a screwdriver to press out the plastic rod clamp, turning it around its axis. . and, having disconnected the rod of the inner handle from the lock, remove the rod.
We remove the front door lock along with the locking drive and rods through the technological opening in the inner door panel. Install the front door lock in reverse order
Door adjustment process
To eliminate defects in the operation of door elements, it is necessary to find out the cause of its occurrence. In some cases, treating moving parts of the mechanism with lubricants helps. The seals between the trim and the body are subject to wear and tear, and they also require replacement periodically. If manipulation of the replaced elements is not enough, technical intervention is required. Regulation is necessary for the following factors:
- the gap in the extreme part of the structure causes the door on the Kalina car to not close tightly;
- The problem is caused by a faulty door lock.
Violation of the geometry of the structure in the doorway is the most common cause of the defect. Gaps can appear in any part of the joint with the body. Most often this happens from above and below. The adjustment in these cases is similar, but has minor differences.
Adjusting the bottom of the door
First of all, it is necessary to establish access to the inside of the lock from the outside. To do this, the glass is completely lowered. The door closes with light blows on the bottom of the casing. During the process, the size of the gap in the lower part of the structure is controlled. When the correct result is achieved, the door is carefully opened and slammed shut. If necessary, repeat the procedure. It is worth monitoring the force of impact and correcting the geometry of the doorway.
This method is used at manufacturing plants at the final stage of car production. The only difference from regulation at home is the availability of technological devices and tools.
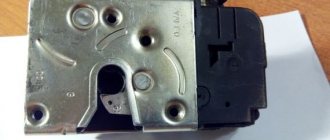
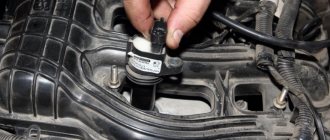
Removing the lock and replacing the cylinder
The design of the trunk lock on the Lada Kalina consists of two parts: the cylinder where the key is inserted and the door locking mechanism itself. All this is disconnected separately and will be written about this in more detail below.
If you need to replace the larva, it is quite easy to remove it. You can do this using an 8mm socket and a flathead screwdriver. Below is shown which bolts need to be unscrewed to release this part along with the body.
Now that the bolts are unscrewed, take a plastic screwdriver and use it to pry off the plastic retainer that secures the rod to the body of the cylinder. For clarity, below is a photograph that clearly shows what needs to be done:
- Then, carefully take the larva so that its spring, which is located inside, does not jump out. If you need to replace a part, then replace it with a new one and assemble everything in the reverse order.
- If it is necessary to completely remove the entire mechanism, then you will have to do a little more work. We unscrew the door locking mechanism itself with a large Phillips screwdriver, there are only two bolts:
When everything is done, you need to pull it a little towards yourself and it can be easily removed; all that remains is to disconnect the plug with the power wires from this structure:
That's all the repairs, which will take about half an hour if you have the right tools and this manual. We install all the removed parts, which can be bought at absolutely any auto store, in the reverse order. I hope that I helped someone with this photo report using the example of my Lada Kalina station wagon.
Door lock adjustment
A car lock is used to prevent the door from opening spontaneously and is a protective element of the security system. The standard Lada Kalina lock consists of two parts: mechanical and electronic. It often becomes the reason why the door handle is difficult to open; Kalina sometimes has such a defect already from production. As in the case of adjusting door gaps, there are two options for correcting the deficiency:
- Take your car to a service station and trust the professional technicians. Recommended for beginners and inexperienced car owners.
- Fix the problem yourself using available tools. Suitable for car enthusiasts with extensive driving experience and basic training.
Adjusting the lock at home is done using a Phillips screwdriver. Before starting manipulations, it is recommended to mark the original position of all elements for possible return to their original state.
To move the lock module, loosen the three screws that secure it. The bracket is now not fixed and can move in the plane. Once it is in the correct position, the screws are tightened into place. The structure is treated with lubricant and undergoes mandatory testing by opening and closing doors.
The procedure should be performed extremely carefully so as not to damage the body paint and trim elements.
If the lock is the reason that Kalina’s door does not open well, and the adjustment did not help, resort to more stringent means:
- The locking bracket is pulled out 3 - 5 mm and secured in this position. The method allows you to use this additional distance for a smoother door movement. It is important to find the optimal size for the structure to bulge from the body. If the door is extended excessively, it will make sounds on uneven sections of the road and allow dust and moisture into the interior.
- Reducing the area of the locking hook. This is usually achieved by filing the mechanism and restoring the locking system to its original state. The size of the cut area affects the ease of opening the doorway. If too much volume is removed, the door may open and close on its own. During processing, it is advisable to round off the sharp tip of the lock tooth.
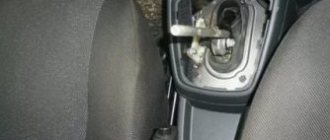
Ignition switch malfunctions
Like any electronic device, the ignition switch of the Lada Kalina is subject to frequent breakdowns. Malfunctions can occur for a variety of reasons, the most common of which are the following.
Oxidation of contacts always leads to serious damage (usually due to moisture and dampness in the machine)
Burnout of contacts, which occurs due to sudden voltage surges. Voltage drops usually occur when the power unit is started, during which the temperature inside the system rises sharply, causing the insulation to simply burn out
This is why it is so important to approach the launch issue wisely.
Mechanical damage. If, when you are about to turn the key, you notice that it has become more difficult to do so than usual, it means that something happened to the lock cylinder, perhaps it was simply clogged with dirt or dust, or maybe there was a defect at the factory that came to light only now.
If the problem lies in burnout or oxidation, then when you turn the key in the lock, you will not see any reaction from the ignition system. In this case, you just need to replace the contacts without changing the entire lock; if the defect in the wires is not severe, then you can get by with cleaning the contacts.
Damage to the lock cylinder also occurs when someone tries to steal a car. In any case, the lock needs to be changed completely. But how to do it yourself?
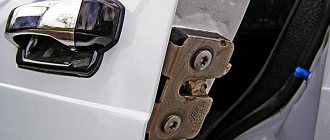
Loose door hinges and how to fix them
Sometimes there is no need to adjust body structural elements. The problem of closing the door is caused by play in the hinges. Their role is performed by standard bolts. The hinge axes weaken due to frequent use, play occurs, the door begins to make sounds when driving, and perform vertical movements.
The defect is eliminated with a wrench. The bolts are tightened with a smooth force and, if necessary, replaced with similar fasteners of a modified design. After the hinges are aligned and the gaps disappear, the door is inserted into place, the size of the gaps on the right, left, and sides is carefully monitored.
Replacing the larva in Kalina
First of all, replacing the lock elements means that the door trim will be completely missing. Therefore, first we will figure out how to dismantle the trim on Lada Kalina cars. The second chapter is devoted to how to remove the larva and install a new one in its place. The last step will actually be the simplest.
Removing the door trim yourself
The casing is attached not only to screws, but also to plastic pistons. The number of screws holding the part in question is four:
Numbers here indicate all fastening elements. But to get to them, you need to remove the screw cap “3”, as well as the inner door handle. The pawl handle also needs to be unscrewed.
If these actions are completed successfully, the casing begins to be dismantled, moving it away from the metal
Dismantling is carried out starting from any of the corners, but care must be taken: the pistons holding the plastic are fragile
If the package includes power windows, you will need to disconnect the connector connected to the button block. Also, another similar connector is present in most trim levels - where there is a central lock. Both connectors must be disconnected.
All the steps described here involve electronics in any case.
Therefore, at the stage before dismantling the trim, you need to open the hood, take the “10” key and unscrew the negative terminal. We are talking about the battery terminal, which can be connected last (when the last screw is screwed in). Anyone who breaks this rule will look for blown fuses. Draw a conclusion.
How to get to the door mechanism
According to the recommendation of the magazine "Behind the Wheel", in the absence of casing, access to the lock is always available. Simply put, there will be no need to remove the inner lining made of metal. The steel sheet is simply bent to the side.
The rotating part with the protrusion is called the “drive”, and this is what you will need next.
Replacing the larva will be easy:
- The key in the cylinder currently fixed in the door is turned 90 degrees;
- Using a steel ruler, knife or thin screwdriver, you need to press the locking tongue located opposite the slot in the body of the cylinder. You need to place a screwdriver between the rotating and stationary parts of the mechanism. Know that in the driver's door the slot is made from the bottom (looks “to the floor”), in the passenger doors - from the top!
- By pulling the key towards you, the larva is pulled out;
- The new cylinder is installed like this: with the key inserted, it is pushed into the lock until it stops. The locking tab will need to be pushed inward.
Read more: Granta timing marks photo
The following photo illustrates the “second step”.
The slot itself, when the mechanism is assembled, is located between the drive and the lock body (at least that is how it is designed). You need to manage to squeeze a screwdriver into the space between these parts. Sometimes this action does not lead to a positive result, and then the lock has to be removed as an assembly.
How the back door on a Lada Kalina should work correctly
When operating domestically produced cars, you have to deal with both acquired and factory defects. The rear door of the Lada Kalina is more often than other body elements exposed to physical impact during driving, includes a number of technically complex devices, and has a high percentage of defects during assembly line assembly. The main components of the normal operating process of the door:
- Correct geometry of fit of the lateral and vertical sides to the body, drain, sills of the car, equal gaps between them.
- Clear operation of the locking mechanism, installed door closer, and central locking lock.
- No extraneous sounds when moving the machine, including over rough terrain or dirt roads.
Careful car care increases its service life. Sometimes, if problems arise, it is enough to change the seal, tighten the fasteners, and lubricate the components and body parts.
Instructions for replacing the lock
Dismantling requires preliminary preparation
It is important to take care of the room in which the work will be carried out; it is better to choose a well-lit place with a comfortable temperature. A closing fragment or larva is purchased
The necessary equipment is prepared:
- screwdrivers;
- pliers;
- socket wrench 8;
- Silicone Grease;
- knife.
Replacing the larva in Kalina
To change the element, you will have to disassemble the door card; this is the only way to get to the lock and remove the trim. To replace the cylindrical core you must:
- Unscrew the handle that is held in place by two screws.
- Remove the trim panel.
- Disconnect the speakers, disconnect the power window wires.
- Unscrew the block with the wires; to do this, press the clamps.
- Unscrew the fastening of the intermediate link arm.
- Remove the rod; to do this, turn the screwdriver around its axis.
- Pull out the end of the clamp.
- Remove the plastic cap.
- Remove the lock cylinder.
- Carry out lubrication work or install a new device.
The parts are assembled in the reverse order. If difficulties arise, it is recommended to contact a repair shop.
Source
Determining the cause of a sagging door
First, about visual and other signs that the driver's door in the car is sagging, requiring immediate repair. Most often, the signal is an unusual force that must be constantly applied to close or open it. Often this flaw is accompanied by a grinding, knocking or ringing noise during a trip. Another sure sign is moisture entering the interior near the door, even if it is closed.
Experienced drivers also make an unmistakable diagnosis when deep or small scratches remain on the threshold of the car - traces from the opening door. Finally, there is an old test for such sagging:
The presence of play will confirm that it is sagging. To determine what needs to be done in this case, the reasons for the deficiency are determined. Long-term practice shows that the causes most often are:
Car door sagging: why it occurs and how to fix it
You've probably encountered a car with a sagging door. And you know how much inconvenience it brings! Not only does the door barely open or not close at all in such cases, but its every movement is often accompanied by an unpleasant sound. Many frustrated car owners lose their composure, not knowing how to eliminate this deficiency. Meanwhile, getting rid of it is easy even for an inexperienced motorist. Moreover, on our own, without turning to expensive service agencies for help.
This is exactly what we are talking about in this material, which has a clear practical direction and provides important information support to many motorists.
Further actions after repair
Having done everything carefully with your own hands, the car door should open and close without any effort. At the same time, a characteristic clap is heard. What to do if there is no slam and the doors work with tension? There is only one answer - the steps described above are done again.
I would like to emphasize the point regarding tightening the door bolts. I advise you to inspect it regularly; you can lubricate the hinges for prevention and the locks themselves. What is not recommended to do is leave them open for a long time, or lean your entire weight on them. It is better not to expose them to contact with heavy objects.
Reminder: Don't slam doors too hard! Otherwise, as you treat them, they will pay you back. By following simple rules, your car doors will last for years without fail. In addition, you won’t have to do the repairs yourself, wasting precious time, which is always in short supply.
We repair sagging car doors with our own hands
Such a phenomenon as sagging doors is a “normal” phenomenon for “not young” cars. This nuisance can cause its owner a lot of inconvenience.
How can you tell if a car door is sagging?
1. Significant force must be applied to close or open the door.
2. When the car moves over uneven surfaces, a characteristic knocking or rattling noise comes from the door.
3. If the door is skewed relative to the body or doorway, water may leak into the interior through a poorly fitting seal.
4. Characteristic scratches appeared on the sills.
Common causes of sagging doors.
1. Significant wear on the hinges and axles.
2. Loosening of hinge fastenings.
3. Warping of door hinges.
The slightest damage can cause the doors to warp or not fit tightly!
I suggest you figure out how to eliminate sagging doors with your own hands.
First, you should make sure that the sagging itself is present, and also determine its cause. To do this, you need to perform some manipulation checks:
1. Open the door that, in your opinion, has sagging, grab its lower part with both hands and slightly shake it, check whether there is any play in the hinges (in the vertical plane), as well as in the fastening. If the hinges are in order, there should be no play.
2. Try also the second verification option. Grab the door with both hands (one hand at the top, the other at the bottom), and try to rotate it along a horizontal axis in both directions. Just as in the first case, there should be no backlash.
3. After this, carefully inspect the hinge fastenings in the places where they are attached to the body; there is a possibility that the cause of the sagging is precisely the deformation of the hinges.
Having established the cause of the sagging, you can try to fix the damage and proceed directly to repairing the car yourself. If the problem arose due to the deterioration of the hinge axis, but the condition of the hinges themselves is normal, then you will just have to replace the axis. It should be noted that if the wear is significant or there is deformation of the entire mechanism, it is best to replace the hinge assembly.
After the failed parts have been replaced, it is necessary to adjust the position of the door relative to the body itself.
This is how it is done! I will describe the sequence to you:
1. Remove the lock mate, this will make it easier for you to make adjustments.
2. Close the door and try to “by eye” determine its correct vertical position; if the door line is parallel to the body, and the door itself has a slight upward or downward displacement, you should slightly loosen the fastening of both hinges and slightly raise or lower the door.
3. Clamp the fasteners; if the end part of the edge of the door on which the lock is located is slightly lowered, while the hinges are fully operational, you will need to unscrew the fastening of the lower hinge and, by placing thin metal plates under the hinge, level the position of the door.
4. If, on the contrary, the edge of the door with the lock located at the end is raised excessively, you should unscrew the fastening of the upper hinges and do the same.
5. Visually determine the horizontal position of the door: if the door is too recessed inward, you will need to move both hinges a little closer to the edge. It is important to achieve a perpendicular position in the horizontal plane; if this parameter is violated, the lock will not be able to work correctly, and the door will most likely jam from time to time.
6. If the door, on the contrary, protrudes slightly outward, you should move both hinges inward.
7. Adjust the mechanical lock, as well as the position of its counterpart.
After completing all the above steps and adjustment work, the door should close without problems, making a light characteristic clap. If this is not the case, you will have to repeat all adjustment operations again.
I would like to add...
To increase the service life of doors and door mechanisms, you need to regularly monitor the presence of lubricant in rubbing joints (lock mechanisms, hinges). Do not forget to check the tightness of bolts and other threaded mechanisms. Never “hang yourself” or lean on open doors, and do not leave them open for a long time.
How to align doors with a bolt
Some drivers manage to solve this problem using ordinary bolts - simply placing them as a spacer in the place of play. However, such a “repair” is very doubtful and is only suitable for a short time, since shaking the car on the road will sooner or later lead to the bolt falling out and the door again stopping to open normally.
And one more thing: in order not to have to deal with the not very pleasant task of repairing sagging doors, treat them, as they say, more politely, that is, you don’t have to make great efforts to close them “with a bang”, you should lubricate them regularly, do not leave them open for a long time and etc. Good luck!
Source
How to adjust a car door? What's the sequence? What are the features?
Cars (brands) are different, there are also front and rear doors, including a fifth door on some types of cars (trunk door).
Adjustment may vary.
The reasons why doors need to be adjusted are also not clear, it could be mechanical damage (impact, for example) or incorrect installation or loosening of fasteners, etc.
Understanding the cause of problems with doors is the first thing to do.
Inspect the hinges, check if there is any play, perhaps adjustment alone is not enough and the door hinges need to be changed, or perhaps the hinge axis is worn out and it is enough to replace only it.
And then we adjust the problem, for example, if the door “retracts” (recessed) much into the interior, then loosen the screws securing the door hinges and move the hinges to the edge, while making sure that the hinges are horizontal, because the lock may begin to jam.
The exact opposite action (move the hinge into the interior) is carried out if the door, on the contrary, sticks out.
When making full adjustments, it is better to remove the door lock mating part altogether (there are only two screws), this makes it easier to adjust.
After adjusting the hinges, close the doors; if everything is in order, install the lock mate.
You can also stops (stoppers, buffers),
check the doors (although not all cars have them); if necessary, tighten them all the way, they do not allow the doors to close deeper, the adjusted value, there are several of them on each door.
If the problem with the doors is in a different plane (for example, they were “twisted” or they sagged), then you can consider the option of lining thin metal plates under the hinges.
This is in general, but there are many individual moments; the doors are adjusted depending on the problem.