During the operation of the car, drivers are often faced with the need to disassemble the doors and remove the trim from them. Such work can be carried out for various reasons - from repairing failed parts to tuning the interior. Despite the reasons why you need to remove the trim from a Ford Focus, you need to know exactly how this procedure is performed in order to avoid mistakes.
- 2 Dismantling on Ford Focus 1, 2 and 3 cars: features and differences
- 3 Removal tools
- 4 How to remove the door trim from a Ford Focus 1
4.1 Front door
4.1.1 Video: dismantling the front door trim
- 4.2.1 Video: dismantling the rear door trim
- 5.1 Front door
5.1.1 Video: dismantling the front door trim
- 5.2.1 Video: Removing the rear door trim
- 6.1 Front door
6.1.1 Video: removing the front door trim
- 6.2.1 Video: removing the trim from the rear door
Why do door trims need to be dismantled?
During the operation of the vehicle, car owners may be faced with the need to dismantle the door trim. Similar work is performed in the following cases:
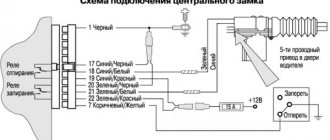
- breakdown of power windows or central locking. Repairing such elements requires mandatory dismantling of the door trim: without this, it will be impossible to carry out the necessary work;
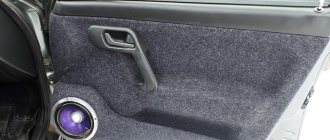
- installation of acoustic columns or any other gadgets placed in the side surfaces of the doors;
- procedures for noise and vibration insulation, installation of insulation or sealant.
During the cold season, the door trim is removed extremely carefully and carefully. When exposed to low temperatures, plastic becomes brittle, making it very easy to break or damage. The most vulnerable are small parts - latches, fasteners and clips. For this reason, it is advisable to carry out work on dismantling the casing either in the warm season, or indoors - a garage or box. In summer, you can remove it anywhere - the main thing is that it is protected from dust and wind.
How to remove the front door trim of a Ford Focus 2 in a garage
Repairing a car with your own hands requires the motorist to have certain skills and knowledge in the field of car repair. However, sometimes even these are not enough to understand how this or that automobile part is removed, especially if there are no visible fasteners, bolts or screws on it. As a result, the already difficult repair procedure is complicated by finding ways to remove the ill-fated part, behind which lies a malfunction that requires elimination.
So one day my door power window drive failed, after a long and unsuccessful search for fasteners, I began to act logically, and as it turned out later, it was completely in vain. As a result, in addition to the fact that I had a faulty lift, I also broke a bunch of door fasteners that were hidden under various decorative covers. In short, I “disfigured” the door while I got to the drive. After that I decided to help those who are just about to remove the door card, and just like me, they are scratching their heads and not only
Disassembled Ford Focus 2 interior preparation before soundproofing photo
Disassemble the interior completely, removing all finishing materials. When disassembling, try to remember to put all the bolts, screws, and hedgehogs separately. What will happen later during assembly?
We apply a layer of vibroplast to the degreased frame, tightly rolling its body, including the floor, arches and wings. The second layer will be glued Shumka for the car body. ON a sticky base, try to stick it completely, avoid gaps.
Once finished, we proceed to reinstall the sheathing, placing it tightly on the sound insulation.
When purchasing vibroplast for a car, or sound insulation, get instructions from the seller, because this material for the body and other parts comes in different quality properties and sizes.
Dismantling on Ford Focus 1, 2 and 3 cars: features and differences
Removing door trim from Ford Focus 1, 2 or 3 cars is a procedure that differs depending on the specific car model. The main differences are the design features of the car doors, the location of the fasteners and the methods of their removal. On all Ford Focus models, the plastic linings covering the door trim are attached to special clips, the removal of which requires extreme care and caution. The dismantling processes on three Ford Focus car models are discussed in more detail below.
Removing the rear door trim of Ford Focus 3
- 19486
Removal and installation of left rear door trim shown. The right rear door trim is removed and installed in the same way.
1. Disconnect the wire from the negative terminal of the battery.
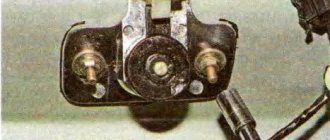
2. Slide the window handle mounting bracket.
To remove the bracket, stretch a strip of clean cloth into the gap between the handle and the door trim. By pulling the fabric against the ends of the staple, hook the staple and release the handle.
3. Remove the bracket
4. Remove the handle from the splines of the window regulator shaft.
5. Remove the power window handle socket.
On vehicles equipped with rear power windows, instead of removing the window handle, do the following. Use a screwdriver to pry the housing of the power window control key and remove it. Press the fastening clamps and disconnect the rear door power window wiring harness connectors.
6. Use a screwdriver to pry off the armrest trim (placing a clean cloth under the blade of the screwdriver to avoid scratching the trim).
7. . and remove the lining.
8. Remove the screws securing the rear door trim.
9. Use a screwdriver to pry off the decorative plug of the screw securing the trim of the interior door lock drive handle.
10. . remove the plug.
eleven. . and unscrew the screw securing the inner handle trim.
12. Disconnect the lining of the inner handle of the lock drive from the door trim.
13. Push the trim of the inner lock drive handle through the trim opening.
14. Pull the bottom of the upholstery...
15. Overcoming the resistance of the fastening clamps, remove the door trim. Remove damaged fasteners from the upholstery and replace them with new ones.
16. To remove the door sound insulation, remove the seal from the window lifter axis.
17. Peel off the sound insulation from the inner door panel.
18. Remove sound insulation.
19. Install the rear door trim, sound insulation and all removed parts in the reverse order of removal.
Removal Tools
To remove the plastic from the door you will need the following set of tools:
- Torx type bits;
- plastic ruler or special plastic spatulas;
- metal ruler;
- a set of flat thin screwdrivers.
If disassembling the door trim involves replacing individual components, parts or elements, then you need to purchase them in advance. Before proceeding with removal, it is advisable to turn off the power to the car by removing the negative voltage from the battery - this is done to avoid short circuits and possible problems with the electrical network.
Robot tool
- Flathead screwdriver.
- Pliers.
- Long head on "8".
- TORX T25 key or as it is usually called - asterisk.
Sequence of work to replace the front door
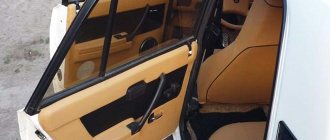
In order to remove the front door of a Ford Focus, it is necessary to have an assistant. In addition, it should be noted that if it is necessary to remove the door, the first step is to disconnect the power wire (Battery). To avoid violating the factory settings of the control unit, as we know, there is an electric lock on the door, which is connected to the control unit. Without removing the wires from the connector (door), we will not be able to replace it in any way, and especially if we bought a new door, then we have to rearrange all the wiring from the old door to the new one with the electric package. Window lifter, radio dynamics, etc..
How to remove door trim from a Ford Focus 1 car
The interior door trim is dismantled extremely carefully and accurately, since it is attached to plastic latches that easily break. At the same time, they sit tightly in their nests, so you have to put in a lot of effort. In order not to break fragile parts, you need to know their exact location - in this case, disassembling the doors will be very simple. Behind it is hidden sound insulation attached to the metal of the door. It comes off very easily, without any effort. After all manipulations have been carried out, the insulation is returned to its place.
Front door
- A screwdriver or any other suitable tool is inserted into special holes located on the door handle, which is then turned.
This will allow you to remove the cap from the handle. Removing the trim from the front door handle - The handle that opens the door is secured with two screws - they need to be unscrewed from their sockets.
The location of the bolts, unscrewing which will allow you to remove the door handle - The protective cap is removed, under which the screw is located - it also needs to be unscrewed.
After this, the door lock handle socket is removed. Behind the cap there is a screw that needs to be unscrewed - The electrical circuit is disconnected, after which the door latch locking socket is removed.
Disconnecting the electronic circuit and releasing the locking socket - Gently loosen the clamps and remove the groove with which the glass is secured.
Loosening the clamps allows you to pull the glass out of the door - The bolts holding the door trim panels are removed.
The casing is secured with bolts that need to be unscrewed - The finishing panel rotates upward and is removed.
The finishing panel is rotated upward and removed - Installation of the door trim is carried out in the reverse order.
Video: dismantling the front door trim
Backdoor
- The door handle cover is removed by unscrewing it from a special socket with a screwdriver or any other tool.
Use a screwdriver to remove the door handle cover - Two bolts are removed.
The indicated bolts are unscrewed - Behind the cap there is a screw that needs to be unscrewed.
After that, the door latch locking socket is lifted and removed. Behind the cap there is a screw, unscrewing which allows you to disassemble the door lock socket - If the car is equipped with a power window, then disconnect the electric latch and remove the locking handle.
In the case of mechanical window lifts, the regulator handle is removed with a regular piece of wire. Dismantling a window lifter with a mechanical and electric drive - The finishing panel of the window, located on the inside, is carefully removed.
Removing the window trim panel - Use a screwdriver to unscrew the finishing panel bolts.
Removing the trim panel by unscrewing the bolts - The door trim rotates upward and is removed.
The door trim is carefully rotated and removed from its place - Installation of the casing is carried out in the reverse order.
Video: dismantling the rear door trim
What is door trim and its purpose?
The door panels on the Ford Focus sedan station wagon and hatchback of the first generation were made of durable but thin plastic. The material had good resistance to mechanical damage and did not crack from frost. The owners noted a characteristic creaking of the trim in the armrest area.
The interior of the third Focus uses higher quality materials - high-strength plastic and eco-leather. The doors are lined with color-matched plastic panels. Purpose:
- ensuring sound insulation of the cabin;
- protection of electrical cables from mechanical damage and rapid operational wear;
- technical review when checking electrical cables;
- decorative function, soft plastic is not only reliable, but aesthetically pleasing and beautiful.
The layout principle of the door pockets on Focus 3 is identical to the first generation. Removal and installation of new front door panels remains the same for any body type. The only difference in the third generation is the new clips or trim fasteners, which are reshaped and made of a hard polymer.
Sheathing fastening
The fastening clip has serial number C-MAX 1257376. For complete reinstallation on one door you will need 5 clips, the cost of one clip is from 25 rubles. It is better to start unfastening the clips from the door lock.
On Ford Focus 3 station wagons, a sixth latch can be installed on the rear door in the right or left corner, respectively, as an additional safety element. Service station technicians and drivers who have reinstalled the trim recommend not using hard tools when working with plastic; it is better to seal the edge of the screwdriver with tape or use a thin rag as a gasket. With high resistance to direct impacts, the sheathing material cracks into fractures.
With the correct order, the driver will need no more than 15 minutes to dismantle the plastic and the same amount to install the panels.
Instructions for removing the door trim on a Ford Focus 3
Ford Focus has been produced by Ford Motor Company since 1998.
The model immediately entered the market in three body styles. Remaining for many years one of the best-selling brands in Russia and the CIS, drivers are faced with a large number of problems, among which repair of door speakers takes 3rd place. How to remove the door trim of a Ford Focus 3 in order to repair internal electrical systems or replace old plastic? Detailed instructions are provided below.
In short, there are no differences in the procedure for removing the trim depending on the version of the Ford Focus. Now a little more detail. As you know, cars of this model have undergone so-called restyling twice since their release in 1999. The second version of the Ford Focus began to be produced in 2008, the third - in 2014. All changes mainly affected the car body. The headlights, the shape of the mirrors and the dashboard have also changed. In the third version, engineers once again changed the central and floor consoles, bumper, hood and radiator grille. We added a heated steering wheel and perpendicular parking system. The engines and chassis of all versions of the Ford Focus remained unchanged, as did the door trim. Therefore, the procedure for removing the door trim, which will be discussed below, is suitable for all versions of this car, regardless of the year of manufacture.
Before we begin removing the casing, we need to decide what we need for this.
Tools and Supplies
- Phillips screwdriver;
- a set of plastic door latches for Ford Focus cars;
- medium-sized flat-head screwdriver;
- a piece of wire 10 cm long and 0.8 mm in diameter;
- 10mm socket head with wrench.
Removing the trim from the front door
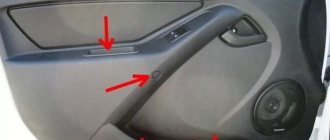
- The door opens, the armrest from below is pryed up with a flat screwdriver and removed manually.
Ford Focus front door armrest can be removed manually
Self-tapping screws from under the armrest of the Ford Focus front door are unscrewed with a screwdriver
The frame on the front door handle of the Ford Focus is pryed off with a flat screwdriver
Step-by-step instructions for FordFocus 1
The first generation of Focus hatchbacks, sedans and station wagons was produced from 1998 to 2005. In 2001, a planned restyling took place. The update did not affect the shape of the casing and the mounting locations of the pistons. The cladding has been modified since the first generation and installed on the restyled version in the standard places for screws and pistons. Disassembling the front door of Ford Focus 1 step by step:
- Use a thin screwdriver to pry the plate off the handle.
- Unscrew the two screws and remove the handle.
- Remove the cover near the locking lever socket, unscrew the screw, and remove the locking handle socket.
- Disconnect the locking plug and pull out the latch locking socket.
- Loosen the clamps, pull out the glass fastening channel, and pull out the glass.
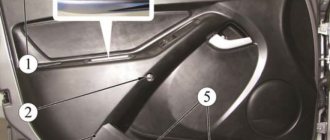
- Unfasten 7 clips around the perimeter of the cladding: three on the outside of the panel, two on the inside, two at the bottom of the panel.
- Gently pull the casing towards you and up, gradually unfastening the pistons.
Door installation
Now all that remains is to install another door. Install the front door in reverse order.
Ford Focus door removal
When installing; Don’t forget to connect the wires first, so it will be convenient for you to set the gaps.
How to remove a door on a Ford Focus (VIDEO)
I bought a real door at a disassembly for 15,000 thousand.
Necessary tool
In order to successfully remove the door trim, you may need the following tools and accessories:
- set of torx bits;
- a set of plastic spatulas or at least a plastic ruler;
- thin flat screwdrivers;
- metal ruler or thin spatula.
If the procedure is carried out with the aim of replacing or installing any parts or assemblies, then, accordingly, you should not forget to prepare the necessary kits.
Before starting the dismantling procedure, it is recommended to remove the negative voltage on the battery to avoid accidental short circuits or other problems with the electrical circuit.
Removing the trim from the front door of a Ford Focus3
The third generation Focus was produced for seven years, until 2022. The generation was modernized in 2014. In 2022, the fourth generation of cars entered the market, the lines received updated body shapes and new engines.
Removing the driver's door card on the Ford Focus 3 model is quite simple. As with previous generations, repairs can be carried out in 15–20 minutes. The main tool for working on Focus 3 remains a plastic ruler and a thin flat-blade screwdriver.
- Use a ruler or screwdriver to pry off the corner of the decorative trim near the front pillar.
- Remove the panel from the door handle, unscrew the two screws.
- At the end, remove the plug and reflector, unscrew the screws hidden under the protective covers.
- Pull out the plug in the handle.
The driver's door trim is installed on 6 pistons. It is necessary to carefully pry up the casing, starting from the bottom corner, applying force, and carefully snap the clips out of their places. Under the casing, the door is protected by a steel sheet in which there are technological holes for clamps with an exposed block of electrical cables.