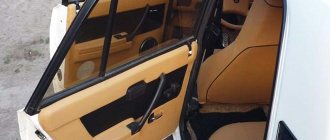
Owners of Lada Priora may well need access to the interior of the door. There are many reasons for this - a failed window lift mechanism, jammed glass, replacement of a standard speaker, a desire to better “silence” the car. In order to do all this, you will have to remove the trim, or, as it is also called, the door card.
There is nothing complicated in this procedure. Everything can be done independently, without resorting to the services of craftsmen, who will then have to be paid for. Yes, and the set of tools needed here is minimal. By and large, you only need 2 screwdrivers:
- straight;
- cruciform.
I would like to note one important point. In some Prioras, the door card can be secured with screws with a cut on the head in the form of an asterisk. In order to unscrew them, you will need a special screwdriver. Be sure to check this point before you begin removing the door card.
I should warn you right away - everything needs to be done quite carefully so as not to break anything. If you perform this procedure in the cold season, not in a warm garage, but directly on the street, then it is best to first buy a few spare bolts and clips.
The thing is that they are made of plastic, which becomes quite fragile at sub-zero temperatures.
Stages of removing the casing
Before removing the trim from the clips, you must remove all bolts, clamps and fasteners that are located in different parts of the door. It is most convenient to do this in a certain order. Before you begin removing the door trim, disconnect the negative cable from the battery.
From the front door
To remove the door trim on a Lada Priora, you need to get rid of all the fasteners. To do this, follow the following procedure.
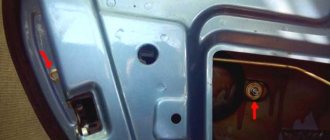
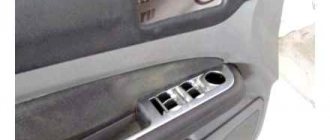
Unscrew the button responsible for locking the door and remove it. Unscrew the screw on the inside door handle. Remove the handle by carefully moving it away with a flat-head screwdriver. Find the two screws in the special pocket that secure the power window control module. They can be hidden under a rubber mat. Unscrew both screws and remove the ESP module. Now you need to disconnect the connector with wires from it. Locate the three screws at the bottom of the door that secure the trim to the door. Turn them inside out. This way you got rid of all the screws and fasteners. Now you need to take a flat-head screwdriver and carefully pry off the casing at the bottom. Unsnap all eight clips, which are indicated in the diagram, starting from the bottom of the door
Be careful at this stage: broken fasteners are quite difficult to repair
Carefully remove the trim. If done correctly, you should encounter almost no resistance.
Location of the main screws that prevent the removal of the casing
Due to their small size, screws and clips are often lost. To make the reassembly process easier for yourself, before starting work, prepare a container where you will put all the small parts.
To install the trim in place, place it against the door. Make sure the fasteners are in place. Insert and tighten the lock button. Thanks to this, you can pre-fasten the door components. Make sure the handle fits into its hole. Now you can snap all the clips into place and screw the screws back in.
Video: how to properly remove the trim from a Lada Priora car with your own hands
From the back door
The procedure for removing the trim from the rear door of a Lada Priora is not much different from what was given in the instructions for the front door. The exception is when working with window lifters: here they have a slightly different mechanism.
- Unscrew the door lock button and remove it.
- Using the same screwdriver, carefully press out the window lifter handle lock.
- Pull out the handle itself and its lock.
- Remove the screw holding the inner door handle trim.
- Remove the trim using a flathead screwdriver.
- Remove the two screws located in the small pen pocket under the rubber mat, and then remove the pen.
- Starting at the bottom of the door, remove the trim from the clips. The operating principle is the same as for the front door.
The rear door is assembled in the reverse order.
Be careful when working with wiring, especially those for window regulators. It is quite thin, so it can tear easily.
As you can see, the process of dismantling both the front and rear door trim of the Lada Priora is not particularly complicated and does not require many tools. A set of two screwdrivers will be sufficient. To avoid damaging the door, follow the main rule: not only unscrew the screws, but also remove the parts attached by them. All additional elements, such as door handles or window lifters, will greatly interfere with the process of removing the trim. If you strictly follow all the instructions, you can easily disassemble and reassemble the door trim without resorting to the help of specialists from car services.
Summarize
Removing the trim is not as difficult as you might think. Please note that you will need several different screwdrivers to get the job done, as well as some insulating tape and clips. It is better to prepare your tools in advance.
The procedure is the same in both cases. It is enough to remove all the fasteners and carefully remove the casing. This procedure is mandatory before repairing parts and mechanisms located inside the door. Thus, you can easily access the parts protected by it.
Basic operating rules:
- Work carefully, try not to damage the parts.
- Don't lose any fasteners or parts you've removed.
- Ensure your own safety when working.
Replacing struts on a Priora: when is it necessary to repair a car?
Re-upholstering the door cards with your own hands
Before determining which pillars on the Priora are better and more reliable, you should make sure that the elements need to be replaced. There are several main reasons why repair work is required. The best decision would be to visit a car repair shop and examine the spare parts by specialists. You can independently determine the need for installation based on the following phenomena:
1. The car holds the road worse.
2. When turning, vehicles are subject to strong roll.
3. There is a knocking or clicking sound in the area of the racks.
4. Shocks when hitting small holes lead to “jumping” of the car and are transmitted to the cabin.
5. When the body rocked, strong vibration appeared.
Bleeding a car is easy and allows you to accurately identify problems. To perform it, the owner needs to swing the body at the corner front point. The next time you lower the car down, you should release it.
If, after lifting to its original position, the body stops swaying, then the condition of the racks is normal. Otherwise, you need to think about what racks to install on the Priora, and start work as soon as possible.
Cost of services
Simple card (direct) from 4 hours 2000–5000 rub. Complex map 3–7 days 6,000–15,000 rub.
Basically, the cost is calculated individually, based on the dimensions (number) of speakers and the desired configuration of the card (location, type of materials used, etc.). Contact us, we will make a good offer.
Manufacturing of other parts for car audio
Selection of audio system components 5 min – 1 hour free Adjustment of acoustics (during installation) free Audio preparation from an hour from 1000 rubles. Installation (installation) of coaxial acoustics 2–4 hours from 1400 rub. Installation (installation) of broadband acoustics 2–4 hours from 1600 rub. Installation (installation) of component acoustics 2–6 hours from RUB 3,500. Installation (installation) of subwoofers 1–4 hours from 500 rub. Installation (installation) of radio tape recorders from 15 minutes from 500 rubles. Organization of linear RCA outputs from an hour from 1000 rubles. Installation of a sound amplifier from an hour from 1000 rubles. Installation (installation) of the processor with configuration 4–6 hours 1500–4000 rub. Organization of control of the radio on the steering wheel from an hour from 2500 rubles. Disassembly and assembly of interior elements from 30 minutes from 300 rubles. Installation of a capacitor (storage) 1 hour 600–1500 rub. Crossover installation 1 hour 800–1200 rub.
What happens if you pour motor oil into the engine above the upper level?
Simple and clear instructions for reupholstering door cards with your own hands
How bad things get depends on the volume of overflow. Agree, the difference between 200 grams and 1 liter is significant.
A little extra lubricant in the engine: are the consequences noticeable?
A little is everything that is above the MAX mark within 1 cm. Say, the same extra 5 mm will not bring much harm. Subjectively, of course, one can complain about the deterioration of dynamics, but the underlying reason for such a complaint is one - self-hypnosis, nothing more.
What will really be noticeable is an increased appetite for butter. The extra centimeter will go away within the first 1,000 km. The negative is that excess lubricant will settle in the form of coke on the oil scraper rings, carbon deposits on the walls of the combustion chamber and soot in the catalyst.
If you regularly fill in a lot of oil, then after a while you will become interested in how to flush the engine from carbon deposits inside, and how to do it without disassembling. Soon questions about the exhaust will arise: how to replace a clogged catalytic converter and how to make a lambda probe blende.
What threatens an impressive overflow
Anything above + 1 cm is considered a critical excess of the norm, and here’s why:
If there is a significant excess of liquid, the crankshaft will dip its counterweights into it, which will result in foaming, which is very bad. For an oil pump, this is cavitation with its erosive effect on parts; for a semi-automatic gas distribution mechanism, this is what causes hydraulic compensators to knock when cold and hot; and for the oil itself, it is the incomprehensible behavior of additives.
- The excess will definitely be thrown out to the intake through crankcase gas recirculation, which is also not good. The inside of the intake pipe will be enveloped in oil droplets, the throttle assembly will become dirty, and the stem and plate of each valve will be covered with malignant deposits.
- The seals will leak. They are not designed to bathe in oil. Their function is to repel splashes.
Advantages and disadvantages
There is a lot of debate as to whether soundproofing car doors is really necessary, and whether soundproofing materials provide any real benefit. Each modification to a car after it leaves the factory can have strengths and weaknesses. This also applies to soundproofing doors. If we talk about the advantages, here are the following points:
- the overall level of comfort of the car increases;
- high-quality insulation increases the value of the car in the eyes of buyers;
- doors can be used to install more powerful acoustics than a standard audio system;
- closing is carried out softer, more accurately, without unnecessary sounds.
As for the shortcomings, here, basically, it all comes down to the fact of increasing the weight of the door. Because of this, they gradually begin to sag, the hinges wear out, and repairs are required. The advice is simple. Don't forget to lubricate the doors, don't overuse the amount of insulating materials, and also try not to keep the doors wide open. Another conditional disadvantage manifests itself in the form of poor audibility of what is happening outside. Some people actually consider this a disadvantage, since the driver hears the signals of other cars worse. But here he has rear-view mirrors at his disposal, which he needs to look at periodically.
Making high-quality sound insulation for doors is really not that difficult. Dismantling takes little time, and there are no complex parts that must be removed before applying a layer of vibration and sound insulation. Therefore, many people prefer to do this work themselves. Based on the recommendations given, following the sequence of actions and choosing high-quality materials, you will certainly be able to achieve an excellent result.
Replacement frequency - what antifreeze to fill
Tuning Lada Largus, cross: all innovations, body kit, interior, chip tuning
The coolant gradually loses its properties as it constantly circulates inside the car system. Thermal conductivity is lost, the level of inhibitors decreases and foaming begins.
If the antifreeze is not replaced in a timely manner, this may cause metal corrosion and engine overheating.
Replacement times depend on:
- Product quality.
- Vehicle operating conditions.
The procedure is carried out on average once every 2-3 years. According to the established regulations, antifreeze is replaced every five years or after a mileage of 250,000 km per year.
But in some cases this period is reduced for the following reasons:
- Presence of sediment or cloudiness in the expansion tank.
- A deposit of a jelly-like mass has formed on the inside of the tank, near the neck. Even if this is noticeable at subzero temperatures, there is a need for replacement.
The volume of coolant poured depends on the engine volume and is 6.3-10 liters.
We specify the tightening torque of the cylinder head bolts during the installation process
Do-it-yourself cylinder valve body maintenance
The cylinder head (cylinder head) is the most important component in the car engine system. The process of tightening the cylinder head bolts will be within the capabilities of a car enthusiast with certain skills. To work, we need a special tool and self-confidence. The instructions provided will help you cope with the task and avoid common mistakes.
First, let's determine in what cases it is necessary to tighten the bolts.
Most modern cars do not require cylinder head bolts to be tightened. On earlier car models (for example VAZ 2109), it is necessary to tighten the bolts in a timely manner in order to successfully pass the technical inspection.
As a rule, the accumulation of moisture in the places where the block comes into contact with the cylinders indicates the need to tighten the bolts. The reason for the appearance of moisture in these places may be a leak of lubricant. There are several most popular reasons for tightening bolts, including:
Violation of the block head structure. Such consequences most often result from engine overheating. Cylinder head gasket leak. This fact also indicates the need to tighten the bolts. It is recommended to adjust the tightening torque after passing a certain mileage and without fail, after repairing the cylinder head.
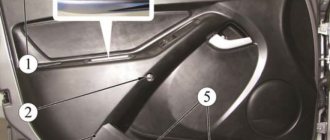
Sheathing fastener diagram
The fasteners on the rear and front doors of the VAZ-2170 are located in different ways, so the procedure for dismantling the trim will be slightly different. In order to easily remove all the decorative elements of the door, you need to study the principles of their fastenings.
Front door fasteners
Before removing the door trim, you need to understand what parts it consists of. To do this, take a look at the diagram.
- Front door trim trim.
- Front door trim.
- Front door trim.
- The screw is self-tapping.
- Front door trim insert.
- Front door trim pocket.
Pay attention to where the trim fasteners are located. Eight clips that hold the trim in place are located at the top of the door, as well as on both sides
They hold tightly enough so that nothing dangles while the car is moving. However, removing the trim is fairly easy once you have removed all the other screws and trim
Eight clips that hold the trim in place are located at the top of the door, as well as on both sides. They hold tightly enough so that nothing dangles while the car is moving. However, removing the trim is fairly easy once you have removed all the other screws and trim.
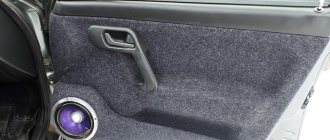
Rear door fasteners
The structure of the rear door of the car is slightly, but different, from the front.
- Front door trim trim.
- Front door trim.
- Front door trim pocket.
- The screw is self-tapping.
- Upholstery trim.
The rear door trim is also held in place with clips. Several more lower ones were added to the side and top pistons.
Thus, the design of the car involves 18 clips on each side, to which the door trim is attached.
The benefits of working independently
Dismantling the casing on Priora on your own will allow you to obtain the following advantages:
- saving time and money. You won’t have to wait in line to have your car repaired when it is needed for its intended purpose;
- gaining experience working with the design, which allows you to repair cars of more than one brand;
- the ability to find other problems in the vehicle;
- prevention of corrosion and other troubles.
As a result, self-repair of a car will become not only a personal experience, but also an opportunity to help others when changing the interior of the car or correcting deficiencies acquired as a result of an accident and careless handling of doors.
How to remove the rear door trim on a Priora
For the rear doors, the sequence of actions is approximately the same, and even easier, but it is worth considering the design features and location:
- use a Phillips screwdriver to unscrew the bolt from the recess for the door handle;
- Two bolts are also unscrewed in the recess of the armrest. If necessary, the entire pad is removed from the clips and removed;
- If the rear windows are manual and not automatic, then the handles are simply pryed off with a flat-head screwdriver and snapped off;
- the cap from the door lock is twisted off;
- Three bolts are unscrewed from the bottom of the casing;
- Using a special puller or a flat screwdriver, the trim is carefully removed from the clips. It is done!
Assembling the door will require the same steps, but in reverse order.
Side glass removal process
Step 1: remove the door trim
To do this, we sequentially dismantle:
- Armrest. It is usually secured to the door with three screws hidden under the plugs. Using a thin screwdriver, pry up the plug - it should come off easily. Now use a Phillips screwdriver to remove the screws.
- Window lifter drive handle. It is held in place by a small plastic element, which can be easily removed by prying it with a thin screwdriver. Next, it remains to remove the drive handle from the splined shaft.
- The handle that opens the door. To remove it, you need to remove the decorative trim.
The casing can now be removed. To do this, you need to press the latches with a flat-head screwdriver and pull the door trim out of the metal frame.
If your vehicle is equipped with side airbags, you will need to disconnect the wiring and remove the airbag sensor. If you have power windows, this will also require additional steps when replacing the glass.
Step 2: remove the decorative trim at the top of the door
To remove the decorative trim, you need to pry the latches with a flat screwdriver. Next, unscrew the plastic cap on the door lock. Now nothing holds the trim on the door; it can be removed
You must act carefully so as not to damage the upholstery. Pry the cover with a screwdriver (from the outside) and slightly lift it off the hooks
Step 3: Remove glass shards
To remove the side glass or remove its remains, you will need to put the window handle back on. The glass (or what is left of it) must be lowered to its lowest position. Be sure to wear gloves to avoid cutting yourself. Now carefully remove the fragments from the seat.
It is better to collect small fragments with a vacuum cleaner. You can pull out fragments from the most inaccessible places using one trick. Take a thin screwdriver and wrap the tape around it with the sticky side facing out. This device will help collect fragments from hard-to-reach places.
If you leave the fragments in the car, then an unpleasant sound will probably appear when opening and closing the door. In addition, the driver and passengers risk injury. Therefore, after you have removed the side rear or front glass, you need to collect the fragments as carefully as possible.
How to remove the front door trim on a Priora
In this article we will talk about how to properly remove the front door trim on a Lada Priora car yourself. As a rule, this procedure is carried out in several cases: when various malfunctions occur in the wiring running through the doors, when the owner of the car installs additional sound insulation, when installing an alarm system and audio system speakers (if the car was purchased without them).
List of tools:
- Flat and Phillips screwdrivers;
- A complete set of plastic caps (just in case they break).
Safety precautions
- Before starting work, disconnect the battery terminal ("minus"), otherwise you may receive an electric shock.
- Step-by-step instructions on how to remove the front door trim on a Priora:
Step-by-step instructions on how to remove the front door trim on a Priora:
- The door trim of Lada Priora is mounted on two types of fastenings - plastic pistons and self-tapping screws.
- First, take a screwdriver and unscrew the 2 screws located in the control module for the electric window lifts and mirrors.
- Then we unscrew the screw that holds the lining of the inner door handle and remove it.
- Next, unscrew the 3 screws located at the bottom of the door.
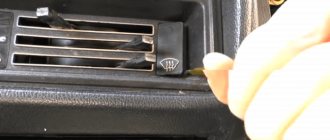
- We unscrew the door lock latch as shown in the photo, and then press the opened pin so that it falls into the trim.
And so, we only have caps left. We wrap a flat screwdriver with electrical tape or masking tape (so that the tip, if it suddenly slips, does not damage the casing), and with its help we begin to carefully snap them off one by one. After this, we take the trim and slowly lift it so that it detaches from the windshield.
Carefully disconnect the wire plug that leads to the power windows and mirrors, and then pull out the module
That's all, now the casing can be removed.
Installation of the casing is carried out in the reverse order. We hope that with the help of our instructions you will be able to remove the front door trim on your Lada Priora quickly and without difficulty!
Components of the window lift system
What should I do if the right one does not work or both electronic devices fail? The window regulators may break, leaving them unable to lower or raise the windows. It is possible that the electronic device is jamming or sticking, but before you repair and disassemble the system yourself, you need to understand its structure. The unit itself works by controlling electric motors installed in the vehicle doors and designed to raise and lower the windows.
The system itself includes the following components:
- electric motors;
- switches located in the doors;
- wiring;
- glass
General structure of the ED system
Why is timely replacement of struts on a Priora so important?
Reliable products can ensure good stability of vehicles on the road. It is impossible to determine exactly which racks are best to install on the Priora. When purchasing, you need to focus on the type of product, their hardness and recommendations or reviews of other motorists. But if problems arise with control and driving, replacement of elements is mandatory.
Only new spare parts can guarantee driving safety. Worn struts can lead to roadside accidents and more expensive vehicle repairs.
A sudden breakdown on the highway will require evacuation and cause unnecessary costs. Therefore, Priora drivers must be attentive to restoring the performance and reliability of the vehicle in the event of any malfunction of the racks or auxiliary parts.
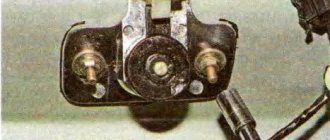
Central locking device
The central locking system is designed to ensure reliable operation under all conditions. It combines several basic elements, without which full use of the system is impossible. New cars have a complex central locking control scheme. Other components of the vehicle’s on-board system are involved.
The device of the central car lock:
1. Control unit.
The electronic control unit is used to transmit signals with commands to the mechanism switches and the central unit. The central unit, after decoding the command, opens or closes the doors, windows, trunk and hatch.
2.Input sensors.
Input sensors are also called microswitches. Work together with door lock limit switches. Microswitches determine and fix the position of the locks after a command from the central control unit.
3.Executive devices.
Actuators are represented by door and trunk locks. They open and close based on microswitch commands. The last link in the chain.
The central locking system operates independently of engine operation. The electronic control unit on the key fob is powered autonomously. A coin-cell battery is used.
Instructions for removing the rear door trim on a Priora
If it becomes necessary to dismantle the rear door cards on a Priora, then the procedure is almost identical, and even somewhat easier. The rear door trim on a Priora is removed in the following order:
- Unscrew the self-tapping screw securing the decorative trim of the door handle.
- Remove the cover, preferably prying it off with a plastic spatula. You can do this with a screwdriver, but in order not to damage the surface, it is recommended to wrap it with electrical tape.
- Unscrew the top part of the door lock - flag.
- Unscrew the two screws using a TORX screwdriver.
- Pry up and remove the plastic tray along with the power window control console.
- Don't forget to disconnect the power supply.
- If the car has manual windows, then you need to dismantle them as follows: first, lightly press on the trim at the location of the window raise/lower handle, and with the other hand you need to remove the plastic ring. After removing the ring, you can pull out the handle.
- Now you can pry the card using a plastic spatula in one place, and then manually unclip all the other clips that secure the casing. There is no need to remove the plastic triangle at the top, as in the case of the front door.
This completes the process of removing the rear door trim on the Priora. All that remains is to carry out the necessary work inside the opening or replace the casing, and then install it in place in the reverse order of removal
At the same time, it is also important to first check the integrity of all clips and replace faulty pistons immediately. Please note that the rear cards use 10 pistons
Below are their traditional locations.
Below is a video with a detailed overview of the process of dismantling the rear door panels on a Priora.
Doing the work yourself is not at all difficult, and besides, the design is quite simple, and it is simply impossible to break anything (except for the pistons). Often, manipulations to remove door cards on a Priora are carried out with the aim of applying soundproofing materials, but that’s a completely different story. An expert description will help you not only perform the manipulations correctly, but also quickly.
Replacement/installation of sound insulation
Installing insulation will protect the driver and passengers not only from unnecessary noise, but also from other factors:
- vibration from a running engine and/or driving on rough roads;
- heat/cold retention depending on the time of year, giving additional comfort to everyone inside the cabin;
- improving the sound of car acoustic systems in the low frequency range;
- The formation of condensation inside the door during constant temperature changes is eliminated. This will also protect wires and other electrical elements.
Soundproofing a car door
It should be taken into account that the installation of vibroplast involves an increase in weight and, accordingly, shrinkage of the door, so it is worth:
- adjust the door again to give it a stable position;
- do not use too much insulating material to avoid permanent shrinkage;
- Use only recommended sizes.
There should be no gap left between the casing and the frame, since such imperfections lead not only to dirt getting inside, but also to excess noise when opening/closing doors or during a trip.
Specifications
Power unit
The “Chinese Diamond” received an independent suspension and a semi-independent beam, the wheels were disc brakes, ventilated in front. The electric booster complements the rack and pinion steering. In Russia, only one powertrain option is offered for the Brilliance V5. We are talking about a Mitsubishi 4A92S gasoline engine equipped with 4 cylinders. The working volume is only 1.6 liters, which could not but affect the power of 110 horses.
This engine, modest in all respects, is equipped with either a five-speed manual transmission or a hydromechanical automatic transmission. Within the city, the car consumes about 10 liters per 100 km, while on the highway it can reduce consumption to 7.8 liters. A car equipped with a manual gearbox accelerates to 100 km/h in 11.9 seconds. The maximum possible speed is 170 km/h. The Diamond with an automatic transmission is a little slower, its acceleration to hundreds is 13.9 seconds. The maximum permissible speed is only 165 km/h.
While driving, the crossover from China does not show anything surprising; on sharp turns it tilts significantly to the side. The weight of the car is almost 1.5 tons, the engine power is not enough for such a mass. Many people, after test driving a diamond, reported that the Brilliance B5 is equipped with uncomfortable pedals.
The main deliveries to the Russian Federation will be the Luxury version, which has an engine with a power of 110 horsepower and a torque of 151 Nm. By the way, specifically for Brilliance B5, a license was obtained from Mitsubishi to use their engine. The gearbox is similar to that of the Hyundai and supports five gears. The similarity with BMW is observed only in appearance; it is very far from any technical similarities. What distinguishes the Diamond from other Chinese crossovers is that it can start the engine from the start button.
Drivers who have driven Chinese cars will not be surprised that, despite the brutal appearance, the Brilliance V5 does not experience any aggression during acceleration. The engine works properly, even growls, but it picks up speed slowly, and not as much as we would like. Therefore, if you own such a diamond in the future, take this technical feature into account when overtaking on the highway.
The car's suspension leaves a pleasant impression.
It is elastic and overcomes any pits and potholes without any special obstacles. Thanks to good sound insulation, any knock is heard quietly and does not cause discomfort. But on sharp turns you feel a strong lean to the side. Specifications
| Modification | engine's type | Engine capacity | Power | Transmission | Acceleration up to 100 km/h, sec. | Maximum speed km/h |
| Brilliance V5 1.6 MT | Petrol | 1590 cm³ | 110 hp | Mechanical 5st. | 11.9 | 170 |
| Brilliance V5 1.6AT | Petrol | 1590 cm³ | 110 hp | Automatic 5 speed | 13.9 | 165 |
Safety
Safety in the Chinese crossover is at a decent level; the car has the following functions:
- Door locking in automatic mode at speeds over 25 km/h;
- Automatic door unlocking in case of an accident;
- Signaling;
- Steering wheel lock;
- Two airbags;
- Locking window lifts;
- The windows can be closed using a remote control, and they also have an injury protection function;
- Seat belts in the rear seats;
- Front seat belt tensioners;
- Headrest height adjustment;
- ISOFIX child seat support;
- The seat belt sensor is activated at speeds above 25 km/h;
- Children's castle;
- Steering column with injury protection.
How to remove the door trim of a Lada Priora yourself
The car brand was released twelve years ago, and since then has been very popular among drivers. And it’s not surprising, because the cost of a high-quality product from the domestic automobile industry is quite low.
Many car enthusiasts can afford to buy it. Repairs and service are cheap, and some parts can be replaced yourself.
For example, from this article, readers will learn how to remove the Priora door trim.
In some cases, vehicle owners want to replace the door trim on the Priora. Achieving this goal is quite simple; you will need a minimum of tools. Lack of experience should not be scary; even people who are not involved in such repairs will be able to remove the old door trim and install a new door trim according to the instructions.
How to remove the trim
The process is divided into three main stages:
- Finding all screws and fixing elements, unscrewing the bolts.
- Removing door trims.
- Dismantling the casing.
The covering of the rear and front panels is removed separately. These steps will be described in detail below in the article; if you do not want to go to a car repair shop, we will provide instructions on how to remove the door trim on a Lada Priora car.
Why is dismantling necessary?
The upholstery of the Lada Priora car is available in several colors. If a car enthusiast wants to change the interior color, then he will have to change not only the seat upholstery, but also the door trim. Components such as noise insulation or insulation cannot be installed without first removing the sheathing.
If the window lifts are damaged, or the door handles are damaged, you will also have to remove the Priora door trim, notice the broken components, and install it back. Also, over time, the cladding loses its appearance, stains appear that cannot be removed.
How to dismantle the casing: instructions
You will need the following tools:
- flat screwdriver;
- Phillips screwdriver;
- clips and pistons to which the covering is attached.
It is not necessary to complete the last point, but it’s better to stock up on clips and pistons in case you break the old ones. In order not to waste time and not run to the store, it is advisable to buy the kit in advance.
When choosing caps or clips for Priora, pay attention to what brand they are intended for. These components for Priora are similar to parts for Kalina
The difference is in length - for Kalina, the clips are one and a half millimeters longer. Ask consultants for help, they will help you choose the right parts.
Front door
So how do you remove the front door trim? Reading the instructions:
- Unscrew the door lock latch.
- Unscrew the screw securing the handle to the door. Remove the screw and remove the handle.
- Unscrew both bolts that hold the switch block. Remove the unit; to do this, unclip the wires from the connector.
- Find the three fixing screws at the bottom of the door, unscrew them, and set them aside.
- Unclip the trim clips using a flathead screwdriver. Using the flat tip of a screwdriver, pry up the edges of the casing and carry out the process from the bottom up.
How does the window lift drive work?
Somewhere in the 80s and 90s of the last century, when people were not so spoiled by the abundance of the foreign automobile industry, having an automatic window opener in your own car was considered a luxury. Any driver who managed to equip the doors with such a device considered it necessary to demonstrate his “curiosity” in action, and therefore happily casually pressed the drive button when the unlucky passenger tried to find the usual handle to open the window.
But times are changing and now it’s unlikely to be possible to find a new car in which you need to work with the handle to take a breath of fresh air. Electric door drives have now become as common a part of a modern car as rear-view mirrors or windshield wipers. Few people have been able to see the device itself, which is responsible for raising and lowering the windows, since as long as it does not break, no one would even think of disassembling the casing just to find out what is buzzing and crawling there. Let's try to talk about it here.
Electric car door drive
The drive is nothing more than a primitive electric motor for experiments, familiar to us from school physics lessons, the force of which acts on a gearbox consisting of a worm gear and a toothed gear. It is based on an armature with a rotor copper winding, rotating in a cylindrical housing, inside of which there is a stator. The central rod is equipped with a “worm”, reminiscent of the spiral of a meat grinder. When the rotor rotates, the worm gear exerts a force on the gear, which acts as a turning handle.
Thanks to this mechanism, there is an impact on the lifting device, which sets the glass in motion. It should be noted that each door has its own motor for the window lifter. But, rather, it depends not on how the winding or contacts are located, but on the convenience of mounting on the door. There are corresponding stickers on the devices themselves.
Sheathing fastener diagram
The fasteners on the rear and front doors of the VAZ-2170 are located in different ways, so the procedure for dismantling the trim will be slightly different. In order to easily remove all the decorative elements of the door, you need to study the principles of their fastenings.
Front door fasteners
Before removing the door trim, you need to understand what parts it consists of. To do this, take a look at the diagram.
the front doors of the Lada Priora consist of several elements
- Front door trim trim.
- Front door trim.
- Front door trim.
- The screw is self-tapping.
- Front door trim insert.
- Front door trim pocket.
Pay attention to where the trim fasteners are located.
location of the fasteners that hold the door trim
Eight clips that hold the trim in place are located at the top of the door, as well as on both sides. They hold tightly enough so that nothing dangles while the car is moving. However, removing the trim is fairly easy once you have removed all the other screws and trim.
Rear door fasteners
The structure of the rear door of the car is slightly, but different, from the front.
rear doors of Lada Priora consist of several elements
- Front door trim trim.
- Front door trim.
- Front door trim pocket.
- The screw is self-tapping.
- Upholstery trim.
The rear door trim is also held in place with clips. Several more lower ones were added to the side and top pistons.
location of the trim fasteners on the rear doors of the Lada Priora car
Thus, the design of the car involves 18 clips on each side, to which the door trim is attached.
Required Tools
You don't need a lot of tools to remove the trim. All you need is:
- straight slot screwdriver;
- Phillips screwdriver;
- new clips and pistons (if you accidentally break the previous ones).
Be careful when purchasing new trim clips and clips. The appearance of the fasteners for the Lada Priora is very similar to similar parts for the Lada Kalina. However, the latter are 1.5 mm longer. Such a small difference may prevent the trim from being firmly secured in place.
How to remove door trim
The door trims on the Lada Priora car are attached in the same places as on the tenth family, but the removal procedure will still be different. So, they generally have to be removed for various reasons:
- to replace the casing itself due to damage, etc.
- for replacing door cylinders, locks or glass
- installation of acoustics (front speakers)
- when soundproofing doors
If for any of these reasons you need to remove the front door card, then below is a list of the necessary tools:
- Torx bit t20
- Bit holder and adapter
- Phillips screwdriver
The procedure for removing and installing casings on Priora
First of all, you need to open the car door, and then unscrew the three screws securing the trim from the bottom. This is clearly shown in the photo.
After this, again using a Phillips screwdriver, unscrew the screw from the recess of the door opening handle.
Now we unscrew the locking cap itself by hand, as shown in the photo below.
Why may it be necessary to dismantle the covering?
There are various situations in which it is necessary to remove door trim. For example, without this it is impossible to install noise insulation or insulate a door. In addition, if the window regulators or door handles need repair, you also cannot do without removing the trim.
Well, in the end, there may always be a desire to replace the casing with a newer one, with an original color scheme or unique materials.
Replacing door trim can significantly change the appearance of the interior
How to remove the Priora door trim with your own hands
Lada Priora sedan TAZ Logbook Selecting IAC for Priora Door trim and its components
If you suddenly want to improve the sound insulation on the Priora or simply check and repair the internal mechanisms (door handle, ESP, etc.), you will need to remove the front door trim or rear door trim. How to remove the casing and how to disassemble it correctly with your own hands? We will try to give you the answer to this question in this article.
Few car owners can go to service centers every time there is a malfunction. Some work, such as removing trim, can be done yourself.
Priora car skins are attached using bolts and special holders, most often made of plastic. It is worth taking care of spare clips in advance, as they may break during disassembly.
The tools you will need are Phillips and straight screwdrivers. Before starting repairs, you must disconnect the negative cable from the battery. During operation, screwdrivers should be directed as close as possible to the holders and fasteners so as not to damage the integrity of the casing.
You can wrap the screwdriver blade with electrical tape or simply insulation from some unnecessary wires. This measure will prevent damage to the top layers of paint on the car door.
How to disassemble the front and rear door trim
Dismantling the casing
The front door trim of the car is held on by special pistons and screws. Disassembly is carried out in the following steps.
First, you need to unscrew all the screws that are located in the area of the car door handle, and along with them the screws that hold the special window lifter control module of the car
Next, very carefully remove this module, just like the car mirror control module
The next step is to disconnect all the wires connected to the modules and connecting them to the power source by releasing the latch. After all the wires are disconnected, you can safely begin to disconnect the handle trim holders. Carefully unscrew the screws, remove the cladding and set it aside.
Typically, the car's trim is attached at the factory with three screws located at the bottom. They need to be unscrewed. Then you need to dismantle the special button that is responsible for controlling the door lock.
Next comes the most difficult and important part of the work: removing the trim from the front door of the Priora
It is necessary to very carefully lift the cladding using a flat screwdriver. This is done in order to remove special plastic holders from the door that hold the lining. As soon as they come out, you need to move them aside
After which you can safely remove the cladding. The main work is finished
As soon as they come out, you need to move them aside. After which you can safely remove the cladding. The main work is finished.
The next part of the job will be disassembling and removing the soundproofing from the car. To carry out this work, it is necessary to remove the special brackets to which the mirror and power window control modules are attached. Then, slowly remove the first layer of soundproofing. Once the front layer and anything in the way is removed, the minor insulation and the bottom layer of insulation are removed.
The method for removing the rear door trim on a car is no different from removing it on the front door, with the exception of the absence of mirror and power window control modules on the rear door
Use caution and carefully monitor your actions. Otherwise, tool marks will remain for a long time.
It is important to remember that you should remove everything that is on top, so that one element does not interfere with the removal of another. Basic instructions and operating principles are given above. If you follow the directions, removing the door trim won't be a big or costly hassle on either your wallet or your time.
If you follow the directions, removing the door trim won't be a big or costly hassle on either your wallet or your time.
Recommendations for working with car doors
General principles for working with front and rear doors include fixing the structure in one position so that there is no chance of injuring your fingers and simply exposing yourself to discomfort due to constantly moving doors. There are several tips to make repairs easier:
- if the casing is being removed for the first time, it is preferable to use video/photo recording in order not to confuse the fasteners and installation paths of individual elements;
- after dismantling the casing, it is necessary to clean the structure inside: remove all dirt, dust, moisture, and remnants of insulating materials;
- To save money in the future, it is best to eliminate all shortcomings. For example, if there is corrosion under the casing, it must be removed. Similarly with faulty wiring - this will eliminate problems with the speakers (wheezing, broken sound) and other problems;
- When painting doors and correcting defects, dismantling may be required to facilitate further work. When installing back, adjustment of the hinges is required.
It is mandatory to check how easily the doors close after installation - you will need to close and open the car several times. If there are difficulties, this is a reason for additional adjustments. In any situation, you will need to clean the frame with alcohol. Under no circumstances should the anti-corrosion coating be removed from the bottom, since this is the part that is subject to the greatest loads.
Priora door panel trim
To cover door cards with leatherette you will need:
- 4 meters of furniture leatherette;
- glue “Moment” or equivalent (0.5 liters per door);
- brush;
- "Super glue";
- stationery knife;
- construction hair dryer;
- fabric gloves;
- White Spirit;
- antenna cable with a diameter of 5 mm.
The covering of Priora door cards is done one by one, one by one. Produced as follows:
- remove door cards;
- clean and wash the surface of the casing;
- cut a piece of leatherette in accordance with the size of the casing (so that they overlap 15 cm over the edges of the casing);
- degrease the sheathing surface with white spirit;
- Using a brush, coat the surface of the door card with glue;
- wait until the glue begins to dry;
- Using a brush, lubricate the underside of the leatherette blank with glue;
Important: the glue on the upholstery and leatherette must be applied in a thick layer!
- wait 10 minutes;
- place the workpiece on the casing in the area of concave areas;
- press the leatherette onto the trim;
- using a hair dryer turned on at low power, warm up the leatherette in the area of the concave areas;
- With a hand wearing a fabric glove, carefully press down and smooth the heated areas of the leatherette;
- move to the convex places of the covering, also heating and smoothing the leatherette;
- last of all, glue the leatherette to the inside of the door card;
- cut pieces of the antenna cable so that it fits in size to the junction of the plastic sheathing elements with leatherette;
- Glue the cable with “Superglue”, hiding the joints.
After completing one door card, you can move on to the next one.
After the glue has dried, all that remains is to install the door cards in place.
Door cards covered with leatherette have an excellent appearance and good performance characteristics.
Reinforced "Hedgehog" pistons for interior door trims of VAZ 2108-21099, 2110-2112, 2113-2115
Reinforced upholstery clamps Raymond for Lada Priora, Kalina 2, Granta, datsun
Original interior driver's door handle Lada Priora
Door stops with 3 locking positions for VAZ 2110-2112, Lada Priora
Original front door interior mirror trims for Lada Priora
Door limit switch for VAZ 2108-21099, 2110-2112, 2113-2115, Lada Priora, Kalina
Ultra fabric for upholstery of door upholstery 1x1.5m
“Hedgehog” fasteners for trunk lid trim (5 pieces) for Lada Kalina, Kalina 2, Priora, VAZ 2108-2115
Original inner rear door trim “Corners” for Lada Priora sedan, hatchback
Set of brackets for fastening the front door handle of Lada Priora
Original interior passenger door handle for Lada Priora
Eco-leather “Rhombus” for reupholstering door upholstery, 4 pieces 66x24cm