Purpose and design of the gearbox
The variable gearbox can simultaneously perform several functions.
By controlling the gearbox, the driver rationally distributes the torque obtained when rotating the crankshaft. The shaft cannot be rigidly connected to the wheel drives, since it is necessary to ensure the ability not only to move, but also to stop the car, move it away, and also move in reverse. The gearbox allows you to separate the engine from the transmission for a long time. This has to be done when the car is parked for a long time or when it is coasting.
The gearbox ensures the conversion of torque, which is transmitted from the engine to the drive wheels. As a result of its operation, the wheels can rotate in a wider range of frequencies than the engine rotates.
Learn about repairs and maintenance
Our experts answer the most frequently asked service questions.
Why is timely oil change necessary?
How often should you change your engine oil? The basic rule that car owners should follow is to change the oil every 10,000 km, or once a season (spring and autumn).
What improvements will occur as a result of gearbox tuning?
The factory gearbox has a number of disadvantages, for example: “long” gears, loss of torque when shifting. Gearbox tuning will help you customize your car to suit your wishes.
Is it worth replacing the gearbox with a repaired one?
Of course it is, with one important note. The gearbox must be repaired in a “trusted” place and have a warranty.
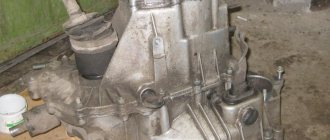
Disassembly and assembly of the VAZ 21213, 21214 Niva gearbox
After the box is removed from the car, you can begin disassembling it, which is performed to replace failed elements. To disassemble the gearbox on a VAZ 2121 and Niva 2131, prepare a standard set of tools and perform the following sequence of actions:
- Having removed the box, drain the oil from the crankcase, after which we disassemble the clutch release mechanism.
- From the toe of the secondary shaft, having unscrewed the fastening nut, press the flange of the elastic coupling.
- Next, use a twenty-two key to unscrew the reverse light switch from the box body.
- Remove the gear selector mechanism, and then disassemble it if necessary.
- Now we need to remove the gearbox housing cover. To do this, use a ten-point socket to unscrew the ten nuts securing the cover. Remove the nuts and washers located underneath them.
- Remove the cover and the sealing gasket located under it.
- Unscrew the inner nut securing the rear gearbox cover. To do this, move the fork rod of the first and second gears down, resting a screwdriver on the rod through the hole in the gear selection mechanism. When the rod moves, second gear will engage.
- And use a thirteen key to unscrew the nut securing the cover.
- Remove the cover and bearing of the fifth gear and reverse gears.
- Remove the rear bearing thrust ring from the secondary shaft.
- Now you can remove the outer ring of the bearing along with the cage and rollers.
- Now remove the inner ring, spacer sleeve and oil flinger from the shaft.
- To remove the shafts, they must be locked by engaging the appropriate gears. The second gear was engaged before removing the rear cover of the box, and to engage the fifth or reverse speed, use a ten key to unscrew the bolt securing the fork to the rod, then press the fork with a screwdriver and move it down, thereby engaging the reverse gear.
- Now that the shafts are locked, use a 17mm spanner to unscrew the bolt securing the fifth gear and reverse gear block, and then remove the bolt and gear block.
- Secure the block in a vice with pads made of soft material and press the inner bearing ring off it.
- Next, remove the fifth gear bushing, gear with synchronizer blocking ring, and hub from the shaft.
- Immediately remove the synchronizer coupling from the shaft.
- Then we turn the fifth gear and reverse fork towards the secondary shaft and remove the reverse gear intermediate gear.
- Remove the transmission clamps.
- Now that the gears and bushings have been removed, we remove the rod and its fork from their seat. Then remove the plug itself from the stem.
- The locking block must be removed from the hole in the box housing. To do this, use a magnetized screwdriver.
- Next, remove the reverse driven gear from the secondary shaft.
- Having removed the gear, we remove the locking key from the groove on the shaft and move it to the side so as not to lose it.
- Using a ten-point socket, unscrew the bolt securing the fork to the third and fourth gear rod.
- We take out the rod and remove the locking block from it.
- Next, using a magnetized screwdriver, remove another locking block located in the groove between the sockets of the first and second, as well as the third and fourth gears.
- We also use a socket to unscrew the bolt securing the fork to the rod of the first and second gears. And take out the rod.
- Now we need to remove the secondary shaft intermediate bearing retaining plate. To do this, use an impact screwdriver to unscrew the three screws that secure it. Remove the screws and the special lock washers located underneath them.
- Remove the locking plate.
- Using a 19mm spanner, unscrew the nut securing the reverse idler gear axle. At the same time, we keep the axis itself from turning with a twenty-four key.
- We take out the axle.
- Remove the clutch housing.
- Remove the spring washer from the input shaft.
- Now we need to remove the countershaft front bearing clamp washer. To do this, secure the input shaft in a vice through soft metal spacers and use a nineteen key to unscrew the bolt securing the clamping washer.
- Remove the bolt and washer.
- Now you can remove the bearing. To do this, use two flat screwdrivers to pry it up and remove it.
- After removing the bearing, its rear ring may remain on the shaft. If the ring remains, use two flat screwdrivers to press it off the shaft.
- Remove the rear ring and thrust ring.
- Now we need to remove the rear shaft bearing. To do this, insert a flat-head screwdriver between the end of the bearing and the first gear gear of the intermediate shaft, and move the bearing.
- And we take out the outer ring with the separator and rollers and its inner ring.
- We move the intermediate shaft a little back and remove it from the gearbox housing.
- Remove the input shaft. Using two flat-head screwdrivers, hook it on its rear bearing and pull it slightly towards you, and pull it out of the box body.
- If necessary, disassemble the input shaft.
- Now remove the needle bearing from the front end of the secondary shaft.
- Next, remove the shift forks for 1st and 2nd gears, as well as 3rd and 4th gears.
- Remove the secondary shaft intermediate bearing. To do this, use two flat screwdrivers to pry it by the mounting ring.
- Tilting it slightly to the side, we pull the secondary shaft out of the box body. If necessary, disassemble it.
At this point, the repair work on disassembling the gearbox on the VAZ 2121 and Niva 2131 has been completed. Make the necessary repairs, then reassemble in reverse order.
Is your Niva's transmission starting to fail? The situation is not pleasant: it becomes uncomfortable to drive, and safety on the road remains in great doubt. We will talk about the reasons for the failure of transmission elements another time. Now let’s try to figure out what to do in fact: change the box or repair it.
Also interesting: Disabling the front axle of a Niva 4x4 (reviews, pros and cons) » Lada.Online
The Niva car is positioned as an SUV that has increased cross-country ability. Due to this, there is a demand for the car. A durable load-bearing body has been installed. The Niva 2131 model is built on the basis of the LADA 4×4. Its tuning allows you to change the exterior and performance characteristics for the better. Since the mid-1990s. Injection engines have become available for Niva cars.
In addition to passenger cars, self-propelled vehicles are also produced under the Niva brand. In particular, this is Niva SK 5. This vehicle is a combine harvester designed for harvesting crops. The machine runs on diesel fuel.
Assembly
Assembly of the fifth gear, reverse gear and gear selection mechanism is carried out in the reverse order of disassembly, taking into account the following:
ALER: I recommend looking at the comments made by firesanek
(Remaking the gearbox into a “torn package”).
During the assembly process, you need to remember one important operation - turning the shafts after each next installed part. The shafts should rotate easily, without jamming. If you feel tight rotation after installing any part, then this part is defective and must be replaced. Don’t be too lazy to do this, otherwise the work will be in vain, the gearbox will either not work properly or will quickly fail again.
Clamp the secondary shaft in a vice through a rag and use a grinder to make cuts on both sides at its rear end to secure the shank nut:
Attention! If the output shaft is worn or faulty, it makes sense to make cuts on the replacement shaft purchased only at the very end of the assembly process, after installing the gear shift mechanism and checking its operation. If there is a defect due to these cuts, you will not be able to return the purchased shaft to the store.
Lubricate the inner race of the input shaft bearing with oil or lithol. We place the input shaft on a wooden block, put the bearing on it with the groove with the locking washer facing up. Through a mandrel (pipe of suitable diameter) we place it on the shaft:
We install the spring ring and the locking ring, press it with light blows of a hammer through a chisel until it is completely fixed:
Diagnostics and repair of the speed box
To carry out a full diagnosis, the speed box must be removed. As a rule, there is a need for this if vibrations, extraneous noise, or oil leakage increase during movement.
How to remove the box? Before you begin removing the gearbox, you must remove the transfer case. Without an inspection hole, it will be difficult to carry out repair work, for example, unscrewing the cardan shafts from the transfer case. The stabilizer can also be removed. The housing of the air filter element must be removed.
In order to remove the gearbox, you should disconnect the lever rod, the clutch housing cover fastenings, the driveshaft, bolts, nuts, and remove the bracket. The suspension of the power unit is adjacent to the body. To remove it you need to unscrew the fastening nuts.
To extend the service life of the VAZ 21213 gearbox, it is advisable to periodically check the level of transmission fluid and change it in a timely manner.
Mineral oil can be added to the machine. However, semi-synthetic and synthetic options have better performance. The advantage of the latest types of oils is that even in winter the gears will be easily engaged.
Timely maintenance of the Niva gearbox allows you to avoid a complete overhaul of the gearbox. Assembling all the dismantled parts is a painstaking task, so it should be trusted to professionals. Replacing the gearbox input shaft bearing is a common procedure that is ordered at a service center.
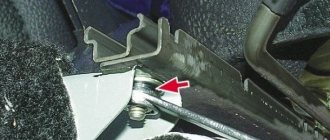
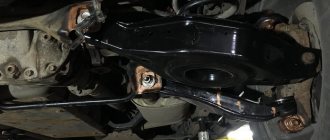
The gearbox linkage is an element of a multi-lever assembly, which is designed to connect the gearbox lever and the rod that fits the power unit. In Niva Chevrolet cars, the rocker is located under the bottom of the vehicle, next to the cardan. This component is susceptible to contamination and the formation of moisture on it, which over time can deteriorate the quality of lubrication of rubbing parts. As a result, parts begin to wear out, which can subsequently lead to various problems.
What kind of rocker should I put on a Niva Chevrolet? This question came to the mind of every Niva car owner who had to deal with a malfunction of this element. In fact, there is nothing difficult in choosing a component.
In practice, many car owners of the above car models install mechanisms from classic Fiat cars on their vehicles. According to reviews on the Internet, these devices are completely suitable for installation in a Chevrolet Niva. However, there is also a negative side. In practice, Niva cars equipped with a mechanism from Fiat cars require more careful adjustment of the element. In addition, despite Italian quality, these components of the transmission system are more susceptible to wear and tear.
Therefore, when choosing a mechanism, you should not “be fooled” by the stories of handicraft “garage” craftsmen and come up with a new headache for yourself. For installation in a Chevrolet Niva, it is better to purchase a standard rocker, which is equipped with basic models of Niva cars.
New rocker for Niva Chevrolet
Repair of Niva 2121 5-speed gearbox
The Niva car is positioned as an SUV that has increased cross-country ability. Due to this, there is a demand for the car. A durable load-bearing body has been installed. The Niva 2131 model is built on the basis of the LADA 4×4. Its tuning allows you to change the exterior and performance characteristics for the better. Since the mid-1990s. Injection engines have become available for Niva cars.
In addition to passenger cars, self-propelled vehicles are also produced under the Niva brand. In particular, this is Niva SK 5. This vehicle is a combine harvester designed for harvesting crops. The machine runs on diesel fuel.
Chevrolet Niva gearbox
The design of the gearbox on a Chevrolet Niva is not original and was developed much earlier than the launch of the conveyor. The type of gearbox is a mechanical five-speed with a three-shaft structure. It is possible to highlight the key components of the box, since the complete diagram of its structure is quite voluminous.
Primary shaft (1). It transmits force from the rotating motor. Can be decoupled from the engine for a short time using the clutch release.
Box housing (3). All mechanisms are lubricated with transmission lubricant, so they are located in a sealed crankcase where this lubricant is poured.
Primary shaft oil seal (4) and secondary shaft oil seal (5). It prevents lubricant from leaking where the shaft enters the crankcase.
Gear synchronizers (7, 8, 9). They serve to more clearly engage gears and fix the selected gearing.
The intermediate shaft (6) is designed so that it is in constant engagement with the input shaft. The intermediate shaft houses the gears.
Secondary shaft (2). Is a driven shaft. It also has gears that can move along the axis of the shaft.
The gear selector is the assembly that drives the transmission gear along the output shaft.
The shaft bearings (purple in cross-section) ensure their rotation.
Chevrolet Niva 5 speed knocks out video repair
Repair of the 5th gear of the Chevrolet Niva gearbox Chevrolet NIVA
The design of the backstage and its purpose on the Niva Chevrolet. The location of the backstage. As soon as you release the gas pedal, the “fifth” immediately “flies out” and you get “neutral.” So, let’s look at the location of all the gears of the box and how they are engaged.
The reverse gear is activated by the fork entering the hole of the intermediate gear. But the thought never left me: On the overpass, loosen the bolts securing the rocker.
Yes, because if you don’t panic, you can fix everything yourself, the main thing is to have enough hands and patience! If such a task seems difficult, you can always call a specialist for help or visit a service station. To repair the fifth gear, the gearbox has already been removed, it is necessary to remove the gear selection mechanism.
The reverse gear is activated by the fork entering the hole of the intermediate gear.
Typical manifestations of Niva gearbox breakdowns
Repair of the Niva (5-speed) gearbox in each specific case depends on the location, number, and complexity of breakdowns.
It should be noted that symptoms in different cases may be similar. Thus, it is impossible to accurately determine the root of the problem based on sound effects alone. Accordingly, if there are any transmission malfunctions, you cannot do without a comprehensive diagnosis of the transmission unit in a specialized workshop.
Also interesting: Design and repair of Niva Chevrolet cooling system fans
Transmission repairs and transfer case repairs Niva 21213 in Moscow are offered by our workshop on favorable terms. If you need to quickly put your car on all 4 wheels, welcome!
Transmission malfunctions
The gearbox, in its basic design, is a gearbox with a variable gear ratio. Since this is a complex device, there may be several reasons for malfunctions. A gearbox failure can be diagnosed by the following signs:
- It is impossible to engage the gear;
- It is impossible to turn off the transmission;
- The engaged gear is not fixed (the speed is knocked out);
- The gear is engaged with difficulty and a characteristic crunch;
- During movement, extraneous noises are heard and vibration is felt.
All possible malfunctions in the trivial classification are divided into malfunctions of the box itself and malfunction of the gear selection mechanism. The first type includes:
- failure of synchronizers;
- gear wear;
- failure of shaft bearings;
- loosening of the nut holding the gear;
- seals leaking.
Chevrolet Niva 5 speed knocks out video repair
Repair of the 5th gear of the Chevrolet Niva gearbox Chevrolet NIVA
The design of the backstage and its purpose on the Niva Chevrolet. The location of the backstage. As soon as you release the gas pedal, the “fifth” immediately “flies out” and you get “neutral.” So, let’s look at the location of all the gears of the box and how they are engaged.
The reverse gear is activated by the fork entering the hole of the intermediate gear. But the thought never left me: On the overpass, loosen the bolts securing the rocker.
Yes, because if you don’t panic, you can fix everything yourself, the main thing is to have enough hands and patience! If such a task seems difficult, you can always call a specialist for help or visit a service station. To repair the fifth gear, the gearbox has already been removed, it is necessary to remove the gear selection mechanism.
The reverse gear is activated by the fork entering the hole of the intermediate gear.
On the ancestors of the Niva Chevrolet SUV, there was a possibility of introducing a rear instead of a fifth. On modern models this possibility is excluded.
Disassembly and assembly of the VAZ 21213, 21214 Niva gearbox
Drain the oil from the gearbox, remove the fork and clutch release bearing (see the relevant sections).
We remove the elastic coupling flange from the toe of the secondary shaft (see Replacing the secondary shaft oil seal)…
The gear selection mechanism can be removed from the vehicle without removing the gearbox. For clarity, these operations are performed with the gearbox removed.
Remove the gear selector cuff.
Set the gear shift lever to the neutral position.
Using a 10mm socket, unscrew the three nuts securing the gear shift lever housing...
...and remove the gear selection mechanism.
The connection is sealed with a gasket.
We use a marker to mark the relative positions of the washers and the guide plate of the mechanism.
Using a 10mm socket, unscrew the two nuts securing the reverse locking plate, holding the bolts with a wrench of the same size...
...and remove the locking plate.
Unscrewing another nut.
...remove the lower washer of the guide plate.
Having taken out one guide bar with two springs,...
...remove the guide plate from the lower end of the lever.
Remove the upper guide plate washer.
Remove the gear shift lever housing.
We remove the rubber sealing rings of the bolts from the grooves of the housing.
Remove the lower ball joint housing gasket.
Remove the flange with the protective cover...
...and the upper housing gasket.
Using pliers, remove the retaining ring.
Remove the washer and spring.
We remove the spherical washer...
...and disconnect the lever and the ball joint housing.
We install the gearbox with the clutch housing on the workbench.
Using a 10mm socket, unscrew the ten nuts securing the lower gearbox cover.
...and a sealing gasket.
Using a screwdriver, through the hole in the gear selection mechanism, we move down the fork rod for selecting 1st–2nd gears (this engages 2nd gear).
Using a 13mm wrench, unscrew the rear cover fastening nut located inside the box body.
Using a 13mm wrench, unscrew the five nuts securing the back cover located outside the case.
We tap the cover bosses with a hammer, while using a screwdriver (or a suitable piece of pipe with the secondary shaft oil seal removed) hold the rear bearing on the secondary shaft.
We slide the cover off the studs and remove it, turning it clockwise (looking from the side of the secondary shaft shank) to prevent the cover from touching the rods and the gear block of the 5th gear and reverse gear.
Remove the cover gasket.
To replace the bearing of the gear block of 5th gear and reverse...
...pry off the bearing rollers with a screwdriver.
. and remove the rollers from the separator.
By hooking the outer ring of the bearing with a hook...
...remove it from the rear cover slot.
Remove the thrust ring of the rear bearing of the secondary shaft.
Remove the outer ring of the bearing with the cage and rollers.
Remove the inner race of the bearing.
Remove the spacer sleeve...
...and an oil deflector washer.
To stop the shafts from turning, it is necessary to engage two gears. 2nd gear was engaged when the rear cover was removed. Before engaging reverse or V gears, release the fork for these gears. For this…
...using a 10mm wrench, unscrew the bolt securing the fork to the rod.
Pressing the screwdriver down on the fork, engage reverse gear.
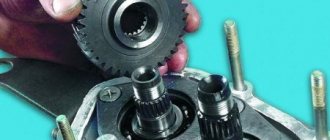
Using a 17mm spanner (head), unscrew the bolt securing the fifth gear and reverse gear block.
...and remove the gear block from the intermediate shaft splines.
We clamp the block of gears of the 5th gear and reverse gear in a vice with soft metal jaw linings.
Using two screwdrivers we press the inner ring of the gear block bearing...
...and remove the inner ring.
Remove the 5th gear gear bushing...
...the gear itself with the synchronizer blocking ring.
...and the synchronizer clutch.
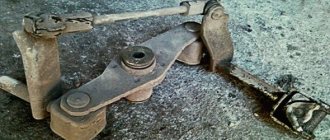
By turning the 5th gear and reverse fork on the rod towards the secondary shaft,...
...remove the reverse gear intermediate gear.
Using a 13mm spanner, unscrew the two bolts securing the clamp cover.
Remove the cover and gasket.
We take out the springs of the clamps (the rod spring of the 5th gear and reverse gear is longer than the other two and has a dark coating color).
Using a magnetized screwdriver, remove all three latches.
We take out the 5th gear and reverse gear shift rod with the fork.
Remove the plug from the rod.
Using a magnetized screwdriver, remove the locking block from the hole in the gearbox housing, which is located between the crankcase sockets for the rods of 5th gear, reverse gear and 3rd–4th gears.
Remove the reverse driven gear from the secondary shaft.
We remove the key from the shaft groove.
Using a 10mm socket, unscrew the bolt securing the 3rd–4th gear shift fork to the rod.
A locking block is inserted into the hole of the rod...
Using a magnetized screwdriver, remove the locking block from the hole in the gearbox housing, which is located between the crankcase sockets for the rods of 1st–2nd and 3rd and 4th gears (this block is noticeably longer than the block located between the 5th-reverse gear engagement rod and the 3rd–4th gear engagement rod) .
Using a 10mm socket, unscrew the bolt securing the 1st-2nd gear shift fork.
Using an impact screwdriver with a Phillips head, unscrew the three screws securing the locking plate of the secondary shaft intermediate bearing.
The screws are secured with special washers.
Remove the locking plate.
Also interesting: Liquids used and filling volumes Niva VAZ 21213, 21214, 2131 lada 4×4 “
Using a 19mm wrench, unscrew the nut securing the reverse intermediate gear axle, holding the axle from turning with a 24mm wrench.
We take out the axis of the reverse intermediate gear.
By unscrewing the nuts securing the clutch housing (see Replacing the input shaft oil seal).
...we separate the clutch housings and gearboxes.
Remove the spring washer with a conical surface from the input shaft (its smaller diameter faces the bearing).
We clamp the splined part of the input shaft in a vice with soft metal jaw linings.
Using a 19mm spanner, unscrew the bolt of the clamping washer of the front bearing of the intermediate shaft.
Remove the bearing clamp washer.
Using two screwdrivers, we pry the front double-row intermediate shaft bearing by the mounting ring...
...and remove the bearing.
When a bearing is removed, its rear inner race may remain on the shaft.
Use two screwdrivers to press the rear inner race of the bearing...
We take out the thrust ring of the rear bearing of the intermediate shaft.
By inserting a screwdriver between the ends of the bearing and the first gear gear of the intermediate shaft, we move the rear bearing.
We take out the outer ring of the bearing with the cage and rollers.
Remove the inner race of the bearing from the shaft toe.
By moving the intermediate shaft back...
...remove it from the gearbox housing.
Using two screwdrivers, pry the rear bearing of the input shaft by the adjusting ring...
...we take out the input shaft assembly with the bearing and synchronizer blocking ring.
Using pliers we open the locking ring...
Remove the spring washer.
We rest the end of the outer ring of the bearing on the jaws of the vice.
Using a hammer with a plastic striker, we strike the end of the input shaft...
...and press the bearing.
Using pliers we open the mounting ring...
Having moved the synchronizer locking ring, use pliers to open the locking ring...
Remove the locking ring...
...and a synchronizer spring.
The blocking rings of the synchronizers of other gears are removed in the same way.
Remove the needle bearing from the front toe of the secondary shaft.
Remove the shift forks for 1st and 2nd, 3rd and 4th gears.
Using two screwdrivers, we pry the intermediate bearing of the secondary shaft by the mounting ring...
Having tilted it, we remove the secondary shaft assembly with gears, couplings, hubs and synchronizer blocking rings from the gearbox housing.
From the rear side of the shaft, remove the bushing and the 1st gear gear assembly with the blocking ring.
Remove the bushing from the gear.
Remove the synchronizer clutch for engaging 1st and 2nd gears.
Remove the synchronizer hub.
Remove the 2nd gear gear assembly with the blocking ring.
From the front end of the secondary shaft, remove the synchronizer clutch for 3rd and 4th gears.
Clamping the secondary shaft in a vice with soft metal jaw linings,...
... use pliers to remove the retaining ring.
Remove the spring washer (it is installed with the convex side towards the front end of the shaft).
Remove the synchronizer hub for 3rd and 4th gears.
...and the 3rd gear gear assembly with the synchronizer blocking ring.
We assemble the gearbox in the reverse order. If, when removing the front double-row intermediate shaft bearing, its rear inner ring remains on the shaft, then the bearing must be assembled before installation. To do this, from the outer ring of the bearing...
...use a screwdriver to carefully remove the separator with balls...
...and put it on the inner ring (removed from the shaft).
We insert the separator with balls and inner ring into the outer ring of the bearing.
When assembling the input shaft...
...using a suitable piece of pipe, press the bearing onto the shaft, resting on its inner ring.
After installing the secondary and intermediate shafts into the gearbox housing, we press in the front and rear bearings of the intermediate shaft, the intermediate bearing of the secondary shaft and the inner race of the gear block bearing. The outer ring of the bearing of the gear block of the 5th gear and reverse gear...
...press a tool head of a suitable size (a piece of pipe) into the socket of the rear cover.
We insert the cage and rollers into the outer ring of the bearing. To prevent loosening of the bolt securing the fifth gear and reverse gear unit, apply thread sealant to the bolt threads. For ease of installation of the rear cover, we install the rear bearing assembly on the secondary shaft. It is advisable to lubricate all sealing gaskets with a thin layer of silicone sealant. When assembling the gear selection mechanism, apply Litol-24 lubricant to the ball joint.
Disassembly
Before removing the rear cover, set the gear shift lever to neutral, unscrew the gear selector mounting nuts and remove the gear shift lever assembly. Then unscrew the nuts securing the rear cover and remove it. One of the cover fastening nuts is unscrewed from inside the gearbox housing with the bottom cover removed. When removing the rear cover, it must be moved not only backwards, but also turned to prevent it from touching the reverse and fifth gear gear block.
After removing the inner ring of the rear bearing 12 (Fig. 3-31) and the speedometer drive drive gear from the secondary shaft, loosen the bolts securing the cover 5 (Fig. 3-32) of the clamps and unscrew the bolts 2 and 4 securing the gear block and the fifth gear and reverse gear fork progress. Remove the oil deflector washer 9 (Fig. 3-31), and then the bushing 1 (Fig. 3-33) of the fifth gear gear and remove the rod 1 (Fig. 3-34) from the fork 2. At the same time, the spacer bushing 3 is removed from the rod. Then remove gear block 4 from the intermediate shaft spline.
Rice. 3-31. Five-speed gearbox rear:
Rice. 3-32. Unscrewing the bolts securing the gear block and the 5th gear and reverse fork:
1 – reverse intermediate gear; 2 – bolt for fastening the gear block; 3 – fork rod; 4 – fork fastening bolt, 5 – clamp cover
Rice. 3-33. Removing the 5th gear bushing:
Rice. 3-34. Removing the 5th gear and reverse fork rod and gear block:
1 – fork rod for 5th gear and reverse gear; 2 – fork for selecting 5th gear and reverse gear; 3 – spacer sleeve; 4 – gear block
At the same time, remove the reverse intermediate gear 1 (Fig. 3-35) from the axle, gear 3 assembled with the clutch and fork 4 from the secondary shaft.
Rice. 3-35. Removing the reverse intermediate gear, fifth gear gear assembly with synchronizer and fork:
1 – reverse intermediate gear; 2 – fifth gear engagement clutch; 3 – gear V gear with synchronizer; 4 – 5th gear and reverse fork
Rice. 3-36. Removing the reverse driven gear and 5th gear synchronizer clutch hub:
1 – intermediate shaft; 2 – reverse driven gear; 3 – axis of the reverse intermediate gear; 4 – fifth gear synchronizer clutch hub; 5 – secondary shaft; 6 – fork rod for 1st and 2nd gears; 7 – fork rod for 3rd and 4th gears
Note. Since 1992, washer 5 (see Fig. 3-31) on the secondary shaft has been canceled and the configuration of secondary shaft 1 and hub 3 of the 5th gear synchronizer clutch has been changed (on the secondary shaft, the diameter for the hub was 28 mm, it became 25 mm; the width of the hub seat the thickness of the washer has increased and the seat diameter has been reduced from 28 mm to 25 mm) The specified parts are not interchangeable with previously produced ones, therefore, when repairing a gearbox of an old design, follow the following rules:
Carry out further disassembly of the gearbox in the order described for the four-speed gearbox.
If necessary, disassemble the lever and gear selection mechanism, for which:
Rice. 3-37. Gear selection mechanism:
1 – guide plate washer; 2 – guide plate; 3 – gear shift lever housing; 4 – ball joint; 5 – spherical washer; 6 – spring; 7, 8 – retaining rings; 9 – gear shift lever; 10 – protective cover; 11 – flange; 12 – reverse locking plate; 13 – spring; 14 – guide bar; 15 – sealing ring; A – risk
Resource of transmission elements
With proper maintenance, all transmission elements have service lives that comply with the regulations. The existing stereotype about unreliability is not confirmed either documentary or practically. Until now, the Chevrolet Niva remains one of the most popular cars on the market. The owners claim that the car is taking care of its 200,000 km, which the plant lays down as a resource. This means that the transmission resource is determined by the manufacturer and cannot be less than 200,000 km.
A car with honest all-wheel drive for little money is a rarity in the modern market. That is why the Chevrolet Niva is in stable demand, both new and used. The simple and reliable all-wheel drive system of this car does not cause any particular difficulties in repair and maintenance, and to eliminate any malfunctions it is enough to know the architecture, design and operating principle of the main transmission components.
Maintenance Recommendations
The cause of the malfunction may be the exhaustion of the intended resource, but most often it lies in non-compliance with basic recommendations for operation and maintenance. Routine maintenance includes only timely replacement of transmission lubricant. It needs to be changed every 40 - 45 thousand kilometers.
Repairing a box is an expensive proposition. It often has to be carried out at a service station, so it is necessary to periodically check the oil level in the gearbox and inspect the crankcase for leaks.
Read news about the new Niva
- LADA Niva – Operating manual – Official LADA website
- Front axle. VAZ 21213, 21214 (Niva)
- Chevrolet Niva transmission repair in St. Petersburg (SPb), Primorsky district, list of car services - addresses, phone numbers and reviews
- How to bleed the clutch on a Niva? Algorithm of actions
- Replacing the drive gear oil seal of the front axle VAZ 2121 Niva 2131
- Installation and reviews of Euro handles for Niva 4x4 (VAZ 2121, 2131) » Lada.Online - all the most interesting and useful about LADA cars
- How to bleed the brakes on a Niva yourself? "
- Interior heater valve VAZ 2121 Niva 2131
Prices for services
The exact cost of repairs can be obtained from the operator by phone: 8
Prices for VAZ gearbox repairs
2108, 2109, 21099, 2113, 2114, 2115, 2110, 2110, 2111, 2112, 2120 Nadezhda, 2123, URBAN, Niva: 4×4, 21213, 21214, VIS 2346, 2129, 2131, 2329, Kalina, 1117, 1118, 1119, Priora, 2170, 2171, 2172, 2173, Chevrolet Niva, Kalina, Largus, Priora, VIS 2347
VAZ classic: 2101, 2102, 2103, 2104, 2105, 2106, 2107
Lada Granta / Granta, Kalina VAZ 2192 (cable drive), Renault Logan manual transmission, VIS 2349