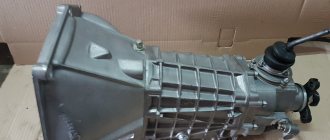
Gearbox VAZ 2106
The Soviet Union is not just a state, but an entire era that lasted more than 70 years.
The state sought to become one of the leaders on the world stage, so it was extremely important that the automotive industry be no worse than in the countries of the Western world. One of the brightest representatives of this race in the automotive industry was the legendary VAZ 2106. Several generations of our citizens have grown up who consider the six to be the best domestic car. And this is not without common sense, because the engineers of the automobile plant in Tolyatti created a simple and therefore reliable car. The gearbox of the VAZ 2106 car was also distinguished by a high degree of reliability and quality. However, without high-quality gear oil, the operation of the gearbox would not be long. The six gearbox is the main element of the transmission, with the help of which torque is transmitted from the power unit through the clutch to the drive of the drive wheels, regulating the speed of their rotation.
Gearbox VAZ 2106 and their design
This car was equipped with two types of gearboxes, one of them was a manual 4-speed transmission. The second is an improved version of the previous one, designed for 5 speeds, also of a mechanical type. At the same time, the five-speed gearbox, due to its modernization, was more expensive and more demanding to maintain. In addition, both of these gearboxes (5-speed and 4-speed) can be interchangeable.
The VAZ 2106 gear shift diagram is shown in the photo.
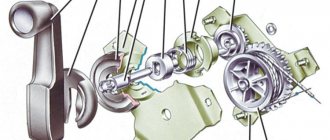
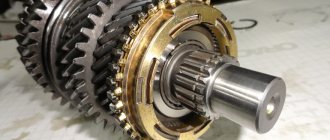
The device of any of them is a simple structure consisting of several shafts (primary, secondary, intermediate), a crankcase and a gear shift mechanism with synchronizers. On the input shaft there is a firmly seated gear, which is in constant mesh with all other gears. The shaft rotates due to two bearings located at the front and rear; the front one is also located in the crankshaft socket at the end. The rear one is located inside the crankcase and is sealed with an oil seal. The presence of the latter is explained by the fact that there is transmission oil in the crankcase.
The secondary shaft rotates due to three bearings. The front needle bearing is firmly seated in the input shaft socket, the ball bearing in the center is located in the crankcase seat, and the rear bearing is pressed into the socket on the rear wall. It also has a seal element that prevents possible oil leakage from the gearbox housing.
The intermediate shaft is a shaft with a gear block that rotates on two bearings. There is a ball bearing at the front and a cylindrical roller bearing at the rear. On the side there is a gear with reverse motion. As for synchronizers, they are structurally the same and consist of a hub, springs and couplings, equipped with locking rings.
Largely thanks to the simple, reliable and high-quality gearbox, the VAZ 2106 can boast of good dynamics and speed characteristics. All gears, with the exception of those at reverse speed, have an oblique tooth and are in constant mesh. Such a design, with its small size, allows more torque to be transmitted to the shafts, especially since the gear ratios of the VAZ 2106 gearbox are selected correctly. In reverse, gears with straight teeth are installed, so the car cannot gain high speed when the reverse gear is engaged, since such gears cannot transmit large torque.
VAZ 2106 gearbox device
Speed shifting occurs as a result of the operation of clutches with synchronizers. The shift lever itself and the entire mechanism are forks with rods. After switching, the speed is fixed by balls with springs that hold the rod. The engineers also provided protection against the possibility of turning on two speeds at once, using special blockers or, in common parlance, “crackers” for this. In order to change the oil, the gearbox has special holes with plugs with threads and rubber seals.
Please note: the performance characteristics of metal parts are selected taking into account the use of high-quality gear oil.
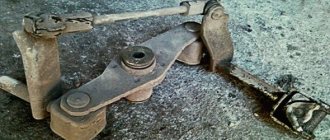
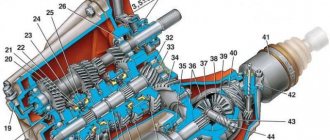
Gear shift mechanism
Speed shift mechanisms Numbers 1, 2 and 16 are the speed forks: 3rd, 4th, 1st and 2nd, rear and 5th.
Fork rods No. 5, No. 7 and No. 9 are controlled by lever No. 8, which is located in the car interior. The gear shift works according to the following scheme: if lever No. 8 changes position, the hinge engages with a recess located on one of the axes, the other end of which is in rigid engagement with fork No. 3. It, in turn, fits into the recess on the forward gear at numbers 16, 23, 24, 25 or number 20 for the rear.
Despite the fact that among the entire line of VAZ cars, the seventh model is structurally one of the most affordable and easy to maintain, not everyone will be able to carry out diagnostic and repair work on their own. This is due to the fact that the car has both simple and complex components and assemblies. So, manual transmission 2107 belongs to the second type.
It is important to understand that assembling such a device requires certain skills, experience and knowledge. However, if necessary, you can perform maintenance and repairs yourself.
In other words, although repairing a gearbox is a complex job that must be done professionally and efficiently, you can carry out a number of operations yourself.
The VAZ 2107 gearbox diagram (five-speed) is practically the same as in a four-speed gearbox, the only difference is the presence of another fifth speed, activated by moving the lever to the left all the way and forward. The VAZ 2107 5 mortar gearbox allows you to change the torque frequency in five different positions:
- moving forward at different speeds in accordance with gears from 1 to 5;
- moving backwards when engaging sixth (reverse) gear.
Gear shifting in a five-speed gearbox is carried out in the same way as in a classic four-speed gearbox. When squeezing the clutch, you need to move the gear shift lever to the desired position corresponding to the speed limit of the car.
Structurally, the VAZ 2107 gearbox is a rather complex device, externally representing the form of a closed case (three sides are closed with completely durable covers, the fourth “passes” into the gear shift knob). The VAZ 2107 gearbox itself consists of about 40 elements and parts. Let's look at the main ones.
Inside the box there are the following main elements:
- The input shaft of the VAZ 2107 is a shaft with four toothed gears (one of the main elements of the box). The input shaft, being one piece with the gears, rotates with them on a bearing, which is fixed in the lower part of the gearbox and sealed with an oil seal;
- The secondary shaft with ten gears, being a continuation of the primary shaft, has gears for first, second and third gears. All gears on the secondary shaft have different dimensions to ensure torque conversion. The secondary shaft rotates on bearings, just like the primary one;
- The intermediate shaft is a kind of “layer” between the secondary and primary shafts and has gears that are one with it. It is through them that torque is transmitted from one shaft to another; The forks ensure gear shifting while the vehicle is moving using a shift lever. By pressing the gear of a particular shaft, the forks force the mechanism to work.
- The device also includes hinges and gear shift levers.
The 2107 gearbox has gear ratios and technical characteristics similar to the VAZ 2105 gearbox. Parameters of the VAZ 2107 five-speed gearbox:
- main pair - 4.1/3.9 (4.3);
- 1st gear - 3.667 (3.667);
- 2nd gear -2.100 (2.100);
- 3rd gear - 1.361 (1.361);
- 4th gear - 1.00 (1.00);
- 5th gear – 0.820 (0.801);
- Reverse gear - 3.530 (3.530).
Main faults on the VAZ 2106 gearbox and how to fix them
Malfunctions of the “six” gearbox have more than one cause. Accordingly, the methods for eliminating them will vary.
Cause of malfunction
Presence of noise in the gearbox (may disappear if you depress the clutch pedal)
There is no noise, but the speeds are difficult to switch on
Between third and fourth gear there is no way to lock the gear lever in neutral
Spontaneous gear shutdown
There is a noise, crackling or squealing sound when shifting gears
Oil leak
It is worth considering that some of the faults are related to other components and assemblies of the car.
A short summary
General structure of manual gearboxes on VAZ
The device of a 5-speed manual transmission Lada Priora, Kalina. General diagram of the gearbox.
New cable transmissions installed on car models with 16-valve engines have become much quieter even when braking the engine. They have reinforced synchronizers (which, however, cannot be called problem-free). They are capable, according to the passport data, of withstanding a torque of 160 Nm. In practice, they work properly even under much higher loads when the car engine is boosted.
You should not think that we are deliberately praising VAZ manual gearboxes; we only noted their well-deserved positive qualities. But, of course, they encounter problems during operation. Let us note the most common malfunctions, their causes and solutions.
Table of the most common malfunctions of VAZ manual gearboxes, as well as their elimination and repair
The most successful manual transmission on Ladas is considered to be the one installed on the Lada Vesta
A new level in the design of VAZ manual gearboxes for front-wheel drive cars has become the VAZ 21807 gearbox, this is a five-speed manual transmission installed on the Lada Vesta. It is considered one of the most successful manual transmissions, as it is reinforced and capable of holding high torque. Problems such as gearbox noise, rapid wear of bearings and gears, oil leaks from seals are not typical for this box, but knocking at idle sometimes occurs, although not on all copies, which is an amazing phenomenon.
It should also be noted that the VAZ 21809 manual transmission is installed on the Lada X-ray. It is as durable as the VAZ 21807, but in the operational practice of owners, oil seal leaks and difficulty in engaging reverse gear are often encountered.
Lada X-ray with manual transmission, which is also quite successful
Gear shift diagram for a 4-speed manual transmission used on VAZ 2101, 2102, 2103, 2104, 2105, 2106, 2107, Niva 2121
Small Summary
So, what can we ultimately say about manual transmissions on VAZs and Ladas? Probably the fact that they started out in the 70s with phenomenally high quality, then the 5-speed manual transmissions suffered a little in quality, which, of course, slightly upset the owners. But it’s also impossible not to note how VAZ figured out (well, almost figured out) many of the problems of its manual transmissions. Just look at the box of the Lada Vesta and its Sport version, with a boosted 140 horsepower engine, how wonderfully the box works with a torque of as much as 180 Nm!
All VAZ boxes are incredibly repairable; they can be restored from any condition, and this can be done for relatively little money. Another big question is the quality of spare parts for gearboxes on our market. Now we are talking not only about cheap analogues, but, unfortunately, also about factory spare parts.
Thank you for your attention to this article, we tried to collect a lot of useful information about the operation and repair of VAZ manual transmissions, problems and ways to solve them, as well as other information about VAZ gearboxes. We hope you found it interesting and found something useful and necessary for yourself! Source
Source
How to replace a gearbox on a VAZ 2106
Before proceeding with dismantling the gearbox and further disassembly, you need to make sure that the cause of the malfunction is in the gearbox itself and is not related to other elements. For example, the following options are possible.
- The oil in the box is below the minimum level or is completely absent. As a rule, in such a situation, the gears will be engaged with a strong crunch and great difficulty.
- The fastenings of the box have become loose and it is hanging loose. Basically, a weakened gearbox is noticeable on the move when driving over bumps.
- Clutch malfunctions. The clutch drive has failed; in this case, if you press the clutch pedal all the way, the gears will also be engaged with difficulty and with a strong crunch.
If you are absolutely sure that the cause of the malfunction lies directly in the gearbox, then you can proceed to the process of removing it.
Dismantling the gearbox
The car must be placed above the inspection hole (unless, of course, it is possible to use a lift). Wheel chocks must be placed under the rear wheels and the parking brake lever must be lowered. The gear shift lever must be removed.
Removing the lever is not enough, since there are still three bushings left on the rocker (the main gear shift lever) that need to be unscrewed.
To do this, use two screwdrivers to carefully separate the petals of the upper bushing. After this it must be removed. Then, with a little effort, you can remove bushings A and B from the lever.
Unscrew the two screws securing the cover to the floor and remove it. Using a screwdriver, loosen the two screws holding the handbrake lever cover and remove it. Remove the screws under the front seats that secure the front floor mats to the floor.
Move the front seats all the way back and bend the edges of the floor mats.
Unscrew the nuts on the front seats that secure the slides to the brackets.
Unscrew the four screws securing the trim to the threshold and remove it (the trims are removed from both sides).
Lift the floor mat and push it forward as far as possible, with the mat ring (A) threaded through the drawstring (B).
Unscrew the screws that secure the plastic cover of the rocker and remove it.
Remove the hose that supplies warm air to the air filter housing. After disconnecting the warm air supply hose, you need to, armed with a wrench, unscrew all the bolts that secure the starter and move it forward. Disconnect the crankcase drain plug and drain the oil into any suitable container.
Remove the exhaust system, starting with the exhaust manifold. You need to disconnect the propeller shaft coupling from the gearbox flange (after removing the muffler). Disconnect the wire block (see photo) from the reverse signal switch (located directly on the gearbox on its right side).
Using a handy tool (pliers or just your hands), loosen the speedometer nut and disconnect the end of the cable from the gearbox.
Remove the clutch slave cylinder (there is no need to remove it completely, just remove it from the bracket; it is not necessary to remove the cylinder hose). Remove the four bolts that secure the clutch housing cover.
Using any suitable wooden block, you need to support the bracket, placing one side of the block on the crossbar and the other on the ground.
Unscrew the nuts that secure the cross member to the body. Remove the block and bring together the rear part of the gearbox. Using the same block, you need to support the front part of the engine, always in the place indicated in the photo.
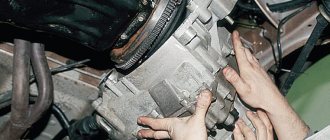
Remove the top bolts that secure the clutch housing to the engine. An assistant must support the rear of the gearbox, and at this time you need to unscrew the lower bolts securing the gearbox housing to the engine. After all the manipulations done, together with an assistant, you need to move the gearbox back in the direction of travel until the input shaft disengages from the engine flywheel. In fact, there is nothing complicated about replacing this unit; no special knowledge or skills are required.
Gearbox installation
Before starting this process, it is necessary to lubricate the splines of the input shaft with “Lithol” or other suitable lubricant.
Next, you need to engage first or third gear, after which you can install the gearbox in the reverse order. During installation, you must pay attention that when it comes to the muffler, you should not tighten the nuts securing the exhaust pipe to the box. First, it is better to tighten the junction of the exhaust pipe and exhaust manifold, and then tighten the fastening of the gearbox bracket and the exhaust pipe.
After installing the gearbox, you need to fill in new gear oil in its place and check the gear shift manually. Any of them should turn on easily. Next, you can check the operation of the box on the go, while the car is moving.
It is best to install and dismantle the gearbox with an assistant. Firstly, it’s more convenient and faster to place the box this way. And secondly, the knot weighs quite a lot. One person in a confined space can simply drop it on themselves.
Of course, the VAZ 2106 is far from a modern car. This means that production technology and the work of all its components have long been obsolete. The only thing that distinguishes them, including the gearbox, is reliability and relative simplicity of design.
Compared to modern transmissions, especially automatic transmissions (automatic), a six-box, no matter 5- or 4-speed, looks primitive. But it is really reliable, and repairs can be carried out literally “on the knee”, with your own hands. Actually, this is why the classic from AvtoVAZ is valued, and still is. In addition, the components are not that expensive.
How to change a torn or stretched parking brake cable on a VAZ classic
All work must be done in the same way as during adjustment, placing the car above the inspection ditch, or lifting it using a lift. There are also some pitfalls. The brake drums, which will have to be removed, are tightly “stuck” to the axle shaft flanges. Beating the drums themselves is more expensive, they are fragile and break easily. Therefore, we will do this: - by hanging the wheels, we will reliably strengthen the car from rolling in a way suitable for your conditions; — fourth gear, release the clutch, “accelerate” and sharply “hit” the brakes; — we repeat this “procedure” until the inertia tears the drums away from the flange; — we clean off the rust from the hub flange with a file - it interferes with pulling out the drum; — rocking from side to side, using wooden drifts, remove the drum. A protrusion on its inner side, formed over years of wear, can also prevent successful removal of the drum. Now, inspect what is inside - the pads and cylinders. Severe wear on the linings is a reason to replace the pads. The cylinders should not leak brake fluid, the boots should be intact without breaks. The cable sheath is bolted to the brake shield. You need to unscrew them very carefully, generously watering them with “Vedashka”, otherwise you will twist the “head” and will have to drill it out. Have you turned away? Wonderful! All that remains is to pull out the old cable and lay a new one in its place. We put everything else back together, and then, having installed the drums and wheels in place, we adjust the parking brake, as described above. Everything is ready, we have successfully replaced the parking brake cable of a VAZ classic. Video on this topic
Read, it might come in handy: Why do brakes squeak And one more thing
Self-replacement of the VAZ 2107 gearshift lever
The VAZ 2107 gear shift lever is used to enable the driver to control the car, which is possible using a gearbox. The gearbox, in turn, is a mechanism inside which there are gears of different diameters. This device is the link between the engine and the drive wheels of the car. For rear-wheel drive cars, which is the VAZ 2107, the manual transmission is typically located under the lever itself. To connect the lever to the gearbox, no additional link is required, as is typical for front-wheel drive car models. The VAZ 2107 rocker is presented in the form of a small half-bent tube onto which the gearshift lever itself is placed. In the material we will pay attention to the question of how to replace it, as well as the features of dismantling.
Oil change tips
We figured out how much oil to pour into the box of a VAZ 2107, and we will tell you how to do it below. Now we will give some tips on how to properly replace the lubricant:
The oil must be changed on a hot engine, warmed up to operating temperature. This is necessary for quick and complete drainage of fluid from the transmission.
Carry out all work wearing gloves that will protect your hands from accidental burns from hot oil.
Change the fluid on an overpass, lift or inspection pit.
When replacing, pay attention to whether there are metal shavings in the lubricant.
Its presence indicates the need for prompt transmission repair.
Five-speed gearboxes of the VAZ 2107 have a certain feature: they need to be filled with approximately 250 ml more oil due to design features.
Changing the oil is quite easy. It is only important to decide which lubricant is best to fill. We have a separate article on choosing oil on our website.
Device location and characteristics
The gearshift lever of the VAZ 2107 is located directly in the car's interior. It is used to be able to change gears while moving. The gear lever fails only in rare cases, and the reason for this is negligence towards the product. If the product fails, it must be replaced. But before replacing, it is necessary to remove the product in question. We’ll find out in more detail how to remove it, as well as replace it on the “seven”.
On the “seven” the gear shift knob has a common problem - rattling and chattering. If you fix such a malfunction using improvised means, then replacing the device will not be necessary. Before you begin replacing the device, you will need to find out the exact causes of the malfunction. After all, sometimes not only the part in question can “fail,” but also the gearbox or clutch.
If you are convinced that it is the gearshift lever that is faulty, then only then should you start replacing it.
Replacement features
Before you begin the replacement, you need to stock up on tools such as wrenches and a screwdriver. We start with the following steps:
- Set the lever to neutral position.
- After this, you need to slide the top cover up. There is no need to completely remove the cover.
- The next step is to move the cover, which is located below, to the top. This cover is also called a thermal protection valve. In the photo below it is shown with a red arrow.
- Now you need to press the device, pushing it to the bottom. After this, you need to insert a screwdriver into the lower part of the product, where the plastic sleeve is located. The bushing is located at the very bottom of the device, as shown in the photo below.
- It is necessary to move the locking sleeve to the lower part, and then remove the product from the box.
- If the device emits strong vibrations, it needs to be replaced with a new one. In this case, you can exchange the part for a product of shorter length, as on foreign cars. A short device is much more comfortable to operate than a standard product.
Many motorists replace the standard gear shift levers with more modern ones, which allows them to uniquely customize the interior of the Seven.
After the standard product is dismantled, we install a new handle in its place. Let's look at what the installation is.
Installing the device on a VAZ 2107
After the standard mechanism has been removed, you will need to remove the rubber bushing from it, if it remains inside. To remove the bushing, you need to use a screwdriver or hook. By prying the sleeve, we remove it from the device, as shown in the photo above.
If you plan to install a standard product in place, then it is advisable to replace the bushing by purchasing a repair kit in advance. When choosing a repair kit, preference should be given to products manufactured by VAZ. The installation process is similar to removing the device. Initially, a rubber bushing is installed, recessing it into the device. Following the bushing, it is necessary to install a rubber band in the form of a washer, which softens the control of the mechanism. Next, you need to install a plastic lock inside the mechanism, due to which the device is fixed to the gearbox “scene”. The assembly is completed by installing the locking sleeve, which had to be moved down at the initial stage in order to dismantle the gearbox lever.
Once the product is ready for installation, you will need to insert it into the drawstring. To do this, you should initially lubricate the slide, and then hit the mechanism handle well with your hand until you feel that the lever has settled into place. This is how the installation of both new and old mechanisms, which were dismantled to replace component parts, is carried out.
Self-tuning of the handle
Some drivers are not satisfied with the quality of repair kits for installation, and they came up with a kind of tuning of the gearbox handle itself: to reduce rattling and vibration going to the shift handle, instead of standard plastic bushings and rubber bands, they insert a piece of hose that fits the outer and inner diameters. This upgrade also allows for easier future installation of the handle.
Additionally, you can make the gear shifting process more convenient by slightly reducing the length of the standard handle. To do this, you need to remove the lever, cut it with a hacksaw to 5-6 cm in length and cut a thread at the end, the same as it was on the cut piece (if you wish, you don’t have to cut the thread). These upgrades are advisory in nature and have their pros and cons. Each driver decides for himself whether to produce them or not.
When choosing products for foreign cars, you should make sure that it can be reliably installed on the VAZ-2107. Otherwise, an incorrectly secured mechanism will lead to an emergency situation while driving.
Gear shift lever - eliminating system ailments
Sometimes a motorist is faced with the question of why the gear shift lever dangles, but before answering it, you should clearly understand what this gearbox element is, its structure and what functions it performs.
Gear shift knob, or what is the design of the system?
A feature of all manual gearboxes is the need to manually operate the lever. We can assume that it is precisely this that performs the most important function in determining the speed limit of your movement. This means that without it, driving a vehicle becomes simply impossible. The principle of operation of the lever is quite simple: by tilting it in the longitudinal and transverse directions, you set it to a position that corresponds to a certain speed.
The gear shift lever handle is connected to the synchronizer via a fork, the position of which transmits information about the number of the selected speed. The synchronizer sets the gears of the gearbox so that the generated engine power allows the car to move at a given speed. When the position of the lever corresponds to neutral gear, it is held in place by springs. The gear shift pattern is often depicted on the head of the lever.
How can the gear shift lever be positioned?
The location of the gearbox levers can be either floor-mounted or steering column mounted. And despite the fact that the latter is considered more convenient to use, nevertheless, in most cases, car manufacturers prefer the first option. This is due to some disadvantages of the steering column arrangement, including: low speed and clarity, the likelihood of incomplete gear engagement, the rods wear out much faster, sometimes they can jam, as well as “knocking out” the gear.
But in both cases, the design of the gear shift lever remains the same. The only differences can be in length, and if previously it could reach even 30 cm, today manufacturers strive to make it as small as possible, eliminating too much travel of the gear lever. Therefore, with a floor arrangement, nothing will change significantly in the design, but there will be noticeably fewer breakdowns.
Shift lever squeak and other problems
From all of the above, it is clear that this part is one of the most important in the entire gearbox, and if it fails, then driving such a vehicle becomes life-threatening. The most common reasons why such an emergency can occur are either mechanical damage or the consequences of incorrect operation. Here are a few breakdowns that you can easily detect on your own.
You should know that the gear shift knob should move freely, without jamming. If difficulties arise in performing this action, most likely the spherical washer or ball joint has failed. They need to be replaced urgently. The creaking of the gear shift lever also indicates a malfunction. If spontaneous shutdown occurs, then you should definitely check the spring; it is quite possible that it simply jumped off.
How to repair a gear shift lever?
In any case, no matter what happens, repairing the gear shift lever involves replacing failed parts, and without completely removing it it will be impossible to do this. For this purpose, the plastic protective plate is dismantled and the hinge cage is released. After which it is necessary to move the jet rod to the side and remove the entire lever. But in order to free up access to all the plastic bushings and axles, it is necessary to remove the cover for the gear shift lever.
To replace the spring, it must be pulled out, and for this you need to dismantle the retaining ring and the hinge with the lever. If you cannot do without replacing the ball joint, you should carefully push the spherical washer apart with your fingers and remove the worn part. At the same time, when installing a new one, lubricate it.
The thrusts change as follows. There is a clamp at the bottom of the car; you should loosen it. Next you need to disconnect it from the hinges and, by unscrewing the fastening nut, you can freely pull out the rod. Installation of the new one is carried out in the reverse order. Thus, having replaced all damaged elements with new ones, you can drive safely. At the same time, do not forget that periodically it is necessary to adjust the gear shift lever.
Installing/removing the VAZ 2106 gearbox
To repair or replace the gearbox, it must be removed. Today we will tell you how to remove or install the gearbox on a VAZ 2106 yourself.
Installation and removal of the VAZ 2106 gearbox
1. Work must be carried out on an inspection ditch or lift.
2. Disconnect the negative cable from the battery.
3. Disconnect the cardan drive from the gearbox and remove it from the car.
4. Remove the exhaust pipe from the mufflers.
5. Disconnect the terminals from the reverse light switch.
6. In the salon, carefully remove the decorative cover from the ring.
7. Use a screwdriver to pry off the rings holding the mat.
8. Moving and lifting the mat, unscrew the four screws securing the cover.
9. Take out the cover with the foam rubber seal from under the mat and lift them up.
10. Pressing down on the gear shift knob, use a thin screwdriver to remove the locking sleeve from the groove of the lever rod...
11. ...and remove the handle.
12. By striking the mounting blade inserted between the engine and the engine compartment partition, we bend the eye washer of the upper clutch housing mounting bolt.
13. Using a 19mm wrench, unscrew the bolt.
14. It is more convenient to use a special curved wrench with a head for this purpose.
15. Using a wrench or a 13mm socket with a cardan joint, unscrew the two upper bolts securing the starter to the clutch housing.
16. Using a 13mm socket with an extension, unscrew the lower starter mounting bolt.
17. Using a 10mm wrench, unscrew the four bolts securing the clutch housing cover.
18. Using your hand or sliding pliers, unscrew the nut securing the flexible speedometer drive shaft to the drive housing.
19. Install a stop under the lower part of the gearbox housing. Using a 19mm socket with a universal joint on the wrench extension, unscrew the remaining three bolts securing the clutch housing.
20. Using a 13mm wrench, unscrew the two nuts securing the cross member.
21. Remove the gearbox by sliding it back.
22. To replace the gearbox, disconnect the clutch housing. We install the gearbox in the reverse order of removal. Before installation, apply a thin layer of CV joint-4 lubricant to the splined end of the input shaft.
Let us remind you that the previous article was about removing and installing the instrument panel on a VAZ 2106 with your own hands.
Tuesday, October 8, 2022
How to remove the gearbox lever of a VAZ 2106
NOTE The gearbox is removed from the VAZ 2106 only assembled with the clutch housing.
USEFUL TIPS The work of removing and installing the gearbox is very labor-intensive, so first make sure that the gearbox malfunctions are not caused by other reasons (insufficient oil level, defects in the clutch drive, loose fastening of the gearbox and its covers, etc.). Since the gearbox is quite heavy, remove and install it with an assistant.
To remove the gearbox from a VAZ 2106 car you will need: keys “10”, “13”, “19” (or a head with extensions and a cardan joint), a key for the drain plug of the gearbox housing, a screwdriver, and pliers. 1. Lower the parking brake lever to the down position. 2. Remove the gear shift lever rod (see “Removing and installing the engine”).
3. Remove the two screws securing the parking brake lever boot and remove the boot from the lever. 4. Remove the front mat (see “Removing and installing the engine”). 5. Remove the floor tunnel cover (see “Removing and installing the engine”). 6. Disconnect the battery.
7. Remove the warm air supply pipe to the air filter housing.
8. Remove the two upper starter mounting bolts. 9. Unscrew the nuts securing the exhaust muffler pipe to the exhaust manifold and remove the locking plates (see “Replacing the exhaust muffler pipe”). If you have difficulty loosening the nuts, complete the work from below the VAZ 2106.
NOTE If the connection between the additional mufflers and the front exhaust pipe is heavily corroded, i.e. the likelihood of their damage is high, it is permissible not to perform step 14. Go to step 15 and disconnect the muffler exhaust pipe assembly with the exhaust system from the exhaust manifold.
16. Remove the driveline safety bracket (see “Removing and installing the driveline”).
17. Unscrew the three nuts from the bolts securing the flexible coupling to the gearbox flange.
18. Remove the bolts from the flange and coupling one by one by turning the driveshaft.
19. Using a screwdriver, pry the coupling away from the flange and lower it down.
20. Disconnect the wires from the reverse light switch (located on the right rear of the transmission).
21. Unscrew the nut and disconnect the cable from the speedometer drive gear (located in the left rear part of the gearbox).
22. Remove the slave cylinder from the clutch housing without disconnecting the hose from the cylinder (see “Removing and installing the clutch slave cylinder”).
25. Unscrew the two nuts (the second one is not shown) securing the cross member to the body and remove the washers. 26. Remove the stop and smoothly lower the gearbox down.
27. Place a stop under the front of the engine to secure it in position.
28. Using extensions and universal joints, remove the left and right upper bolts securing the clutch housing to the engine. Remove the spring washers and eyelets.
29. Remove the left and right lower bolts securing the clutch housing to the engine. Remove the spring washers.
NOTE Have an assistant support the rear of the transmission.
30. Remove the gearbox from the VAZ 2106, first moving it backward until the input shaft leaves the clutch, and then down.
NOTE Do not rest the end of the transmission input shaft on the clutch pressure spring thrust flange to avoid deforming the clutch pressure plate connecting plates.
31. Install the new gearbox on the VAZ 2106 in the reverse order of removal. Fill the gearbox with the required amount of oil.
USEFUL ADVICE Before installing a gearbox on a VAZ 2106 car, apply a thin layer of LSC-15 or Litol-24 lubricant to the splined part of the input shaft and engage 1st or 3rd gear.
Crankcases in transmission
There are four types of crankcases used in the transmission of a modern car:
- Gearbox housing;
- Clutch housing;
- Drive axle housing;
- Transfer case housing.
Each of these types of crankcases has its own functions and design features.
Gearbox and transfer case housing. This is the housing of the gearbox and transfer case (in vehicles with all-wheel drive), which also provides lubrication for the parts. Today, the most common are solid crankcases made of cast iron or aluminum alloys, and they are divided into two types:
- With a cover on the top of the crankcase;
- With a cover at the end of the crankcase opposite to the clutch.
The cover in the upper part is typical for old gearboxes of trucks and cars (GAZ-53A, GAZ-24 Volga, Moskvich, KAMAZ, MAZ, ZIL, Ural, KrAZ, etc.), and the cover at the end - for modern gearboxes. Such boxes (exclusively mechanical) are still used on most domestic and foreign trucks. However, it should be noted that in a number of trucks the gearbox housing is composite - it includes separate housings for the clutch, divider and the box itself.
Automatic transmission housings have their own characteristics. In particular, the automatic transmission crankcase is often combined with the torque converter housing, and it also contains an oil pan. The presence of a pallet is due to the design features of the “automatic machines” - the pallet provides access to the valve body (control unit, valve assembly), which is usually installed at the bottom of the box.
Clutch housing. This is the only “dry” transmission sump - during normal operation there should be no oil or foreign liquids in it. The clutch housing, as the name implies, serves as a housing for the clutch parts; it is located between the engine and the gearbox. This crankcase may have covers for visual inspection and adjustment of the clutch, but this solution is not always used.
In cars with automatic transmission, the torque converter housing is located in place of the clutch housing.
Drive axle housing. This is the housing of the main gear, interwheel and interaxle (in three-axle trucks) differentials, wheel gears and wheel gears (if any). Today there are two main types of axle housings:
- Split (split) crankcase - such a crankcase consists of two cast halves connected in a vertical plane (the parting line can run in the center or slightly to the side), it is typical for older cars, although it is still found on UAZ cars and many domestic medium-duty trucks;
- One-piece crankcase - in such a crankcase the body is made one-piece, and on one or both sides (front or back, or only from the bottom) it is closed with stamped covers; it is typical for modern cars and trucks.
In this case, various crankcase options are possible. For example, stockings (bridge beams) can be either separate elements that are pressed into the crankcase itself, or made integral with the crankcase body (this type of pit is called a “banjo” for its characteristic shape).
Split crankcases and crankcases with separate stockings are usually made by casting, while one-piece crankcases combined with beams are stamped from sheet metal. Forged axles have high strength and rigidity, which is why they are most often used in trucks.
It is important to note that in axles with separate wheel reduction gears (in UAZs, many trucks and off-road vehicles), the axle housing actually consists of three separate housings - the central housing of the final drive (and differential) and two wheel reduction housings. All transmission housings (with the exception of the clutch housing) have a number of common elements:
All transmission housings (with the exception of the clutch housing) have a number of common elements:
- Filler neck with a plug (often the plug is equipped with a dipstick) - used for filling transmission oil during maintenance;
- Drain plug (usually has a built-in magnet to collect metal shavings) - necessary for draining used transmission oil);
- Breather - necessary to equalize the pressure in the crankcase and the atmosphere when the unit heats up; it prevents oil from being squeezed out through the detachable connections of the crater when the pressure increases excessively.
Removing and installing the gearshift lever on a VAZ 2107
When driving a car, the VAZ 2107 gear shift lever is needed in order to be able to vary the speed using the gearbox. Like any part of a car, it is susceptible to malfunctions, so this article is about how to remove the gearbox lever of a VAZ 2107 and, if necessary, repair or replace it.
The lever itself is a short segment coming out of the switching mechanism (in everyday life a rocker), and its continuation with a knob is called a rod. If it loosens too much, it can lead to difficult gear shifting or it may simply fly off the lever. Such consequences usually result when gear shifting is difficult for some reason, or the damper spacer sleeve has simply become loose over time, or the problem is in the rocker.
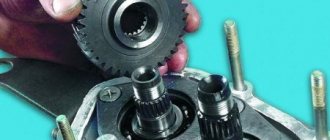
How to remove the input shaft from the box
The gearbox must be installed on a flat surface so that nothing prevents its disassembly
Before starting work, it is important to clean the housing from dirt and liquid spills so that debris does not accidentally get inside the housing.
The box looks like an elongated bell
To work you will need standard tools:
- set of wrenches;
- flat screwdriver;
- a thick bolt or a screwdriver with a powerful blade.
You need to pull the input shaft out of the gearbox strictly according to the regulations:
- Pull the oil level indicator out of the box body.
- Remove the bolt with flat washer and two nuts that hold the clutch cable bracket. Remove the cable mechanism from the gearbox.
- Unscrew the four bolts from the box cover and remove the cover.
- Unscrew the bolt with spring washer that secures one part of the input shaft.
- Before you start working with the input shaft, you will need to prevent the shafts from spinning among themselves. To do this, they need to be fixed: for example, insert a thick screwdriver between the teeth.
- Unlock the input shaft securing nut. It is very firmly planted and can take a long time to remove.
- After this, carefully pull the shaft out of the gearbox housing.
Photo gallery: main stages of work
Even after unscrewing the bolts, the cover will fit tightly to the body, so effort will be required to remove it
The most difficult stage of the work is when you have to unscrew this nut
The input shaft must be pulled out of the box very carefully so as not to damage both the shaft itself and adjacent elements
For further work, you will need to wipe all the mechanisms in order to be able to carry out troubleshooting.
Rejecting the input shaft
When the car and gearbox are operating normally, the driver, as a rule, does not have any suspicions about the exhaustion of the shaft and its elements. However, if the car starts to “strange things”, for example, the gear does not work or the speed starts to switch on in an arbitrary order, then you need to make sure that the box and, in particular, the input shaft are working.
This gear can no longer be used and needs to be replaced.
The correct culling procedure is carried out according to the following scheme:
- Visual inspection of the input shaft for abrasions and deformations.
- General condition of the retaining rings and locking ring springs.
- Wear of splines.
- Scuffs and burrs on gears.
That is, a routine inspection of the mechanism allows you to determine the degree of wear of each element and, if necessary, replace them
It is important that the gears and the splined part of the input shaft do not have even the slightest damage, otherwise you will have to install new parts
How to dismantle the gearbox lever of a VAZ 2107
If you had problems with play in the bushings, then you need to purchase a repair kit for the VAZ 2107 gearbox handle in advance and after dismantling it.
Before starting work, prepare a screwdriver.
- Set the box to neutral.
- Slide the cover.
- Push the damper locking sleeve down with a screwdriver.
- Remove the rod with the knob.
- Remove the remaining bushings from it.
- Replace them in reverse order as shown in the picture.
Before reinstalling, fully assemble the rod and bushings, slide it onto the lever, and push down sharply to seat it in place.
If you need to completely replace the rocker, then add a 10mm wrench to the screwdriver (preferably a socket or socket):
- remove the decorative panel;
- unscrew the boot;
- use a 10mm key to unscrew the mechanism;
- remove it from the box.
After repair or replacement, assembly is performed in the reverse order.
The quality of bushing repair kits leaves much to be desired and the backlash of the rod remains quite large, so some, instead of plastic and rubber bushings, simply select a simple hose according to size and attach it to it.
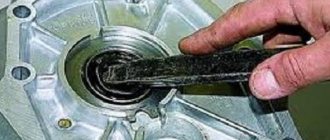
Replacing oil seals
The need to replace oil seals arises when an oil leak occurs from the gearbox housing. Both the front and rear cuffs can fail. In this case, the seals will need to be replaced.
Input shaft oil seal
If signs of damage to the input shaft oil seal were noticed, i.e., traces of lubricant leakage appeared in the area of the clutch housing, then the likely cause is failure of the input shaft seal. An oil leak may also appear from the engine when the rear crankshaft oil seal wears out. In order to determine where exactly the oil is leaking from, you can try to figure it out by smell, since motor lubrication is different from transmission lubrication.
The gearbox input shaft oil seal is installed in the clutch housing
Description and dimensions
The VAZ 2101 gearbox input shaft oil seal has the following dimensions: 28x47x8 mm, which corresponds to the inner and outer diameter, as well as the thickness of the race.
Replacing the input shaft oil seal
To replace the cuff on the input shaft, you will need to remove the box from the car and remove the clutch housing. Then, using the adapter, we knock the oil seal out of the housing and remove it with pliers. To install a new part, you will need a suitable sized mandrel and a hammer.
To replace the input shaft oil seal, you will need to dismantle the gearbox, remove the clutch housing and knock out the damaged element. The new cuff is installed in the reverse order
Secondary shaft oil seal
When the secondary shaft oil seal fails, traces of oil leakage appear in the rear part of the gearbox. In this case, the part needs to be replaced.
Description and dimensions
The secondary shaft cuff has the following dimensions: 32x56x10 mm
When purchasing a seal, you should pay attention to these parameters so as not to mistakenly take a part of a different size
Replacing the secondary shaft oil seal
On the secondary shaft of the VAZ 2101 gearbox, compared to the primary shaft, the oil seal is much easier to change, since there is no need to dismantle the unit. Preliminary measures include removing the cardan together with the elastic coupling. After this, perform the following steps:
- Remove the centering ring from the secondary shaft.
- Remove the locking element.
- Unscrew the nut by 30.
- We remove the flange with a puller or knock it down with a hammer.
- We pry up the old oil seal with a screwdriver and remove it from the rear of the gearbox.
- We press the new cuff with a suitable piece of pipe.
Lever tuning
The gear lever is located on the “seven” somewhat poorly, some believe that it is too long, others stretch far, and a general remark when turning on the reverse gear is added to the main ones, that we hit our hand on the passenger’s knee.
Some select levers from foreign cars that are suitable in size and secure them. The second, and easiest, thing to do when upgrading the handle yourself is to simply make it shorter. To do this, the lever rod is sawed off to 5 - 7 cm in length and the thread is re-cut.
The most radical way of tuning is to move the lever closer to the driver and reduce its travel when changing gears. It looks, when brought to its logical conclusion, solidly.
Read more about this procedure on the website.
The above tuning of the lever makes the interior of your car unique, but do not forget about driving safety because the given examples have their pros and cons, and it’s up to you to decide whether to do them or not.
Transfer of the scenes on the classic (2106-2107)
In general, this modification was not in my plans until I decided to make a center console, because... The original gearshift knob doesn’t fit in either the village or the city, somehow it doesn’t stick out well, or rather, it prevents me from redoing the instrument console, and it looks like it’s on a bus and sometimes hits me on the knee)
In short, it’s decided, I’ll move the stage!
I read all sorts of forums, looked at how others are remaking it. I did a little educational program for myself. I have a 5-speed gearbox, this, as I understand it, makes the conversion process easier, because... no need to turn the worm)
I chose, in my opinion, the most optimal solution.
Necessary materials:
1) Gear shift mechanism from a Chevrolet Niva - 1,500 rubles 2) Gear shift knob from a VAZ 2108-09 - 500 rubles 3) A metal tube with a diameter just enough to fit into the shift mechanism. If I'm not mistaken, 18mm is the best. 4) Tie rod clamp.
At first, instead of the 08 backstage, I wanted to buy a Shevik backstage. But it seemed to me that it was too massive, and it costs on average about 2,000 rubles. Its only advantages are that you don’t need to redo the fastening to the gear shift mechanism and the reverse gear will be engaged with recessing, and the disadvantage is that it has a curved shift lever itself, which I didn’t really like.
In general, the installation process is not difficult. We put the gearbox in neutral. We unscrew the old switching mechanism from the box from the passenger compartment. It is mounted on three studs, which are located on a circle of larger diameter. It’s just that there are three more studs there, if you unscrew them, the switching mechanism itself will come apart and from there (according to eyewitnesses) all sorts of springs will fly, which you can then put together.
We install a new mechanism from the Shevik, just in case, we check that the gears are engaged, so as not to disassemble everything again later.
We saw off all the excess from the wings and figure out where to put it. I screwed it with 2 bolts to the metal strip that had the old seat mounts on it. Holds quite tightly.
We measure the tube to size, weld it at one end to the rocker, and clamp the other end with a clamp in the switching mechanism. By the way, it is better to make the slots on the switching mechanism thicker so that the clamp presses better.
Well, that’s basically it, we start the car, check it, and rejoice)
The result was an almost short-stroke slide. I made a video of how it all works, because... When I read how others were remaking it, I wanted to see how it all worked, I think someone would be interested. And maybe after watching the video, the classic with a short-throw slide will become even bigger)
Pros of the remodel:
- the location of the rocker has become much more convenient - gears shift more clearly - reverse gear is engaged without recessing - there is more space in the part closest to the panel, in fact, this is what prompted me to move the rocker - and it’s just nice to poke around in the car once again)
Oh, by the way, I forgot to say about the handbrake. Now I am finishing the design for its transfer, because... he gets in the way of the scenes)
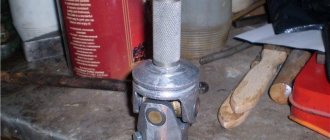
Necessary tool for oil change
Let's consider what tools and devices are needed in order to change the oil in the VAZ 2104 as quickly and conveniently as possible.
This:
- Hexagon 12
- Watering can
- Oil filter puller
- Container for draining oil
- Rag
- Knife
- Screwdriver
In the gearbox and rear axle
This:
- Hexagon 12
- Key/socket 17
- Oil container
- Oil syringe
- Rag
- Needle or thin wire
That's all it takes. As you can see from the list, you won’t have to buy much, if at all. And the cost of what you need to purchase is small - so changing the oil on your VAZ 2104 yourself will cost you less than a trip to the service station.
Where is
It is located in the car interior, below the dashboard, to the right of the driver (or to the left if the car is right-hand drive). It is used to change gears in the gearbox.
The shift lever is a reliable and stable part. But due to careless and careless use, it also breaks. If you suddenly begin to grab the control lever or press on it, then repairs cannot be avoided. Before you start replacing the VAZ 2107, you need to understand how to remove it from the box.
Gear shift knob
Common illnesses include rattling and loose handles. Let's call this the first stage. If you do not fix the problem immediately, you will have to completely replace the element in the future. This part, like others in the car, must be treated with care and calm. Don’t pull it, hurry up and press it into the “feeder”. If the gears do not shift smoothly and comfortably, then you probably did not press the clutch all the way, or there are problems with the gearbox. And you need to repair it, not the handle.
From 4-speed to 5-speed
Finally, let’s consider such an issue as converting the gearbox from 4 to 5 stages of the VAZ-2105. Such a modification is quite possible, since when the five-speed gearbox was created, the basis for it was the 4-speed version. But in this case, you will have to replace some of the components taken from the 5-speed gearbox, namely:
- Back cover;
- Intermediate shaft (with a hole for mounting the 5th gear gear block);
- Secondary shaft (in the 5-speed version it is slightly shorter);
- 5th speed gear block;
- Reverse idler gear axis;
- A set of rods together with a fork for 5th and reverse gears;
- Gear shift mechanism (slide);
- Reverse light sensor;
- Power unit mounting bracket;
Next, it is enough to completely disassemble the 4-speed gearbox and assemble it as a 5-speed gearbox using the specified components.
Instructions
- Place the VAZ 2107 car on stands.
- Eliminate the exhaust system and remove the thermal protection valve.
- First remove the cover from the handle.
Removing the cover - Remove the retaining clip and washer. And take out the shift rod, it is located on the side.
- Place a wrench at the bottom and turn it 90 degrees. Press out the spherical liner.
- Pull out the handle.
- Lubricate the liner with lubricant.
- Install the handle with the insert (the arrows should indicate the direction of the longitudinal axis).
- Press down on the liner from above. Secure it.
- Attach the cover so that the arrow points forward.
- Place the washers and insert the rod. Screw on the bracket.
- Replace the thermal protection valve, as well as the exhaust system.
- Secure the cover and put on the handle. Record the state.
Now you know how to make this replacement on a VAZ 2107. We hope that our article was useful. Let your car work long and well.