The parts that are responsible for opening and closing the engine valve are installed along with the drive belt. The belt is often subject to wear and tear and is quickly used up. Change timing belt vaz 2109 you can do it yourself, without turning to specialists for help. In this article we have collected complete information. Soon you will see that VAZ 2109 timing belt replacement It happens simply and does not require special skills. Enjoy reading.
The engine GMZ controls the valves and cylinders. This set of parts begins to work using a belt. According to the standards, replacement of the timing belt and shaft belt in the VAZ 2109 and VAZ 21099 is carried out every 40-50 thousand km. Experts say: “If you have time to replace the belt, the driver will reduce the likelihood of cracks and breakage.”
Many car owners turn to specialists for help. But, as practice shows, it is quite possible to replace the belt on a VAZ 2109 yourself. Replacing the VAZ timing belt will not take you much time. Just follow the instructions.
Preparing to replace the belt
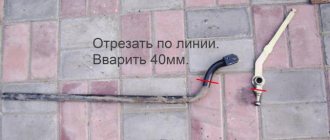
Replacing the crankshaft belt requires some preliminary work. To do this, lift the hood and remove a small section of the air duct pipe, loosening the fastening elements with a wrench. Then the protective front part of the belt guard . Before doing this, you need to loosen the three mounting screws. You can use a regular open-end wrench.
The front right wheel is removed in advance to gain access to the crankshaft. In the car, put the switch in the fourth position and ask an assistant to hold the brake pedal. Now install the 19mm socket on the long wrench. After the screw is unscrewed, you can put the gear in neutral and release the brake pedal.
When to change timing belt
As practice shows, the frequency of replacing a belt on a VAZ 2109 should be every 80 thousand km. But, most vehicle owners prefer not to bring the belt to the specified value, and change the timing belt after 45,000-50,000 km. The reason for replacement may be related to the operation of the equipment in different temperature conditions, as well as the unstable behavior of parts.
To avoid breakdowns, it is recommended to assess the condition of the belt. This assessment is carried out annually or every 8-15 thousand kilometers. To complete the inspection, it is important to remove the plastic front drive unit.
The belt should be replaced in the following cases:
- when scratches are detected;
- tears appeared on the belt or it began to delaminate;
- Oil began to appear on the belt (it is necessary to identify and eliminate the sources of engine oil spills).
Tools and materials
Before you start replacing parts, you should do a lot of preparation. First things first, prepare your tools and materials:
- a set of wrenches or sockets (sizes 8, 10, 17 and 19 mm);
- a screwdriver with a thick tip;
- rotary wrench for tension roller (industrial or handmade);
- tool for replacing spark plugs;
- marker for making marks on parts;
- cloth for cleaning the lid;
- new belt;
- video clip.
If you don't have a wrench, you can install the roller using two suitable pins and pliers. The pins are inserted into the holes and rotated with pliers.
Belt selection
When purchasing a timing belt for a VAZ 21099, it is important to focus on the manufacturer. According to customer reviews, products from Gates and Contitech factories have an ideal balance between quality and value. Many experts recommend installing a Gates tension pulley. The part has high build quality and can last for many years.
Let's consider the design of the gas distribution system
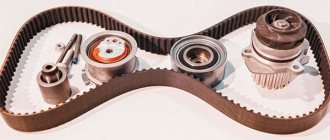
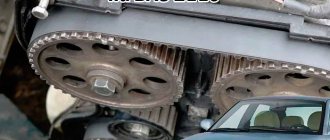
The VAZ 2109 timing belt (gas distribution mechanism) is a rubber or rubber-metal toothed belt (instead of a chain), the notches of which are located on its inner side. It is needed to synchronize the rotation of the crankshaft and camshaft in a car engine. The synchronized operation of the crankshaft and camshaft is of great importance, because only through the coordination of both of these engine parts, the gas distribution mechanism synchronizes the injection of the fuel mixture and the emission of exhaust gases through the intake and exhaust valves. The timing belt's job is to rotate the camshaft at half the speed of the crankshaft.
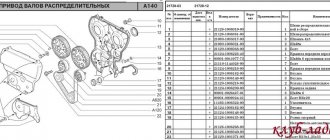
To replace the belt yourself, it is important to know the gas distribution diagram (photo below). Timing diagram VAZ2109
Timing drive diagram:
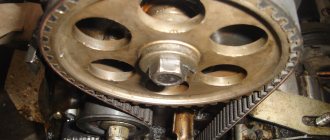
- 1 - crankshaft pulley
- 2 - VAZ water pump pulley
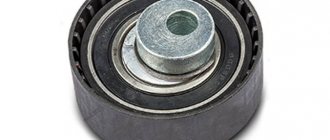
- 3 – roller – tensioner
- 4 - back cover
- 5 - camshaft pulley
- 6 – timing belt
- A - installation mark on the back cover
- B - mark on the camshaft pulley
- C – mark located on the pump cover (oil)
- D - mark on the crankshaft pulley
To set the valve timing correctly, it is important that the marks A - B coincide, and at the same time the marks C - D coincide, otherwise the car will either not move at all, or you will drive very little, and the cost of the issue will be a major overhaul of the engine.
Where is the timing belt located?
First, let's remember where the timing belt is located and what it looks like. Its location is in front of the engine, but do not forget that motors come in longitudinal and transverse locations. In most cases, gas distribution mechanisms use a toothed rubber belt, but in a considerable number of car models from different manufacturers, a steel chain is also used for this.
Engine cylinders can be equipped with two or four valves with one and two camshafts (CV), respectively. The kinematics of the gas distribution mechanisms of such engines differ. We will show them using the example of 8- and 16-valve power units for the VAZ 2110, 2111 and 2112.
The scheme with two shafts is more complicated, and in it, in addition to the pulley of the second RV, a support roller is added. This also complicates the belt replacement procedure. It is most difficult to perform this operation after a break or severe stretching of the belt, when the factory timing settings can be completely lost. Replacing in normal mode is not so difficult that you can’t try to do it yourself.
Timing functions in a car
Let's consider what tasks the gas distribution mechanism in a car performs. First of all, it must ensure timely supply of air or fuel-air mixture to the engine cylinders. It also promotes the release of exhaust gases from the cylinders. Both functions are performed through the timely opening and closing of valves.
The principle of operation of the timing valve is best considered on the most common four-stroke piston internal combustion engines. The gas distribution mechanism provides the connection between the valves and the camshaft with the drive. Valves, consisting of a plate and a rod, supply air or a fuel-air mixture to the cylinders and also release exhaust gases. Thus, a distinction is made between intake and exhaust valves, and the diameter of the plates of the former, as a rule, is larger.
In turn, the timing belt drive drives the camshaft, which is located in the cylinder head and determines the order of operation of the cylinders and valve timing. As a result, it turns out that the task of the timing belt and the system itself as a whole is to start the engine and ensure its stable operation when changing speed and revolutions, by starting the camshaft and synchronizing the valve timing with the operating cycles of the internal combustion engine.
Timing belt service life and causes of failure
So, the most vulnerable and quickly wearing part of the timing belt is the belt, or belt drive. On average, given the operating conditions in Russia, the part wears out after 60-70 thousand kilometers. If the timing belt spontaneously breaks, there is a high probability that the valves will be severely bent. Therefore, they will have to be changed too. This is a waste of both money and time. Therefore, it is recommended to periodically inspect the belt drive for signs of wear.
Accelerated wear of the timing belt is facilitated by:
- Unbalanced speed mode, leading to frequent jerking of the belt drive.
- Motor oil gets on the surface of the part, which begins to corrode its fibers.
- Insufficient or excessive tension on the drive belt.
Also, the belt breaks and falls off if the time threshold for its operation is exceeded. That is, if the driver did not change the part in time.
Natural wear of the part.
During operation, the belt not only wears out, but also bends, resulting in microcracks that subsequently grow and lead to belt breakage.
Each node has its own service life. The timing belt of the eight-valve VAZ engine operates for 60 thousand kilometers.
Buying a defective belt.
Don't skimp on critical spare parts. By saving 100-200 rubles you can be stuck on the road for a long time.
Contact with technical fluids on the belt.
Oil or coolant can easily get on the timing belt. Oil gets in due to wear on the camshaft and crankshaft seals, and antifreeze can leak out when the pump wears out.
Malfunction of timing drive parts.
Timing drive parts include:
- Camshaft and crankshaft gears.
- Tension roller
- Pump drive gear
Over many thousands of kilometers, the timing gears wear out and the possibility of the belt jumping over a gear tooth increases.
Due to a poor-quality belt tension roller or due to its long use, it may jam. Also, do not overtighten the belt. A belt that is too tight begins to whistle and can break very quickly.
During operation, the pump bearings wear out and play appears at the pump shaft, as a result of which the pump drive gear is crooked and the timing belt begins to slip and rub against the protective casing or the block.
When does a timing belt need to be replaced?
The manufacturer has determined the frequency of replacing the camshaft drive belt on the VAZ 2109 every 75 thousand km. However, car owners prefer not to bring the mileage to the specified value, performing repairs after 50-60 thousand km. This is due to the operation of equipment under conditions of temperature changes, as well as due to the unstable quality of components.
To be on the safe side, it is recommended to regularly inspect the condition of the belt. The procedure is carried out annually or after 10-12 thousand kilometers. To carry out inspection, it is necessary to remove the plastic drive cover.
The belt must be replaced in the following cases:
- when abrasions are detected;
- in the presence of tears and delaminations;
- when oiling occurs (it is additionally required to detect and eliminate the source of the engine oil leak).
Recommendations from experts
Experts strongly recommend changing the timing belt along with the tension rollers, because... their resource is not much longer, unlike the belt, and if the rollers are not touched, then in the future this can also have a bad effect on the operation of the entire unit. Also, when replacing the timing kit, we recommend changing the front crankshaft oil seal and camshaft seals; if you do not change them, then after 25-30 thousand km they may leak and then you will again have to pay for the work of specialists in time and amount equal to replacing the timing belt + replacing the seals .
In Moscow, the timing belt can be replaced at the RF-Motors service center.
| Car brands we work with | ||
| Audi timing belt replacement | Hyundai timing belt replacement | Nissan Timing Belt Replacement |
| Replacing a Bentley timing belt | Replacing the Infiniti timing belt | Replacing the Opel timing belt |
| BMW timing belt replacement | Isuzu timing belt replacement | Peugeot timing belt replacement |
| Chevrolet timing belt replacement | Jaguar timing belt replacement | Porsche timing belt replacement |
| Citroen timing belt replacement | Jeep timing belt replacement | Renault timing belt replacement |
| Daewoo timing belt replacement | Kia timing belt replacement | Replacing the Skoda timing belt |
| Dodge timing belt replacement | Land Rover timing belt replacement | Subaru timing belt replacement |
| Fiat timing belt replacement | Lexus timing belt replacement | Replacing a Suzuki timing belt |
| Ford timing belt replacement | Mazda timing belt replacement | Toyota timing belt replacement |
| Replacing a Honda timing belt | Mercedes-Benz timing belt replacement | Volkswagen timing belt replacement |
| Hummer timing belt replacement | Mitsubishi timing belt replacement | Replacing Volvo timing belt, etc. |
Choosing the right timing belt
Choosing a timing belt, which is the most important element of the engine, is an important and responsible matter. Incorrect selection of a belt according to technical parameters or skimping on quality can lead to serious problems and costly repairs. If the belt breaks or its teeth are critically worn, there is a high probability that the pistons will hit the valves and bend them. Therefore, when choosing a new timing belt, it is important to adhere to the following recommendations:
- Don't save money and don't buy the cheapest belts
(you can choose the average price). You should especially not save money if the car is operated in extremely harsh conditions. A high-quality, reliable belt will pay for itself many times over.
- The best option is to buy the original, which was installed by the engine manufacturer.
For greater reliability when choosing, in order to avoid mistakes in the size and shape of the teeth, it is better to remove the old belt and show it to the seller in the store so that he can select the same one. Particular attention should be paid to the width, length and shape of the belt teeth. If it is not possible to buy the original, select an analogue that is closest in quality and parameters to the original.
- The belt should feel smooth and free of roughness to the touch.
, and also should not have small potholes or pores. The belt teeth must be free of sagging, only small burrs are acceptable.
- An important property of the timing belt is its elasticity
. The more elastic it is, the longer its service life will be. When purchasing, you can compare the elasticity of several different belts and determine which one is the most “oaky” (hard).
- If possible, compare the catalog or article number of the old belt with the numbers on the new product
. They should be on the back (smooth) side of the belt.
- A large number of fakes are sold on the automotive spare parts market.
. To protect yourself from purchasing a low-quality part, it is better to buy a belt at retail outlets owned by official dealers. It is also recommended to purchase a complete set: a belt with rollers in one sealed package, with instructions. The most frequently counterfeited products are those from Gates. To check, you can compare the numbers (on the back) of several identical products - the numbers should be different. If the numbers on all products are the same, then you are dealing with a fake.
- Online shopping is common today, but making the right choice of timing belt via the Internet is very difficult
.
How to choose the right timing belt, which brand is better, what are the prices on the market?
On the one hand, the timing belt is a simple thing, so it won’t create any special problems when choosing. On the other hand, each engine model has its own, correct one, with special technical characteristics.
Therefore there are three options:
- Select by VIN code or technical data of the car. This is the most accurate method that all specialists use. It is especially relevant if you need not only a belt, but also the entire replacement kit.
- Select according to certain characteristics. That is, knowing the width and number of teeth, choose exactly the same one.
- Knowing the individual number (the one indicated by the manufacturer), choose the same one or an analogue (catalogues of analogues are available in any online store).
All three methods have the right to exist, but specialists mainly use the first and third, and ask for technical specifications only for verification.
In terms of brands, there are three categories of recommended brands:
- OEM, that is, belts with the brand of the automaker. This is an ideal, albeit the most expensive option, since their quality is almost the same as that of the factory ones. It runs quite well throughout the entire regulatory period and presents almost no unpleasant surprises (almost - because a defect can slip through even two or three stages of quality control, nothing can be done about it). OEM prices go up to $200 (per belt, not per set), but this is perhaps an extreme option. On Lada, for example, branded ones cost from 25 to 100 dollars.
- Premium brands are manufacturers who make spare parts to order from automobile concerns (that is, they produce OEM products) and release them under their own brand. The quality is high, reliability too, prices are lower than the original, but not by much. These are, for example, Contitech, Lemforder, Gates. Prices start from 10 and go up to the same 200 dollars.
- Mass market brands are those manufacturers that are in greatest demand. Prices are usually average, but the quality is quite decent. For example, the most popular brands among buyers are Bosch, Dayco, SKF and Blue Print, prices for which start from 5 and end at 100 dollars.
Do the rollers need to be changed at the same time as the belt? After all, the difference in price between a separate timing belt and a complete set is very, very noticeable, so is it worth the expense?
The answer to this question is very simple - the more fuss with replacement, the more arguments there are for replacing the entire set, including the water pump. The rollers wear out and begin to vibrate, this vibration shortens the service life of the belt itself. Even if you don’t change it yourself, but go to a service station, it’s still better to pay once for the work than twice with a short interval.
However, if the belt is replaced for any reason long before the end of its standard service life (for example, it was incorrectly installed and frayed, or was initially of very poor quality and quickly cracked), then it may be enough to replace only it, and not the whole set.
Removing the old timing belt
To remove the old belt, do the following:
- Unscrew the spark plugs. This will make it easier for you to remove the old belt.
- Rotate the shaft by the pulley bolt and mark the material. Experts advise turning the shaft several times to make sure that you are doing everything correctly. Accuracy will allow you to set the phases correctly.
- Mark with a marker the general position of the belt on all gears. This mark can be placed on the belt and other parts.
- Unscrew the nut connecting the tensioner pulley with a 17 mm wrench.
- Release the belt tension by turning the roller with a wrench or the pin with pliers.
- Carefully remove the old belt from the engine.
- Take the old part and compare it with the one you bought.
- Remove the tension roller. Many experts recommend changing not only the belt, but also the assembly along with it. In this case, it does not matter what state the node is in.
How to choose quality parts
Buy a camshaft from a reliable and time-tested company, for example, PJSC Avtovaz. The packaging has a seal with a hologram. It shimmers in the light and features the company's logo. There is also a sticker with a barcode on the box. The item is packaged in blue translucent film. There is a stamp from the Quality Control department inside the package. Buy rockers together with adjusting bolts. There are new and old style levers. The holes in them differ in diameter and number of cuts. If you buy rockers and bolts separately, chances are they won't fit together.
Read, it may come in handy: The oil filter has a flaw
Timing marks VAZ 2109
In order for the engine to start after replacing the belt, it is necessary to install marks on the flywheel . What to do if you find a roller malfunction? In this case, it is better to replace it with another one as soon as possible. Despite the fact that it is wiser to do this in any case, so that there are no problems with the presence of a belt. If you can’t do this, try this: the nut that holds the roller is lowered using a 17mm wrench. We find a mark on the primary camshaft sprocket and connect it to the mark at the top.
How to set timing marks on a VAZ 2109? To connect the marks , remove the screw holding the camshaft sprocket, attach the marks to the crankshaft belt, and then secure it again.
Now you need to align the marks on the VAZ . To do this, locate the small elongated recess and point on the gear drive shaft. We put a drive wheel on the material for transmission. Afterwards, rotate your hands until the wheel hits all the VAZ 2108 timing marks . This is not difficult to do. The arm strength is enough to turn the pulley.
Occasionally the marks on the drive rod are not visible. After attaching the marks to the camshaft, make sure that all marks on the flywheel and housing are aligned. To do this, you must first remove the plug, after which the timing marks 2108 will become visible. If the VAZ timing marks do not match, then after replacing the crankshaft belt the engine will not rotate. Even if it starts, it will work unstable and chaotically. Therefore, try to approach this stage as responsibly as possible. Setting the marks is important for successful repair and subsequent operation of the machine.
About the VAZ 21099 car
The VAZ 21099 (Sputnik or Samara Forma) was the latest model of the plant of the well-known “ninth” Samara family. It was a nine that had been produced for a long time, only with a removed luggage compartment. Because of this, its length increased by 200 mm. In addition, the radiator grille, front fenders, and hood received changes. The dashboard, which drivers called “high,” received a tachometer. Before the plant began production of the tenth VAZ family, it remained the most popular domestic car for that time.
VAZ 21099
The VAZ 21099 car was equipped with an 8-valve power unit with a displacement of 1500 cm3, but some of them could have engines with a displacement of 1300 cm3. At first, the power system was with a carburetor, and later the plant switched to an injector. The timing mechanism drive for both types of engines was belt driven. The design of the 1.5-liter engine pistons was such that the possibility of the piston meeting the valves after belt damage was virtually eliminated. The use of such a drive scheme made it possible to reduce the weight of the engine.
This innovation simplified the replacement of a VAZ 21099 with an injector and a toothed belt carburetor. For correct installation of valve timing, special timing marks are provided on the rear bracket for plastic protection of the timing drive, as well as on the cylinder block in the area of the pulley on the engine crankshaft.
Timing diagram
The gas distribution mechanism is designed in such a way that the valve stem is acted upon by the camshaft cam; there are no valve drive levers in this arrangement. The thermal gap is set on a cold engine by installing adjusting washers, which are selected to the required thickness.
The design of the timing mechanism drive for cars with an injector does not differ from cars with a carburetor in the power system.
Particular attention to the condition of the timing mechanism parts should be paid to engines with a displacement of 1300 cm3. If the belt breaks in such an engine, the valves meet the pistons, which will cause an expensive overhaul of the power unit. Check the condition of the mechanism parts more often. Rotate the pulleys and inspect the condition of the belt teeth. This will avoid negative consequences during operation of the machine.
Replacing a belt with an injection engine
The timing belt is installed only on one engine of the “nine” type - the cylinder volume is 2 liters. Using the fuel injection system did not adjust the camshaft drive chain. The procedure for replacing a part with an injection engine is very similar to the replacement process for a carburetor car engine.
The difference lies in several factors. You will need to do the following:
- Remove the crankshaft position sensor located next to the pulley from the engine. During disassembly, remove the plug from the socket, and then loosen the sensor mounting bolt. Then remove the sensor from the hole.
- To loosen the nut, unscrew the M13 nut located on the generator.
There are also some differences when reassembling:
- The drive wheel for transmission must be set as level as possible. To do this, it is necessary to install the upper mark of the first cylinder on the flywheel and metal housing.
- In this case, the nameplate of the gear must exactly match the gap on the nameplate. The installed drive wheel must be in front of the sensor.
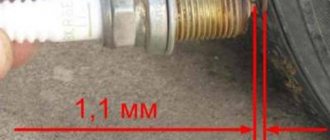
- Pay attention to the gap. The gap between the parts should be no more than one millimeter.
- Once assembly is complete, start and test the engine.
Dismantling
To correctly replace the timing belt, you first need to dismantle the element. The process can take quite a lot of time, although the work itself is not very difficult.
- Remove the casing covering the belt, pulleys, dismantle the tension roller and other elements related to the gas distribution mechanism.
- The cover is held in place by three mounting bolts, so removal should not be a problem.
- Remove the alternator belt. This will give you access to the desired object - the timing belt. To do this, lower the retaining bolt down a little and move the generator towards the engine. This will loosen the belt, making it easy to remove.
- Align the gas distribution mechanism to the marks. First you need to install the crankshaft in the required position. This is done by turning it and looking through the hatch on the clutch housing.
- Stop rotating as soon as the mark on the crankshaft flywheel aligns with the marks on the housing. This indicates that the piston of the first cylinder is at TDC - top dead center.
- Make sure that the mark on the camshaft gear is aligned with the mark on the metal housing.
- Having set the marks, you can begin the procedure of dismantling the old worn timing belt.
- Release and move the tension roller to the side. This will release the tension on the strap. As a result, it can be removed from its position.
- Next you need to remove the belt from the crankshaft gear. To do this, the pulley is first removed.
- There should be no problems with dismantling the pulley, since it is removed this way. First remove the right wheel, turn the steering wheel to the right and you will gain access to the side shield. The shield is removed, and behind it is the crankshaft pulley. Relevant for carburetors and injectors.
- If your VAZ 2109 has an injection engine, you will need to fix the crankshaft to remove the pulley. It is not difficult to do such a procedure. Insert a long screwdriver into the special hatch where the flywheel mark is located. This will lock the crankshaft in the required position, so you can easily unscrew your pulley.
- On a carburetor VAZ 2109, fixation should be performed directly on the pulley.
- Before you begin removing the timing belt, examine the condition of the water pump and tension pulley. You should also check whether the axis of the tension roller and timing gear are in good condition.
- If there is damage, defective elements must be replaced.
- Check the current condition of the camshaft and crankshaft seals.
Crack on the strap
Experts agree that when replacing the timing belt, the rollers and pump should also be replaced. But this is a recommendation, not a requirement.
Replacing the roller
Replacing rollers or other drive belt parts is very easy to do. The work does not require the use of special tools. Follow the step by step instructions:
- Remove the terminal from the battery to disconnect the vehicle from power.
- To prevent accidental rotation of the crankshaft, use installation tools.
- We unscrew the bolt that changes the tension, loosen and remove the belt.
- Remove the part (if there is a fastener, unscrew it).
- Replace damaged parts and fold the mechanism in reverse order.
Installing a new timing belt
The crucial moment has arrived. If the camshaft and crankshaft markings match, a new timing belt must be installed. If there are markings or writing on the belt, they should be in a clockwise direction, and if they are attached to a belt, the hand should be oriented as well. Before doing this, remove the old belt. If it is intact, check it. If you see that it is cracked, it is dangerous to carry out replacement work.
The belt is first installed on the crankshaft gear and then, with a little force, installed on the camshaft sprocket. When installing, wind the drive sprocket and tighten the roller with a saw.
Checking the timing belt tension is done by adjusting the tension roller.
But, there is an easier way to install a new belt. To install a new belt, follow these steps:
- Install the new tensioner in the desired position.
- Move the belt through the gears. If it is necessary to change the position, this can be done by turning the drive shaft clockwise.
- Rotate the roller until the belt is properly tensioned.
- Tighten the roller.
Final installation
It's time to install a new belt.
- First we pass it under the crankshaft gear.
- Then we put the timing belt on the camshaft gear.
- Then we touch it by the toothed pulley of the water pump and pass it to the right of the roller.
- We fasten the crankshaft pulley.
- We put on the generator belt and tighten it.
- Tighten the roller nut, thereby adjusting the tension of the timing belt.
It is important not to turn the camshaft and crankshaft until the belt is installed. There is a special key to tighten the roller. If you don't have one, you can insert 2 screws of the appropriate diameter into the small holes on the face of the roller and use a screwdriver to secure it while tightening.
The correct belt tension can be determined by trying to rotate it 90 degrees on the side opposite the pump pulley. If after applying some force it turns, then everything is correct. If it does not turn or turns more than 90 degrees, then the tension needs to be adjusted again.
Now all that remains is to turn the crankshaft by its pulley several times to make sure that all the marks match. And if this is the case, then screw the side shield, protective cover and wheel into their proper places. And if the marks do not match, you need to remove the belt and adjust everything again.
This completes the replacement of the timing belt on the VAZ 21099.
Source
Why does the belt break?
Make sure that the belt is installed straight. Due to distortions, the belt is prematurely damaged and breaks. One of the reasons may be bearing failure. If a breakdown is detected, the bearings must be replaced, as there is a risk of coolant leakage and belt breakage.
How to tighten the timing belt of a VAZ 2109
To tighten the belt securely, turn the tension roller using a wrench. When the belt is installed correctly, the branch should rotate ninety degrees.
If you overtighten the belt, you will find overload on the bearings and other parts. Too much pressure is harmful to the belt, which may break during physical activity.
It is very important to know and understand!
In conclusion, it is worth saying that a timing belt break leads to a major overhaul of the entire engine. Because this is where the valves and pistons hit, and they begin to bend. That is why you should check the part at a certain interval of time in order to immediately identify defects and malfunctions; if they exist, immediately replace the timing belt itself and all components, do not wait until something irreparable happens. And also correctly set all the marks on the VAZ 2109 timing belt, and carry out the tension correctly. In another case, it can scroll, and if it is too tight, it will easily break off, while having a strong impact on the rest of the engine. Even a novice driver can perform all the work presented; the main thing is to study everything carefully and set the marks correctly so that there is no malfunction of the gas distribution mechanism. After all, the good operation of the car engine will depend on this.
How to set the timing belt on a VAZ 2109 video
After this, the protective timing belt is installed, for which it must be installed on the seat and the three bolts must be tightened again. Reinstall the air intake and secure it with the clamp. The metal and plastic guards are installed in place, the wheels are removed, and the vehicle is lifted off the jack. Then you can start the engine. It will start without problems, and its operation should be stable, without differences or insignificant sounds. This is only possible if all symbols match and the seat belt is tightened with sufficient force.
Experience shows that replacing VAZ 21099 and 2109 timing belts can be done independently, without the need for professional personnel at a service station, especially if it is a planned replacement and the belt is intact before replacement. You don't need any special tools, you just need a socket set with a door and keys, and a regular flathead screwdriver can do the job on its own.
If you are a beginner, replacing a VAZ timing belt can be a daunting task. We suggest watching a short video that explains in detail how to install the timing belt on a VAZ 2109.
Why did you put the belt on the marks but the engine does not develop power?
Such cases are frequent; if you make a mistake by one tooth, the engine will not develop full power. For example, we have jumped a tooth ahead, the engine starts, you give the gas and it barely spins up, but as soon as you turn the distributor towards the plus side, the engine begins to develop power. But according to normal, the distributor should be in the center according to the marks on the distributor, with a slight deviation either plus or minus; this depends on the ignition setting; if the distributor has to be moved to the very edge, then this is a sign that a mistake was made when installing the timing belt.
If you made a mistake back a tooth, the engine will start very slowly, it will feel like it is biting, and detonation will also appear when you press the gas (ringing in the engine).
The question arises why this happens, you look at the marks, everything is correct, but the engine is not working correctly, the whole point is that the mark on the tin boot along which the camshaft gear is aligned can be slightly bent both down and up, this is why errors occur.
Photo. Distributor marks with a correctly installed timing belt.
The main thing is that when the belt is replaced and installed correctly, the ignition does not go astray, but this is understandable for carburetor engines with a distributor.
It’s simply impossible to determine this on the injector, since the computer itself adjusts the ignition, but if you feel that the engine is running worse or a malfunction has come on on the panel, try moving the belt to one tooth.