The parts that are responsible for opening and closing the engine valve are installed along with the drive belt. The belt is often subject to wear and tear and is quickly used up. change the VAZ 2109 timing belt yourself, without turning to specialists for help. In this article we have collected complete information. You will soon see that replacing the VAZ 2109 timing belt is simple and does not require special skills. Enjoy reading.
The engine GMZ controls the valves and cylinders. This set of parts begins to work using a belt. According to the standards, replacement of the timing belt and shaft belt in the VAZ 2109 and VAZ 21099 is carried out every 40-50 thousand km. Experts say: “If you have time to replace the belt, the driver will reduce the likelihood of cracks and breakage.”
Many car owners turn to specialists for help. But, as practice shows, it is quite possible to replace the belt on a VAZ 2109 yourself. Replacing the VAZ timing belt will not take you much time. Just follow the instructions.
Preparing to replace the belt
Replacing the crankshaft belt requires some preliminary work. To do this, lift the hood and remove a small section of the air duct pipe, loosening the fastening elements with a wrench. Then the protective front part of the belt guard . Before doing this, you need to loosen the three mounting screws. You can use a regular open-end wrench.
The front right wheel is removed in advance to gain access to the crankshaft. In the car, put the switch in the fourth position and ask an assistant to hold the brake pedal. Now install the 19mm socket on the long wrench. After the screw is unscrewed, you can put the gear in neutral and release the brake pedal.
When to change timing belt
As practice shows, the frequency of replacing a belt on a VAZ 2109 should be every 80 thousand km. But, most vehicle owners prefer not to bring the belt to the specified value, and change the timing belt after 45,000-50,000 km. The reason for replacement may be related to the operation of the equipment in different temperature conditions, as well as the unstable behavior of parts.
To avoid breakdowns, it is recommended to assess the condition of the belt. This assessment is carried out annually or every 8-15 thousand kilometers. To complete the inspection, it is important to remove the plastic front drive unit.
The belt should be replaced in the following cases:
- when scratches are detected;
- tears appeared on the belt or it began to delaminate;
- Oil began to appear on the belt (it is necessary to identify and eliminate the sources of engine oil spills).
Tools and materials
Before you start replacing parts, you should do a lot of preparation. First things first, prepare your tools and materials:
- a set of wrenches or sockets (sizes 8, 10, 17 and 19 mm);
- a screwdriver with a thick tip;
- rotary wrench for tension roller (industrial or handmade);
- tool for replacing spark plugs;
- marker for making marks on parts;
- cloth for cleaning the lid;
- new belt;
- video clip.
If you don't have a wrench, you can install the roller using two suitable pins and pliers. The pins are inserted into the holes and rotated with pliers.
Belt selection
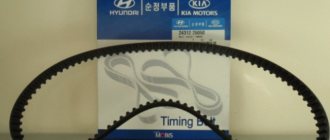
When purchasing a timing belt for a VAZ 21099, it is important to focus on the manufacturer. According to customer reviews, products from Gates and Contitech factories have an ideal balance between quality and value. Many experts recommend installing a Gates tension pulley. The part has high build quality and can last for many years.
Replacing the timing belt VAZ 2109 1.5 liter 8 valves with photos and videos
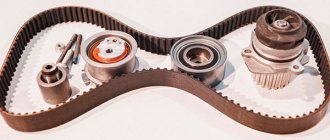
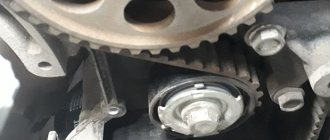
Old VAZ 2109 with a 1.5 8 valve engine, timing belt replacement. In general, it could be a VAZ 2114 or 2110, there is no difference in operation, the eight-valve engine is the same everywhere. Together with the belt, we will change the pump, the tension roller and two pulleys, the camshaft and the crankshaft. If the timing belt breaks, the valves on this engine do not bend, but it is better not to let it get to that point. Changing the pump and roller is a prerequisite so that after a thousand kilometers you don’t have to disassemble everything again. But it’s up to you to decide for the pulley, the price is 150 rubles per pair. There were cars where a slightly bent pulley caused the belt to slip and gradually wear out, reducing its service life. On this car the belt was worn down in half.
We recommend that you periodically check the condition of the belt to avoid annoying consequences and not have to look for someone to take it to a repair shop. Replace every 40,000 kilometers.
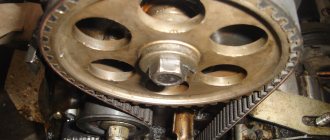
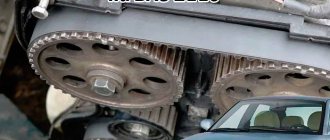
And here is the patient himself.
To replace it, we need a key for the tension roller, the price is half a hundred rubles. You can buy it at any auto store. As well as a set of keys and sockets and two hours of free time.
Begin
Everything we need.
We unscrew the three ten bolts securing the protective timing cover and remove it.
Next, loosen the nut thirteen that secure the generator and unscrew the tension bolt ten.
We take the generator to the engine and remove the belt.
Remove the engine protection and drain the antifreeze. We set the camshaft mark by turning the crankshaft clockwise. The ebb on the pulley should be opposite the bend of the protective cover fastening.
Unscrew the crankshaft pulley mounting bolt. We put the assistant in the cabin and force him to engage fifth gear and press the brake. And at this time we easily and naturally unscrew the bolt using a 19 meter head and a pipe of one and a half meters. It must be screwed properly, and some craftsmen lubricate it with sealant and then wait for kind words addressed to them.
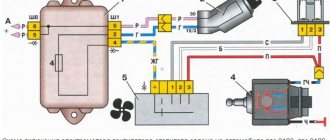
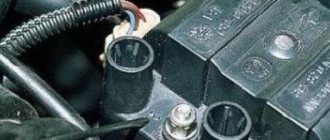
On the left side we see the crankshaft position sensor. We will need it to subsequently check the correct installation of the timing belt. We remove the crankshaft pulley and see that the marks match.
Unscrew the nut on the tension roller 17 and remove it along with the belt. Then unscrew the camshaft pulley bolt and remove the last one. Be careful not to lose the key. We unscrew everything that secures the protective metal shield, namely one ten-point nut and a bolt securing the cover, three bolts securing the pump.
Remove the protective cover and pump. Antifreeze remaining in the block may leak out if you have not drained it. Carefully, it's sweet.
We clean all the parts from oil and belt residues, as well as the pump seat from the old gasket and sealant.
Lubricate the gasket of the new pump with sealant and put it in place. We install the metal protection and tighten all the bolts and nuts securing it. We tighten the pump bolts evenly in a circle, then check whether the pump is spinning. Recently a client brought in an original pump, which turned out to have slightly larger petals and after installation it began to bite. I had to modify it with a grinder and take measurements several times. These are the spare parts we have.
We check if the key is lost on the camshaft and install the pulley. We tighten its bolt to seventeen.
Now comes the fun part - installing a new belt.
We check that all marks match. We first place the belt on the crankshaft and pump. Then we tighten the right descending branch of the belt and put it on the camshaft pulley and tension roller. We check all the marks again and tighten the belt with a roller. The tension is considered sufficient if, with the force of two fingers, you can twist the longest branch of the belt by a maximum of 90 degrees. It’s easier to take the right branch of the belt with two fingers and twist it, if more than 90 is not very bad, but less is very bad. An overtightened belt will wear out quickly and will also reduce the life of the pump.
We place the bottom protective plastic cover. And on the crankshaft pulley we mark the twentieth tooth after skipping two teeth. We count counterclockwise.
This mark corresponds to the top dead center of the first cylinder. We put the pulley in place and the mark should be against the crankshaft position sensor. More precisely, against the small iron core of the sensor. Sometimes it gets into the gap between the teeth, this is considered acceptable. We tighten the pulley in the same way as we unscrewed it, with the help of a partner.
We turn the crankshaft two turns and check the marks; this is where our mark on the pulley comes in handy.
If everything is in trouble, we collect everything that we took apart. As they say in smart books, install the parts in the reverse order of removal. Don't forget to add antifreeze.
We start the car, accept congratulations from family and friends and head off to adventure.
Removing the old timing belt
To remove the old belt, do the following:
- Unscrew the spark plugs. This will make it easier for you to remove the old belt.
- Rotate the shaft by the pulley bolt and mark the material. Experts advise turning the shaft several times to make sure that you are doing everything correctly. Accuracy will allow you to set the phases correctly.
- Mark with a marker the general position of the belt on all gears. This mark can be placed on the belt and other parts.
- Unscrew the nut connecting the tensioner pulley with a 17 mm wrench.
- Release the belt tension by turning the roller with a wrench or the pin with pliers.
- Carefully remove the old belt from the engine.
- Take the old part and compare it with the one you bought.
- Remove the tension roller. Many experts recommend changing not only the belt, but also the assembly along with it. In this case, it does not matter what state the node is in.
Timing marks VAZ 2109
In order for the engine to start after replacing the belt, it is necessary to install marks on the flywheel . What to do if you find a roller malfunction? In this case, it is better to replace it with another one as soon as possible. Despite the fact that it is wiser to do this in any case, so that there are no problems with the presence of a belt. If you can’t do this, try this: the nut that holds the roller is lowered using a 17mm wrench. We find a mark on the primary camshaft sprocket and connect it to the mark at the top.
How to set timing marks on a VAZ 2109? To connect the marks , remove the screw holding the camshaft sprocket, attach the marks to the crankshaft belt, and then secure it again.
Now you need to align the marks on the VAZ . To do this, locate the small elongated recess and point on the gear drive shaft. We put a drive wheel on the material for transmission. Afterwards, rotate your hands until the wheel hits all the VAZ 2108 timing marks . This is not difficult to do. The arm strength is enough to turn the pulley.
Occasionally the marks on the drive rod are not visible. After attaching the marks to the camshaft, make sure that all marks on the flywheel and housing are aligned. To do this, you must first remove the plug, after which the timing marks 2108 will become visible. If the VAZ timing marks do not match, then after replacing the crankshaft belt the engine will not rotate. Even if it starts, it will work unstable and chaotically. Therefore, try to approach this stage as responsibly as possible. Setting the marks is important for successful repair and subsequent operation of the machine.
Timing marks (gas distribution mechanism) of engine 21083 (2108, 21081)
The engines of VAZ 2108, 2109, 21099 cars and their modifications in the timing drive have three pairs of installation marks.
When they are combined, the camshaft and crankshaft are in a position in which the pistons of the first and fourth cylinders of the engine are at top dead center.
It is necessary to set the timing drive marks when replacing the timing belt, when setting the ignition timing, when checking and adjusting thermal valve clearances, repairing the engine and replacing its parts, etc.
Timing drive timing marks for engines 21083, 21081, 2108 of VAZ 2108, 2109, 21099 cars
Mark on the camshaft pulley and mark-protrusion on the rear timing cover
Mark on the crankshaft pulley (“sprocket”) and the ebb of the engine oil pump housing cover
A number of engines of VAZ 2108, 2109, 21099 cars have an oil pump without an installation mark on the body. In this case, when setting the timing drive marks, we focus on the marks in the clutch hatch and the camshaft pulley.
Mark on the flywheel and mark-triangular cutout of the ignition timing scale
The mark on the flywheel is a long, shallow cross mark. If there is dirt on the flywheel, it may not be visible. To detect it, you need to gradually turn the flywheel and wipe its surface with a rag soaked in solvent.
Diagram: timing marks for VAZ 2108, 2109, 21099 vehicles with engines 21083, 21081, 2108
Notes and additions
— To access the timing marks on the camshaft pulley and the rear timing cover, it is necessary to remove the outer cover of the car engine timing drive. We align the marks by rotating the crankshaft by the ratchet bolt with a “19” wrench or a large slotted screwdriver by the flywheel teeth in the clutch housing hatch clockwise. It is not recommended to turn the camshaft pulley mounting bolt with a wrench.
— To access the installation marks on the crankshaft pulley and the oil pump housing, it is necessary to jack up the car and remove the wheel from the timing drive side. Then loosen the generator, move it towards the engine (or loosen the tensioner nut, if equipped) and remove the drive belt. Next, use a key set to “19” to unscrew the crankshaft ratchet bolt (in this case, the flywheel is fixed in the clutch housing hatch by the teeth with a slotted screwdriver). We remove the generator drive pulley and screw the ratchet bolt back (you can use it to rotate the entire timing drive).
— To access the installation marks on the flywheel and the ignition timing scale on VAZ 2108, 2109, 21099 vehicles, there is a hatch in the clutch housing closed with a rubber cover. It is located under the thermostat. The flywheel in the hatch can be rotated using a large slotted screwdriver using the teeth of the flywheel crown.
Source
Replacing a belt with an injection engine
The timing belt is installed only on one engine of the “nine” type - the cylinder volume is 2 liters. Using the fuel injection system did not adjust the camshaft drive chain. The procedure for replacing a part with an injection engine is very similar to the replacement process for a carburetor car engine.
The difference lies in several factors. You will need to do the following:
- Remove the crankshaft position sensor located next to the pulley from the engine. During disassembly, remove the plug from the socket, and then loosen the sensor mounting bolt. Then remove the sensor from the hole.
- To loosen the nut, unscrew the M13 nut located on the generator.
There are also some differences when reassembling:
- The drive wheel for transmission must be set as level as possible. To do this, it is necessary to install the upper mark of the first cylinder on the flywheel and metal housing.
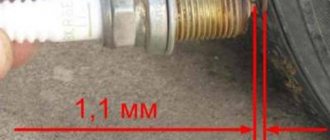
- In this case, the nameplate of the gear must exactly match the gap on the nameplate. The installed drive wheel must be in front of the sensor.
- Pay attention to the gap. The gap between the parts should be no more than one millimeter.
- Once assembly is complete, start and test the engine.
Drive and adjustment of timing belt tension of the VAZ 21083, VAZ-2111 engine
Timing camshaft drive of VAZ 21083, VAZ-2111 engine
The camshaft is cast iron, five-bearing. The working surfaces of the cams and the surface under the oil seal are whitened to increase wear resistance. To prevent axial movement of the camshaft, a flange is provided on its rear side, which is fixed between the cylinder head (with bearing housing) and a plug installed on the rear side of the cylinder head.
Rice. 2.62. Camshaft drive diagram: 1 – crankshaft toothed pulley; 2 – toothed pulley of the coolant pump; 3 – tension roller; 4 – rear protective cover; 5 – camshaft toothed pulley; 6 – toothed belt; 7 – tension roller axis; A - installation ledge on the rear protective cover; B - mark on the camshaft pulley; C - mark on the oil pump cover; D — mark on the crankshaft pulley The camshaft is driven by a toothed belt 6 from a toothed pulley 1 mounted on the crankshaft. The same belt also drives pulley 2 of the coolant pump. Roller 3 is used for...
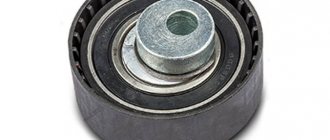
Replacing the roller
Replacing rollers or other drive belt parts is very easy to do. The work does not require the use of special tools. Follow the step by step instructions:
- Remove the terminal from the battery to disconnect the vehicle from power.
- To prevent accidental rotation of the crankshaft, use installation tools.
- We unscrew the bolt that changes the tension, loosen and remove the belt.
- Remove the part (if there is a fastener, unscrew it).
- Replace damaged parts and fold the mechanism in reverse order.
Replacement features
The operation is not a complicated process, but requires care and concentration, since mistakes can lead to a major overhaul of the power unit. The car is placed on a level area. Wheel chocks should be installed under the wheels to prevent the machine from rolling away.
Replacing the timing belt on a VAZ 2108 engine is done as follows:
- It is necessary to remove the drive protection and the generator drive belt from the crankshaft pulley.
- You should unscrew the pulley bolt, remove it and return the bolt.
- It is necessary to remove the rubber plug from the clutch housing hatch. Next, rotate the crankshaft until the mark on the crankshaft flywheel aligns.
- The matching of the installation marks is checked.
- Loosen the tension roller fastenings and remove the timing belt in the following sequence: From the camshaft pulley.
- From the video.
- From the pump pulley.
- From the crankshaft pulley.
Note! When the timing belt is removed, do not rotate the crankshaft, because This can lead to bent valves and costly engine repairs.
Installing a new timing belt
The crucial moment has arrived. If the camshaft and crankshaft markings match, a new timing belt must be installed. If there are markings or writing on the belt, they should be in a clockwise direction, and if they are attached to a belt, the hand should be oriented as well. Before doing this, remove the old belt. If it is intact, check it. If you see that it is cracked, it is dangerous to carry out replacement work.
The belt is first installed on the crankshaft gear and then, with a little force, installed on the camshaft sprocket. When installing, wind the drive sprocket and tighten the roller with a saw.
Checking the timing belt tension is done by adjusting the tension roller.
But, there is an easier way to install a new belt. To install a new belt, follow these steps:
- Install the new tensioner in the desired position.
- Move the belt through the gears. If it is necessary to change the position, this can be done by turning the drive shaft clockwise.
- Rotate the roller until the belt is properly tensioned.
- Tighten the roller.
Engine characteristics
Throughout the entire production period, these models were equipped with V8 power units of various modifications. They differed in their working volume, which varied by installing pistons of different diameters and a crankshaft with a reduced piston stroke. Later they began to install VAZ-2111-80 and VAZ-11183-20 engines with an injector in the power system. The first of them had a working volume of 1500 cm3, and the second was already 1600 cm3.
Replacing the timing belt on the 2108 engine, performed efficiently and in a timely manner, ensures a long period of operation of the engine. The engines are equipped with pistons with a working diameter of 76 mm; for engines with a volume of 1.5 or 1.6 liters, their diameter is increased to 82 mm, which have a recess for the valve heads. The piston stroke in the engine is 71 mm; for engines with a displacement of 1100 cm3 it was reduced to 66 mm. Replacing the timing belt on a VAZ 2108 can be done earlier than the factory recommendations if the operating rules of the power unit are not followed.
Owners of VAZ 2108, 2109 should be aware that untimely replacement of the timing belt can lead to its breakage, and this causes damage to the valves in the cylinder head of the power unit.
VAZ 21083 or VAZ 21093 engines do not have this drawback. In the event that the timing belt on these engines breaks, the valves do not meet the pistons, since the pistons have special recesses. To replace the timing belt, simply align the marks and install a new product.
Why does the belt break?
Make sure that the belt is installed straight. Due to distortions, the belt is prematurely damaged and breaks. One of the reasons may be bearing failure. If a breakdown is detected, the bearings must be replaced, as there is a risk of coolant leakage and belt breakage.
How to tighten the timing belt of a VAZ 2109
To tighten the belt securely, turn the tension roller using a wrench. When the belt is installed correctly, the branch should rotate ninety degrees.
If you overtighten the belt, you will find overload on the bearings and other parts. Too much pressure is harmful to the belt, which may break during physical activity.
It is very important to know and understand!
In conclusion, it is worth saying that a timing belt break leads to a major overhaul of the entire engine.
Because this is where the valves and pistons hit, and they begin to bend. That is why you should check the part at a certain interval of time in order to immediately identify defects and malfunctions; if they exist, immediately replace the timing belt itself and all components, do not wait until something irreparable happens. And also correctly set all the marks on the VAZ 2109 timing belt, and carry out the tension correctly. In another case, it can scroll, and if it is too tight, it will easily break off, while having a strong impact on the rest of the engine. Even a novice driver can perform all the work presented; the main thing is to study everything carefully and set the marks correctly so that there is no malfunction of the gas distribution mechanism. After all, the good operation of the car engine will depend on this. Source
How to set the timing belt on a VAZ 2109 video
After this, the protective timing belt is installed, for which it must be installed on the seat and the three bolts must be tightened again. Reinstall the air intake and secure it with the clamp. The metal and plastic guards are installed in place, the wheels are removed, and the vehicle is lifted off the jack. Then you can start the engine. It will start without problems, and its operation should be stable, without differences or insignificant sounds. This is only possible if all symbols match and the seat belt is tightened with sufficient force.
Experience shows that replacing VAZ 21099 and 2109 timing belts can be done independently, without the need for professional personnel at a service station, especially if it is a planned replacement and the belt is intact before replacement. You don't need any special tools, you just need a socket set with a door and keys, and a regular flathead screwdriver can do the job on its own.
If you are a beginner, replacing a VAZ timing belt can be a daunting task. We suggest watching a short video that explains in detail how to install the timing belt on a VAZ 2109.
Main stage
- After these steps, you can proceed to the main stage. First of all, you will need to remove the right engine mudguard. Sometimes it is enough to unscrew the two mudguard screws with a wrench to open access to the crankshaft pulley.
- The next step is to remove the alternator belt. To do this, you will need to unscrew the nut of the lower mounting bolt. Then you need to move the generator towards the engine and remove the belt itself.
- The third step is to remove the protective cover. The work is done using a key. The cover is secured with three bolts that will need to be unscrewed.
When the above work is completed, it will be possible to make a replacement. For successful work, you will need to align the installation marks of the part elements. If this is not done, all steps will have to be performed again.
As for replacing the timing belt on a VAZ-2108, it is performed as follows:
- Loosen the timing roller mounting nut using a 17 mm wrench. The loosened roller is turned counterclockwise to reduce belt tension.
- Remove the faulty timing belt. To do this, it is shifted from the pulley and removed from the tension roller.
- Install a new part purchased in advance. It is important to ensure that all the necessary marks match, otherwise the process will have to be repeated. After installation, you will need to tighten the belt with a nut.
To properly tension, you need to insert a key into the hole in the tension roller. After this you will need to turn it clockwise. The belt will begin to tighten and it is important to stop the action in time to avoid achieving too much force.
Once the belt is tightened, you will need to check its tension. If all actions are performed correctly, the part will rotate 90 degrees. Otherwise, you will have to loosen the tension until the required value is achieved.
The final steps to replace the belt will be:
- Tightening the tension roller nut.
- Reinstalling the crankshaft pulley.
- Fastening the timing cover.
- Wheel installation.
- Lowering the car from the jack.
- Battery connection.
Only after this will it be possible to start the engine to check the operation of the correct replacement. If the car starts without any problems, then the replacement was successful. If the malfunction does not disappear, it is recommended to seek help from a service station.
To change parts, it is worth considering that they have marks that need to be connected. For example, there may be no identification mark. In this case, for a high-quality connection of the parts, it will be necessary to install the gear shaft pulley in the center of the cut on the lower ebb of the cover.
To avoid frequent replacement of the timing belt in the engine, it is recommended to regularly inspect the vehicle. This way, it will be possible to identify a possible problem in advance and fix it much faster and cheaper.
VAZ 2108 is a car that has gained trust among domestic car enthusiasts. This model is equipped with an engine with a timing belt. If this part wears out, you can replace it yourself, and if necessary, seek the help of professionals at a service station.
In this article I will tell you in detail how to change the timing belt on a VAZ 2108 2109 2113 and 2114 with an eight-valve engine. Whether it is injection or carburetor does not matter. You will also learn about the reasons why the timing belt breaks and about little tricks that make replacing it easier.
On eight-valve VAZ 2109 1.5-liter engines, if the timing belt breaks, nothing bad will happen to the engine except replacing this belt. The valve doesn't bend!