Functions and design of the camshaft
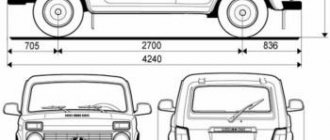
The VAZ 2107 camshaft (injector and carburetor) synchronizes the operation of the intake and exhaust valves with the position of the pistons in the engine cylinders. It opens the exhaust valves to release exhaust gases and the intake valves to fill the combustion chambers with an air-fuel mixture. The “seven” uses an engine layout with an overhead camshaft. This reduces the cost of construction and makes the maintenance process easier. The VAZ 2107 camshaft is connected to the engine crankshaft via a chain driven by a sprocket. As the camshaft rotates, the cams located on it press on the rocker and open (close) the valves at the right moment. The camshaft bearing journals rotate in the bearings of the “bed” installed in the engine head. Lubricant from the oil pump is supplied to them through the oil channels, so the condition of the camshaft affects the pressure in the engine lubrication system.
Camshaft faults
The main reason for checking the condition of the VAZ 2107 camshaft is the appearance of a characteristic knocking sound in the head while the engine is running. There may be several reasons:
- wear of camshaft cams;
- wear of camshaft support bearings or bed journals;
- deformation of the part as a result of overheating;
- the appearance of a crack on the support of the part;
- camshaft fracture;
- lack of oil or low pressure in the engine lubrication system;
- clogged oil channels
- low quality oil.
Summary characteristics of VAZ 2101-2107 and Niva camshafts
Here I will provide a summary table of camshaft . I'll start with the standard and familiar 2101 to purely sports shafts. In general, the characteristics of camshafts are given on the manufacturers’ websites, but for some reason no one wanted to collect all the information together. I will also give a definition of terms related to camshafts. The most frequently mentioned terms are: phase, rise, overlap, and sometimes the base is indicated.
Phase - the duration of the valve position in the open state. It is measured in degrees of rotation angle of the car's crankshaft and shows at what angle the crankshaft will turn during the time the valve is open. Lift is the maximum amount of valve travel. Measured in millimeters. Overlap is a value measured in degrees of crankshaft rotation angle. Makes it clear how long both valves of one cylinder are in the open position. Also, overlap is measured in millimeters. Knowing the amount of overlap in millimeters, you can judge whether the valves will hit the piston because When the valves are in the overlap, the piston moves near top dead center (TDC). The term base usually refers to the diameter of the round section of the camshaft cam. Measured in millimeters. So if the diameter of the round section of the camshaft cam corresponds to the standard one, i.e. 30mm for a classic VAZ engine, then the camshaft is considered full-base, and if it is smaller, it is not full-base. The vast majority of tuning camshafts are incomplete. Also, when selecting and installing a camshaft, you should understand that shafts with a lift of more than 12 mm require valve seats to settle. You can find out more precisely the required amount of valve drawdown on the camshaft manufacturer’s website.
Type Inlet Exhaust overlap base Lift, mm phase, gr. Lift, mm phase, gr.
2101 9.5mm 232gr. 9.5mm 232g 0.5mm 22g 30mm 21213 10.6mm 243.5g. 9.5mm 229g 0.5mm 23.5g. 30mm STI-1 10.7mm 266gr. 10.7mm 266g 1.7mm 48g no info. STI-2 11.2mm 280gr. 11.2mm 280g 2mm 64g. no info STI-3 11.7mm 293gr. 11.5mm 285gr. 2mm 65gr. no info STI-4 12.1mm 309gr. 12mm 301gr. 3mm 81gr. 28.8mm Dynamics 113 11.3mm 244g. 10.2mm 234gr. 1.2mm 36gr. 30mm Dynamics 115 11.5mm 290 gr. 11.5mm 290gr. 2.1mm 78gr. 29.4mm Dynamics 118 11.8mm 260g. 11.3mm 246gr. 1.3mm 39gr. 29.4mm Dynamics 125 12.5mm 322gr. 12.2mm 318gr. 4.5mm 108g 27mm Dynamics 130 13mm 335g. 13mm 335gr. 5.5mm 125gr. 26.6mm Estonian 1 10.5mm 256gr. 10.5mm 256gr. 1.5mm 44gr. no info Estonian 2 11.2mm 289gr. 11.2mm 289gr. 2mm 77gr. no info Engine M12 12.8mm 307gr. 12.2mm 298gr. 2.2mm 83gr. 27.5mm M22 engine 13mm 316gr. 12.4mm 307gr. 3.2mm 97gr. 27mm M32 engine 13.2mm 325gr. 12.7mm 317gr. 4.2mm 112gr. 26.5mm MM M3 13mm 332gr. 12.5mm 332gr. 5.1mm 135gr. no info MM M4 12.5mm 339gr. 12.7mm 322gr. 5.1mm 130g. no info Needs 11.8 11.8mm 296g. 11.8mm 296gr. 3.5mm 84gr. no info
Of course, there are other camshafts in nature, but they are much less common. Also, the names of camshafts may differ in different sources. OKB Dynamics is currently marking its camshafts with a new designation. For example, Dynamics 118 is also Dynamics 51.
Save:
| Updated 03/04/2011 04:37 |
How to remove the camshaft of a VAZ 2107
Replacing the VAZ 2107 camshaft begins with its dismantling. To do this you need to do the following:
- place the car on a level surface;
- wait until the engine cools down;
- clean the engine head cover from dirt;
- remove the air filter, disconnect the cable, tip and rod of the throttle valve drive, remove
- fuel hose from the bracket (on a car with a carburetor engine);
- disconnect the air supply hose, vacuum hose and remove the fuel filter from the bracket (on a car with an injection engine);
- Using a 10mm wrench, unscrew the nuts securing the cylinder head cover;
- remove the washers from the cylinder head cover;
- release the wiring harness, crankcase exhaust and power steering hoses, and the headlight hydraulic adjustment tube from the bracket mounting;
- remove the cylinder head cover from the studs;
- remove the gasket;
- set the camshaft position so that it corresponds to the end of the compression stroke in the fourth cylinder;
- Use a chisel to bend the petal of the camshaft sprocket lock washer;
- engage first gear to prevent crankshaft rotation;
- Using a 17mm wrench, unscrew the camshaft sprocket mounting bolt;
- remove the bolt together with the lock washer;
- Using a 10mm wrench, unscrew the two nuts securing the chain tensioner;
- remove the tensioner;
- tie the chain to the camshaft sprocket with wire so that it does not jump off;
- remove the sprocket and chain, move it forward;
- Using a 13mm wrench, unscrew the nuts securing the camshaft bearing housing (this must be done evenly so that the housing does not “lead”);
- remove the bed along with the camshaft from the studs;
- use a 10 mm wrench to unscrew the two nuts securing the thrust flange;
- remove the flange from the groove in the front journal of the camshaft;
- pull the camshaft out of the bed (bearing housing).
If signs of wear are visible on the camshaft journals or cams, the camshaft needs to be replaced. It also needs to be changed if cracks or deformation appear. Sometimes the cause of a knocking noise may be wear on the camshaft housing bearings. In this case, it is enough to replace only the bed.
How is the price determined?
The cost of the part depends on the design features. A classic type element will be inexpensive. The price increases when the part parameters change. The amount can increase 10 times . It is not recommended to choose based solely on cost. The performance of the spare part is important.
The price increase is facilitated by transportation costs for delivery to the seller, the final buyer. The marketing characteristics of those who are part of the product sales chain can have an impact. These factors are of low quantitative expression.
Installation of camshaft VAZ 2107
The cylinder head camshaft is installed in the reverse order of removal. Before installing the part into the housing, it is necessary to lubricate the support journals with engine oil. When assembling, you should pay attention to two important points:
- correspondence of the marks on the camshaft and on the sprockets of its drive;
- tightening torque of the camshaft housing nuts.
First, you need to properly tighten the camshaft nuts. The nominal tightening torque of the nuts is 2.2 kgf•m. You cannot immediately tighten the fastening to such a torque. The VAZ 2107 camshaft is tightened in three to four stages so that the body is pressed evenly, without distortions. The nuts should be tightened from the center to the edges, in accordance with the “tightening chart” (see figure).
When the camshaft is installed, it is necessary to set its position relative to the crankshaft. There are marks on the camshaft bed, the front engine cover and the crankshaft and camshaft sprockets that should be followed. Even if the drive chain has been securely attached to the sprocket, when installing the camshaft, make sure that its position matches the position of the engine crankshaft. To correctly set the marks on the VAZ 2107 camshaft, you must perform the following steps:
- make sure that the mark on the crankshaft pulley is located opposite the long mark on the front engine cover (this corresponds to the top dead center of the fourth cylinder);
- install the sprocket on the camshaft and make sure that the mark on it matches the mark on the “bed”;
- put the chain on the sprockets without disturbing the position of the shafts;
- make sure that when the chain is tensioned, the marks match;
- tighten the camshaft sprocket bolt;
- turn the crankshaft two turns with the wrench;
- check the alignment of the marks on the camshaft and crankshaft;
- if necessary, change the position of the chain on the camshaft sprocket;
- Tighten the camshaft sprocket bolt and secure the lock washer.
After this, all that remains is to adjust the chain tension using the tensioner and complete the assembly by installing the cylinder head cover and other parts.
Preparatory stage
To set the ignition on a VAZ 2107 , no special conditions are required; the operation can be done both in the garage and on the street, including in winter. For work, prepare the following set of tools:
- flat screwdriver;
- metal probe 0.35 mm thick;
- open-end wrench size 13 mm;
- a car light bulb designed for a voltage of 12 V with wires soldered to it;
- a wrench with a long handle designed to turn the crankshaft;
- key for unscrewing spark plugs.
Note. Instead of a special key to rotate the crankshaft, you can use a regular open-end wrench measuring 36 mm. If you don’t have such a key, then you will have to set the marks in the old proven way: by engaging 4th gear and raising the rear wheel, turn it manually, thereby turning the crankshaft.
Ideally, it is better to have in your arsenal a device for setting the ignition on a running engine - a strobe light. It is equipped with a lamp that flashes simultaneously with the moment of spark formation in the cylinder, which allows you to see the position of the notch on the crankshaft pulley at idle speed and clearly adjust the advance angle.
Important point. The ignition is set in order to ensure that the spark appears in a timely manner and the engine starts, after which additional adjustments will be required. But the latter will not bring you the desired result when there is no compression in the cylinders or problems with the carburetor make themselves felt. If these faults are not eliminated, the engine operation will remain unstable, no matter how you configure the spark generation system.
Hence the conclusion: you can set the ignition correctly at any time, but to set it well - only on a working engine and carburetor.
ICE theory: Motor 2103 with head 21214 with reg. star (modern)
2:17 — How to measure compression 9:55 — How to install an adjustable sprocket 10:00 — How to set up a split gear.
VAZ 2107 injector - treatment of tripping and misfires
Diagnostics revealed that the fourth gasoline injector was clogged, tripping and multiple misfires in all.