The VAZ-2109 rocker is a simple mechanism used to change gears. The driver, applying force in one direction or another, acts through the rocker on the gearbox. This switches on the required speed. Very rarely, the mechanism breaks down and requires partial or complete replacement. Most often the cardan shaft fails. Changing it won't be difficult. But if the rocker itself is broken, you can think about a little tuning - make a short-stroke one. This will require less effort to engage the desired gear.
Short-throw slides for "nine"
Such designs were developed exclusively for sports models, but are widely used in production ones. Advantages of the VAZ-2109 short-stroke rocker over the standard one:
- Easier gear shifting.
- The backlash of the gearshift lever is reduced, especially when using a cardan from Kalina.
- You need to either buy it or make it yourself.
- It takes a lot of force to change gears. Despite the smaller stroke, this type of backstage is more suitable for people who are not only strong in spirit.
But you don’t have to buy a VAZ-2109 rocker in stores; you can make a short-shifter from a regular one with little welding skills.
To do this, cut the old rocker in two places and weld pieces of a metal plate to lengthen the arms. The main thing is for the new drawstring to fit into place, so first carefully study the drawing, which shows the locations of the cuts.
The VAZ 2109 is known as the most successful car of the Volga Automobile Plant after the collapse of the Soviet Union. It is still widely popular among domestic drivers. At the moment, production of the VAZ 2109 and its modifications has been suspended. In addition to 2109, its direct successor 2114 is often found on the roads of our country, as well as the successor to the “eight” 2113, and the “tens” - 2115.
Comparison of short and long stroke
Car enthusiasts describe the difference in options as fantastic. The renovation dramatically improves ergonomics. The amplitude of movements of the gear shift knob decreases by two to three times, but the force on its tip increases. The increase is quite acceptable, since gear shifting occurs in an unloaded state with the clutch depressed and does not require any serious effort.
Some experts believe that an increase in the shoulder leads to an increase in forces on the gearbox rods and to additional wear on the gearbox. There is no statistical confirmation of this point of view yet. Unfortunately, it is not possible to order a short-stroke configuration from the factory. You must install it yourself at your own risk. AvtoVAZ does not approve of such changes in the design of the Nine.
Independent modernization of the design associated with welding the levers lengthens them, and the height of the gearshift knob above the tunnel increases by about 5 cm. Such alteration requires welding work and the involvement of an experienced specialist, for whom cutting the levers using a grinder, installing a pipe and a strip of the appropriate section , and also welding the levers is not difficult.
The adjustment changes the ergonomics, but due to the reduction in the strokes of the shift knob, it is not perceived as a deterioration.
Let's sum it up
In order to operate a car normally and without difficulties, you must always remember the important features of its design. Often, after using a fairly reliable but old foreign car, the owner decides to exchange it for a domestic car, but the reliability habits of some elements do not allow him to use the vehicle normally. Constant sudden shifting of gears and lack of proper inspection of components often lead to the need to replace assembled parts and overpay for service and repair work. With the help of a normal service, you can get rid of virtually any problems.
The cost of repairing the rocker on domestic cars is often more expensive than the cost of the factory mechanism itself. Therefore, equipment replacement is most often used. If we are talking about expensive foreign cars, repairing the gear shift mechanisms in them is often completely impossible. It is impossible to answer unequivocally the question of what to do with a broken slide. You must always take into account the characteristics of the vehicle, the make and model, the year of manufacture, as well as the actual condition of the gear shift element in the car. Otherwise, repair work will be expensive and will not bring the desired results. Has a link ever broken on your car?
Reasons for replacement
There are several situations when the owner of a VAZ 2109 has or wants to get into the design of the gearbox and specifically work with the rocker:
- Oil is leaking due to a damaged rocker seal. It must be replaced;
- The old drawstring was out of order;
- I would like to exchange the long-stroke for a short-stroke in view of its advantages.
Now to the question of when replacing or repairing the backstage is a necessary measure.
- The backlash of the gearbox selector has increased significantly.
- Gears change with difficulty, and when changing speed, extraneous sounds appear.
- It is possible to change gears, but with a lot of effort.
- Speeds change incorrectly. Instead of one, a completely different one turns on.
- It is impossible to turn on all or part of the gears at all.
Even if the resulting play is still insignificant, it is advisable to immediately begin repairs or completely change the drawstring.
Replacing the oil seal
If you find that the oil in the gearbox is gradually disappearing, you can suspect the rocker seal. There is nothing else left to do but change the element.
- First, buy a new shift rod seal. It costs about 70-100 rubles.
- Drain the oil from the box, having prepared a clean container in advance. This is in case you refill the same oil. Although this is an excellent reason for you to change the transmission lubricant at the same time.
- To make sure the oil flows out better, first unscrew the filler plug or remove the speedometer gear. After draining the oil, screw the cap back on.
- We climb under the car and disconnect the fasteners of the gearbox lever driveshaft.
- Pull the boot off the cardan, unscrew the bolts securing it to the gearshift rod. Problematic fasteners that you will have to tinker with.
- After removing the cardan shaft, remove the rod boot.
- We remove the damaged oil seal using an awl or suitable available tools. The main thing here is the stock itself.
- We install a new one in place of the old oil seal and press it with a tube of the appropriate diameter.
- Put the boot back in place and rotate the driveshaft.
- Please note that the bolt securing the cardan to the rod is an adjustment bolt. Therefore, screw it in exactly the same way as before dismantling. Otherwise, some speeds may not turn on.
Oil seal
After the work done, do not forget to check the result.
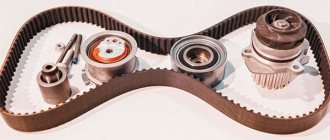
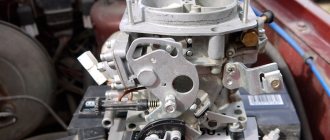
Replacing the cardan
Practice shows that if problems arise with the slide, it is not at all necessary to completely change it.
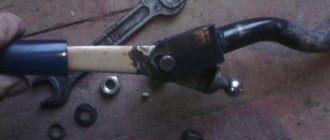
Kardanchik
The instructions for replacing the cardan are as follows.
- Using two 13mm spanners, unscrew the clamp that relates to the speed switch drive rod.
- Pull the boot off with a screwdriver, moving towards the box. If you want, remove it completely. So it definitely won’t interfere with the repair process.
- Using a 10mm wrench, unscrew the fixing bolt on the cardan.
- Apply several gentle, not strong blows with a hammer to knock the cardholder off the shaft. Remove the boot to the side if you have not done so before.
- We replace the old cardan with a part from Kalina. It is more reliable, efficient and durable.
- For reassembly you will need the help of a friend. Do not rush to tighten the clamp immediately at the end.
- The assistant will set the position of the gearshift lever at the optimal points from inside the cabin. First you need to catch the center, then move the lever a little to the right while you tighten the clamps from below.
- Check if the gears engage well. If yes, then we continue assembling the unit and check the updated gearbox under real road conditions.
https://youtube.com/watch?v=wNKKJvY6J4Y
The experience of VAZ 2109 owners shows that when there are problems with the rocker, the essence often lies in an unsuccessful factory cardan. By replacing it with an analogue from Kalina, you will be able to get rid of discomfort and continue to confidently operate your car. By replacing the cardan shaft, the design of the gearbox will improve significantly.
Adjustment
After changing the link or cardan, you should definitely adjust the operation of the unit.
- Engage reverse gear, loosen the clamp tension.
- Set the gearbox selector to the position in which it should ideally be located when engaging reverse.
- Tighten the clamp back.
- A similar operation is performed with other speeds.
There are situations among VAZ 2109 owners when difficulties arise when engaging reverse gear. This is where adjustment can help.
- Set the gear lever to first gear;
- Loosen the rocker clamp;
- Turn the rocker drive counterclockwise;
- Turn the drive until the selector is pressed against the plastic stopper for the reverse gear. You will feel this without any problems;
- Resting against the stopper, tighten the clamp under the bottom. That's it, the adjustment is done.
Adjustment process
How to replace the oil seal
If you detect an oil leak from the gearbox, carefully inspect the crankcase.
The leak will reveal itself. Lubricant usually leaks out through the CV joint seals and rocker panels. In the latter case, to replace you will need to perform a number of actions:
- Purchase a new VAZ-2109 gearbox seal. Its price is about 100 rubles.
- Drain the oil completely from the gearbox by unscrewing the plug from the bottom using the key “17”. If necessary, you can replace the lubricant later. It is recommended to pull out the upper dipstick to facilitate oil drainage.
- Disconnect the cardan from the rocker arm.
- Remove the boot, use a 10mm wrench to unscrew the bolt securing it to the gearbox rod.
- Using an awl or a thin screwdriver, remove the old oil seal. Inspect it for damage.
- Install the new oil seal using a pipe or large washer to press in.
Video: Replacing the VAZ 2109 Backstage Repair Kit
How to adjust the wings of a VAZ 2110?
It should be noted that the block is replaced only after full adjustment. Failure to do so could result in you losing a significant amount of money for a completely different reason.
It is recommended to adjust the curtain in the following cases:
When one of the above symptoms occurs;
- After removing the gearbox;
- after replacing the cardboard or unscrewing the fixing clips;
- after turning the wings on their hinges.
Keep in mind that even minimal changes in spacing make a difference when making adjustments.
For example, a displacement of the wings relative to the cardan by 1-2 millimeters can lead to complete restoration of the functions of the gearbox.
To adjust the wings, proceed as follows:
- Sit on the overpass (try hard, but put it in first gear).
- When you reach altitude, do not touch the shift knob (leave first gear engaged).
- Turn on the handbrake and place the cartridges.
- Sit under the car and locate the clamp that secures the hinge and joint.
- Loosen the collar.
- Get into the car and move the lever behind the scenes to the left (other directions are prohibited).
- Get under the car and lock the clamp.
- Check the gearbox.
Guide to replacing the wing of a VAZ 2110
If the setting didn't work, here's the best option. replace the VAZ 2110 or repair it (if you have the necessary skills).
The job of replacing the scenery is as follows:
1. Culinary tool. You will need a screwdriver, side knives and a set of wrenches.
2. Buy a VAZ 2110 for body repairs.
3. Open the cover.
4. Locate the nut that connects the transmission rod to the handle tip.
5. Remove the special cover and press the disc away from the nut.
6. Get into the car and remove the arm control frame. Generally, latches can interfere with this operation. Don't worry. just apply the force and everything should be demolished.
7. Replace the cover.
8. Using a sharp knife, cut out the retaining collar and remove the cover.
Warning! Don't be afraid to damage the collar. it will still have to be replaced once.
9. Remove the tunnel lining on the floor.
10. Disconnect the jumper from the gear handle.
11. Pull out the shift knob (just pull it up).
12. Insert the guide sleeve inside the lever.
13. Remove the four mounting bolts that secure the arm to the housing.
14. Remove the housing and remove the shaft.
15. Carefully inspect all components. If there are signs of wear on the rubber array, it is better to replace the bushing completely. If there is severe wear on the hole under the handle axis or play is visible, the wings must be replaced.
16. Put everything in its place.
17. Adjust the gearbox drive.
As a rule, installing and replacing scenes takes no more than 30-40 minutes. So you don't need to be afraid of this job and rush to the station immediately. you will do everything yourself. Good luck on the roads and of course no breakdowns.
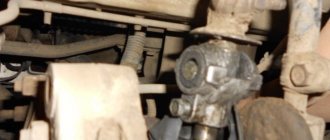
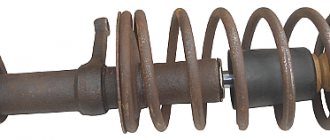
Constant velocity joint or CV joint
VAZ 2110 grenade boot
The design of the car provides that the hinge is subject to a significant load and is made of very strong alloys. A well-maintained and good CV joint (grenade) can last longer than the car itself. To achieve this result and save money, because the procedure for replacing a hinge is expensive, you must follow some rules. One of these rules is to systematically check the condition and timely replacement of the grenade boot. The most important enemies of a car grenade are dirt, dust, water and sand that enter the working part while driving. To protect against such destructive factors, anthers are installed, which are protective rubber cones that very tightly cover the CV joint mechanism of the vase. If you find that the grenade boot is torn, it must be replaced immediately. During periodic technical inspections, you need to carefully inspect the boots and replace them if necessary.
Note. If folds, cracks, deterioration in the elasticity of the rubber and other deformations and damage are found on the anthers, replacement should not be shelved.
Short-throw slides for "nine"
Such designs were developed exclusively for sports models, but are widely used in production ones. Advantages of the VAZ-2109 short-stroke rocker over the standard one:
- Easier gear shifting.
- The backlash of the gearshift lever is reduced, especially when using a cardan from Kalina.
- You need to either buy it or make it yourself.
- It takes a lot of force to change gears. Despite the smaller stroke, this type of backstage is more suitable for people who are not only strong in spirit.
But you don’t have to buy a VAZ-2109 rocker in stores; you can make a short-shifter from a regular one with little welding skills.
To do this, cut the old rocker in two places and weld pieces of a metal plate to lengthen the arms. The main thing is for the new drawstring to fit into place, so first carefully study the drawing, which shows the locations of the cuts.
The linkage is an important component of the VAZ 2109 gearbox. If it fails or does not work satisfactorily, the linkage can be easily replaced or repaired.
Appearance of the deviceThere are two types of scenes:
There is no fundamental difference between the two types of units. The advantage of a short-throw is that it provides faster gear changes for a fraction of a second.
Do not believe those who claim that a short walk has a positive effect on dynamics. There is no connection between the rocker and the dynamics of the car. But the short walk has its advantages.
Replacement kit
Short walker
Many people are still wondering whether it is worth changing their standard factory long-stroke linkage to a short-stroke one.
Short walker
Make your decision purely on the basis of individual reflections and do not “be fooled” by statements regarding a significant increase in dynamics with the transition to a short-stroke.
The real difference between short-stroke and long-stroke is shown in the table.
Backstage type
Peculiarities
Draw your own conclusions from here - do you need such a drawstring or not. There is nothing complicated in terms of replacement. The only question is the purchase.
The VAZ-2109 rocker is a simple mechanism used to change gears. The driver, applying force in one direction or another, acts through the rocker on the gearbox. This switches on the required speed. Very rarely, the mechanism breaks down and requires partial or complete replacement. Most often the cardan shaft fails. Changing it won't be difficult. But if the rocker itself is broken, you can think about a little tuning - make a short-stroke one. This will require less effort to engage the desired gear.
Replacing the gearbox seal (gearbox rod) using the example of a VAZ 2108-2109 |
Replacing the box seal
I don’t know, maybe the first method is more suitable for someone, but I personally don’t want to remove the box in order to replace the gearbox rod seal. The second option is simpler and faster, which is why I chose it.
Diagnostics.
You can understand that the gearbox seal needs to be replaced after driving into an inspection hole or after parking the car for a long time. A car that needs to replace the oil seal will have oil smudges and marks on the asphalt after parking. Typically, in some cases, car owners attribute this phenomenon to a poorly tightened oil filter. If you don’t replace the rod seal in time, you can get to the point where the box becomes dry, after which you won’t get away with just replacing the seal. In order to avoid this phenomenon, experts recommend regularly monitoring the oil level in the gearbox and engine. In addition to oil leaks, you can detect a damaged oil seal by the characteristic crunch that appears when changing some gears.
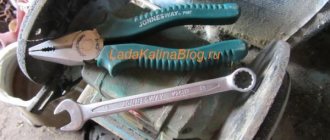
Replacing the gearbox seal with your own hands: tools.
- Keys for “10”, “13”.
- A curved slotted screwdriver or something similar to a crochet hook.
- Awl.
- Plastic stopper from under water.
To carry out this repair you will need an inspection hole or a lift; you can also do it using the old “old-fashioned method”. To do this, you need to take two tires and lay them flat, then you can ride on boards or stones to this elevation.
Now directly about how to replace the gearbox rod seal.
1. Get under the car.
3. Next, bending back the wide part of the boot, you will see a cardan that is attached to the rod.
- In order to get to the oil seal, you need to disconnect the cardan from the rod, as well as from the gearshift lever. It is attached to the gearshift lever using a 13mm key bolt.
- Do not unscrew the nut completely, this will loosen the connection between the lever and the cardan shaft.
- Now remove the lever from the cardan, thereby engaging first or third gear.
- In order to disconnect the cardan from the rod, you need to move the lever to the side, then using a key set to “10”, completely unscrew the bolt.
- Remove the driveshaft and set it aside.
gearbox rod oil seal
- After the old oil seal is removed, the replacement of the box oil seal with a new one begins.
- Before installing a new one, clean everything from oil and dirt, and only then press the rod oil seal into the seat.
- To install a new box seal, I used a plastic bottle cap, having previously cut out its central part. You can do it without it, here, as they say, whatever is more convenient for you.
- If you succeeded in replacing the gearbox oil seal, you can proceed with reassembly in the reverse order.
Important nuances
Sometimes, after connecting the gearshift lever to the cardan, the rocker (the one in the cabin) can move greatly, after which changing some gears will simply become impossible. The reason for this is the bolt at “13”, which connects the fastenings of the cardan and the gearbox lever. The thing is that this bolt is also an adjustment bolt, so before collecting all the tools and announcing the completion of the work, loosen it and, by manipulating the gear shift lever, adjust the handle travel “to suit you.” For example, you can make it so that 5th gear will be closer, that is, you won’t need to reach far for it.
Now that everything is assembled, all that remains is to add oil to the box and check the operation in motion. That's all for me, I hope everything is clear to you, try it and you will succeed, replacing a gearbox oil seal is no more difficult than replacing a wheel or cabin filter.
Fixing the problem
Let's look at several ways to help fix the problem with engaging reverse gear.
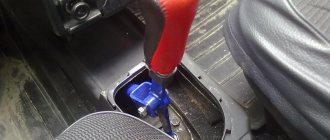
Backstage adjustment
Before you begin solving the problem, take with you everything you might need:
- new gearbox driveshaft;
- speed selector shaft oil seal;
- two ring wrenches 13;
- wrench 10;
- hammer;
- screwdriver.
To fully replace the cardan, you will need to drive into a pit or overpass. In addition, you will need an assistant who will shift the gearbox lever while you adjust it.
Let's start replacing the cardan and adjusting the rocker:
You need to crawl under the bottom of the 2109 and find your gearbox. Take two 13mm wrenches and loosen the clamp located on the transmission drive rod. After this, you can remove the drive from the gearbox mechanism rod. Then take a screwdriver and, with a little force, pull the boot closer to the unit. If you accidentally damage the boot, you can simply dismantle it so that it does not bother you
Now take a 10mm wrench and unscrew the locking screw on the cardan. Next, take a hammer and very carefully knock the gearbox driveshaft off the shaft. Do this carefully so as not to damage the shaft
Remove the cardan boot if you did not remove it initially. If necessary, replace the speed selector shaft oil seal. At this point we can consider that half the work has already been done. Now you need to install the driveshaft of the box. We install the element in the reverse order. First, install the new boot in place, and then place the cardan on the shaft. Remember that the position of the retaining screw must coincide with the recess on the shaft. When the universal joint is in place, tighten the fixing screw and install the boot on the universal joint. You also need to put the gear shift drive rod on the cardan rod, but there is no need to tighten the clamp. Next, you will need the help of another person, since you need to adjust the gearshift lever. Ask your assistant to sit in the driver’s seat: he should set the gearshift lever to “neutral” and move it slightly to the right. In this position, an assistant should hold the lever while you tighten the cardan clamp.
When the cardan adjustment is completed, you need to check how the speeds on the lever are switched on. If the problem that caused the reverse gear to not engage in your VAZ 2109 was in the cardan, which is most likely, then after replacing the element the fault should disappear.
Changing gearbox oil
Also, one of the common reasons why reverse gear in a VAZ 2109 does not engage is poor gear oil. As stated above, the liquid has already lost its properties and its further use does not make sense. But how do you understand that the transmission fluid has already exhausted its service life? This issue should be taken seriously, because the fluid replacement procedure is not that cheap. Therefore, you need to know for sure that the gear oil has lost its properties.
- Pull the dipstick out of the gearbox hole to measure the level and drop a drop of liquid onto a white cloth. If at least one of the following conditions occurs, change the oil immediately.
- The lubricating fluid is discolored and may have a slightly black tint. Also, even in a small drop of oil you can see metal particles or other dust.
- The transmission fluid is opaque and appears very viscous. If you try it by touch, the substance will stick to your hands. In addition, if you drop this oil onto a piece of cloth or napkin, it will be absorbed very slowly compared to new oil.
- Very cloudy or foamy liquid. This may mean that transmission oil has entered the engine. If so, then the problem with engaging reverse gear is the first thing you will notice. If the car continues to operate on poor transmission fluid, then it may be necessary to completely repair the gearbox and the entire transmission system.
Replacement
If the steps described in the previous paragraph did not help you, then, apparently, you need to replace the element yourself.
What will you need?
In order to replace the backstage, you will need to prepare everything that may be required to complete the work:
- directly new rocker for VAZ 2110;
- screwdriver;
- side cutters;
- set of wrenches;
- ratchet;
- lubricant "Litol-24".
New rocker for VAZ 2110 transmission
Flat head screwdriver
Side cutters - you will need to use them to cut through the clamp
Prepare a set of wrenches - you will need different sizes of wrenches
Ratchet for loosening bolts
Lubricant "Litol-24"
Step by step instructions
- Sit in the interior of your VAZ 2110 and use a screwdriver to dismantle the decorative cover of the gearshift lever. Pull the gear selector up and remove it along with the protective cover.
- Take a 10" wrench and unscrew the two fastening nuts one by one, as well as the bolt securing the rear gear lock bracket trim.
- Next, take a “13” wrench and unscrew the nut securing the gearbox lever axis. Then unscrew the screw securing the axle. This is where you may need a ratchet.
- Dismantle the axle. Then remove the set of bushings from the gearbox selector (so as not to lose them during the replacement process).
- After this, you need to dismantle the jet thrust from the rocker pad. To do this, take a spanner wrench with which you will hold the nut on top, and using the “13” wrench, unscrew it, as shown in the photo.
- Then you need to remove the facing part of the floor and the plastic console - otherwise it will not be possible to dismantle the backstage. To do this, unscrew all the bolts around the perimeter of the console. After removing the top of the console, do the same with the bottom. Be careful not to damage the electrical wires.
- Next, unscrew the four screws securing the gearbox selector to the car body.
- Get under the bottom of the vehicle and, using a 13mm wrench, unscrew the nuts of the rocker pad bracket, and then remove the bracket itself.
- Dismantle the rocker assembly with the gearshift lever. Carefully visually inspect all elements of the device. Perhaps only the cushion has worn out, and the drawstring itself has not yet reached the end of its service life. Then replace the pillow and install the element in place.
- If the transmission component itself has failed, that is, mechanical damage is clearly visible on it, for example, the ears have broken off, then the link should be replaced with a new one. Before doing this, lubricate all rubbing elements, including the gearbox lever, with engine oil or Litol-24 to avoid squeaks.
1. Using a screwdriver, remove the gearbox protective cover.
2. Unscrew the nuts and screw securing the reverse locking device bracket.
3. This is what the reverse gear locking device looks like when disassembled.
4. Unscrew the bolts securing the rocker to the VAZ 2110 body with a wrench.
5. Dismantle the backstage through the bottom of the car.
6. This is what a failed link with cracked mounting lugs looks like.
This completes the replacement of the VAZ 2110 backstage with your own hands. Reassemble all components in reverse order.
Adjustment
The backstage adjustment should be made in several cases:
- after dismantling the gearbox;
- when the cardan has been replaced or the fixing clamps have become loose;
- if the linkage rotates on the hinge.
Of course, this will also be advisable if you have recorded signs of a malfunction of the element, which are described in the previous paragraph.
What to cook?
Before you begin repairs, prepare in advance:
- wrench to loosen the clamp;
- wheel chocks or bricks.
Universal wrench
You will need wheel chocks...
...or the most ordinary bricks
Step by step instructions
To perform repairs, that is, adjustments, you need to perform the following steps:
- First, drive your VAZ 2110 into a garage with a pit or onto an overpass.
- Place bricks or special wheel chocks under the car. Apply the handbrake.
- Climb under the bottom of the car and find the clamp that secures the linkage and hinge.
- Use a wrench to loosen the clamp.
- Then sit in the driver's seat and put the car into reverse. Remember that the lever must be in the extreme left position. Therefore, set it the way you think it should ideally be when engaging reverse gear. It is advisable to do this work with an assistant so that he holds the gearbox lever in the position you set it.
- Now again climb under the bottom of the car and firmly fix the clamp in this position.
Reach under the bottom and loosen the clamp, then set the gearbox lever to the reverse gear position
This completes the adjustment of the device. Take a test drive and check the operation of the unit. If necessary, repeat all steps again.
Backstage adjustment:
Note! Before you go to the auto store and buy a new rocker, be sure to try to adjust the old one first so as not to waste money, maybe everything is fine with the old rocker!
1) At the very beginning of the operation, we will tell you why the adjustment of the rocker may go wrong, namely, after removing the box, after replacing the cardan shaft, or after unscrewing the nuts and bolts that secure the tension clamps of the rods that come from the rocker, and in other cases.
2) Now let’s move on to the actual adjustments, firstly, you will need to first drive the car into a pit or lift it using a lift, then climb under the bottom of the car and there you will find the boot under which the driveshaft itself is located (the boot is indicated by a red arrow), next to with this cardan and the boot that covers it, the end of the rod coming from the rocker itself will be attached, and this end will be attached using a tie clamp, so take two screwdrivers in your hands and with their help loosen the bolt nut a little (the nut is indicated by a blue arrow, and the bolt green), while when you loosen, hold the bolt itself with one wrench so that it does not turn, and with the other at this time loosen the nut, after the nut is slightly loosened, take a screwdriver in your hands and insert it into two holes, namely in the hole between the tie clamp (Indicated by a yellow arrow) and into the hole of the rod itself (Indicated by a white arrow), thereby widening both holes (In fact, these are not holes but a groove, so in the future we will use this word) so that the link rod can easily move relative to gear selector rod.
Note! Before you crawl under the car, put the car into first gear!
3) After you loosen the tension clamp, get out from under the car and return to the car interior. In the cabin, move the gear shift lever all the way to the left, but forward or backward and do not even try to pull it.
4) And to complete the operation, again climb under the car and tighten the nut of the same bolt that secured the tie rod of the rocker link.
Note! When all the operations are completed, test the gearshift lever for functionality, namely, check whether all gears engage clearly, start the car, drive it a little and if the shifter is working, then everything will be fine and you won’t even need to change anything!
By the way, another way (almost the same method) of adjusting the rocker, see the video clip below, in this video an example is shown on a VAZ 2109 car, but don’t pay attention to this, since the entire gear shift mechanism is on front-wheel drive cars VAZ, including the top ten, is practically no different from each other!
Replacing the gear shift rod oil seal on a Zhiguli (VAZ-2108, VAZ-2109, etc.)
Leaking gear shift rod oil seal is a fairly common failure. However, this does not make it any easier; there is a problem and it must be solved somehow.
First of all, every car enthusiast thinks about whether it is possible to replace the rocker seal on their own? And if so, then so? In this article I will try to explain to you how to do the repair yourself and give you some practical tips on replacing the gear shift rod oil seal. This manual is suitable for owners of cars such as VAZ-2109, VAZ-2108, VAZ-2110, VAZ-21099, VAZ-2115.
Repairing with your own hands is not an easy procedure, however, having done it once, you will gain valuable experience, plus, on top of everything, you will save a considerable amount of money.
I suggest starting with the fact that first of all, you need to decide on the replacement method option. There are two options for carrying out this type of work.
1. The method that I actually used is what I will recommend to you. This option involves replacing the rocker seal in the inspection hole by knocking out the bushing along with the seal.
2. The method does not require an overpass or inspection hole, but will require some effort and skill on your part, as well as manual dexterity and several long self-tapping screws. Let me explain, this method involves screwing self-tapping screws into the oil seal, and pulling it out, then pressing it into place, while lying under the car... Agree, this is not suitable for everyone and not everyone can do it! Now let's take turns. Let's move, so to speak, from words to actions.
Let me start with the fact that you need to stock up on all the necessary tools to replace the gear shift rod seal of the VAZ-2109, VAZ-2108, VAZ-2110, VAZ-21099, VAZ-2115.
You will need:
1. Two keys for “13”.
2. Key to “10”.
3. Screwdriver or wrench (needed to knock out the oil seal bushing).
4. Hammer (medium size).
5. Head (socket) on “22”.
6. Silicone sealant (personally, I always use Abrovsky 999).
For those who decide to change the oil seal “lying on the ground”, this list of necessary tools will be slightly changed, adding:
1. Key for “13” and “10”.
2.1-2 self-tapping screws (long).
3. A piece of pipe of suitable diameter and length (for pressing in the oil seal, I can’t say the exact dimensions, because, as I already said, I am a supporter of the first method).
Spare parts.
Well, there’s nothing complicated here at all. Buy a Balakovo shift rod oil seal and don’t forget about the cardan shaft boot. As practice shows, in most cases the boot is either already torn or will tear when trying to remove it. Therefore, do not skimp and take it just in case, maybe not this time, but it will still be useful. By the way, quite recently new gear shift rod seals, the so-called “Reinforced” ones, began to appear on the market. I have indicated the difference in the photo. I don’t dare to praise or recommend them yet, since I haven’t had a chance to try them myself yet.
Now comes the final stage - a detailed description of the process of replacing the gear shift rod oil seal on a VAZ-2109, VAZ-2108, VAZ-2110, VAZ-21099, VAZ-2115.
Let's get started.
1. Using two keys at “13”, it is necessary to loosen the gearbox control rod clamp. Before doing this, you can mark the connection between the cardan and the rod, so that later you don’t have to “mess around” with adjusting the gear shift, then disconnect the rod from the cardan.
2. Pull the boot back a little, then using a “10” wrench, unscrew the fastening bolt that secures the cardan to the gear shift rod.
3. Remove the boot and cardan.
Using a screwdriver against the side, knock the bushing out of the gearbox.
4. Using the same screwdriver, you need to knock the oil seal out of the bushing, after which, using the head at “22”, press the oil seal in until it stops.
5. Now, lubricate the bushing with pre-prepared sealant and, lightly tapping with a hammer, press it into the PP box.
For those who “are not looking for the easy way out” and prefer to work “from the ground,” the first and second steps will be as follows: screw the self-tapping screws into the oil seal, then pull the screws until you pull out the oil seal. The new oil seal is pressed in using a piece of tube; select the diameter and length yourself.
Now we can safely say that replacing the gear shift rod oil seal on a VAZ-2109, VAZ-2108, VAZ-2110, VAZ-21099, VAZ-2115 is quite possible to do with your own hands.
Please rate this page
sanekua.ru
Why change the driveshaft?
On all VAZ 2108-2110 cars without exception, there is a strong play in the gearbox linkage, as a result of which we get unclear gear shifting:
- We can say with confidence that this is a disease or a deficiency of all cars of this brand
- The cause of this “illness” is the original gearbox driveshaft
- If you want to eliminate such a drawback, then our instructions will help you reduce the backlash of the rocker and increase comfortable gear shifting (especially since you achieved this by replacing the rocker)
- First you need to get to the car market and purchase there (or at a spare parts store) a short-stroke universal joint from a Lada Kalina car
- You should take it complete with a boot, because the boot does not fit on a standard cardan
Tools
After the purchase, we look in our arsenal for the tool necessary to replace the cardan shaft. I think there will be no problems with this, because this operation requires a minimum amount of tools:
- Two ring wrenches “13”, plus one wrench “10”
- Hammer
- Screwdriver
- To replace the universal joint, you need to drive onto a pit or overpass
- An assistant, preferably sober, will be useful to you at the end of the work, when you need to adjust the ideal position of the gear lever
- Using two “13” keys, loosen the clamp located on the gear shift drive rod and pull the drive off the gear shift rod
- Then use a screwdriver to pull the cardan boot towards the box; in principle, it’s better to remove it altogether so that it doesn’t interfere (after all, we won’t need it anymore)
- Then we take the key to “10” and unscrew the bolt that fixes the cardan
- Then we take a hammer and, with not very strong blows, knock the cardan from the shaft and pull off the boot (if you didn’t decide to remove it right away)
- And so, we’ve already done half the work, and if necessary, we can also change the oil seal on the gear selection shaft (as long as it’s convenient to get to)
- Pull the new boot onto the shaft
- After this, we install the cardan from Kalina, fasten it with a bolt, special attention should be paid so that the bolt exactly matches the special recess on the shaft
- Tighten the bolt, then pull the boot onto the driveshaft
- After this, we put the drive rod of the gear shift on the rod, but do not tighten the clamp
- If the thrust lever cannot be put on the cardan (usually a longer rod gets in the way), then file (shorten) the cardan rod, just do not overdo it
- It's time to invite an assistant who will sit in the cabin and set the gear shift lever to the optimal position
- To do this, first let him set the lever in the center, then move it a little to the right, and hold it in this position
- At this time you tighten the clamp
- Only after this it is necessary to check how the gears began to shift
Let's get down to business
The short-stroke rocker for the VAZ 2109 requires the following tools for manufacturing:
- Grinder and cutting wheel for metal or, at worst, a hacksaw for metal
- A piece of pipe and a piece of flat metal
- Welding (welding machine)
- be sure to purchase a lever drive from Lada Kalina
- The photo shows the places where you will need to make an incision.
Cut locations for your standard lever
- Everything is quite simple: you will need to remove the rocker from the car
- Moreover, it is not necessary to remove everything (I admit, I did just that and regretted it a little - it’s a chore, it turns out) it will be enough to disassemble your ball joint (to do this, unclench the locking metal ring so that the plastic fastening tabs separate and the ball is released)
- Then loosen the clamp near the gearbox and turn off the traction
- After this, carefully pull the rod through the dirt cover and get out of the car.
- Now you need a grinder with a cutting wheel for metal, a familiar welder with a welding machine, or someone who has access to one (you have the machine and know how to weld yourself - generally a test)
- Next, use a grinder to cut the parts according to the marks in the top photo. Then we weld a piece of pipe (with a wall thickness of 2 - 3 millimeters) into the rod and a piece of sheet metal with a thickness of 5 - 6 millimeters
- These pieces must certainly have the same length, otherwise you will have an unpleasant distortion, which is not at all desirable and the drive will only work worse
- For myself, I lengthened it by only 2 centimeters
- However, the space in the cabin allows you to lengthen it by 3 - 5 centimeters
After the cut, prepare pieces for insertion of the same size
- At first two centimeters was quite enough for me, but then I got used to them and it seems not enough again
- By the way, regarding the pieces, welders have nowhere to put them; as a rule, finding a suitable one does not cause any problems
- The VAZ 2109 short-stroke rocker is installed in the reverse order of removal
- However, among other things, the hinge with a hook, which serves to prevent erroneous engagement of reverse gear, rises automatically and no longer fits into a special slot on the blocking plate
- In order to avoid this, either remove this plate completely (this is for the especially lazy) you can ride without it, or you should move it upstairs to the height to which the hinge has risen
When you have installed the rocker on the VAZ 21093 gearbox, all that remains is to replace the drive shaft to eliminate play in the lever