The gearbox in VAZ 2110 cars is one of the most involved dynamic elements. Because of this, the unit often becomes loose, which makes operating the car inconvenient. A shaking gear shift lever is a fairly common occurrence in domestic cars. There are two ways to combat this defect: constantly adjust the gearbox or make the rocker short-stroke - the process can be done independently. You can also purchase a gearbox repair kit from another VAZ model, which initially comes with a short-throw driveshaft.
What is so good about a short-stroke rocker? Firstly, it guarantees reliable operation of the gearbox over a long period of time. Secondly, the short-stroke version helps to increase the clarity of VAZ gear changes, including in the 2110 model. This is quite enough to make the operation of the power plant more comfortable, because smoothness, stroke and clarity of gear shifting are important for the gearbox.
Differences between a short-stroke link
The main differences can be seen even in photographs. We see that the short-stroke rocker has smaller dimensions, namely length. To reduce the stroke length at startup, the length of the transmission under the hinge should be increased. Due to this, we can not only get shorter gears, but also maintain the traction axis in its original position.
It is worth understanding that after such tuning, you will need to put more effort when changing speeds. After upgrading, switching will resemble joystick control, which is undoubtedly a plus. In addition to the rocker, you can install a backlash-free cardan, which will also have a positive effect on the smooth operation of the gearbox.
Making a short-stroke slide with your own hands
So, let's begin the modernization process:
- We raise the place of attachment of the piece of iron that goes from the gearbox to the lever inside the VAZ 2110 interior.
- You can do without dismantling the rocker, the main thing is to disassemble the ball joint.
- Now we need to ensure that the plastic paws release the ball. To do this, you need to unclench the metal ring. We disconnect the rod and carefully drag it inside through the cover, which is responsible for protecting it from dirt. It will be much more convenient to work if the clamp near the gearbox is loosened.
Replacement is carried out according to the same scheme. Only instead of welding, a freelance short-stroke rocker from another car is installed. Replacement is a more expensive solution, so doing it yourself is problematic. If you have experience working with gearboxes, then replacing and purchasing a new part will cost about 1,000 rubles.
Installing a short-stroke cardan
The first step is to purchase the cardan itself. The best choice would be a part from Priora or Kalina. Usually it is included in the repair kit with a boot, so the standard boot from a VAZ 2110 will not fit here.
Work is performed only if there is an overpass, inspection hole or lift. It is also recommended to call an assistant for help, since at the end of the process it will be problematic to independently adjust the position of the gearshift lever.
The work proceeds according to the following scheme:
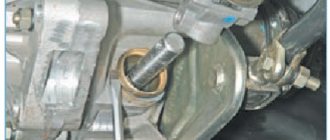
- Armed with two 13 keys, we need to loosen the clamp on the drive rod and then pull it off the rod.
- The next step is to dismantle the boot. Next, use the 10th key to unscrew the bolt, which is a lock on the standard cardan. Now you can remove the cardan with gentle blows of a hammer.
Important: it is necessary to check the condition of the oil seal. If this is the first intervention in the gearbox, then it is most likely in a worn condition, so it is recommended to change the boot.
- We install the driveshaft from the Priora in the reverse order: put on the boot and install the new driveshaft, securely tighten the fixing bolt, and then tighten the boot. All that remains is to put the drive rod on the cardan rod, but the clamp should not be tightened.
- Now the assistant gets behind the wheel and places the gearshift lever in the optimal position. At this time, the clamp is tightened. Done, the replacement is complete, all that remains is to test the switching.
How to replace the universal joint
In most cases, it is not the rocker itself that fails, but the cardan. Due to its displacement, even a small one, a failure occurs in the gear shift mechanism.
Standard VAZ-2109,2114 scenes are rarely installed during repairs; similar parts from Lada Kalina are used. The replacement looks like this:
- Using two keys set to “13”, unscrew the clamp securing the cardan to the rod.
- Using a screwdriver, pull the boot towards the box housing. If desired, you can remove it completely, and if it has cuts or other damage, replace it with a new one.
- Unscrew the fixing bolt with a “10” key.
- Knock down the cardan with a hammer, strike carefully so as not to damage anything.
- The Kalinovsky universal joint is much more durable and reliable, so install it instead of the standard one.
- Reassemble the entire structure in reverse order. But do not rush to tighten the bolt on the clamp - adjustment is necessary.
Video instruction
Many inexperienced drivers begin to panic and talk about a breakdown of the gearbox, although in fact the culprit of the problem is the rocker.
Practice shows that replacement and repair are rare and not very common measures. Much more often, the current situation forces you to simply adjust the scenes.
But today we will talk not only about adjustment, but also talk about the features of modification, repair and replacement of this element.
Element location
Adjustment
Now let's talk about how you can adjust the link if it shows primary signs of malfunction.
- First of all, try by hook or by crook to engage first gear.
- Place the car on an overpass, turn on the handbrake, place additional supports under the wheels to avoid the car moving.
- Do not turn off first gear on the transmission.
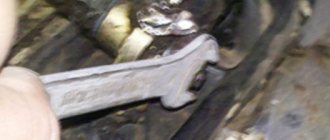
- At the bottom, find the clamp that holds the rocker and secures it. To do this you will have to crawl under the hood. You shouldn't have any problems finding the gearbox. The clamp needs to be loosened.
- Now return to the salon. Your task is to move the box lever as far as possible to the left. If you start to pull the handle forward or backward, the drawstring will most likely come off. You don't need it.
- Get back under the car and tighten the clamp back.
- In many cases, simply shifting the rocker relative to the cardan shaft by literally a few millimeters is enough.
When adjusting, pay attention to the condition of the cardan shaft. It may require replacement if worn.
Work is in full swing
Finalization
Now many owners of the VAZ 2110 are discussing the possibility of refining and improving the gearbox by replacing the rocker from a standard one to a short-throw one.
The short walk is the result of independent tuning. Decide for yourself whether to carry out such work or not. But from the point of view of the efficiency of the gearbox, installing a short-throw rocker is only beneficial, since gears begin to shift more clearly.
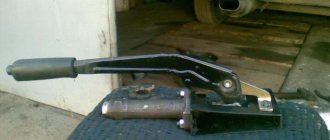
Short walker
To install a short walker for yourself, it is not necessary to completely dismantle the standard version.
To do this you need to perform several operations:
- You just need to disassemble the ball joint from the outside;
- Next, the metal ring of the support is opened and the legs made of plastic are spread apart;
- This is how the ball will come out;
- Now the rod is disconnected from the support, and a small piece of pipe and a piece of sheet metal of good strength are welded to the rod;
- Be sure to lift up the hinge with the hook, otherwise erroneous switching of speeds will not be avoided.
Installing a short drive will entail the need to apply more force when engaging a particular gear. But on the other hand, switching becomes clear and smooth. Therefore, decide for yourself which option would be better for you - standard or short-stroke.
Repair
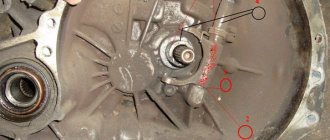
Regardless of what exactly you do with the rocker - repair, adjust or change, you will still need to disassemble this unit.
Disassembly is performed as follows.
- Remove the cover from your gear shift knob.
- Place the car on a pit, or raise the front end with a jack.
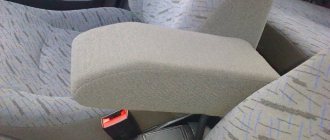
- Remove the front console. It is held in place by mounting bolts.
- Now remove the curtain itself. To fix it, AvtoVAZ used 6 bolts in the case of the VAZ 2110 model.
- When carrying out dismantling work, be sure to examine the condition of all elements.
- By bending the boot, you will gain access to the support, oil seal and cardan shaft.
Changing the boot
Now regarding the repairs. There may be several recommendations in this regard, depending on the current state of the node and its components.
- At best, repairs will require the use of a repair kit for the backstage. It doesn't cost much.
- If the bushing is deformed, it will need to be replaced with a new one.
- Check the lever shaft bore for wear.
- Make sure there is no play in the driveshaft. Otherwise, a regular repair kit will no longer be enough, that is, a complete replacement of the entire backstage will be required.
- Often the culprit of extraneous noise and rattling when shifting gears in gearboxes is the rocker pad. Changing it is quite simple, and even a beginner can perform the operation.
Replacing the oil seal
Quite often, VAZ 2110 owners are faced with a situation where, after parking under the car, they find traces of oil. There are two options here - the oil filter has worn out or there are problems with the oil seal.
Symptoms of a malfunctioning rocker
There are certain signs indicating that it is the gearbox linkage that has become unusable, and not the transfer case itself.
The most common signs:
The first gear is driven correctly, but after a while the reverse gear is set independently;
As soon as the listed symptoms, even one of them, are noted while driving a car, you need to contact the service to fix the problem. If experience and desire allow, you can fix the breakdown yourself.
The most common symptoms of a link failure and possible cause:
- The play in the gearbox lever can be clearly felt: the cause could be physical wear of the linkage, the problem can be solved by completely replacing the part.
- The box slide rings when gears are changed: sometimes the sound indicates a poorly performed repair or a factory assembly defect.
- Speeds are switched with great effort: adjusting the VAZ 2110 rocker will fix this; if the problem persists, you will need to replace the element.
- When you engage the first gear, the lever shifts to reverse gear: the reason is precisely in the gearbox, a mandatory replacement is required. The situation can be corrected by a repair kit, but this depends on the severity of the damage or the detected wear of the assembly elements.
- When the engine is running, strong vibration is transmitted to the gearshift knob: the hinges need to be checked, the cause could be play.
Adjusting the scenes of the VAZ 2110: do-it-yourself modification
Even such an element as the gearbox linkage can be modified. Most car enthusiasts prefer to change the standard rocker to a short-throw one. Such tuning in the future involves performing such an operation as adjusting the scenes of the VAZ 2110.
If this procedure is not completed, you will experience problems with gear shifting in the future. It is best when adjusting the rocker is done with an assistant, otherwise you need to be patient.
Do-it-yourself repair should reveal the cause of the problematic shifting of rear and fifth gears. Setting up the VAZ 2110 backstage is done in several ways.
Option one is rear speed adjustment. To do this, you need to switch the box to move backward, loosen the clamp a little and switch the lever to the position in which it should be when the reverse gear is engaged. Tighten the clamp and the problem disappears.
The second method becomes relevant in the case when there is no possibility of switching reverse gear. In this case, the adjustment of the VAZ backstage is performed in first gear. We switch to first speed, loosen the rocker clamp (it is located at the bottom of the car), turn the rocker drive counterclockwise until the gearbox lever rests against the reverse gear lock, made of plastic. All that remains is to tighten the clamp, and the adjustment is complete.
Setting the neutral position of the gearshift knob is done by calculating the depth of fit of the rocker on the driveshaft of a VAZ 2110 car.
It often happens that do-it-yourself modifications cause unpleasant rattling sounds in the area of the gearshift lever. Of course, you can ignore this, but we do everything as a businessman. The easiest way out of this situation is to install a spring, which will help hold the gearbox and prevent unpleasant noise from occurring.
Be that as it may, you need to work not with the symptoms, but with the cause of the malfunction; we hope that adjusting the VAZ 2110 rocker will not cause you any problems.
It would seem that such an element as the backstage cannot be modified or modernized, because everything here is extremely simple. However, tuning is also possible here, we’ll talk about this in this article, and as an example we will have a VAZ-2110 car. Many car owners prefer to change the standard rocker because it has too long a stroke; instead, they install a short-stroke one. This is good because the clarity of switching improves and less time is spent on it, but at the same time, car enthusiasts for some reason forget that the rocker needs adjustment.
If there is no adjustment, the driver will soon feel difficulty changing gears. It is recommended to do the work together with an assistant, although, if desired, you can do everything alone.
In this case, the owner of the “ten” replaced the rocker, did not adjust it, and had problems when shifting from reverse to fifth gear. The adjustment can be done in different ways; we will consider several options with you.
Excursion inside the UAZ
When buying a new or used car, the question inevitably arises: will there be many problems with its repair and maintenance?
Today we’ll talk about some of the features of repairing units of Ulyanovsk “loaves” and “tadpoles”. The long service life of the UAZ is ensured by the frame, which, according to drivers and repairmen, is “eternal.” In fact, it is much stronger than that of the Gazelle. Almost all other components can be repaired or replaced. And the design of the UAZ allows repairs of any complexity to be carried out not at a specially equipped service station, but in an ordinary garage or in the yard, using ordinary tools and some simple devices.
From the point of view of access to units, the cab-over-engine layout has its advantages and disadvantages. The owner of a UAZ who does not have a garage can easily carry out maintenance and minor repairs to the engine in bad weather: flush or adjust the carburetor and ignition, replace the fuel pump and cooling pipes, tighten the belt or clean the generator brushes, and adjust the valves. All these operations are carried out while sitting in the cab on the driver or passenger seat.
But with serious engine repairs, complications arise: it is slightly “shifted” back, and the rear wall of the cabin is located approximately between the third and fourth cylinders. The last, fourth cylinder is located under a non-opening protrusion in the rear wall of the cabin. For a “loaf” this protrusion is located in the cargo compartment or rear passenger compartment, and for a “tadpole” it’s even worse – in a tight “gap” between the cabin and the platform. Because of this, it will not be possible to remove the valve lifters of the fourth cylinder. Drivers and mechanics came up with a simple solution: two holes with a diameter of 12–13 mm are drilled in the cover above the place where the pusher rods are located. The main thing is to find exactly the right place. With the “loaf” it is easy to drill and remove the rods, but with the “tadpole” it is more difficult - you have to somehow crawl between the cabin and the platform.
The same protrusion simply will not allow you to remove the head from the studs screwed into the block. Often we get out of this situation by unscrewing the studs themselves. Experts in the intricacies of body repair sometimes decide to recut body iron: armed with a grinder and a welding machine, they cut off the protrusion and hang it with bolts. But the UAZ service mechanics unscrew the engine from the supports, tilt it strongly back and fix it in this position. Then removing the head is much easier.
The UAZ engine sump is located far from the front axle beam, which is why these cars compare favorably with passenger cars. To repair the oil pump or replace the liners, you do not need to unscrew the engine from the supports and lift it. Even the driveshaft of the front axle will not hurt to simply unscrew the mounting bolts and remove the pan.
Sooner or later, the owner of a UAZ will most likely have to deal with a major overhaul of the engine, which means removing it from the car. To begin, disconnect all electrical wires, the fuel line, the clutch fork drive, and remove the radiator from the car. The gearbox cannot be removed, but only unscrewed. All that remains is to remove the rather bulky 170-kilogram unit from the cabin.
The “loaf” has a hatch in the roof designed to pass the cables or chains of the lifting mechanism and raise the engine. But such a mechanism is not always at hand. And the onboard vehicle simply does not have a hatch. Therefore, the only possible option for mechanization is a forklift with a load boom, but most often the engine is removed manually. This will require several assistants, levers, cables or chains. The work is simplified by the fact that both seats can be removed easily, and the doors swing open more than 90°.
Long levers, longer than the width of the car, are carried through the cabin. These can be pipes, logs, strong sticks. The motor is tied to the levers by the “eye-brace”, passing a cable or chain under the crankcase. In this case, it is better to tie the cables or chains “pull”, without any play. The engine is removed from the mounting mounts and pushed forward so that the input shaft of the box comes out of the clutch and the valve cover comes out of the body niche. The gearbox, transfer case and cross member remain in place. The most crucial moment comes: assistants (four people are needed, but there were also those who managed to do it together) lift the engine. First, it is placed on the right wheel arch (the steering wheel is in the way on the left), and then it is lifted again and taken out through the right door from the cabin.
It is better to first remove the attachments from the engine: carburetor, starter, distributor switch, fuel pump, oil filter housing. And the motor will become noticeably lighter, and these devices will not be damaged. Some suggest a more drastic step: remove the cylinder head from the engine before removing it.
It is believed that the gearbox and transfer case combined into one unit are more advantageous from a design point of view than those installed separately. But when repairing one of these boxes, you will have to remove a rather heavy (more than 70 kg) unit from the car. If the gearbox of a domestic rear-wheel drive passenger car, as a rule, can be removed and lowered to the ground by hand, then under the UAZ gearbox block you will have to place a strong shield made of boards or a Euro pallet on stands, and then lower it to the ground. In the repair areas of motor depots, the same shield or pallet is moved along the edges of the inspection ditch protruding above the floor.
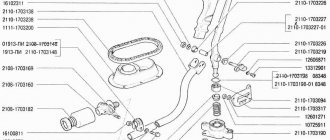
Self-adjustment of the rocker on a VAZ 2110. Adjustment of the gearbox rocker with your own hands
The gearbox linkage, like everything else in a car, requires care and timely adjustment. misadjusted gearbox linkage can cause discomfort while driving. For example, the gear knob may rattle, the gear shift may become inaccurate, the speeds may “knock out” from time to time, and the lever itself may begin to “play.”
To get rid of all this, you need to carry out a simple procedure for adjusting the gearbox rocker, especially since adjusting the rocker will take you no more than half an hour.
The gearbox slide is necessary to prevent random switching of gears due to the simultaneous movement of the sliders. Often, the entire transmission suffers from an incorrectly adjusted rocker, and as a result, you are at risk of malfunctioning the entire gearbox. In our previous articles, we have already talked about this detail several times, for example, in the article: About how to install a short-throw rocker on a Lada Priora. and also in the article: Installing a short-throw rocker on a VAZ 2109. In addition, the issue of engaging gears and gearboxes is addressed in this article.
Adjusting the gearbox slide requires the presence of an assistant, in which case the result, and the work itself, will be of better quality. It is fashionable to adjust the slide in several ways; below we will talk about each of them in more detail.
Installation of the backstage from "Kalina"
Replacing the VAZ 2110 gearbox shifter On a VAZ 2110 you can successfully install a Kalina shifter:
- To do this, it needs to be modified a little.
- The cardan from the new model is 20 mm longer than the original “tenth”.
- Therefore, it needs to be cut, to do this, use a lathe.
Note: when cutting manually, you can ruin the part, since when the temperature of the metal increases, it loses its strength.
- The replacement of the slide must be carried out in the garage from the inspection hole.
- Remove the plastic tunnel from the car interior.
- Also remove the boot.
- Remove the old rocker, unscrew all the fasteners from under the bottom of the car.
- Install a new link and adjust it.
Note: adjustment must be carried out in order to later avoid troubles that arise during operation of the vehicle.
Why is it recommended to install a cardan from the new Kalina? On VAZ-2110 models, universal joints made of less resistant material are installed, so they quickly fail. This causes premature play in the rocker, which usually affects the quality of gear shifting while the vehicle is moving. After purchasing a new link, a visual comparison should be made of the old cardan and the purchased one.
The comparison will be entirely in favor of the new acquisition. The Kalina cardan is made of better quality material, it is much more wear-resistant.
After installing a new link, the lever may rattle. Since this link completely eliminates play, that is, the vibration is transmitted completely to the lever.
[custom_ads_shortcode2]
How to adjust the rocker on a VAZ 2110 with your own hands
Before adjusting the gearbox linkage, it is necessary to perform a number of preparatory work:
- Drive the car into the pit.
- Tighten the handbrake and install the wheel chocks.
Method No. 1 - adjusting the rocker according to the rear speed.
- Loosen the clamp.
- Engage reverse gear and position the lever as you would like it to be in this position.
- Then tighten the clamp and check how the rocker works, whether you are satisfied with the current position of the lever and the operation of the rocker.
Method No. 2 - adjusting the rocker at first speed.
This method is used, as a rule, when the first method did not produce results.
- Turn on first speed.
- Loosen the rocker clamp.
- Turn the rocker drive counterclockwise until the gearshift lever begins to rest against the plastic reverse speed stop.
- Tighten the clamp and check how everything works.
Method No. 3 - adjusting the scenes in neutral.
If you do not have a plastic stopper, the adjustment is made in neutral gear.
To adjust the neutral position of the gearshift lever, you need to accurately calculate the depth of the shift of your gearbox to the driveshaft of the VAZ 2110. Sometimes such manipulations result in the appearance of annoying rattling of the lever.
If adjusting the rocker does not lead to anything and there is still a problem with switching, replace the rocker completely or ask for help from specialists.
Replacing the rocker rod oil seal
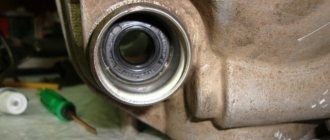
The normal condition of the oil seal determines whether the oil “disappears” from the gearbox, so if you notice oil stains on the asphalt after parking, you should think about whether it is the oil seal or the oil filter.
Therefore, after checking the filter, it’s the seal’s turn. A malfunction of the VAZ 2110 oil seal can also be suspected if a crunching sound is heard when changing gears.
The oil seal can only be replaced in a hole, overpass or other device that allows you to get under the car:
- First of all, we pay attention to the rubber boot. If oil escapes from the VAZ 2110 gearbox through the oil seal, then the entire boot will be in its drops;
- We bend the boot and disconnect the cardan, gaining access to the cuff;
- We remove the cardan from the lever, and then from the rocker;
- Having removed the cardan, we get to the oil seal;
- Using an awl and a hook, remove the cuff on the gearbox;
- Now you need to press in the new oil seal. Traditional craftsmen usually install it using a plastic bottle cap;
- If the replacement was successful, we return everything to its place, install the boot, and we can consider this minor repair complete.
Remember that any rocker repair will not be successful if it is not adjusted correctly. It is best if the setup is done with an assistant, since it is problematic to do this on a VAZ 2110 yourself.