Lada Kalina is already equipped from the factory with a special on-board computer mounted directly into the instrument panel. Thanks to this, you can react as quickly as possible and diagnose the problem that has arisen. There is a self-diagnosis mode for this. Unless the previous owner was motivated by selfish goals and “turned out” these light bulbs, in which case they need to be replaced.
The video shows entering the diagnostic mode of the on-board computer on the Lada Kalina:
Errors are shown as a digital code and in this article we will tell you how to read them correctly and make the right decision.
Diagnosis of errors
When you begin to notice something unusual in the behavior of your car, or there are obvious problems in its operation, then it certainly makes sense to have it diagnosed. Naturally, the OBD-II diagnostic connector will show errors most efficiently and accurately, however, not everyone has sockets to control this connector and has to use the standard one.
In order to enter self-diagnosis mode, you must:
- Turn off the ignition.
- Click on the daily vehicle mileage button.
- Then, continuing to hold it, turn the key in the lock.
- Thanks to this, all available indicators will light up, and the dial indicators will go into self-test mode and show data from zero to maximum.
- When this happens, use the button located on the steering column switch and use it to switch the data on the instrument panel.
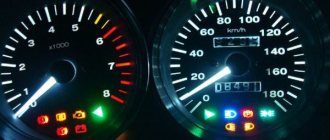
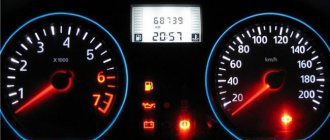
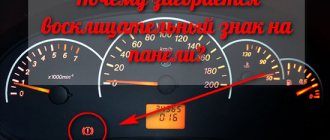
- To read the fault codes, we need the last one - the third screen. Unambiguous error codes will be displayed there.
Displaying the error code on the third screen of the bookmaker. The photo shows error 4 (faulty coolant temperature sensor).
Error codes (decoding)
These are the most common error codes that can appear if there is a malfunction on the Lada Kalina.
| Code | Decoding |
| 2 | Exceeding the voltage level in the vehicle's on-board network. |
| 3 | Malfunction of the gasoline level sensor in the fuel tank. Possible circuit break. |
| 4 | When this code appears, the car owner needs to pay attention to the operation of the antifreeze temperature sensor. There is also a possibility of a circuit break. |
| 5 | There is a problem with the outside temperature sensor. |
| 6 | The control unit has detected engine overheating. It is recommended to deal with this problem before further operation of the car. |
| 7 | Emergency lubricant pressure in the internal combustion engine is reported. |
| 8 | If you see this code on the dashboard, then you need to check the functionality of the brake system. The on-board computer recorded an error or breakdown in its operation. |
| 9 | The on-board computer reports that the battery charge is too low. It is recommended to perform a more thorough check of the battery. |
| E | An error has been reported in the data packet stored in the EEPROM. |
Checking the system using special equipment
If the system is checked through a diagnostic block using OBD-II, then the code combination will consist of four characters, preceded by a letter at the very beginning.
- P - indicates a problem with the engine or transmission.
- C - displayed when an error occurs in the “running”.
- B - when such a letter designation appears, you should pay attention to the serviceability of the central locking system, airbags, and power windows.
The second digit means:
- 0 – common code for OBD-II;
- 1 – number of the car manufacturer;
- 2 – number of the car manufacturer;
- 3 – reserve code.
The third character refers directly to the type of failure:
- 1 – malfunction in the air supply system and fuel system.
- 2 – similar to code “1”.
- 3 – failures and malfunctions in the ignition system.
- 4 – auxiliary control.
- 5 – malfunctions during idle operation.
- 6 – malfunction of the ECU or its circuit.
- 7 and 8 – malfunction in the transmission.
In order to delete the error code that appears from memory, you need to hold down the daily mileage button and hold it in this position for more than –4 seconds.
Instructions for dismantling and repair
Dismantling the tidy may be required to perform tuning, replacing backlight bulbs or repair work. You can find out how to remove the instrument panel on a Lada Kalina from the car's operating instructions.
LED instrument lighting
Tools and materials
Before disassembling the Kalina 2 instrument panel, you need to prepare the following materials and tools:
- a set of keys;
- Phillips and flat screwdriver;
- replacement parts and bulbs.
Before carrying out work, turn off the power to the vehicle by removing the negative terminal from the battery.
Removing the Kalina torpedo
Algorithm of actions
The disassembly procedure consists of the following steps:
- Using a Phillips screwdriver, you need to unscrew two self-tapping screws.
- Next, you need to remove the trim from the instrument panel.
- At the next stage, the spring clips are removed from the clutch.
- After unscrewing two screws, you need to slide the panel towards you.
- The latch holding the block must be pryed up using a flat-head screwdriver and turned.
- Next, you need to disconnect the connectors with the wires and you can safely remove the tidy.
- To remove the glass from the instrument panel, unclip the plastic clips.
After dismantling, you can replace faulty parts and lighting tabs. If the LED warning lights on the Lada Kalina have burned out, it is impossible to replace them, since they are soldered in. In this case, you need to change the entire instrument panel of the Lada Kalina 2. The Kalina instrument panel is assembled in the reverse order.
Thus, knowing how to disassemble the panel on Kalina, you can repair it yourself if the backlight or signal lights do not light up.
Self-diagnosis mode on Kalina 2
Self-diagnosis of the instrument panel on the 2nd generation
What is a liquid crystal display or indicator? liquid crystal display, or LCD for short, is a flat-shaped display based on liquid crystals. So, it was not in vain that I started with LCD indicators, since we will talk about the LCDs installed in the Lada Kalina.
An indicator installed on the dashboard displays information processed by the on-board computer. The amount of information displayed depends on the vehicle configuration.
This screen displays the following information:
1. Current time or number of the suggested manual transmission gear (or automatic transmission mode);
2. It also shows the total mileage of the vehicle or mileage during one day(s);
3. Displays data on the external temperature or one of the indicators (the latter depends on the vehicle configuration);
4. Fuel level.
In order to start the self-testing mechanism in a Lada Kalina car, you must:
1. The battery must be connected;
2. It is necessary to hold down the car daily mileage reset button and turn on the ignition
Read also: How to disassemble a magnetic lock
3. Then, after turning on the LCD indicator, you need to press the “mileage” button again once. The indicator display will then show the program version;
4. Error codes, if any, will be displayed in the top two lines;
5. In order to return the system to working condition, there are two ways:
•press any of the buttons on the control panel;
•wait 15-30 seconds. and the system itself will return to working condition, however, when choosing this option, you do not need to press the buttons.
Below is a breakdown of the codes that may appear on the panel:
1. Code 2 – on-board network overvoltage;
2. Code 3 – fuel level indicator (open circuit);
3. Code 4 – coolant temperature indicator, also an open circuit;
4. Code 5 – the external air temperature sensor has failed;
5. Code 6 – engine overheating;
6. Code 7 – oil pressure level is too low;
7. Code 8 – the vehicle’s brake system has broken down;
Many modern cars have the ability to independently read electrical system problems. Error codes on Kalina, after decoding, can reduce the time required to find a faulty unit in the electrical wiring.
Self-diagnosis codes
CAN bus errors
Airbag errors
Errors of light, mirrors and others
Video “Diagnostics of errors on VAZ Kalina”
Comments and Reviews
Instrument panel testing
You can find out the version of the instrument panel by self-testing, during which all instrument panel systems will be automatically tested, indicating its model and firmware version.
We test the instrument panel as follows:
1. With the ignition off, press the daily mileage reset button (small pin on the dashboard);
2. Turn on the ignition while holding the daily mileage reset button;
3. While the arrows are moving up and down, release the daily mileage reset button and briefly press it again.
How to read data:
1. The first line is the firmware version of the instrument panel.
2. The second line is the model of the instrument panel.
Troubleshooting
The Lada Kalina has a central control unit for the injection engine and vehicle electrical system. Problems that arise during the operation of electronic and electrical systems are recorded by the unit in the form of errors and stored in memory. If there are such problems, the orange Check Engine light on the panel lights up. Some errors can be displayed on the screen installed on the instrument cluster and deciphered.
Code analysis allows you to accurately determine the incorrectly operating element and repair or replace this unit. You can check for problems more deeply and thoroughly by connecting a special scanner to the diagnostic connector. The diagnostics and list of errors are the same on a 16-valve car and on a car with a simpler 8-valve engine.
Step-by-step self-diagnosis
Checking for errors in the ECU and displaying their numbers on the dashboard is called self-diagnosis. This procedure is not complicated and can be easily done independently.
In this case, the owner of a Lada Kalina 1118 station wagon or sedan must perform the following actions:
- Get behind the wheel of a Lada Kalina car and press the daily mileage reset button on the instrument cluster (Reset).
- Turn on the ignition while holding the button pressed.
- The instrument cluster will switch to test mode, during which the full backlight will turn on, all indicator lamps will turn on, and the device arrows will begin to move smoothly in both directions along the scale.
- Using the button on the right lever of the steering column switch, you can sequentially change menu items, including self-diagnosis of devices, software version (firmware, inscription like Uer x. x) and error codes in the unit’s memory.
- It is necessary to look at the codes recorded in the ECM and determine their meaning.
- To exit the self-diagnosis mode, you need to wait about 30 seconds without performing any actions.
Kalina steering column switch button
The modernized Kalina 2 has a slightly different instrument panel design. The procedure for displaying errors is similar; codes appear in the top line of the display as a three-digit number. Below the indicator line, information about the vehicle's serial number is displayed (looks like a six-digit number).
It is important to note that sensor problems are recorded in memory only if there is a long-term absence of a communication signal with the device (more than 20 seconds). For short-term breaks there will be no error, although there is a malfunction in the car.
How does the electronic unit on Grant work?
Before making changes to the car's firmware or performing diagnostics, you need to consider the basic principles. As much as some would like to jump right into making practical changes, you need to understand how the electronic “brain” works.
Any computing system, be it an ECU or a home PC, is a storage device. A home PC contains photos, videos, games, and work software. The computer constantly stores the user’s actions, errors, and data about software failures. All this is hidden among system files hidden from view.
The Lada Granta electronic control unit is also a computer, only the tasks it is designed to solve are more specific. There is also diagnostic information here. It is stored in RAM. This memory stores all the data that comes from various sensors. Information is stored until the block calculates everything it needs for some actions, then the information is erased from memory.
When it comes to diagnostic information, the car owner must be very careful. RAM cannot operate without a power source.
Decoding combinations
Errors read on the standard panel of the on-board computer can be deciphered using the table. It is useful to print out such information and carry it with you in the glove box, since breakdown of car sensors can happen on the road. Many problems can be corrected only during repair work in a car service center. Knowledge of the decoding will allow the owner to control the process of repairing his car.
Self-diagnosis codes
When diagnosing, you can read the fault codes listed in the table from the instrument panel. Please note that several errors may be displayed simultaneously during the verification process.
Below is a complete list of self-diagnosis errors.
| Code on screen | Decoding |
| 2 | Excess voltage in the on-board electrical network |
| 3 | No signal in the circuit from the fuel level sensor |
| 4 | No signal from the internal combustion engine temperature sensor |
| 5 | The signal from the sensor measuring the air temperature outside the car is not detected |
| 6 | Raising the engine temperature above the permissible level |
| 7 | Critically low oil pressure in the engine lubrication system |
| 8 | Brake fluid leak or failure of the system's electronic components |
| 9 | Excessive reduction in battery voltage |
| E | EEPROM data error |
Controller errors
For more complete diagnostics, the car needs to be checked with a KKL VAG-COM for 409.1 scanner. To do this, you need the scanner itself and a laptop with the pre-installed Diagnostic Tool v. 1.3.1., which allows you to view all the vehicle’s operating parameters and find out possible problems. Error codes received by such devices will consist of four numbers and a letter located in front of the numbers.
It should be remembered that each letter is responsible for a certain part of the machine components:
- B - indicates errors in the electronic components of the car body (window lifters, microclimate);
- C - errors in chassis components (power steering);
- P - malfunctions in the engine or automatic transmission control systems.
Read also: Compare Peugeot 408 and Citroen C4 sedan
The video, shot by the author of CompsMaster, clearly demonstrates the connection of a test laptop to the diagnostic connector and shows the functionality of the program.
Another way to control the ECM is the additional on-board computer State, which is connected directly to the diagnostic connector and installed on the center console. This device is capable of reading almost all operating parameters of various vehicle systems. There are several types of State computers, which are selected according to the model of the ECM unit.
Basic mistakes
The table below summarizes the main error codes for Kalina category “P” without taking into account the letter prefix.
| Number | Decoding |
| 0030, 0031, 0032 | The heating of the lambda probe installed upstream of the converter is faulty (burnout of the spiral or short circuit) |
| 0036, 0037, 0038 | The heating of the lambda probe installed after the converter is faulty (burnout of the spiral or short circuit) |
| 0101 | Operating parameters of the engine air supply sensor are outside the tolerance range |
| 0102 | The signal level from the engine air supply sensor drops below the permissible level |
| 0103 | Increase in signal level from the air supply sensor to the engine above the permissible level |
| 0112 | The signal level from the air temperature sensor at the engine inlet drops below the permissible level |
| 0113 | Increase in signal level from the air temperature sensor at the engine inlet above the permissible level |
| 0115 or 0116 | Incorrect data from the engine temperature sensor |
| 0117 | The signal level from the engine temperature sensor drops below the permissible level |
| 0118 | Increase in signal level from the engine temperature sensor above the permissible level |
| 0122 | The signal level from the throttle angle sensor drops below the permissible level |
| 0123 | Increase in signal level from the throttle angle sensor above the permissible level |
| 0130, 0131 and 0133, 0134 | Missing or low signal from the first lambda probe |
| 0132 | Crankshaft Position Sensor Error |
| 0135 | Incorrect operation of the heating system of the first lambda probe |
| 0136 | Short circuit of the second lambda probe |
| 0137, 0138 | Missing or low signal from the second lambda probe |
| 0140, 0141 | Incorrect operation of the second lambda probe heating system |
| 0171, 0172 | Excessively lean or rich mixture |
| 0201-0204 | Gap in the injector control wiring (from 1 to 4 cylinders) |
| 0217 | Engine temperature goes beyond the upper limit |
| 0230 | Broken fuel pump drive relay |
| 0261, 0262 | Breakdown to "minus" or "plus" of the wiring for controlling the injector of the first cylinder |
| 0264, 0265 | Likewise for the second cylinder |
| 0267, 0268 | Same for the third cylinder |
| 0270, 0271 | Same for the fourth cylinder |
| 0300 | Numerous misfires on all cylinders |
| 0301-0304 | Problems with ignition in a specific cylinder (from 1 to 4 cylinders) |
| 0326-0328 | Failure of the knock sensor |
| 0335-0338 | Damage to the signal circuit from the crankshaft sensor |
| 0340 | Camshaft position sensor does not work (only for 16 valves) |
| 0342, 0343 and 0346 | Phase sensor (only for 16 valves) |
| 0351-0354 | Coil failure (16 valves only) |
| 0363 | Restriction of fuel supply due to ignition misfires |
| 0422 | Low efficiency of the neutralizer |
| 0441, 0444 and 0445 | Absorber malfunctions |
| 0480, 0481 | Radiator fans do not work |
| 0500 | Speed sensor faulty |
| 0506, 0507 | Failure of the idle control system |
| 0511 | No signal from IAC |
| 0560, 0562 and 0563 | Problems with voltage in the on-board network |
| 0601 | ECM memory error |
| 0615-0617 | Problems with the starter relay |
| 0627-0629 | You need to check the fuel pump relay |
| 0645-0647 | Problems with power supply through the relay to the compressor clutch |
| 0650 | Malfunction warning lamp does not work |
| 0654 | Failure of the tachometer circuit |
| 0685-0687 | Closing the main relay circuits |
| 0691, 0692 | Fan relay shorted |
| 1102, 1115 | Drop in resistance of the lambda probe heating coil |
| 1123, 1124 | Violation of mixture parameters at idle |
| 1127, 1128 | The same, but at medium load |
| 1135 | Short circuit of the first lambda probe heater circuit |
| 1136, 1137 | Violation of mixture parameters at low load |
| 1171, 1172 | Incorrect operating parameters of the CO sensor |
| 1335, 1336 | Throttle Position Error |
| 1386 | Errors in the data transmission circuit from the knock sensor |
| 1410, 1425 and 1426 | Absorber purge failure |
| 1500, 1501 and 1502 | Open or short circuit in the fuel pump relay circuit |
| 1509, 1513 and 1514 | Damage to the idle speed control circuit |
| 1606, 1616 | Rough Road Sensor Errors |
| 1620-1622 | Errors in ECU memory blocks |
| 2070, 2071 | Malfunction of the valve for changing the length of the intake channels |
| 2100, 2101 | Open circuit of the electric throttle valve |
| 2102, 2103 | Electric throttle actuator short circuit |
| 2122, 2123, 2127 and 2128 | Damage to the gas pedal position sensor |
| 2187, 2188 | Violation of the mixture composition at idle |
| 2135, 2138 | Asynchronous operation of throttle position sensors |
| 2176, 2178 | It is necessary to set the throttle valve to zero position |
| 2187, 2188 | Violation of the mixture composition at idle |
| 2301, 2304, 2307 and 2310 | Closing the control circuits of the ignition coils |
| 2500, 2501 | Exit of the operating parameters of the generator excitation circuit beyond the tolerance range |
| 0720 | Automatic transmission output shaft sensor faulty |
| 0717 | Failure of the automatic transmission turbine speed sensor |
| 0706, 0705 | Contacts in the automatic transmission selector are faulty |
| 0962, 0963 | Failure of the pressure regulation solenoid in the automatic transmission |
| 0973, 0974 | Failure of the gear shift solenoid in the automatic transmission |
| 0731-0734 | Transmission errors in automatic transmission |
| 0744, 1744 | Automatic transmission clutch malfunctions |
| 0711-0713 | Failure of the automatic transmission oil temperature sensor |
| 0863 | Automatic transmission unit communication error via CAN bus |
| 1735-1738 | Gear selection lock |
| 062F | Resetting the memory of the automatic transmission control unit |
| 230 | No signal from fuel pump relay |
| 263, 266, 269 and 272 | Failure of the control unit (driver) of the injector nozzles |
| 650 | Burnout of the check indicator or its wiring |
Read also: Vision test by driver's commission
The video, shot by the channel “In Sandro’s Garage,” demonstrates all the functionality of the additional State computer.
CAN bus errors
On the Lada Kalina 2, several specific errors in the CAN bus operation are often encountered.
The main ones include:
- U0001 - general CAN bus malfunction;
- U0009 - short circuit of CAN bus components;
- U0073 - CAN shutdown;
- U0100 - no communication between the ECM and CAN;
- U0155 and U0305 - errors in interaction between cruise control and CAN bus.
EMUR errors
Kalina cars are equipped with an electromechanical power steering (EMPS), during which errors with index C are common.
| Code | Decoding |
| 1011, 1012 | Rotation sensor does not work |
| 1013, 1014 | Supply voltage out of tolerance |
| 1021-1024 | Torque sensor faulty |
| 1031-1033 | No signal from steering shaft position sensor |
| 1041-1045 | The position of the auxiliary motor rotor is not determined |
| 1050-1061 | Opens and short circuits of the motor winding |
| 1070-1079 | Various errors in the EMUR control unit |
ABS errors
In the chassis of modern Kalina and Kalina 2, equipped with an ABS system, the following category C errors are often encountered.
| Code | Decoding |
| 0035, 0040 | Failures of speed sensors on the front wheels |
| 0045, 0050 | Similar, but on the rear |
| 0060, 0065, 0070, 0075, 0080, 0085, 0090 and 0095 | Damage to valves in the anti-lock braking system module |
| 0161 | Stop light doesn't work |
| 0550, 0640 | ABS control unit memory errors |
| 0800 | Low voltage in the ABS block circuit |
Airbag errors
Many Kalinas of recent years of production are equipped with airbags that have their own control units. They are characterized by errors with index B.
| Code | Decoding |
| 9000 | Control unit error |
| 9001, 9002 | Malfunctions in the driver and front passenger seat belts |
| 9003, 9004 | Front airbag failure |
| 9042 | Incorrect power settings |
Errors of light, mirrors and others
In addition to those listed above, we can highlight a number of errors in the light control unit, which is installed on some Kalina cars:
- In 9501 - there is no signal from the raindrop sensor on the glass;
- In 9502 - the sensor sensitivity regulator does not work;
- In 9503, 9505 and 9506 - errors in the functioning of the windshield wiper;
- In 9504 there is a problem with the operation of the headlight relay.
If you have heated and electrically adjustable rear view mirrors, additional errors are possible:
- In 9244, 9246, 9247, 9250 and 9251 - malfunctions of the mirror tilt system;
- B 9230 - error in the mirror control unit;
- In 9252 - sticking of the regulator contacts.
As a separate block, you can consider controller problems related to the operation of electrical equipment on the body and in the cabin. Such errors are indexed B.
| Code | Decoding |
| 0001-0004 | Turn signal lamps do not work |
| 0005-0018 | Various problems in the operation of window motors |
| 0019-0026 | Problems with power supply to mirrors |
| 0027-0028 | Malfunctions of fog lights |
| 0035-0038 | Open circuit or overload |
| 0039-0043 | Breaks in the glass heating circuits, side lights and low beams |
| 0044-0046 | Immobilizer errors |
| 0052 | Error that appears after a power failure |
| 1375-1378 | Air conditioner evaporator sensors do not work |
| 1382-1385 | Open circuit in the interior temperature sensor circuit |
| 1860, 1861 | Power parameters are out of tolerance |
In addition, one of the most common errors on the Lada Kalina is P 0441, indicating an insufficient volume of air supplied to purify the absorber. This problem causes the check lamp to come on after prolonged driving and does not affect the driving performance of the car. Malfunction P 1602 is no less common; it signals a loss of voltage to the ECM and is recorded in memory after the battery is disconnected.
Errors in lambda probes and their heating systems are common. For example, 0036, which indicates a failure of the electrical heating of the sensor. The solution to this problem is to replace the sensor or install a decoy. As changes are made to the design of cars and new options become available, the list of error codes for the Lada Kalina is constantly expanding.
What are standard parameters
Each engine has its own standard parameters. These are technical characteristics that determine the normal operation of the motor. These parameters are compared with the values obtained during diagnostics. All measurements are carried out with the engine running at idle speed.
The presence of errors that are stored in the car's memory is the so-called DTC parameter. What these errors are can be determined by deciphering their codes, which can be easily found on any resource on the Internet. There are entire tables with interpretations of error codes.
But the engine may have malfunctions and malfunctions and not generate errors. For example, if the idle speed is too high, the control unit believes that the driver pressed the gas pedal, does not perceive the situation as an error and, naturally, does not display it during diagnostics.
Read more: Willson guard liquid glass reviews
If, during engine diagnostics, all measured parameters differ from typical values by no more than 20%, then the engine is operating normally. Components and parts whose performance exceeds the specified value can be considered faulty.
Reset errors
If necessary or after correcting problems, the driver can delete the error from the control unit’s memory. To do this, you need to activate the service mode, enter the error codes menu and press the Reset button, which should be held for at least 3 seconds. After this time, the codes will be discarded. Deletion is indicated by a message like “——” on the instrument cluster screen.
Controller errors can be reset using software. Typically, this procedure is carried out during regular vehicle maintenance.
Firmware
Now it’s worth taking a closer look at the software. Of course, the best option is to purchase licensed programs, for which you need to shell out money, and sometimes quite a lot. On the other hand, as is typical for many, you can use pirated software that is adapted for connecting to a car.
IMPORTANT! It is worth choosing the software carefully, since, as practice shows, many car enthusiasts then take the car to the station to restore the software for their version of the ECU. It is possible to ruin the control unit, it is located in the cabin
So, what programs can be used to diagnose the Lada Kalina:
- AutoCom pro CARS diagnostic program release 1.AutoCom pro CARS - car diagnostic program
- ScanMaster 2.1 in Russian for ELM327 crack. ScanMaster 2.1 with which you can carry out diagnostics
- 6.26 RUS (for ELM327 and Android).ELM327 - software for car diagnostics
- USB driver Autocom cdp pro cars USB.Autocom - a program for diagnosing the condition of a car
- Vasya Diagnostic 1.1 for KKL adapter. Vasya Diagnostic is one of a number of programs for diagnosing the condition of a car
- VAZ diagnostic program for models, Priora, Kalina, Granta. Standard program for diagnostics of the LADA family of cars
- VAG-COM USB KKL adapter. The most common program for diagnosing LADA Kalina
These are basic programs with which you can diagnose and reset errors on Kalina.
Recommendations
Comments 21
Does the actual mileage on the controller match the odometer reading?
How can I check it? The actual mileage is around 100 thousand. This can be seen from the generator.
The dealer scanner sees it. Probably only him... It’s bad that the mileage is reduced. It’s not clear why: the car is 2011 and should cover 100,000 km in 5 years. More expensive with a twisted mileage? Don't think.
In fact, I have a lot of questions for the former owner... I bought the car at a parking lot, where the sellers give the documents only after signing the contract (for verification, they have a document from a notary that the car is clean). After the purchase and arrival home, I checked the car at the traffic police office and saw that the car had been hit in the “right” (error on the website... left) rear door. A week later, the paint, which was not even varnished, absorbed dirt, dust, etc., and my door is now gray-yellow... Why couldn’t I say that it was beaten, painted, etc.? Do you think he wouldn’t find out? Or would he start lowering the price? Yes, it seems like we already bargained with him for almost 30 thousand... Why did he solder off Dzhekichan? Error because? And the fact that the insert is installed instead of the catcollector and gives an error (which is normal and not a problem) - isn’t that a bad thing? In short, there are a lot of questions for him)))
Mass air flow sensor (MAF)
The mass air flow sensor on Kalina is installed in the engine compartment between the throttle valve and the air filter housing. The sensor is responsible for counting the amount of air entering the engine. According to the readings from the sensor, the fuel mixture is formed.
Signs of malfunction:
- Increased fuel consumption;
- Floating speed;
- Difficulty starting the engine;
- Poor traction;
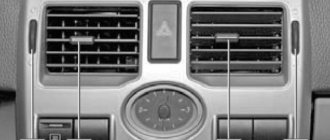
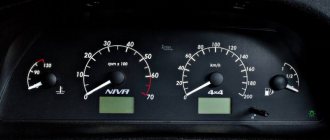
Description and location of indicators and instruments on the panel
Thanks to the tidy, the driver receives information about the condition of the car and the speed of movement.
Tidy Lada Kalina 2
A novice car enthusiast should know about the purpose of warning lights from the very first days.
Below is a description of the device:
1 - tachometer - a device showing at what frequency the crankshaft rotates; 2, 4 — direction indicators, left and right, respectively; 3 — speedometer, displays the actual speed of the vehicle; 5 — coolant temperature indicator; 6 - indicator showing the fuel level in the tank; 7 — fuel reserve warning light; 8 - button with which the daily mileage readings are reset; 9 - a lamp indicating that the emergency lights are on, during which the side lights and turn signals flash, indicating a car malfunction; 10 — electric power steering lamp. Goes off when the ignition is turned on. If it continues to light, then the EUR is faulty; 11 — high beam indicator. The light is on if the high beam is on; 12 — indicator of the applied hand brake; 13 — external lighting indicator; 14 — airbag malfunction indicator; 15 — emergency oil pressure indicator in the car system; 16 — immobilizer warning light; 17 - liquid crystal screen displaying information from the on-board computer; 18 — seat belt malfunction indicator; 19 — battery charging lamp; 20 — emergency brake fluid level indicator; 21 - electronic brake force distribution light, red light indicates a malfunction; 22 — brake pad warning light; 23 — anti-lock braking system (ABS) indicator; 24 - a constantly burning orange light indicates problems with the engine.
conclusions
As practice shows, diagnosing the Lada Kalina using the dashboard is quite easy and simple. This does not require any special tools or skills. It is worth noting that, according to the experience of many car owners, it is not always possible to fully diagnose all errors in the electronic control unit, since wear and breakage of some contact connections can be interpreted by the ECU in its own way.
Kalina error codes are a type of vehicle diagnostic information that every car owner needs to know. The fact is that with their help, self-diagnosis of the Lada Kalina is performed, and this allows you to identify the malfunction of one or another component without waiting for the car to seriously break down.