The standard illumination of the VAZ 2106 instruments, according to reviews from car owners, does not satisfy many of our compatriots who personally own this vehicle. There are very serious complaints about this electrical equipment unit - sometimes the light is dim, sometimes other problems arise in this component.
Sometimes there are cases when the instrument lighting on a VAZ 2106 car does not work for reasons related to other defects in the VAZ’s electrical equipment system. But the purpose of the backlight is precisely to make it easier to drive a car in conditions of poor visibility or at night.
It is in such conditions that monitoring instrument readings on the panel of auxiliary indicators located directly in front of the driver of the vehicle seems to be quite problematic, because visibility conditions do not allow this. Therefore, the illumination of the VAZ 2106 instrument scale plays an important role, especially with good brightness and luminous flux strength of electric light sources.
Instrument panel VAZ 2106
The standard instrumentation provides control of readings and displays the status of the main parameters of the car.
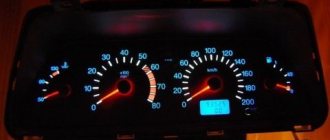
The standard dashboard of the VAZ 2106 has 5 dial indicators, provides control of readings and displays the status of the main parameters of the car
The product consists of the following list of elements:
- 5 pointer instruments;
- 2 digital indicators;
- 9 indicator lights.
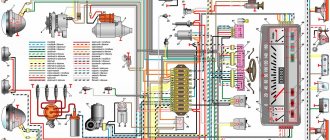
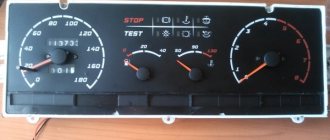
Instrument panel VAZ 2106: 1 - fuel level indicator; 2 — fuel reserve warning lamp; 3 — liquid temperature indicator in the cooling system; 4 — oil pressure indicator; 5 - warning lamp for insufficient oil pressure; 6 — tachometer; 7 — speedometer; 8 — daily counter of the distance traveled; 9 — odometer; 10 — control lamp for turning on the high beam headlights; 11 — control lamp for direction indicators and hazard warning lights; 12 — control lamp for turning on external lighting; 13 — handle for resetting the daily trip meter; 14 — control lamp for covering the carburetor air damper; 15 — battery charge indicator lamp; 16 — indicator lamp for turning on the parking brake; 17 — rear window heating switch; 18 — fog light switch in the rear light; 19 — external lighting switch
The following devices and indicators are installed in the panel:
- speedometer;
- tachometer;
- battery charging indicator;
- engine temperature sensor;
- odometer;
- resettable mileage counter;
- oil level sensor;
- oil pressure gauge;
- fuel presence sensor.
What kind of dashboard can be installed
If for some reason the standard dashboard does not suit you, you can update it in several ways:
- modify the dashboard by improving the backlight and gluing modern instrument scales;
- install a tidy from another car;
- make a homemade shield with installation of the necessary devices.
Depending on the chosen option, both the costs and the list of work that will need to be performed will depend. When choosing a dashboard from other cars, you need to take into account that many models on the VAZ 2106 may simply not fit not only in size, but also in connection.
From another VAZ model
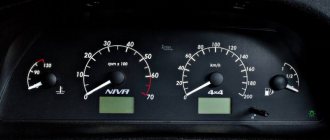
Due to the unique design of the “six” instrument panel, it is quite difficult to choose a suitable replacement option. Some car enthusiasts are installing a device from a VAZ 2115, for which they change the standard front panel to a “seven” one and build a new dashboard into it. Such modifications will require the purchase of additional components (speed sensor, wires, connectors), as well as the correct connection of the standard wiring to the new dashboard.
On a VAZ 2106 you can install a device from a VAZ 2115
From "Gazelle"
If you have thoughts about introducing a device from the Gazelle into the VAZ 2106, then you should take into account that the products have different connection diagrams, sizes, and in general they are very different from each other. Therefore, you first need to think about the feasibility of this kind of modification.
To install the dashboard from the Gazelle on the “six”, a serious alteration will be required
From a foreign car
An instrument panel from a foreign car, even from an old one, will make the front panel more beautiful and unusual. However, you need to be prepared for the fact that along with the tidy, you may need to replace the entire front panel. Most often, dashboards from BMW e30 and other foreign-made cars are installed on “classics”.
For the VAZ 2106 it is necessary to select the most suitable torpedo based on instruments and indicators
Modernization of the dashboard
In most foreign cars, this part is quite functional and looks quite presentable. Alas, the same cannot be said about the interior of the VAZ-2106. The “six” torpedo is made very “clumsily”, which forces the owners to modernize it.
The most popular option is to replace the standard element with a modern analogue. Installing an updated panel will not only change the external part of the car, but will also add functionality. The disadvantage of such manipulation is its high cost (from 5-6 thousand rubles, taking into account all materials and components).
Removal
1. Prepare the car for work (see “Preparing the car for maintenance and repair”).
2. Disconnect the wire from the negative terminal of the battery (see “Battery - removal and installation”).
4. At the bottom of the instrument panel, disconnect the wire from the air damper close warning lamp switch.
5. Using a screwdriver, pry off the top of the shield and remove it from engagement with the panel.
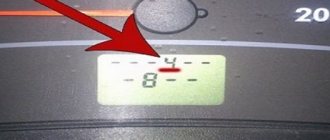
Note: If the top of the shield cannot be pressed out, we pierce two holes with an awl at the bottom of the instrument panel in special places (shown by arrows). Using a thin screwdriver or a metal rod, press out the spring clips and remove the bottom of the shield.
6. Remove the shield from the instrument panel.
7. Having pulled out the shield as much as possible, unscrew the knurled nut securing the speedometer cable by hand and disconnect the cable.
8. Disconnect the two connectors of the dashboard wiring harness from the instrument panel wiring harness.
9. Having previously marked or remembered the location, disconnect the wire blocks from the three key switches.
Dismantling instructions
Removing the VAZ 2106 instrument scale may be necessary when repairing and replacing its elements, tuning and modification. Dismantling is not difficult and will require a small set of tools: wrenches and screwdrivers.
The removal procedure consists of the following steps:
- First of all, you need to remove the front box from below the tidy.
- Then you need to unscrew all the fasteners and pull out the lower latches.
- Remove the radio plate.
- Next, remove the casing from the steering column.
- The next step is to disconnect the wires. Each one needs to be marked to make assembly easier.
- Now you can dismantle the shield by disconnecting all connectors.
- After removing the sensors, they need to be sorted in order to assemble correctly.
After upgrading the instrument panel, assembly is carried out in the reverse order (the author of the video is Nikolay).
In conclusion
Knowing how to tune the instrument panel on a Zhiguli car yourself, you can save a lot. In addition, any owner approaches the processing of his cars responsibly at every stage. The cost of similar services in specialized centers is much more expensive, and the quality is not always guaranteed. The simple manipulations and recommendations given above will allow you to radically change the “tidy”. In addition to improving the appearance, you will receive additional protection and some useful options that will be useful for the domestic “six”.
General tuning aspects
The simplest VAZ 2106 is to purchase a ready-made set of accessories and replace standard devices. You can install it yourself using the instructions included with the kit. More labor-intensive is the tuning of individual devices, which involves replacing stickers and arrows.
When changing arrows and stickers, you need to be careful, as these parts are very fragile.
Tuning can be done by replacing the meter dials with white ones and installing overlays on the panel. You can cover the panel with artificial leather or leather if you have sufficient funds. Before stretching the material, the surface of the shield must be cleaned and then adhesive must be applied in an even layer. Next, press the leather or substitute over the entire surface and wait until the glue dries. At the last stage, you need to process the edges, giving it an aesthetic appearance.
In conclusion
Knowing how to tune the instrument panel on a Zhiguli car yourself, you can save a lot. In addition, any owner approaches the processing of his cars responsibly at every stage. The cost of similar services in specialized centers is much more expensive, and the quality is not always guaranteed. The simple manipulations and recommendations given above will allow you to radically change the “tidy”. In addition to improving the appearance, you will receive additional protection and some useful options that will be useful for the domestic “six”.
vote
Article rating
Stages of work
At the initial stage of improving the illumination of VAZ-2106 instruments, it is necessary to dismantle the panel panel, as a result of which access to the indicators becomes available. Next, remove all index arrows. Then unscrew a couple of small bolts and remove the scales. To remove the speedometer indicators, unscrew the screws and turn the scale to the left. At this stage, the gauge needle will drop slightly and begin to dangle. After it freezes, you need to mark the position with a marker. This is necessary for subsequent accurate operation of the speedometer.
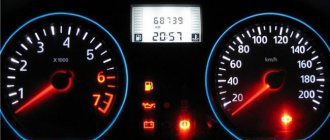
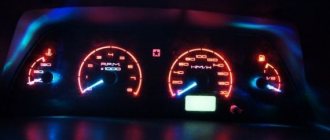
After dismantling all the scales, they begin to paste them. New white elements are applied over the standard equipment. To prevent the background from blending in with the arrows, they are highlighted in a different color. To improve the backlight, you will need to remove the light filter, then you can begin installing the LEDs. For these purposes, metal bases are used, which are heated and mounted on the side parts of the panel. If there are VAZ-2106 devices in dark-colored cases, it is advisable to lighten them using white “self-adhesive”.
At the final stage, the LEDs are connected by connecting them to the main wiring of the vehicle through wires. As a result, you will be able to change the color of the scales and arrows, as well as improve the backlight, which is immediately noticeable when driving at night. Most representatives of the domestic “classics” will be improved in a similar way.
Stages of work
You will be interested in: “Lada-Kalina”: electrical diagram, technical characteristics
At the initial stage of improving the illumination of VAZ-2106 instruments, it is necessary to dismantle the panel panel, as a result of which access to the indicators becomes available. Next, remove all index arrows. Then unscrew a couple of small bolts and remove the scales. To remove the speedometer indicators, unscrew the screws and turn the scale to the left. At this stage, the gauge needle will drop slightly and begin to dangle. After it freezes, you need to mark the position with a marker. This is necessary for subsequent accurate operation of the speedometer.
After dismantling all the scales, they begin to paste them. New white elements are applied over the standard equipment. To prevent the background from blending in with the arrows, they are highlighted in a different color. To improve the backlight, you will need to remove the light filter, then you can begin installing the LEDs. For these purposes, metal bases are used, which are heated and mounted on the side parts of the panel. If there are VAZ-2106 devices in dark-colored cases, it is advisable to lighten them using white “self-adhesive”.
At the final stage, the LEDs are connected by connecting them to the main wiring of the vehicle through wires. As a result, you will be able to change the color of the scales and arrows, as well as improve the backlight, which is immediately noticeable when driving at night. Most representatives of the domestic “classics” will be improved in a similar way.
Improving the appearance of the “six” torpedo
A torpedo is available in the interior of any car and consists of a dashboard, stove, and regulators. This element of the VAZ 2106 interior has a rather unattractive appearance, so car owners are trying to improve it. This is not difficult to do, but it is important, since tuning the dashboard can not only change the appearance of the interior, but also make the operation of the car more comfortable.
In order to upgrade a torpedo, you can use several methods.
| Way | Sequencing |
| Option No. 1. Replacing the standard panel with a modern design. | The latest generation panels look impressive, but have a number of disadvantages, namely: they are less safe than the classic VAZ 2106 torpedoes, they have a low degree of reliability and high cost. |
| Option No. 2. Upholstery of the structure with artificial leather. | A less expensive method of modernization, but performing the procedure yourself beautifully and correctly is quite difficult. |
| Option number 3. Painting. | A cheaper upgrade that's easy to do yourself. To do this you need to take the following steps. Remove the torpedo. Wash, wipe dry with a soft cloth and dry. Using a rubber spatula, apply a layer of plastic putty to the part. Sand the surface with fine-grained sandpaper. After the putty has dried, apply primer and paint. |
The painting option has only one drawback - a short service life.
Step-by-step instructions for installing the dashboard trim
There is a fourth modernization option: installing a trim on the torpedo. Let's take a closer look at how to do this yourself. The special trim performs not only decorative, but also protective functions for the torpedo. To perform this work better and more efficiently, first dismantle the torpedo by unscrewing the mounting bolts.
- Wash the part thoroughly using a soft sponge to avoid scratching the surface.
- After drying, apply a degreasing compound to the mating surfaces.
- For greater adhesion of the glue to the surfaces, sand them with fine-grained sandpaper.
- An excellent result will also be ensured by priming the mating surface of the lining with a uniform thin layer using compounds for plastic.
- Apply glue and connect the trim to the torpedo. Allow time for the glue to dry completely and set.
For more reliable fastening in inconspicuous areas, use self-tapping screws, since with weak contact the pad may make squeaks when driving. This is a fairly durable tuning, but it is also imperfect: under the influence of high temperatures, the lining may become slightly deformed over time.
Controls, instrument panel and interior equipment
Controls
- Sunshield.
- Interior rear view mirror.
- Steering wheel.
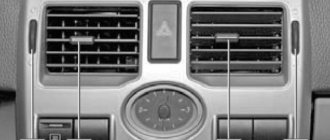
- Deflector (left).
- Watch.
- Deflector (right).
- Ashtray.
- Cigarette lighter.
- Glove box cover.
- Storage shelf.
- Gear shift lever.
- Parking brake lever.
- Alarm.
- Instrument lighting switch.
- Indicator lamp for insufficient fluid level in the hydraulic brake drive.
- Accelerator pedal.
- Brake pedal.
- Clutch pedal.
- Ignition switch.
- Instrument cluster.
- Fuel level indicator.
- Coolant temperature gauge.
- Oil pressure indicator.
- Tachometer.
- Daily mileage counter.
- Speedometer.
- Odometer.
- Indicator lamp for turning on the high beam headlights.
- Turn signal indicator lamp.
- Indicator lamp for turning on side lights.
- Button for resetting the daily mileage counter.
- Battery charge indicator lamp.
- Indicator lamp for the carburetor choke control handle.
- Indicator lamp for turning on the parking brake.
- Heated rear window switch.
- Warning lamp for insufficient oil pressure.
- Rear fog light switch.
- External lighting switch.
- Fuel reserve warning lamp.