Today I would like to share my personal experience with minor modifications to the dashboard.
I think many owners of nines of the VAZ family are familiar with the problem of insufficient brightness of the standard instrument panel lighting. Personally, the panel in my car also spoiled my nerves by constantly losing contact in the flexible backlight board.
The modification method is quite simple and requires a minimum of investment.
So, what was required for modification: 1. 1/4 meter of LED strip (in my case it is SMD3528); 2. two pieces of wire 10 - 15 cm long (preferably multi-colored); 3. soldering iron (and the ability to work with it); 4. a small amount of any glue (PVA and silicate are not advisable); 5. skill and patience:)
First of all, we dismantle the panel. On top it has a lampshade, into which standard lighting bulbs are inserted, connected by a flexible board. The flexible board, in turn, is screwed with two screws to the board on the back side. We take out the light bulbs and leave them until better times, take out the flexible board, having first unscrewed the contact screws, and throw it in the trash.
The lampshade itself is point-fused to the panel body. We carefully pry it away from the body, trying not to break it, we will need it later. There is a diffuser glass under the lampshade; we leave it in place, otherwise only part of the panel will be illuminated.
We take the LED strip and solder the + and - wires to it. Glue the tape in the center of the lampshade on the inside. Glue it right in the center! Otherwise, the illumination will be uneven at the top and bottom of the panel. The tape has a self-adhesive base, but personally, to be safe, I added a couple more drops of superglue. We take the wires out through one of the holes from the former standard light bulbs. It would be a good idea to seal the remaining holes with something to prevent dust from getting inside the lampshade. I just covered them with regular electrical tape.
We return the lampshade to its place and glue it with glue. I used “liquid nails” - drop by drop onto the former fasteners. You can use a glue gun.
Next, we solder the wires to the board (do not confuse plus and minus - THIS IS IMPORTANT, unlike standard lamps). The negative is on the same track where the wire from the negative terminal of the tachometer is soldered. You can, of course, fasten the wires to the tracks with standard screws, but here you need to take into account two points: firstly, the connection is not as reliable as with soldering, and secondly, they burst when tightened (they were too weak, or there is strength - no need for brains :).
Common instrument panel faults
The instrument cluster on the VAZ 21099 or 2109 is a fairly reliable unit. However, even this can fail over time.
The main malfunctions characteristic of the VAZ instrument panel:
- The lights on the instrument panel of the VAZ 2109 stopped lighting. If only a few light bulbs refuse to work, then most likely the reason lies in their burnout. If the instrument panel lighting stops working completely, then most likely the problem is a poor power supply. As practice shows, power problems are usually caused by either damaged wiring or oxidation of contacts at connections and connectors. If this is the case and the backlight does not light up due to oxidation, then you can get rid of this problem by cleaning the contacts or replacing them. If the problem lies in the lighting sources, then replacing the lamps will solve it.
- Another problem, oxidation on the circuit board, is common in older vehicles or vehicles with moisture present. Due to oxidation of the board, the backlight and some instruments may not work, in particular, fuel level and coolant temperature controllers, tachometer, etc. If the needles do not rise on the tachometer, speedometer, fuel consumption sensor and generator voltage, or they work chaotically, then you need to carry out a full check of the dashboard.
- VAZ 2109 cars are characterized by the problem of a non-working speedometer. As a rule, it appears as a result of wear of the cable connected to the box, or due to repairs to the device and its incorrect connection. If the cable is worn out, then you just need to replace it, there is nothing complicated about it. The main thing is to connect the cable correctly so that its tip fits exactly into the groove on the tidy speedometer.
- Damage to the board itself. Such a malfunction occurs quite rarely, but, nevertheless, it should not be forgotten. If the structural board fails, the shield will have to be repaired, but if this does not help, then it will need to be replaced.
Popular methods for changing a torpedo
To begin with, here is a list of the most popular methods for changing the front panel. We include:
1. Complete replacement. Installing a new torpedo, which was taken from another one, can be called a rather difficult job. Note that if instrument panels and other small tuning parts can be found on sale, then suppliers of such parts do not create a torpedo (it can be found on sale extremely rarely). This is due to the fact that such tuning is carried out quite rarely. However, only by completely replacing the panel can you get rid of cheap plastic and put an end to the crickets that can make long-distance travel simply unbearable.
2. Quite often, partial modifications are carried out, which is represented by the creation of additional niches for the multimedia system, a control unit for new functions, and so on. Such work cannot be called difficult, since plastic is used in the manufacture of the torpedo - a material that can be easily processed using available tools. The main thing is to carry out such work carefully, since if mistakes are made, important electrical elements and so on can be damaged.
The first method is implemented quite rarely, but allows you to achieve truly unsurpassed results. The second is easier to implement, but does not allow you to completely get rid of low-quality plastic.
Panel tuning options
If you decide to tune your instrument panel, then most likely you will be interested in knowing what options exist for doing it. The tuning shield, as you know, pleases the driver’s eye, so this issue is relevant for many car owners.
Dismantling the shield
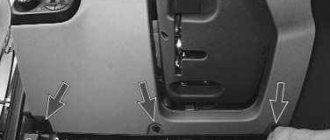
To tune the dashboard, you first need to remove the device itself.
To do this, you only need to disconnect eight fasteners; to do this, you can use a regular knife:
- First, the fastenings on the driver’s side are disconnected;
- then you need to release the latches located there, on top;
- after this you can disconnect the middle part of the tidy;
- the panel itself is dismantled (the author of the video is Artem Volivach).
Experts' opinion
Alexander. It is recommended to abandon GPS navigators with external installation: there is no need to mount them on glass, as the view from the driver’s seat is significantly reduced. If the navigator is really needed, then you can create a special niche for it in the dashboard. The VAZ torpedo is quite simple and has a large amount of free space to accommodate various control units and multimedia systems.
Alexei. I installed a new torpedo from another car - a difficult job that required patience, precision and a lot of free time. I’ll say right away that you need to be well versed in the placement of important elements of your car: wiring, air ducts, and so on. Dismantling must be carried out carefully, since the original torpedo may still be needed.
Video “Instructions for replacing the speedometer cable on a VAZ 2109”
How to repair the speedometer on a “nine” if it stops working - visual instructions for replacing the cable at home are given in the video below (the author of the video is Vladimir Edwin).
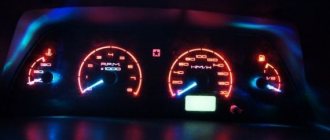
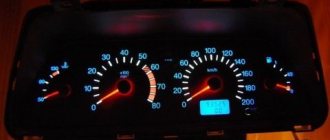
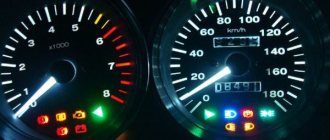
The backlighting of the VAZ 2109 instrument panel is often not satisfactory for drivers. You can change the color and its brightness yourself, without turning to the salon for help.
To improve the lighting, you need to install LEDs instead of conventional incandescent light bulbs. Their glow is much brighter, in addition, you can choose the color of the backlight at your discretion: blue, green, red or white. These are the main colors, but if you look, you can also find purple LEDs.
Replacement of light bulbs or sockets must be carried out carefully and carefully. If the car owner decides to use LEDs to illuminate the buttons, then you need to purchase a light bulb with a regular base. Soldering and a special cartridge are needed if there is a desire to replace the backlight of the instrument cluster. Among the many LEDs, there are also those that have a diffuse or, conversely, point glow.
These effects are achieved using a focusing lens configuration. A more uniform backlight is suitable for illuminating the scale on the instrument panel, and a brighter light is suitable for the button icon. Every driver should take into account the features of design changes when improving his car.
How to do easy tuning of the VAZ-2109 dashboard with your own hands
During the salon of the domestic “nine”, tuning its “tidy” becomes a truly irreplaceable element. Beautiful modifications can be done with your own hands. To do this, you will need to make a new dial on a computer using special design programs and printing the picture on a printer.
However, first you need to clearly think through the appearance of the dials for the car's tachometer and speedometer, as well as for all the sensors that remain. Once the dials are printed, they need to be laminated, and then you can start removing the instrument panel.
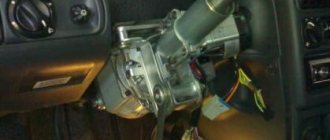
To do it correctly, you must first remove the steering wheel pads and also mark the steering position relative to the shaft. Then carefully unscrew the fastening nut.
Next, you can remove the steering wheel and unscrew the screws that are located in the area of the car lower casing. After this, you will have to disassemble the steering column. When the instrument panel is removed, you should unscrew the arrows from the old speedometer and tachometer. Subsequently, they will be attached to the updated dials.
During this time, you can also repaint the dials and hands in bright colors. Regular spray paint cans are suitable for this. At the same time, it is better to make the dial a rich black color.
You can make it matte using special products. In this case, the arrows need to be painted in bright pink or original red-burgundy tones. After the painted plates of the machine dial have dried, they are completed with an old or pre-prepared scale and removed hands.
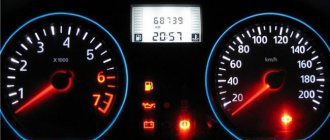
In a situation where the owner wants to modernize the instrument panel in a more modern way, he should also use a special (original, as in the video) backlight. You can add an original touch using a fluorescent marker, but more on that below.
Every driver of a domestic car wants to make the instrument panel of his VAZ-2109 as bright and original as possible. Here is one of the options for how beautifully you can modify this element of the machine.
You will also need a fluorescent marker or paint. It will change color if exposed to ultraviolet light. This technique is often used in modern nightclubs. You will also need ordinary light bulbs with sockets, like those in the “tidy”. no need to change, they will remain in place. Everything you need is there, you can get started.
First you need to remove the plastic, then the dashboard. Also, don't forget about the black plastic that surrounds the glass. We disassemble the standard insert, as well as the arrows. Most often, there are no holes in the new insert. Therefore, you will have to do them. For the arrows, the holes will be needed wider than in the standard trim. Otherwise, the arrows will start to stick.
Next you need to dismantle the lighting that is installed. The work should be done carefully so that the plastic is not damaged. We take out the board with the light bulbs. We install a neon light bulb instead of the usual ones, and stick a plastic protection on top. It used to have factory bulbs screwed in. Don't forget about the control unit for the new neon light bulb. Be careful not to reverse the polarity at all times.
If this happens, nothing will shine. Next you need to screw in the instrument lighting bulbs. This should be done in parallel to the neon lamp. We lay the wiring from the inside; first, for this you need to make holes in the partitions.
Let's check if everything is correct. The light bulbs inside should be adjusted. Next we put on the overlay and seal it. After these steps, all we have to do is paint the hands with a purchased fluorescent marker or paint. It is advisable to repeat painting after 10 minutes. After this, the arrows can be installed in their place. This completes the tuning.
Check the work, otherwise you will have to disassemble everything. If there are no problems, you can assemble everything in strictly reverse order. After this, the VAZ 2109 will be equipped with a colorful panel like good foreign cars. If desired, you can use fluorescent paint to paint the dashboard trim in the place where the needle reaches its limit. It looks very nice.
Instrument control panel illumination
When carrying out tuning inside the car, some drivers purchase the necessary parts in specialized stores or make them themselves. When redesigning the lamp design, you need to maintain the original dimensions so that you can easily replace them with the original ones. Usually they light up the control panel for the stove and appliances. Some designers use backlighting for a voltmeter, clock, or oil pressure indicator.
To illuminate the stove, you first need to carefully remove the plastic handles of the levers that control the dampers and remove the glass. Below it is the stove itself. To do this, take any sharp object (knife or scissors) and carefully pry the glass. Prepare foil according to its size. It will be an additional source of illumination.
Fixed on the inside of the glass, it will give a very attractive appearance to the stove, and the console illumination will not be concentrated only in the place where the LED is installed next to the handle.
The next step is to remove the lamp socket from the backlight of the stove control unit. The lamp must be replaced with a purchased LED. In order for the light to spread around the entire perimeter of the stove, an LED strip is used, which is glued to the bottom. Two wires are usually soldered to the contacts, which are connected to the cartridge.
↑ Position of the ignition key in the lock
In the ignition switch, the key can occupy the following positions:
- 0 — all consumers are turned off. The key does not come out. Steering is not locked;
- I — ignition is on. The key does not come out. Steering is not locked;
- II - ignition and starter are on. The key turns fully clockwise, overcoming the force of the spring. The steering is not locked. In this position, the key is not fixed; for the starter to operate, it must be held by hand. Immediately after starting the engine, the key should be released, and it will return to position I under the action of the return spring. The ignition switch has a built-in locking device that will prevent the starter from being turned on while the engine is running. You can only turn the key to position II again after you have returned the key to position 0;
- III - ignition is turned off. The key is removed. When the key is removed, the steering is locked. To turn off the anti-theft device, insert the key into the ignition switch and, turning the steering wheel slightly left and right, turn the key to position 0.
Features of backlight replacement
How to change the panel, making it a designer one? You need to be extremely careful and precise when removing and disassembling the dashboard, so as not to subsequently disturb the correctness of its readings. Often, during disassembly, the chrome plating of parts suffers. So be patient and get to work.
First, remove the dashboard panel. You can read about how to change it in the repair instructions for your car brand. Then remove the instrument cluster, disconnect the plugs, bend the speedometer cable and replace the bulbs. Gradually remove the filters from the buttons. It is better to leave the green-blue light spectrum on the panel unchanged, but replace the green filters completely.
You can make the rear window heating button illuminated orange, and the fog lamp button illuminated turquoise. This shade can be achieved by passing the white color of the LED through a green filter. The reflector can be foil secured with double-sided tape. The hazard warning lights should be red (like in foreign cars). In this case, maintaining polarity is of particular importance.
In a ring filter, using a file, you can make triangular slits through which the light will be scattered. The overall illumination pattern will become more uniform. It's time to check the performance of the LEDs. Only after this check can a constant voltage of 12 V be supplied.
Instrument needles are often replaced with special ones with backlight. This effect is achieved by a lamp located near the axis. Every driver who has basic knowledge of car mechanics and puts in a little effort can boast of a beautiful dashboard. Improve the design of the VAZ 2109 and enjoy it!
When the instrument panel on a VAZ 2109 does not light up, this is one of the common malfunctions of this unit. To fix a problem, you first have to find the cause of its occurrence.
Instrument lighting VAZ 2108, 2109, 21099, connection diagram
Let's figure out how the instrument lighting of the front panel of VAZ 2108, 2109, 21099 cars works, how it turns on and how it works.
Connection diagram for the instrument cluster illumination of VAZ 2108, 2109, 21099 cars
Description of the scheme
— The voltage in the electrical circuit connecting the backlight lamps of the instrument cluster of VAZ 2108, 2109, 21099 cars is supplied from terminal “30” of the generator.
— You can turn on the instrument lighting by pressing the exterior lighting switch button (the backlights will light up along with the side lights, license plate lights, etc.). In this case, the ignition must be turned on. The inclusion of external lighting is signaled by a separate lamp in the instrument cluster.
— You can adjust the brightness of the backlights using a special regulator installed in the front panel, to the left of the steering column. It is a rheostat that smoothly changes the resistance when the handle is rotated.
Dimmer control for instrument lighting of VAZ 2108, 2109, 21099
— The electrical circuit is protected by fuse F10 (7.5A) in the fuse and relay mounting block (in block 17.3701 this is fuse No. 7 10A).
Notes and additions
— The illumination of the instrument cluster of VAZ 2108, 2109, 21099 is combined with the illumination of switch keys and switches on the front panel (rear window heating switch, PTF switch, rear fog light switch, exterior lighting switch), as well as a backlight lamp for the heater and cigarette lighter levers . On cars with electric windows, the backlight lamps for their keys are also connected here. They are all connected by a white “positive” wire coming from the backlight dimmer.
Source
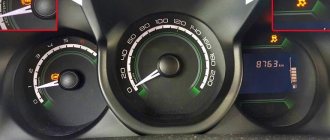
Types of panels
Instrument panels on the VAZ 2109 are of at least three types:
- Low panel;
- High panel;
- Electronic panel on nines with Europanel.
On versions with a low panel, failure of the entire panel is extremely rare. This is due to the fact that here the speedometer and econometer are equipped with mechanical drives. Therefore, it is unlikely that they will fail along with the electrical component.
Installation of a multimedia system and other elements
With the spread of touch screens, they have become quite often used in the production of multimedia systems that are installed in cars. Of course, you can purchase a GPS navigator that will be mounted on top of the panel. But still, this design option is impractical, as it takes up a lot of free space and impairs visibility.
If desired, you can implement a multimedia system into the torpedo. For this:
1. Select a multimedia system. 2. Find out its exact dimensions. 3. We mark the area on the dashboard. 4. We cut out the plastic. 5. Install the multimedia system. 6. Connect the system. 7. We carry out decoration.
In the same way, you can install control units for additional functions, for example, self-installed fog lights or interior lighting. In order to significantly simplify the work, you can buy a disassembled control panel from another car, also mark the location on the dashboard and cut out a place to install the panel.
In general, we can say that it is possible to modify a factory torpedo almost beyond recognition.
Why doesn't it light up?
- First, remove the cover of the mounting block and make sure that the fuse is intact. The fuse markings are located on the inner surface of the cover. You should look for fuse F16 or F5, depending on the year of manufacture of your VAZ 2109.
- If the fuse is intact, be sure to check whether the contacts of the fuse you are looking for have not oxidized. It is not uncommon for shields to fail due to broken contact.
- Check if there is power to the dashboard. To do this, you will need a warning light and the ignition on. Disconnect connector X4 in the mounting block and check for voltage at pin 3. The disadvantage of the VAZ 2109 design is that when it rains, the mounting block immediately becomes wet. This causes oxidation of the contacts in the pads, which causes the electrics to stop working. Sometimes not only the contact is oxidized, but also the board of the Nine mounting block.
Installing a torpedo from another car
A significant modification can be called the installation of a torpedo, which is intended for another car. Such work is carried out extremely rarely, as it is difficult to perform. Its features include:
- The panel must be selected according to the width of the cabin, otherwise it will not become simple even after modification. At the same time, attention is also paid to the height. For example, SUVs have a higher dashboard, which will not fit into the car in question. Most often they choose torpedoes from foreign cars that were produced in the last millennium. This is due to the fact that they can be found at an affordable price when disassembled, and modifications may be insignificant.
- All elements of the front part will have to be redistributed. Particular problems arise with the location of the stove and steering column. If these elements do not significantly coincide in location, then significant changes must be made to the design of the torpedo.
- In any case, you will have to create new seats and fasteners on the body, since it is more difficult to change the torpedo. This moment determines the need for precise marking, as well as welding, creating holes, and so on.
- Many problems arise if the panel does not fit the width of the body. It is quite difficult to shorten a torpedo qualitatively, but it is still possible. After this, you will have to use additional decorative elements to close the seams.
The work can take several days or even weeks, and the cost of rework varies widely.
Such services are provided only by companies that specialize in tuning.
Popular faults
If we talk about the dashboard of VAZ 2109 cars, then they are characterized by certain problems. We will tell you about them, and also tell you how to act correctly in a given situation.
| Fault type | Your actions |
| Gasoline level and temperature indicator does not work | In most percent of cases, this situation occurs due to breakdown of devices, sensors of these devices, or an open circuit of the power supply. Therefore, first check the circuit for continuity, make sure that the fuses have not blown. If this is not the case, check whether the gas level and temperature sensors are working. Only if none of the actions allowed you to get rid of the breakdown, you can begin to replace the devices themselves. No options, the problem lies in them |
| When the fuel tank is full, the arrow points to zero | If you have worked on the fuel level sensor, the fault most likely lies with you. When manipulating this device, the float limiter is often knocked down. Either the limiter is installed incorrectly or adjusted, causing the resistor winding to end. To resolve the problem, remove the sensor and then adjust the limiter again |
| The fuel gauge needle regularly jumps and ends up at zero | Here, most likely, the resistor has weak contact with the current collector. Another possible option is that there is a break in the resistor. To resolve this situation, we recommend replacing the hot level sensor with a new measuring device |
| The fuel level lamp is constantly on | If this lamp is constantly on, there is probably a short circuit in the fuel level sensor supply wiring to ground. Another option is that the sensor’s flexible bus is shorted to the fuel intake pipe. You will have to disassemble the device to align the bus and get rid of the resulting short circuit |
| Indicator lamps do not work on the dashboard | There is a high probability that the light bulbs have simply burned out, or they are poorly held in their seats due to loose contact. Replace the bulbs, but first try tightening the contacts. Traces of oxidation may be detected. When cleaned, the light bulbs can work normally again. Also, do not exclude the possibility of wiring breakage or oxidation of the tips of the supply wiring. Try going over the wires with a tester, cleaning the contacts if necessary. |
| The speedometer does not work, the flexible shaft is noisy | In such a situation, you will have to change the speedometer drive cable or replace the entire speedometer assembly. But before you bother so much, check that the fastening nuts of the tips are tightened correctly and properly. The flexible shaft may make noise during operation due to deformation or violation of the permissible bending of the shell of less than 10 centimeters during installation |
The instrument panel of the VAZ 2109 is not so complicated that you cannot figure it out on your own. But in the absence of experience, it is better to entrust the repair to specialists, or to enlist the support of a partner who understands this matter.
Car dashboard cover
Another way to get rid of low-quality plastic is to cover the torpedo. As a rule, leather or a high-quality substitute is used for this. It is quite difficult to do the covering yourself; the plastic, which was previously part of the interior design, will serve as the basis.
When choosing a material, you need to abandon fabric, since the front panel is constantly exposed to direct sunlight and is often exposed to greater impact than other upholstery elements. When choosing a color, you need to give preference to not bright shades that will not be very noticeable. Quite often you can find examples of tuning that use bright fabric: red, blue and other colors. Note that this option looks quite attractive, but during a long trip the driver and passengers will be very tired.